Scratch-Built/Bash Live Steam: Redbeard's Rail-Truck
Scratch-Built/Bash Live Steam: Redbeard's Rail-Truck
Scratch-Built/Bash Live Steam: Redbeard's Rail-Truck

You also want an ePaper? Increase the reach of your titles
YUMPU automatically turns print PDFs into web optimized ePapers that Google loves.
<strong>Scratch</strong>-<strong>Built</strong>/<strong>Bash</strong> <strong>Live</strong> <strong>Steam</strong>:<br />
<strong>Redbeard's</strong> <strong>Rail</strong>-<strong>Truck</strong><br />
BY<br />
Larry Newman<br />
Pensacola, Florida, USA<br />
(<strong>Live</strong> <strong>Steam</strong> Forum/Topic: redbeards railtruck)<br />
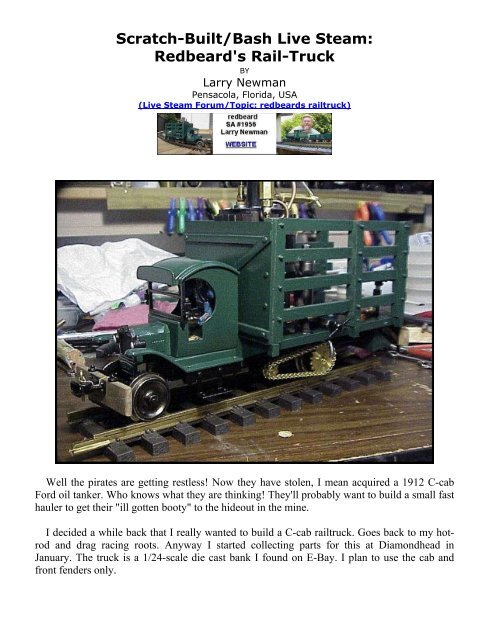
Well the pirates are getting restless! Now they have stolen, I mean acquired a 1912 C-cab<br />
Ford oil tanker. Who knows what they are thinking! They'll probably want to build a small fast<br />
hauler to get their "ill gotten booty" to the hideout in the mine.<br />
I decided a while back that I really wanted to build a C-cab railtruck. Goes back to my hotrod<br />
and drag racing roots. Anyway I started collecting parts for this at Diamondhead in<br />
January. The truck is a 1/24-scale die cast bank I found on E-Bay. I plan to use the cab and<br />
front fenders only.
Here is the basic truck.<br />
And here are the parts I will use.<br />
The original idea was to use a Midwest Heritage<br />
boiler and engine that I picked up as a kit at the flea<br />
market at Diamondhead. I put the kit together and<br />
talked to several steamers about it. While it runs<br />
good and is kind of fun, it just does not have the<br />
power I am looking for. I got a lot of advice from<br />
Harry Wade about the boiler and decided to leave the<br />
kit intact as a stationary engine.
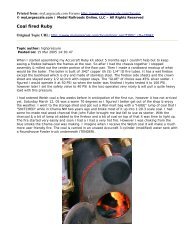
So I built my first boiler, actually as I write this, I am building my first boiler. I am waiting<br />
for a few supplies to arrive before I finish the boiler. It is a vertical boiler about the same size<br />
as the one in the Midwest kit, but is much thicker materials. I used 2-inch type L tubing for the<br />
body. Using the post from Larry Herget on his coal-fired Ruby construction, (found in the<br />
"Informative Threads Index" here in My Large Scale under <strong>Live</strong> <strong>Steam</strong>) I formed the flanged<br />
ends from 1/16 thick copper sheet. I turned a hardwood former for this and used a c-clamp<br />
instead of doing it on my lathe. I decided to add "hedgehog spikes" to help the heating process.<br />
I did the boiler work late nights after working all day and did not take pictures while building<br />
it. It is all soldered with 70% silver solder. (1275 F melt) I will be building a gas burner for it<br />
and will try and take pictures as I go.<br />
So now I was needing to decide on the power for the truck. I had these two 10mm Ruby<br />
cylinders left over from the Mason project. (I upgraded it to 1/2-inch cylinders) Problem was, I<br />
had no valves for them. I thought about building a valve for one of them and using a single<br />
cylinder for power. I looked hard at<br />
whether I could machine a piston valve<br />
accurately enough to work. On the<br />
advice of a friend I called and talked to<br />
Dave Hottmann about this. On Dave's<br />
advice I called Cliff at Accucraft and<br />
checked on getting a valve. I now have a<br />
complete valve assembly coming, both<br />
sides and the reverser valve. This of<br />
course started me thinking about using<br />
both cylinders and having a truck that<br />
could pull a car or two. Hmmmm. So<br />
this is where I am right now.<br />
What to do? As you might guess by now I am not planning this thing at all. I have no<br />
prototype, no pictures and no drawings. Seems to be more fun this way. Don't know yet what<br />
wheel arrangement or wheels or anything else yet. More to come!<br />
Bruce Gathman:<br />
Larry, Ya thinking of putting the cylinders vertical?<br />
Hi Bruce, Don't know if you will see this before you take your "timeout" but after I spoke<br />
with you I decided against mounting the cylinders vertically. I am also pretty sure I am going to<br />
go with two drive axles.<br />
Larry Green:<br />
Larry, You have become addicted to the small and unique, a fine group to be sure.
Hi Larry, Thanks for the comment, I think I resemble that remark. I definitely march to a<br />
different piano than most. As I said earlier the whole idea for me is to have fun in my shop but<br />
away from my work. I hope to have this one and possibly another engine ready for<br />
Diamondhead. As well as some rolling stock for the pirates to pull.<br />
Howard Maculsay:<br />
Larry, it looks like another interesting & challenging project. I'm just about finishing up<br />
my rail truck.... a very satisfying project. The best of luck to you!<br />
Howard, You can be sure I have been following your log. I kind of felt odd starting this<br />
while yours is going on, but there really was no direct influence. Except that I also saw Sonny<br />
Wizelman's "Matilda" article and knew that I was going to build a truck. My design is still<br />
floating about but is beginning to gel. Since I am pretty sure that I am using both Ruby<br />
cylinders, I am probably going to build it so that it can haul some cars around. I am very<br />
pleased with how your truck is looking. Let's both keep "truckin"!<br />
Anyway here is how my thinking is<br />
going today.<br />
But all of this could still be tossed out<br />
if something else pops into my head.<br />
More Later!<br />
I built the burner out of copper tubing using the basic layout from the plans for "Idris" by<br />
Dave Watkins. This is found on a link from Vance Bass.<br />
http://www.nmia.com/~vrbass/steam/drawings.htm<br />
I did not follow it but used it as a basis.
I turned a jet from brass stock and soldered it<br />
directly to a piece of 1/8-inch copper. I figure I won't<br />
be changing it! Here are the parts finished;<br />
... and here is the burner putting out some heat!<br />
This is as far as I can go with the burner until I make the boiler base and mounts. I am still<br />
waiting on a couple of fittings for the boiler, so the tuning of the burner will have to wait.<br />
More to Come!<br />
David Wegmuller:<br />
Hi Larry, Cool project! I have a similar ring burner and vertical boiler in my "Vermod"<br />
(http://wegmuller.org/trains/live_st...dex.html). See the last picture at the bottom of the page.<br />
I am very happy with this burner: it is quiet and economical. The Ruby gas tank I use is good<br />
for at least two boiler's worth of water. Each run lasts between 15 and 20 minutes.<br />
Hi David, Thanks for the comments! I looked over your Vermod page, pretty cool! I have a<br />
feeling I may be setting myself up for a<br />
disappointing performance. Several<br />
friends have e-mailed me to let me know<br />
my boiler is too small for the two Ruby<br />
Cylinders. At this point I will probably<br />
continue and see what happens.<br />
I built the mounts for the truck cab<br />
today. Here is a picture of the cab<br />
mounted;<br />
As to the boiler situation I'll just worry<br />
about it for now and keep moving.
I started on the truck bed last night and<br />
finished almost all of it this morning. I<br />
left the rear edge open, as I have not yet<br />
laid out where the fuel tank will be. Right<br />
at the end of the bed underneath looks<br />
like the best location, but I have not<br />
decided yet. I needed to get the bed<br />
firmed up and mounted so I could build<br />
the boiler mounts. Here is the bed from<br />
the topside;<br />
And here it is from the bottom; onward<br />
we go!<br />
Today I built the mount for the burner.<br />
The bed will have a large hole underneath<br />
the burner to supply air for combustion.<br />
This will be bored the next time I take the<br />
bed off the truck. Here is the burner<br />
mount.
I also finished the boiler itself, so I<br />
built the mounts for the boiler also. The<br />
tape around the boiler is in place of a<br />
brass band that is not made yet. I still<br />
have not decided if I am going to wrap<br />
the boiler with wood. So the boiler bands<br />
are waiting for that decision to be made. I<br />
want to fire everything first and see how<br />
hot things get before I decide to stick<br />
some planks on the boiler. I have seen a<br />
few blackened planks on gas fired<br />
vertical boilers! Anyway here is the<br />
boiler mounted.<br />
I will have to put this aside for a few days and attend to the real world before I get caught!<br />
Much more to come!<br />
Gerald:<br />
Hi Larry, From the last photo it looks like you are adding a water gauge, plus I have<br />
notice a few extra holes in the boiler top? I found out that the fill bushing that comes with the<br />
boiler kit is threaded on the inside the same thread as the Wilesco safety valve, (it is also the<br />
same thread and fitting as a lampshade retainer).<br />
Hi Gerald, I think you may have missed that I decided against using the Midwest engine and<br />
boiler. The boiler in the picture is one I built from much heavier materials. I decided to use<br />
butane to fire the truck and the consensus was that the Midwest boiler was not heavy enough<br />
for gas firing. I am using a water gauge on the boiler, and the four fittings on the top are safety<br />
valve, goodall valve, throttle (steam outlet) and gauge. So if I read your post correctly, the<br />
water fill bush on the Midwest boiler is the same thread as a Wilesco safety valve? That could<br />
be a handy thing to know.<br />
I would say that I'm back, but I didn't go anywhere. I had to tend to some house repairs that<br />
were left over from Ivan. Still not quite finished but I needed to get back to my train bench and<br />
try to get things moving again. I have been at a slowdown because I needed to machine a<br />
throttle valve. I have not run a lathe for about 20 years, and needed a little refreshing. But I<br />
have made my throttle valve this weekend. First picture is the needle during machining. It is<br />
turned from 1/4-inch brass hex stock.
Next picture is the needle finished<br />
with o-ring.<br />
Next is the body of the valve. It was<br />
made from 5/16-inch brass hex stock.<br />
Threads on the needle and inside the<br />
block are 3/16" x 40. Mounting threads<br />
are 1/4" x 40.<br />
And finally the finished valve<br />
temporarily threaded onto the boiler.<br />
Hopefully I can do an operational<br />
mock-up now to see if the boiler will run<br />
the two Ruby cylinders. Onward we go!
Took a little time today and worked on the pirate's rail truck. Since the throttle valve is<br />
finished I decided it was time to put he boiler together and test it.<br />
The first picture is of the sight glass<br />
mounted to the boiler.<br />
I did not use any sealer on the threaded<br />
fittings yet since I am not sure that this is<br />
the final configuration of things.<br />
Next I soldered up a siphon for the gauge.<br />
Then I installed the "Jim Sanders" safety valve<br />
and goodall valve. Now it was time to see how the<br />
burner would work. The hole in the bed under the<br />
burner did not supply enough air for the burner so<br />
I decided to add a series of vents around the<br />
shroud under the boiler. Since I was sort of in the<br />
dark about what this burner would need, I started<br />
with seven 1/16th inch holes then increased them<br />
to 1/8 then 3/16 and finally 1/4 inch. At this point<br />
the burner seemed to be burning very clean and<br />
hot.
So I filled the boiler and lit her up. <strong>Steam</strong> came up in about 3 minutes and climbed to 35lbs<br />
and the safety released and kept her at 35lbs. A little seep on several of the threaded fittings,<br />
but the boiler was keeping up enough to regularly blow the safety. So I cracked the throttle<br />
valve and bled steam off into the air (no running gear assembled yet). And the boiler kept the<br />
pressure up with no problem. How nice it is when your first boiler makes steam! Time to<br />
assemble the cylinders and valves, build some linkage and a lubricator and see if the boiler will<br />
keep up with two stock Ruby cylinders. Much more to come!<br />
Well I got some time to work on the truck. I assembled the cylinders and valves and started<br />
working on the reverse linkage and the shifter. (I figure that "trucks" don't have Johnson bars,<br />
so I built a shifter.) Since I want to try and have some cargo space in the bed of the truck, I<br />
wanted the shifter to be mounted on the side of the bed. First I built the linkage to connect to<br />
the reverser valve.<br />
I know this is hard to see, but the next<br />
time I take the bed off the chassis I will<br />
post a picture with no cylinders and<br />
drivers in the way.<br />
Next I built the shifter into the side of<br />
the bed.
Then to make sure everything was<br />
working properly I ran an air line to the<br />
reverser and tested the running gear.<br />
My next project will be modifying the<br />
leftover Ruby lubricator and plumbing<br />
the steam line. Then I can test the boiler<br />
with the cylinders and see if it is big<br />
enough. If that goes well, I will build a<br />
fair size fuel tank to fit under the back<br />
edge of the bed. More to come!<br />
Worked over the original Ruby<br />
lubricator today. The first thing I did was<br />
to unsolder the old steam tube and cut a<br />
length of 1/8 inch copper long enough to<br />
go from boiler to reverser. I drilled a new<br />
smaller hole for the steam/oil transfer.<br />
The old tube had a .023"-inch hole, the<br />
smallest drill I had is .019 so that's what I<br />
used. Here is a picture of the old<br />
lubricator body with the tube removed,<br />
and the cut out cleaned up for the new<br />
tube.<br />
Next I turned a small shut-off valve to<br />
make a lower drain on the lubricator. In<br />
the picture from top to bottom; the old<br />
body with a hole to mount the valve at the<br />
bottom. The body of the valve. (Drilled<br />
for drain tube) A short length of copper<br />
for the drain. The valve needle.<br />
(Threaded 8-32) The longer piece of 1/8-<br />
inch copper (steam line) is not picture<br />
here.
Next I soldered all the connections and<br />
cleaned everything up.<br />
Next I fitted the inlet tube to the boiler throttle<br />
valve and soldered on a 1/4-40 connector, and<br />
installed the lubricator.<br />
That's it for tonight, my only niece is getting married tomorrow and I need to get a few hours<br />
sleep for the week. Next task will be to route the outlet tube to the reverser valve and solder on<br />
a connector. Then I will jury rig the stock Ruby fuel tank to test everything. Lots more to come!<br />
Howard Maculsay:<br />
Larry, it's coming along really nice.... great work. I'm going to be making a valve or two<br />
pretty soon. Not having ever made valves from scratch, I'd really like to get a dimensioned<br />
sketch of your lubricator drain valve, both the body and the needle valve, if possible.<br />
Hi Howard, I don't plan things at all so I made this drawing "after the fact". I hope this is<br />
enough to work from. I used 3/16 inch round for the needle, and 5/16-inch hex stock for the<br />
body. Size of components was chosen for practical reasons. I figured that 8-32 was about as<br />
small as would be strong enough in brass. So the 2.8MM end of the needle was as large as<br />
would clear the 8-32 die. Since I am a jeweler my only accurate caliper is metric, and I used it
to layout the lengths while I was turning the needle. So there are mixed measurements galore.<br />
When I made this I did not think I would be trying to duplicate it or I may have drawn a plan<br />
first, but probably not. If you need more info let me know. The "point on the needle was left<br />
fairly blunt to be more durable as this is a shut-off only valve.<br />
Well! Got several loose ends tied up and ran a<br />
steam test on everything this weekend. Lots of small<br />
problems that were worked out, and a successful<br />
BUT disappointing first steam. Everything worked as<br />
it should, but the boiler does seem to be too small or<br />
not efficient enough to maintain pressure with the<br />
two Ruby cylinders. This was somewhat expected<br />
from several long "chats" with Larry Herget about his experiences with similar boilers. I<br />
decided early in the process that I would proceed as if I knew it would work because the entire<br />
truck project is an education for me. Larry suggested a couple of "remedies" that might help,<br />
and I will probably try them. This may slow progress down a bit but THAT'S LIFE! So my<br />
next post may be slow in appearing. But the truck will be made functional one way or another,<br />
and WILL be at Diamondhead 09!<br />
Bill Megill Jr.:<br />
Larry, I am not sure with the ruby, But if you do not need full power can't you just adjust<br />
the valve cutoff to save steam? That is if you will not be pulling much.<br />
Hey Bill, If you are talking about cutting back on the steam valve, it is still not enough to<br />
overcome the bad match-up of boiler and cylinders. I am REAL new to this hobby and while I<br />
am enjoying it, I am doing a lot of learning by making mistakes. Where I erred was that<br />
assuming that the volume of different types of boilers made them comparable in output. This<br />
boiler size was based on the volume of water in the Ruby's original boiler. But it turns out that a<br />
single flue vertical boiler is not nearly as efficient as a single flue horizontal boiler. So what I<br />
am looking at now is an engine combo that can't hold a head of steam at the slowest speed I can<br />
make it run. I am going to try a couple of things before I make major changes, but I am afraid<br />
that the combination is just too far off to work well.
As Dwight would say; HEHEHE What<br />
a difference a day can make! Did not do<br />
any finish work or even smoothing of<br />
corners, but today I "temped" up an<br />
"outside flue" on the boiler. This was<br />
from a suggestion from Larry Herget<br />
about improving efficiency of vertical<br />
boilers. Still needs work but I needed to<br />
know if it would make a difference. Here<br />
is a picture of the top of the boiler.<br />
Basically it's a wrapper that is spaced out<br />
from the boiler to let the burner heat the<br />
outside of the boiler as well as the flue.<br />
Then I rigged a Ruby fuel tank to the<br />
truck bed with some clamps.<br />
And took her outside and fired her off.<br />
Ran a whole tank of fuel through while<br />
she ran around in little circles. I added<br />
water through the goodall once. Kept a<br />
fair head of steam (20-25 lbs) without<br />
any problem. Maybe, just maybe this will<br />
work out!
Howard Maculsay:<br />
Posted By redbeard on 09/02/2008 8:53 PM<br />
As Dwight would say;<br />
Basically it's a wrapper that is spaced out from the boiler to let the burner heat the<br />
outside of the boiler as well as the flue.<br />
Well, just think what will happen if you insulate that outside wrapper and even keep more<br />
heat surrounding your boiler. Nice job, Larry.<br />
Hey Howard, Yes that is part of the finishing plan for the wrapper/flue. Also will add a spiral<br />
flue retarder to "grab" a little more heat from the fire. Then maybe I can get her to steam well<br />
enough to move on to the rest of construction.<br />
I have a few "pain" problems to deal with as well. Both of the brass linkages that thread into<br />
the valve pistons are undersized on the threads, so I think I have to make new ones. This means<br />
getting tap and die for whatever metric size they are. The Ruby book just calls them "M2", I<br />
don't know if there is only one 2mm metric thread. Any help out there?<br />
Ryan Bednarik:<br />
Larry, Common M2 thread size on our engines is 2mm x 0.4. There are three or four 2mm<br />
thread sizes but our size is as stated above. Keep up the good work; always enjoy your<br />
solutions to a problem and creativity. Brilliant work!<br />
Hey Ryan, Thanks! I knew one of you guys would know the answer to my question. And<br />
thanks for the comments, I try to be as self sufficient as I can but this is all so new to me I ask a<br />
lot of questions. So some of my "solutions" were suggestions from more experienced steamers.<br />
THAT is why this is so much fun, everybody helping each other.<br />
Gerald (steamboatmodel):<br />
Hi Larry, I wonder if just insulating the boiler itself without the wrapper would work?<br />
Hey Gerald, Thanks for the suggestion. During the first testing with steam I did try insulating<br />
the boiler without the outside flue. There was a slight improvement but not enough to run the<br />
truck without waiting for steam to "catch-up". This was a sort of bad and hectic test period and<br />
I neglected to list all the things I tried while testing.(bit of a panic time!) The difference with<br />
the "outside flue" wrapper is night and day. Hopefully it will be enough to squeak by with<br />
enough capacity for steam. Thanks Larry Herget for the advice, I listen even if I am bullheaded!<br />
Well here we sit, pondering the route of an unwanted visitor named Ike. Feels a lot like<br />
another unwanted guest a few years back named Ivan. We have not really recovered from that<br />
visit. Such is coastal living......
Worked on the truck a little today. <strong>Built</strong> a<br />
flame restrictor for the flue.<br />
<strong>Built</strong> a 90-degree steam exhaust diverter.<br />
Ran an exhaust pipe up to the boiler flue<br />
area, insulated and lagged the boiler with cork<br />
and then 1/4" x 1/16" wood strips.<br />
And finally late evening put it all back<br />
together for a test.
She did run better than previous test, but not well enough to be satisfied with the system. So<br />
now that all of this is done and looking pretty good, its time to go back to the basic chassis and<br />
make some BIG changes. I am thinking that I will do away with the forward driver and one<br />
cylinder. In place of the driver I'll put in a jackshaft with a flywheel and a sprocket for a chain<br />
to the rear drive axle. This way I can keep the frame basically as is and be a little ahead of the<br />
curve. Seems like a lot of work when I was fairly sure it would not work well, but I needed to<br />
make all of these components. I'll also end up with another Ruby cylinder to make something<br />
else out of! Should have listened to you Larry!<br />
I got most of the major pieces made to convert the two-cylinder pirate rail-truck to a single<br />
cylinder pirate rail-truck. Since I wanted to utilize as much of what was built already, I am still<br />
using most of the Ruby parts that I started with. I am removing one cylinder, one valve and<br />
valve gear and one set of drivers. I am adding a jack-shaft, flywheel, and chain drive. In picture<br />
"A" I have mounted the jack-shaft in the old driver location using sealed ball bearings from a<br />
local hobby shop. I purchased some chain and one sprocket from Stock Drive Products back<br />
when I was planning to use the Midwest boiler and engine. (I made the rear sprocket and cut<br />
the teeth by hand.) The Ruby wheel is drilled and tapped for the sprocket to mount to (picture<br />
"B").<br />
I turned the flywheel out of 1/2 inch by 1 inch brass stock I had laying about.(picture "C")<br />
The crankpin is made form an old steel axle from some plastic wheels I replaced on my ore<br />
cars. I disassembled the Ruby drive axle with the eccentrics to use one of them on this truck<br />
(picture "D").
As soon as I fine-tune the fit of these new parts and figure how to temporarily block off the<br />
valve block on the "chain side", I will air test the running gear. If everything works, THEN I<br />
will cut off the valve block and cap the lines. Then I will have another Ruby valve, eccentric<br />
and cylinder for ANOTHER project. Hopefully I can get this configuration to work!<br />
It Runs! (on air anyway)<br />
Got all the kinks and high spots taken care of and ran the single cylinder and drive train on<br />
air tonight. I tried to do a movie but my camera just won't focus that close in movie format. (I<br />
don't have a movie camera; my digital camera will take short mpegs) So all I can show you is a<br />
still of it running in my hand. Since the reverser linkage is mounted to the truck bed, I had to<br />
hold it in my hand and set the reverser valve with my fingers. Not a pretty picture, but it did run<br />
pretty. I may not get much time this week but I am anxious to to reassemble the truck and get<br />
some steam to this set-up. As soon as I do I will post more pictures.<br />
John Riley:<br />
Larry, Have been watching your progress with great interest. If you are thinking of<br />
changing boiler config's suggest you look at Mark Horovitz Sidestreet Bannerworks Loco of<br />
the Month for Sept 2007.<br />
He shows a pair of tram engines, and their boilers, which would fit well in a rail truck. He<br />
has also converted a single Ruby piston/cylinder to a double acting ossie. Since you have a<br />
spare this might be a future project. My own experience with a small horizontal porcupine<br />
pot boiler fired by a ceramic burner originally designed as an after market upgrade for a<br />
Mamod feeding a two cylinder ossie steam motor geared a la Larry Herget has been quite<br />
satisfactory. The horizontal boiler also can be hidden in a truck easily.<br />
Hey John Riley, Thanks for the comments. On this truck I am going to keep the boiler as is. I<br />
have enjoyed building this so much I am going to build at least one more steam truck (probably<br />
two more!). Since I cut out the "extra" valve block I have an extra cylinder and valve to work<br />
with. So I will have to learn how to build a reverser valve! Have not thought about boiler for
the next truck yet, so I will reserve comment on that one at this time.( well almost,..... it will<br />
probably be horizontal) Before the next truck I have another very complex Ruby Kit bash<br />
underway. No announcements yet, but lots of gears involved!<br />
Winn Erdman:<br />
Larry, Too bad, it was looking so good. I think your solution is really neat. It should have<br />
the good side effect of slowing the speed. To plug the extra valve can you just reinstall the<br />
valve slide and hold it in neutral? Good luck, I think this thing would be cool to watch it run.<br />
(Don't post a video just for me, I can't get it on my puter anyway) Sometimes chasing<br />
problems can be a pain, but it really brings out the engineer in you. It feels so great when<br />
you come up with a solution that works. I hope the Big Blows don't get you!!!<br />
Hey Winn! Good to see some new "Bogie Posts"! I worked on all the rough edges of the<br />
moving parts and reassembled the single cylinder set-up today.<br />
P.S. Winn, I cut out the valve block so I would have a complete cylinder assembly for a<br />
future project (missed that comment in my first read of your post).<br />
Worked on the pirate truck again today<br />
instead of working on business. Have to<br />
play catch-up now! BUT the truck is now<br />
on four wheels. I built the front axle<br />
assembly today. Simple and sturdy.<br />
And here is a shot of the truck showing<br />
it's new stance as a four-wheeler instead<br />
of a six-er. Oh Well, live and learn! And<br />
boy have I learned a lot on this project.<br />
It will be several days before I can<br />
work on it again.
It <strong>Steam</strong>s!<br />
I put all the pieces (that are made) back on the truck and clamped a Ruby fuel tank to the<br />
truck bed. Filled everything, lubricated everything and fired her up. Tried to catch the safety<br />
valve popping but I never got it.<br />
Once she was up to the safety (35lbs.) I rocked the shifter to clear the condensate from the<br />
cylinder and off she ran. Still a lot of fine-tuning to get everything just right, but the mechanism<br />
is proven now. Will self start in forward, but I had to nudge her to get reverse. I am going to<br />
build a fuel tank next and then start on the trim and decor. I made a short low quality video of<br />
the first steaming with the one cylinder modification.<br />
Here's a video of it.
Today I built the fuel tank for the<br />
truck. I bent some .039" thick copper into<br />
two L shapes, drilled the appropriate size<br />
holes for the gas valve and the filler<br />
valve, and hard soldered it together. The<br />
first picture shows the pieces as they<br />
were made.<br />
The next picture shows the finished<br />
tank before cleaning and painting.<br />
The gas valve was made almost exactly<br />
like the lubricator drain valve earlier in<br />
this string. The only difference is the<br />
needle has a long tapered point to allow<br />
adjustment of gas flow, and a threaded<br />
fitting for the fuel line to the boiler. The<br />
filler valve came out of a cheap butane<br />
pencil torch (had for years and never<br />
used). I think this is the last major<br />
component on the truck. Now its LOTS of<br />
little pieces and parts.<br />
I got the fuel tank mounted today and did a short<br />
steam on the bench. Here is a picture of the tank<br />
mounted.
Gerald (steamboatmodel):<br />
Hi Larry, Did you do a hydrostatic test on the fuel tank? I was told to test any<br />
butane/propane tank to 350 psi. A fuel tank is a pressure vessel the same as a boiler is and<br />
should be tested to twice the working pressure. a 70/30 or a 60/40 butane mix have pressures<br />
of 145 and 165psig (10 and 11 bar) respectively. Straight propane will reach 260psig (18<br />
bars).<br />
Gerald, I do not have any way to "hydrostatic test" the fuel tank. I leak tested it and pressure<br />
tested by dunking it (full) into hot water.<br />
I can't believe it has been a month<br />
since I posted anything on the railtruck. I<br />
have only worked on it a little now and<br />
then; my business is having a tough time<br />
in this economic environment so I have<br />
been staying focused on survival. Today<br />
however I have worked on getting more<br />
heat from the burner and I built handles<br />
for the steam valve and the lubricator<br />
drain. In working on the burner I realized<br />
that the lubricator is uncomfortably close<br />
to the boiler for adding oil while engine<br />
is hot.<br />
So I soldered a piece of 5/16 hex stock to the cap to<br />
allow a wrench or nut driver to be used. On the<br />
burner I figured I needed more air to get proper<br />
combustion of the fuel, so I added a circle of holes in<br />
the base around the burner. Then I made a "cup" for<br />
the burner to keep the flame contained and aimed at<br />
the boiler bottom. I added a coil of stainless wire to<br />
act as a radiant heat source. The first picture shows<br />
the modifications to the burner.<br />
The next pictures show the new handles.
I think everything will work out OK now. On blocks I got several long runs by adding water<br />
to the boiler, and was able to keep steam up at 30 lbs. Lots of adjustments and a small leak on<br />
the lubricator to deal with. Hopefully I can set up a small track this weekend and test it then.<br />
Well after a lot of fiddle-factor and adjustments I got the truck to run 14 minutes with a few<br />
pumps of water in the goodall valve. So I think I will move along with the rest of the truck. I<br />
still have to decide if I want a pilot or just a beam on the front, mount a beam and coupler on<br />
the rear, build a stake body, replace the boards on the boiler, (during the burner mods they got a<br />
little singed...OK they caught fire a few times) and then I don't yet no what else will go on it.<br />
Here is a short video of the truck running, still low quality stuff; I can't buy a camera right now.<br />
Here's another of the action.<br />
Semper Vaporo:<br />
Don't say, "caught fire", say that is expertly applied "weathering." The words are, "I<br />
meant to do that!"<br />
HMMMM Weathering! Of course that's what it is... I just forgot I did it that way!<br />
So after I ran the truck today, I worked<br />
on the pilot beams. The rear beam, braces,<br />
coupler and steps are finished.
I ran out of time and energy before I<br />
finished the front beam. I have laid out<br />
what I am building and cut the beam<br />
itself, and started the bottom bracket.<br />
Maybe tomorrow if there is time<br />
available.<br />
I think things will move along now,<br />
but WHO KNOWS?<br />
Howard Maculsay:<br />
You're getting to that point where you can see how much you rail truck will haul,<br />
right??? Really looking great. The radiant burner coil is very clever. I'm anxiously waiting<br />
to see what treatment you give the truck bed...wood stakes and rails or solid brass sideboards<br />
or.... Again, nice work.<br />
Hi Howard, I am glad to have come to the point where I know the boiler-engine combo will<br />
pull a car or two. My choice of this combination was flawed from the beginning, but I am<br />
sneaking around the problem. I have one special car in mind to go behind the truck.... a<br />
dynamite car for the pirate miners! I am now at the point where I do not want to add weight to<br />
the back of the truck, so anything behind the cab now has to be as light as practical. So it will<br />
likely be a wood stake body, but I have not started it yet.(meaning no plans yet!) Still OK for<br />
weight on the front, but I don't think I will use a "cow-catcher" pilot. Just a beam with a<br />
coupler, can't see steps even... nowhere to step to! Maybe a few tools or such...<br />
Today I have only had a little time this<br />
afternoon to "play with trains", but I did<br />
finish mounting the front beam.<br />
No coupler yet, I made a pattern to cast<br />
a single pocket link and pin coupler but<br />
have not cast the plug or made the mold<br />
yet. The coupler will be in my next batch<br />
of castings, along with a journal for<br />
building my Dynamite car. I'll post<br />
pictures when they are cast. I hope to get<br />
back out here after dinner and get started<br />
on the truck bed... but we'll see what else<br />
pops up and demands my time.
Henner Meinhold:<br />
I have to agree with Howard! The radiant coil is a brilliant idea! You should reveal some<br />
of your secrets about making these nice castings....<br />
Hi Henner, Thanks for the comment. No secrets to my castings, I am a jeweler in "real life"<br />
and have been doing lost wax casting for over twenty years. I have all the equipment for<br />
modeling in wax, casting, and making vulcanized rubber molds to do duplicate casting. So far I<br />
have only done a few train related items in brass, but as I need things I will make molds if it is<br />
practical to do so. I have been thinking of building a sterling Loco for a long time...................<br />
This is the first update on building<br />
the stake body on the Pirate railtruck.<br />
First I disassembled the bed down to<br />
the point where I could solder on the<br />
edges of it. Then I cut some 1/4-inch<br />
square brass tubing to use as stake<br />
pockets. I soldered them to the bed.<br />
Next I sawed up some stakes to fit<br />
the pockets. I know that these are<br />
way over scale, but I do want this<br />
truck take some abuse. Later they<br />
will not look so big I hope.<br />
That is where I am at the start of<br />
my day. More later, but maybe not<br />
today (life keeps intruding on the<br />
train work).
Well I got the bed built! The sides are<br />
all wood, but because of the heat and<br />
"occasional flame" issue I built a brass<br />
front-gate. This will keep the diecast cab<br />
from getting scorched, I mean<br />
"weathered"! hehehe<br />
Getting real close to calling it ready for<br />
paint. Time to take a step back and<br />
consider what else the truck might need.<br />
I still have not cast the front coupler, so<br />
I decided to start the painting process.<br />
First I cut new wood for the boiler<br />
lagging, since the first ones had been<br />
"flame weathered" so badly. Then I<br />
disassembled the boiler and painted all<br />
the pieces, and reassembled it.<br />
Then I painted the stake body the color<br />
the truck will eventually be painted.
I am still here! It has been a long time<br />
since I have taken any time with the rail<br />
truck. I finally got the coupler cast and<br />
made a mold from it to reproduce it.<br />
Hope to get a lot more done on the truck<br />
before Diamondhead! here is the coupler;<br />
Will post more as I get things made.<br />
Worked on the truck some more today.<br />
I found some pirate figures! This poor<br />
fella has a BIG hook for a left hand, but I<br />
figure there's no steering in a rail truck so<br />
he'll be all right.<br />
Could not get him to stay bent even<br />
with heat, so I drilled up through the<br />
heels of his pointy-toed boots all the way<br />
up to his chest and put some brass rods<br />
in.
Then I was able to bend him into a<br />
sitting position and have him stay. So I<br />
built a floor and a seat back and now I<br />
have a RED BEARDED pirate in the cab<br />
of the truck!<br />
More to come!<br />
Got a little more done today. Added some steps<br />
for the short-legged pirates to climb up in the truck<br />
cab (using up more Ruby parts ). Also took care<br />
of the axle stubs on the front axle. Several people<br />
have asked me about them, long-term plans are to<br />
cast some spoke wheels. That does not seem to be<br />
happening very quickly so I cut off the stubs.<br />
More as it comes... starting to think paint!
I am looking forward to seeing the<br />
entire Tallahassee bunch in a few days. I<br />
decided that it was time to start the<br />
"Krylon Hustle". Per Bob "diesel" Pope<br />
that means I am ready to paint the truck.<br />
Took her apart first.<br />
Then I started with the cab; here is the<br />
cab apart and sanded.<br />
And now it is barely warm enough<br />
outside to spray some paint.<br />
Got some parts painted and got one<br />
batch baked, in the picture the top left<br />
group (the cab pieces) have been baked. I<br />
bake the parts for two hours, so baking is<br />
the slowest part. More later!<br />
My plan is to have it pretty well<br />
finished before Diamondhead.
Mark Scrivener:<br />
Looking very good. I'm lovin' this thread. I'm also jealous as I have a ton of painting to do<br />
but it has been too cold and humid to risk a botched paint job.<br />
Thanks Mark, It has been too cold to paint for a couple of days (today started out at 38 and<br />
reached 60 about 2 PM) and now there is rain in the forecast for the next 4 days. So I painted as<br />
many pieces today as I could. I cheat a little bit also; I spray the paint on warm pieces (warmed<br />
with 100 watt bulb) outside and immediately bring it into the shop. This way I can use Krylon<br />
down to 50-55 degrees F without blushing. It does make for some fumes in the shop but I have<br />
4 separate vent systems installed, so fumes are not bad. Wish I had space to put in a small paint<br />
booth... oh well I guess I'd rather buy more steam parts. We do what we have to!<br />
All the pieces and parts are painted and<br />
baked, and the reassembly has begun. I<br />
decided to calm down the purple, blue<br />
and yellow outfit on the pirate while he<br />
was out of the cab. Here is where I am<br />
starting my weekend.<br />
My goal is to get her assembled this<br />
weekend. lol<br />
It's not finished yet but I have made a<br />
lot of headway on the reassembly. Here<br />
is where I am at the end of my Saturday<br />
workday.<br />
I would have had the boiler in, but the insulation on the steam line to the lubricator comes a<br />
little bit too high up the line and keeps it from aligning with the throttle valve. Not a big<br />
problem but the paint on the insulation is wet, so it's a good place to stop today.
Looks like the pirate rail truck will go to Diamondhead with a paint job. I got all the pieces<br />
back together and have none leftover. (I am pretty sure that's a good thing!) I will try and get<br />
some lettering done but right now I am just happy she is back together. I will wait a day or two<br />
before steaming to let all the paint settle down. That will still give me some time if anything is<br />
not assembled right or if .............???? Note ol' redbeard in the first picture!<br />
I got some logo decals made and<br />
installed today. From the looks of it I<br />
think the pirates are planning on hauling<br />
some dynamite to their mine.
Come on now these pirates may not be wrapped too tight, but even they wouldn't stack<br />
dynamite next to a boiler! That's why there are couplers on the truck! Gotta go pack the truck<br />
for Diamondhead. See you there I hope. Meant to stick a still in here.<br />
Here is a short video of the truck pulling one and then 5 little cars.
POST DIAMONDHEAD 2009<br />
The pirates went to Diamondhead and had a FANTASTIC time. I went over on Tuesday and<br />
just about ran the wheels off the truck.<br />
Here is one of the first runs I made with<br />
the truck.<br />
Every time I ran her she ran better, by Thursday night I was topping the boiler off four times<br />
with the goodall and running right at thirty minutes. Late one night (all a blur by now) Jim<br />
Sanders and I ran the truck on a four foot diameter circle with cars all the way around to the<br />
front coupler. I was pleasantly surprised that she had plenty of power to do this so off we went<br />
to a bigger track and the truck made laps with twenty cars. I will post pictures and/or videos<br />
when I receive them (I was having too much fun to remember to take pictures!).<br />
I entered the truck in the drawbar<br />
contest on Saturday and won my class!<br />
(single axle) here is the truck running<br />
Sunday with the trophy in the bed.<br />
Of course the fact that I was the<br />
ONLY entry in the single axle class may<br />
have helped me win! ??<br />
All in all a wonderful steam-up for the pirates. Many thanks to Jerry Reshew and all those<br />
volunteers that made the show run so smoothly.
I have not done anything to the truck or the Ruby Mason since I returned from<br />
Diamondhead.<br />
This is what I have been doing instead.<br />
The truck ran much better than I expected at Diamondhead and I figured out that part of the<br />
reason was that I did not have a track to run on here, and could not really judge how things<br />
were progressing. So I am building a small (30 feet) test track right outside the door to my<br />
workshop. I have several modifications to make to both engines, and they are the type of<br />
changes that need to be run for comparisons to previous set-ups. So... I am putting up this track<br />
with any of my "un-allocated" time. I plan on moving the exhaust on the truck into the boiler<br />
flue to try and clean up it's messy running habits. I am also going to build a water car to pull<br />
behind the truck and pump water to the boiler for longer run times. I will probably build it so<br />
that it will work with both and possibly any other engines I build. I picked up a Regner electric<br />
water pump at Diamondhead. This year it was worth the trip to Diamondhead just for the "Flea<br />
Market". I will start a new thread when I start on the water car. I hope to be posting videos of<br />
the truck at Diamondhead soon................<br />
I got my first track finished today. A<br />
small track right outside my shop door<br />
for testing things. Track is about 29 feet.<br />
Here is the first run on it with the Pirate<br />
<strong>Rail</strong>truck.
I did another video but it is so low resolution I decided not to put it on here. Hopefully I will<br />
get some Diamondhead footage sent to me soon and will post that.<br />
I got the first of the videos from Diamondhead today. Here is a clip with the rail truck<br />
pulling 20 cars. THANK YOU Jim Sanders! ! !<br />
I can't believe it is March already! I have not<br />
worked on anything steam powered since I put up the<br />
small track... til today! The only real issue I had with<br />
the truck at Diamondhead was the amount of water it<br />
dribbled out on the track. Every time I ran the truck I<br />
chased it with rags. So as much as I liked the novelty<br />
of the "tailpipe" I have opted for a cleaner running<br />
truck. So I moved the exhaust to the flue. I built a<br />
brass sleeve to keep the pipe centered and then ran<br />
copper to the sleeve. Just ran it in the dark to check it<br />
out, and it got rid of the "wet track" problem. Here<br />
are a couple of pictures of the exhaust tubes. From the<br />
"chain side";<br />
And from the "flywheel side": I need to<br />
do a little "tuning" but it works pretty well<br />
already.
It's been a while since I have had any<br />
"steam time", but I got in a little this<br />
evening. To prepare for the water car I<br />
moved the steam line to the gauge to free<br />
up a fitting in the boiler to inject water.<br />
Hard to see in the picture but it is plugged<br />
right now. Ran it for a while today, I need<br />
to work on the blast pipe still. Anyway<br />
here is a picture of the re-routed gauge<br />
line (also got the gauge down into the bed<br />
a good bit).<br />
That's it for today, hopefully some<br />
more time tomorrow.<br />
I finally got the new decals on! WOW!<br />
Thanks again Stan Cedarleaf! Here are a<br />
couple of shots (while the clear-coat is<br />
still wet).
Here is one more shot of the T-1 <strong>Rail</strong><br />
truck running. I think that she is finished<br />
now, so unless there are any unplanned<br />
changes this will finish this log. Time to<br />
get rolling on the next one! Keep watch<br />
for what the pirates come up with next!<br />
I did not expect to be posting anything else to this log... but here we go. I borrowed a camera<br />
to take pictures and while learning how to use it I took a video of the T-1 on my test track. So<br />
here is I hope a better video than I could do before.<br />
Dragging up a post from the past!<br />
The only real issue I have had with the rail truck since I finished it has been the filler valve<br />
for the fuel tank. The valve I used was an un-vented valve from an inexpensive butane minitorch.<br />
The valve worked well but as it was not vented the only way I could be sure to fill the<br />
tank all the way, was to crack open the fuel valve and fill the tank until I heard liquid coming<br />
from the burner. Since the tank is lower than the burner, this meant I was always starting with<br />
an over-full fuel tank. This made for some odd lighting procedures where it appeared that I was<br />
setting the whole truck on fire. This year at Diamondhead, Richard Jacobs had Accucraft filler<br />
valves in the dealer room... so I decided to take care of this problem. And here it is 5 months<br />
later and I am installing the valve. Jim Sanders from Wee Bee Loco made me an adapter to put<br />
the valve in my tank. Thanks Rich and Jim!
Here is a picture of the new<br />
valve installed and the old valve<br />
on the left.<br />
Movie shortly!<br />
Well, here is a try at embedding a video.