Coal fired Ruby - Santa Cruz Lumber Co.
Coal fired Ruby - Santa Cruz Lumber Co.
Coal fired Ruby - Santa Cruz Lumber Co.

Create successful ePaper yourself
Turn your PDF publications into a flip-book with our unique Google optimized e-Paper software.
Printed from: myLargescale.com Forums http://www.mylargescale.com/forum/<br />
© myLargescale.com / Model Railroads Online, LLC – All Rights Reserved<br />
<strong><strong>Co</strong>al</strong> <strong>fired</strong> <strong>Ruby</strong><br />
Original Topic URL: http://www.mylargescale.com/forum/topic.asp?TOPIC_ID=28942<br />
Topic author: highpressure<br />
Posted on: 15 Mar 2005 14:30:47<br />
When I started assembling my Accucraft <strong>Ruby</strong> kit about 5 months ago I couldn't help but to keep<br />
seeing a firebox between the frames at the rear. So after I had the chassis together I stopped<br />
assembly & milled out the center portion of the floor pan. Then I made a cardboard mockup of what<br />
would be the boiler. The boiler is built of .042" copper ith (5) 1/4" ID fire tubes. It has a wet firebox<br />
except the backhead which is dry and made of stainless steel. The firebox side sheets and the crown<br />
sheet are stayed every 1/2 sq inch with copper stays. The "GLUE" of choice was 45% silver solder. I<br />
figured I would operate it at 50 PSI so when the boiler was finished I hydro tested it to 100 PSI,<br />
however later I set the safety valve to 40 PSI & the loco operates very nicely & will pull a quite heavy<br />
load with this pressure.<br />
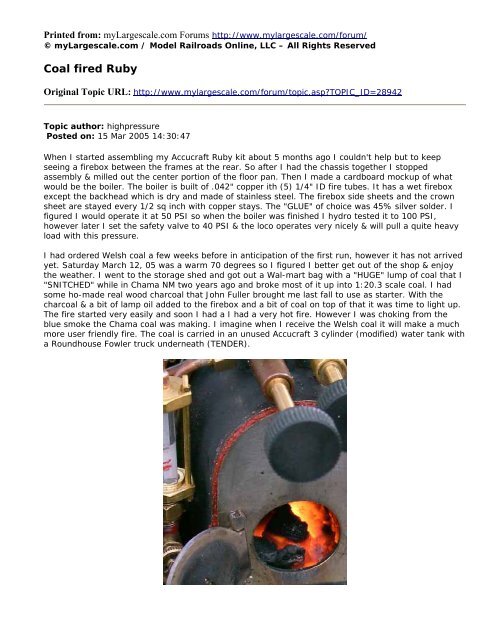
I had ordered Welsh coal a few weeks before in anticipation of the first run, however it has not arrived<br />
yet. Saturday March 12, 05 was a warm 70 degrees so I figured I better get out of the shop & enjoy<br />
the weather. I went to the storage shed and got out a Wal-mart bag with a "HUGE" lump of coal that I<br />
"SNITCHED" while in Chama NM two years ago and broke most of it up into 1:20.3 scale coal. I had<br />
some ho-made real wood charcoal that John Fuller brought me last fall to use as starter. With the<br />
charcoal & a bit of lamp oil added to the firebox and a bit of coal on top of that it was time to light up.<br />
The fire started very easily and soon I had a I had a very hot fire. However I was choking from the<br />
blue smoke the Chama coal was making. I imagine when I receive the Welsh coal it will make a much<br />
more user friendly fire. The coal is carried in an unused Accucraft 3 cylinder (modified) water tank with<br />
a Roundhouse Fowler truck underneath (TENDER).
Being the first run I was surprised how well the little loco ran. It was pulling 3 Bachman gondolas with<br />
Sierra Valley metal wheels and a large brick in two of them. After set in motion the loco kept steam<br />
up, sometimes popping off with out use of the blower. After I mastered the firing technic a bit things<br />
got better. Keeping the water up was easy as there is an injection valve under the front dome. My best<br />
run on one firing was about 500 feet, or 3 times around my 174 foot track. After that long with out<br />
any fuel added it sure was ready for some food & water. I have enjoyed building this loco enormously.<br />
I have a bit more to do on the loco but now I can take my time and do it ramdomly when I have time.<br />
Here's a photo from that first run.
Here's another photo of it going slightly upgrade saying "I think I can, I think I can, I think I can".<br />
Larry Herget, DeSoto, Missouri.<br />
Replies:<br />
Reply author: Bob Starr<br />
Replied on: 15 Mar 2005 15:07:45<br />
Good Deal Larry!<br />
I did look at your boiler at DH and was very curious as to how this would run. Glad that it is a success.<br />
My only concern is how well the <strong>Ruby</strong> frame will hold up to the heat. The fact that you put water legs<br />
in the firebox should help, tho. Keep us posted on the future results.
Reply author: Charles<br />
Replied on: 15 Mar 2005 17:51:51<br />
Larry<br />
Amazing to see another outstanding and unique application to a <strong>Ruby</strong>. Please give some insight to the<br />
development of the wet firebox on the <strong>Ruby</strong> when you have the time. Given that you are doing what<br />
you want, when you want, lucky to have such options with grand results!<br />
Reply author: livesteam5629<br />
Replied on: 15 Mar 2005 18:29:38<br />
Hey Olfa**<br />
What is all that red stuff around the backhead joint. High temp silly-cone caulk..??? You never cease to<br />
amaze me. What next? No, no don't tell me..just suprise me in May at the Mid West Steamup. Hope<br />
you had a good time at Scranton. Looks like John got you home safely.<br />
Noel<br />
Reply author: EASTSIDE RAILWAY<br />
Replied on: 14 Apr 2005 11:27:01<br />
what for boiler feed pumps (hand pump etc.) are in the ruby???<br />
thanks for answers...<br />
Reply author: Steve Shyvers<br />
Replied on: 14 Apr 2005 14:58:48<br />
Larry,<br />
Thanks for the inspiring report! Who'd've thought seriously that a <strong>Ruby</strong> was a candidate for coal? My<br />
guess is that there's a boiler wrapper that covers the boiler/firebox and the firebox stay ends, and the<br />
red caulk is in the joint between the wrapper and the SS backhead. I like the water gauge too. How<br />
about a full photo of it?<br />
Reply author: gary Armitstead<br />
Replied on: 14 Apr 2005 16:09:48<br />
You know the ONE great thing about this? The SMELL of coal being <strong>fired</strong>. And the Dismal guys are<br />
trying to get the diesel "smell" from their smoker units. Just nothing like live steam and coal. Just<br />
teasing guys!<br />
Reply author: highpressure<br />
Replied on: 14 Apr 2005 17:28:00<br />
EASTSIDE RAILWAY: There is a water injection valve under the front dome to feed water in from a<br />
garden spray bottle.<br />
STEVE: The water glass is just a simple lathe turning. For a closer look see<br />
http://www.mssls.info/larryh/ruby33-fullbackhead.jpg<br />
Larry Herget
Reply author: samevans<br />
Replied on: 21 Apr 2005 13:34:13<br />
Dear high pressure<br />
Any chance of a drawing and full description of the boiler?<br />
Best<br />
Sam E<br />
Reply author: highpressure<br />
Replied on: 23 Apr 2005 18:47:06<br />
Dear ????<br />
Well, I do not work from or make any drawings. I look at the project at hand & proceed. The man<br />
above guides my hands and the machinery does the job. Some times a bit of Southern <strong>Co</strong>mfort helps<br />
.<br />
My main goal was to make a coal <strong>fired</strong> boiler with a wet fire box. This boiler has wet fire box side<br />
sheets and crown sheet however the backhead is dry, that all of the <strong>Ruby</strong> outer trim would fit on<br />
(STACK & DOMES). It is all .042" thick sheet copper, cut & rolled up. All of the plates are flanged &<br />
rivited. The (5) flues are 1/4" ID. Silver solder was used for assembly and there are stays at all<br />
locations that require them. I steam it at 50 PSI and it had a Hydrostatic test of 100 PSI when it was<br />
completed. It has a stainless steel grate and below it an ash pan. I have steamed it about 6 hours and<br />
it steams very freely. OH, by the way I made two of them. No, it's already gone.<br />
Larry Herget<br />
Reply author: samevans<br />
Replied on: 26 Apr 2005 13:25:10<br />
Larry<br />
The name is Sam Evans.<br />
Many thanks for your reply. Did you take photos during construction? I guess with those I could have a<br />
stab at it. My disabled partner would like a coal <strong>fired</strong> loco. The size of the <strong>Ruby</strong>/<strong>Ruby</strong> boiler is one<br />
which I might be able to make/afford to make with the equipment I have to hand. I would be very<br />
grateful for any help..<br />
Best<br />
Sam E
Reply author: Pete Thornton<br />
Replied on: 26 Apr 2005 14:01:06<br />
quote:<br />
I'd like to attempt this project, if it is not to difficult and can be compleated by a beginner.<br />
Guys,<br />
Larry did a beautiful job, but he's not a beginner.... Check his profile: this gent is the ex-owner of<br />
Ozark and a 1in:1ft steam engine modeler. Note Larry didn't even work from drawings - he has<br />
enough experience to be able to build one from scratch.<br />
<strong><strong>Co</strong>al</strong> <strong>fired</strong> boilers are not simple nor are they easy to make. The recent coal conversion of an Accu<br />
K-27 caused all sorts of discussion, and cost several thousand $$.<br />
Yeah, I know, raining on everyone's parade again...<br />
I'm just jealous of his abilities!<br />
Reply author: GNSteamer<br />
Replied on: 26 Apr 2005 16:48:02<br />
Larry,<br />
You did a beautiful job on the conversion. Now what did the conversion cost in materials and how<br />
many hours did it take you?<br />
Reply author: bigsteam<br />
Replied on: 27 Apr 2005 22:22:08<br />
Pete, You Said .......<br />
quote:<br />
<strong><strong>Co</strong>al</strong> <strong>fired</strong> boilers are not simple nor are they easy to make.<br />
sorts of discussion, and cost several thousand $$.<br />
The recent coal conversion of an Accu K-27 caused all<br />
In reference to the "all sorts of discussion" and the "un-happy faces" in your post, is there a problem<br />
with this conversion?<br />
John<br />
Reply author: highpressure<br />
Replied on: 28 Apr 2005 21:53:58<br />
Harlan'<br />
I built two of these Boilers. I would say that the total cost of the materials for both of them was<br />
around $35.00. NOW, that is just the bare boiler with the bushings in and a hydro test. That includes<br />
none of the outer fittings, waterglass, throttle & blower valve, goodall, safety valve ect.<br />
Time wise it took about 6 months from it's inception, Now that is not working full time on them as I<br />
built several other items in that time. Actual hours of design, layout and assembly (JUST THE<br />
BOILERS) no external appliances I would guess about 50 actual hours for both. It is easier & takes less<br />
time to build multiples as the design & set up has allready been done.
Here's a shot of the first cardboard mockup.<br />
This is what’s inside. The firebox, tubes & front tube sheet.
This is just before the hydrotest, it had just been removed from an acid bath to remove all flux &<br />
oxidation.<br />
Hey fellas, quit dreaming & start cutting metal. If you screw it up, throw it away & start over. I have a<br />
box in the shop with "JUNKED" projects from 40 years ago. That's how you learn, make a mistake<br />
once & it will be the last time. Plus you have this very fine Forum with many very talented individuals<br />
out there if you have a question. Remember, practice makes perfect. The more you do with your<br />
hands the more they will be able to do.<br />
Reply author: Pete Thornton<br />
Replied on: 29 Apr 2005 13:22:19<br />
John,<br />
My<br />
(unhappy faces) were strictly adjacent to the mucho $$ signs!<br />
My information about the DJB Engineering and the Pikes Peak Loco works versions is that they work<br />
very well. Beautiful, and if you have to ask you can't afford it.<br />
There's been several discussions here - try a search of the topic archives.<br />
Reply author: BNGP10<br />
Replied on: 02 May 2005 17:51:43<br />
If someone would offer this type of conversion boiler for such a entry level and affordable locomotive,<br />
at a very attractive price mind you, it would do wonders for folks on tight budgets that would give<br />
anything to have a coal <strong>fired</strong> steamer. I love the works of John Shawe and Larry H and wish I had<br />
those ablites, or someone to teach me, but I dont. So, someone out there looking to start making up<br />
some of these, I think there would definatly be a market for them if they could be produced at a cost<br />
effective price so that anybody could afford them, ie: if you afforded the ruby engine, then you could<br />
afford the boiler. Make it a drop in replacement with no machining or soldering. Just my 2 cents.<br />
Cheers Mike PS I would buy one!
Reply author: Pete Thornton<br />
Replied on: 03 May 2005 15:03:21<br />
quote:<br />
you afforded the ruby engine, then you could afford the boiler<br />
Mike,<br />
Nice try, but highly unlikely... I think the coal <strong>fired</strong> boilers for the K-27 added over $1000 to the price.<br />
There's no way a boiler like Larry's could be made for much less than the price of a <strong>Ruby</strong>, so you'd basically<br />
double the cost. [IMHO]<br />
Then you have to find some Welsh Steam <strong><strong>Co</strong>al</strong>, and pure charcoal, and learn how to deal with a coal fire.<br />
Not a trivial project, IMHO.<br />
Reply author: BNGP10<br />
Replied on: 04 May 2005 18:19:15<br />
That is exactly what I would like to see, a coal <strong>fired</strong> ruby for double the price, to me that would be an<br />
excellent entry level coal <strong>fired</strong> steamer. If I could get a coal burning boiler for basicly the same cost as<br />
two rubys, I would start saving up today. Cheers Mike<br />
Reply author: sparks<br />
Replied on: 05 May 2005 11:30:55<br />
I'll second the motion for a 2X cost, coal <strong>fired</strong> <strong>Ruby</strong>, or a $500 boiler that you could bolt unto your<br />
$250 ruby kit. I think that I might even try my hand at boiler making in the near future to convert<br />
mine. This is not rocket science so lets encourage more of this stuff, not discourage folks from wanting<br />
to get more involved. My fireproof undies are in place. Flame away<br />
P.S. Anyone know where I can get a couple pounds of Welsh coal? (seriously)<br />
Chuck in Pflugerville<br />
Reply author: Ray C.<br />
Replied on: 05 May 2005 19:31:21<br />
I agree. In my opinion, doubling the cost of a basic <strong>Ruby</strong> is a mere drop in the bucket as far as an<br />
entry level coal burner goes. That is, assuming that it's technically feasible and all....<br />
Reply author: Charles<br />
Replied on: 06 May 2005 07:02:38<br />
I doubt that the cost for a production of coal <strong>fired</strong> boilers would be $500 for a <strong>Ruby</strong>. For example, the<br />
replacement cost for an Aster boiler can range from $250-600 and that's for a "normal" boiler. But if it<br />
was to become available I would certainly purchase one. Yet, there may be a problem in that I hear<br />
the <strong>Ruby</strong> is off the production line. An interesting issue would be the overwhelming demand of "gauge<br />
scale" Welsh coal- could be a run of the market (maybe I'll purchase some 50 lbs bags and start<br />
marketing scale size coal loads!).
Reply author: Ray C.<br />
Replied on: 06 May 2005 10:14:20<br />
Good points. By the way, a great source for 'bean size' Welsh coal is <strong>Co</strong>le's Power Models in North<br />
Hollywood, Ca., (818)762-0272. This is real high quality stuff, with very little impurities. Last time I<br />
bought some, I got a 10 gallon bucket<br />
for under $50. For a small scale loco, that should last quite a while. You might have to break some of<br />
it up, but shouldn't be a big deal.<br />
Reply author: chuckger<br />
Replied on: 06 May 2005 11:15:37<br />
Hey Guys,<br />
Around here you could buy a ton of rice or barley coal around $125 That should be almost a life time<br />
supply.<br />
chuckger<br />
Reply author: Charles<br />
Replied on: 06 May 2005 12:31:01<br />
Chuckger<br />
I did try the regional rice but not as good as Welsh coal. Even tried mixing it the result was not the<br />
quality of heat in combination with less ash allowing for better air flow and less clinkers on the grates<br />
while running the K4 (could be the fireman....).<br />
Reply author: insanerocketkid<br />
Replied on: 11 May 2005 23:45:33<br />
Message:<br />
How do you make the stay bolts?<br />
I plan to try something of the sort this summer, since I'll have access to a machine shop, and access<br />
to some HIGH temperature torches, so I'm sure I could just pick up some copper and quality silver<br />
solder, and then have some fun. The only big problem that I am a little fearful of is the turning of flat<br />
material into a tube. I have seen several techniques, but would be thankful if you would be willing to<br />
send me an email about the process of doing so. I really hope I can accomplish such a project, so that<br />
I can have a "toy" to play with in my spare time. I also could use this for practice for future<br />
locomotives that I hope to scratchbuild, and coal firing these would be the perfect solution.<br />
I sent you (highpressure) an message through mylargescale. If you didnt' get it, I'm from St. Louis,<br />
and would like to maybe meet some of the St. Louis live steamers. It'd be nice to meet some of you<br />
guys. I really wish I could make it to the midwest steamup, but I am leaving a week too late from<br />
School. :-(<br />
If any of the st Louis guys want to meet up, let me know. I can probably set up my "portable" track,<br />
and we can have some fun.<br />
Mike
Reply author: Pete Thornton<br />
Replied on: 12 May 2005 07:25:27<br />
Mike,<br />
From my observations, most small-scale boilers don't use stay bolts, and most home-made boilers<br />
seem to use existing copper tubing. (The problem is to fit the end caps.)<br />
I strongly suggest you subscribe to the small scale live steam message board, which is populated with<br />
guys who do all kinds of engineering, including making their own boilers.<br />
The sslivesteam mail archives will give you all kinds of fascinating details, from types of copper to<br />
procedures for testing.<br />
Those guys probably know where to find stay bolts too!<br />
Reply author: highpressure<br />
Replied on: 12 May 2005 11:00:27<br />
INSANEROCKETKID:<br />
Stay bolts are used in Small scale boilers. However they are not actually bolts, most use copper rod of<br />
approriate size. Staying keeps the flat surfaces from bulging from the internal pressure.<br />
Forming flat copper sheet (.040" thick) is very easy. NOTE: Larger boilers operating at higher<br />
pressures will require thicker material. The first step is laying out the boiler shape & all of the hole<br />
locations on the sheets and cutting them out.<br />
After that is done the sheets have to be annealed (HEATED) to a very dull red and let cool slowly in the<br />
location they were heated until you can handle them. After annealing the copper is very soft, kind of<br />
like a piece of hard rubber. I use a former made of P.V.C. pipe of the correct size & hand roll the sheet<br />
around the former. In the photo below all of the bending was done in one step around the P.V.C.<br />
Former. If the copper becomes unworkable during forming just reanneal it, let it cool and procede. The<br />
next step I put several radiator hose clamps around the copper and squeeze it right down tight against<br />
the P.V.C. former. Tapping with a very small hammer while it is on the former helps things go into
place. Then I drill the lap joint on the bottom for rivits. After that it is removed & cleaned, the lap joint<br />
is fluxed and the rivets installed & set then it is soldered.<br />
Make a set of formers out of scrap aluminum (I have use wood on several, "MAHOGANY") to fit in the<br />
lathe (SEE PHOTO BELOW). This operation could be carried out using a large c-clamp & hand triming<br />
the flange. The formers have to be sized to allow for material thickness so that the end cap will fit<br />
snugly into the inside of the boiler shell.<br />
The end caps are easily made out of flat copper stock to any size you desire; Cut basic over size circles<br />
and anneal them. Below you see the copper discs mounted in the fixtures in the lathe.
This photo shows the endcaps after hammer forming ( LIGHTLY & SLOWLY) the flange. After the flange<br />
is formed the surplus to the left is cut off while still in the lathe.<br />
Here are the end caps, with the holes for the tubes drilled. They are no longer end caps, they are now<br />
the front tube sheets.<br />
And it was all made from a flat sheet of copper from McMaster-carr.<br />
Larry H
Reply author: Havoc<br />
Replied on: 12 May 2005 13:47:29<br />
Thanks for the pics on this!! I'm slowly coming to the step of making my endplates, so this is a very<br />
nice illustration. I'm starting from drawn tube instead of rolling my own but that isn't a big difference.<br />
Do you really hammer the plates on the lathe??? I tought this was a big no-no.<br />
Are you going to make this an illustrated boiler making class??? Please?<br />
Reply author: insanerocketkid<br />
Replied on: 12 May 2005 19:03:35<br />
Did you use a special composition of copper? I know there are a multitude of types of copper that is<br />
available out there, and I for one would prefer to pick the appropriate material.<br />
Mike<br />
Reply author: highpressure<br />
Replied on: 15 May 2005 19:25:27<br />
Havoc:<br />
You did not see the following in the writing. "VERY SMALL HAMMER". You also missed; "HAMMER<br />
FORMING" (LIGHTLY & SLOWLY). The hammer I use is brass about 1/4" in diameter and about 1<br />
1/4" long with a 10" long handle, ho-made of course. This little hammer is also good for tapping out<br />
(cutting out) gaskets.<br />
Larry<br />
Reply author: Bob Starr<br />
Replied on: 15 May 2005 21:52:49<br />
Message:<br />
Larry,<br />
To each his own, but I still don't think that I would advocate hammering on a lathe. Maybe it is just<br />
me; and definetely a personal thing. I see that hammering could cause obloging of the bearings. Of<br />
course this would depend on how often you do it. I really have never had any problem making them<br />
off the lathe.<br />
I looked at your boiler at DH, as you well know. And commend you on your excellent workmanship! I<br />
think that your idea of putting the water legs in the firebox will make the chassis, which I consider a<br />
bit light, to stand up better.<br />
Reply author: Havoc<br />
Replied on: 16 May 2005 04:07:32<br />
Would it be possible to "spin" the end pieces instead of hammering them?<br />
Going to try to make my bearings today (again...). Saw a nice Black Five running yesterday. I wonder<br />
how long it will take before I can tackle something like that...
Reply author: Bob Starr<br />
Replied on: 16 May 2005 08:41:42<br />
Actually, spinning is even harder on the lathe bearings than hammering would ever be. Spinning lathes<br />
are specialty type lathes. Plus you would have to design yourself a tool holder with pegs in it. It really<br />
is quite easy to hammer your end pieces over a former and does not take much effort. No matter how<br />
you do the operation, you need to continualy anneal it when it gets hard.<br />
Reply author: David BaileyK27<br />
Replied on: 16 May 2005 10:02:10<br />
Why bother to flange the plates, non of my coal <strong>fired</strong> boilers has flanged plates other than where it is<br />
done for cosmetic reasons such as the backplate, but even there it is not required, I also make my<br />
boilers with a "dry" backhead as it is much easier this way.<br />
David Bailey www.djbengineering.co.uk<br />
Reply author: Havoc<br />
Replied on: 16 May 2005 11:53:55<br />
quote:<br />
Why bother to flange the plates, non of my coal <strong>fired</strong> boilers has flanged plates other than where it is done for<br />
cosmetic reasons such as the backplate, but even there it is not required,<br />
Indeed, if you look at the results the Australians had with their testing it is not needed for the boilers<br />
we are talking about. But I have to in order to get a certificate at the club. Because the rules are laid<br />
out that way.<br />
So spinning is out.<br />
Reply author: highpressure<br />
Replied on: 16 May 2005 19:40:43<br />
Bob Starr; Hello,<br />
I just weighed my LITTLE HAMMER & it weighs 1.6 oz's with the wood handle and I am not tapping on<br />
the chuck, I am tapping on annealed .040" copper. I can bend it by hand it's so soft. The copper disc is<br />
supported in wood or aluminum formers. As I am forming the flange, if it stops moving I stop tapping<br />
& remove it and take it back to the torch for another dose of "HEAT". This is being done on a 9" logan<br />
with a 1 7/16" spindle with a .800" pass thru, with bearings, not bushings. I would imagine the<br />
knurling I do on this lathe puts at least 20 time's the load as this LITTLE HAMMER.<br />
David,<br />
Here in Missouri USA the Insurance underwriters, required our Incorporated Live Steam Club ( St.<br />
Louis Live Steamers, Inc.) to have recorded inspections made during construction of the boiler. The<br />
boiler also has to be built to the Club's accepted spec's. Flanged plates are part of that spec. I came to<br />
small scale from ride on scale and I just do things the same as I did then, habit I guess.<br />
HAVOC: SEE ABOVE. Yes the cup can be spun & I have done that on larger boilers. However the the<br />
disc has to be retained by a small center pin in the formers or it will fly out of the formers, I use a<br />
1/16 Steel pin. The center flue usually consumes the pin hole in the cup when the flue holes are bored.
Past President, Vice President, Secretary, Treasurer, boiler inspector (<strong>Co</strong>nstruction & hydro test) &<br />
plain OL" flunky to do what no one else wanted to do from 1969 to 1990 of the St. Louis Live<br />
Steamers, Inc.<br />
Larry<br />
Reply author: PeteH<br />
Replied on: 29 Jun 2005 16:41:34<br />
Hi Larry! Long time no see :-)<br />
Any news on how the Welsh coal has been working?<br />
Reply author: dwegmull<br />
Replied on: 30 Jun 2005 10:28:40<br />
quote:<br />
(...)<br />
Then I drill the lap joint on the bottom for rivits. After that it is removed & cleaned, the lap joint is fluxed and the<br />
rivets installed & set then it is soldered.<br />
(...)<br />
Larry H<br />
Hi Larry H.,<br />
Which type of rivets, flux and silver solder do you use?<br />
Greetings,<br />
David Wegmuller<br />
Reply author: Eric M.<br />
Replied on: 30 Jun 2005 19:10:43<br />
Hi Larry-<br />
I'm friends with David Wegmuller and I thought I would elaborate on his question a bit. We are<br />
building a variety of live steam projects and we are doing some boiler making. We have had difficulty<br />
getting the silver solder to fill gaps. We noticed that your method of boiler construction involves a lap<br />
joint and flanged tube sheet. We were wondering how you deal with the tiny gap that there would be<br />
between the tube sheet and the boiler shell at the lap joint. Perhaps the solder you use is better at<br />
filling gaps?<br />
Any information you could provide would be helpful.<br />
Regards,<br />
Reply author: Bob Starr<br />
Replied on: 30 Jun 2005 21:27:02<br />
Message:<br />
Hello Eric!<br />
I thought I could stab at your questions and take a little pressure off of high pressure Larry<br />
Silver solder is not fond of filling gaps, so getting a perfect fit is always essential. Not always a reality,<br />
tho. If it is not objectional you can tap the gap closed of course, sometimes even alittle bit helps. But
the main culprit for not being able to fill is the ability to clean inside of your gap. Soaking the joint in<br />
your pickle solution for long time can help. I use a product called Sparex which is used in jewelery<br />
trade and cleans very well. Heating the solution helps considerably too. After you have done, inspect<br />
your joints and scrape as deepely into the joint as you can to remove any stubborn fire scale (the<br />
black stuff) that is on the metal.<br />
Now, when you are soldering always have a small (1/8" dia) pointed metal probe near by. When the<br />
solder becomes molten, push it around with this probe. Lots of times I will pick flux up with the probe<br />
and insert into the joint while I am heating. If you are using snipits of solder you can also pick these<br />
up with the pointed end and place them where you want and stroke the solder to spread it out. The<br />
trick here is to work the solder in different stages of molteness. Sometimes it easier if the solder is<br />
sort of half molten when you have very large gaps. After you have bridged the gap you can come back<br />
and heat the solder better so that it penetrates.<br />
Watch, too, how you heat your joint. If you heat evenly you will have better luck. It is also best to<br />
heat the whole piece and just at the end concentrate at the joint. Remember, the solder will flow<br />
towards the hottest part of your metal. You can use this to your advantage many times and again coax<br />
it with your pointed stick. With the proper technique and practice you can pull solder right around a<br />
joint just advancing your torch ahead of your solder. Hope this helps.<br />
Reply author: Eric M.<br />
Replied on: 01 Jul 2005 11:50:33<br />
Message:<br />
Hey Bob!<br />
I was hoping you might chime in too. These soldering techniques you describe sound mighty fussy. We<br />
could use a bit of practise. There is no doubt that we could have spent a bit more time closing gaps<br />
before we soldered. We also tend to just let the solder flow and "do it's own thing" I guess we need to<br />
make one of those probes you described. thanks.<br />
Regards,<br />
Reply author: Bob Starr<br />
Replied on: 01 Jul 2005 13:17:51<br />
Eric,<br />
I answered your email too, but I thot I would put out some more info for all to read. Fussy is probably<br />
a good word, but with boilers, being a pressure vessel, meticulousness is a neccessity. If I build a<br />
flanged boiler, I do spend a bit of time making sure that my gaps are as small as I can get them to be.<br />
The main reason is that large areas filled with solder are weak compared to the ones that fill by<br />
capillary action. If your gap is really large, you could insert a small piece of metal in the gap, but I<br />
really would not recommend that for a boiler.<br />
Because I have been soldering things for over 40 years, I find myself just feeding the solder wire<br />
directly at my joints. I don't always recomend that to folks as you can easily melt your metal if you are<br />
not familiar with the critical colors metal turns when it gets to melting points. With practice you can<br />
learn to keep your heat in front of your solder whether you are using snipits or directly from the wire.<br />
Learn to pull the solder thru the joint, especially if you are soldering a boiler end.
Reply author: Eric M.<br />
Replied on: 01 Jul 2005 13:30:23<br />
Thanks Bob,<br />
We bought a BIG torch tip from Sulpher Springs and we use a bulk propane tank. Perhaps we could<br />
cut down on the heat. What type of torch do you use? If you could, tell me what type of flux you use<br />
too.<br />
Regards,<br />
Reply author: highpressure<br />
Replied on: 02 Jul 2005 11:46:45<br />
Hi all'<br />
On all of the Ga-1 boilers I have built I have used a Sievert with a # 3524P burner head. This<br />
head will just idle with a small flame head (POINTED) or turn into an inferno that will heat any<br />
boiler from a Mogul size down.<br />
I think the biggest problem new builders will have is OVERHEATING the project. No matter how<br />
clean or how much Flux protection, if you overheat the metal with to large (uncontrolable heat)<br />
of a tip the Flux will burn away and the metal will oxydize. I place a small piece of silver solder<br />
in the flux right at the joint. When the heat starts working on the fluxed joint the piece of silver<br />
solder will start to flow just after the flux starts to look like water, follow up with more solder<br />
just behind the flow of solder.<br />
It also helps to have some type of reflective ceramic based material to place the project on. By<br />
also placing a backstop behind the project the heat passing the item will be reflected to the side<br />
(BACK) not being heated giving a more evenly heated project.<br />
I am a cheap person. To clean my projects before & after soldering I use a mixture of used<br />
Sulphuric acid (FREE BEHIND WALMART) and distilled water. 1 part acid to 8 parts water, in a<br />
plastic covered container that has been clearly marked CAUTION ACID. For larger quantities<br />
adjust measurements accordingly. I then put in 1 cup of used battery acid. The first cup of<br />
distilled water is poured while standing to the side as there will be some chemical reaction (eye<br />
protection is a must) then I add the other 7 cups of water. NEVER POUR WATER INTO ACID AS<br />
IT WILL BOIL VIOLENTLY ALWAYS POUR ACID, SLOWLY INTO THE WATER . The wash I am<br />
presently using is now 9 years old and just as effective as when it was first made. I usually<br />
soak the project about an hour or overnight if in no hurry. I then remove it with rubber gloves<br />
& rinse it outside with the garden hose. I then take it into the sink and rinse it with warm water<br />
while brushing it with a fine stainless steelwire brush. It will now like like a fine piece of GOLD<br />
jewelry.<br />
See ya soon'<br />
Larry<br />
Reply author: Bob Starr<br />
Replied on: 02 Jul 2005 12:11:12<br />
Good points about overheating, Larry. Glad that you mentioned that.<br />
Eric,<br />
As far as a torch, I use an oxy-acetelene; which you need to be careful with as it is quite hot. I use<br />
handy flux, usually the black, but I am using the white right now and it works just fine. Sulphuric acid<br />
works real nice, Larry, but I always seem to get some on my clothes and by the next time they are<br />
washed they got big ol' holes in them. Sparex will not cause that and seems to work as well. I use
ordinary fire brick to solder on and like you say a back one does help to retain the heat.<br />
Reply author: highpressure<br />
Replied on: 02 Jul 2005 14:17:03<br />
Bob'<br />
A common ordinary fire brick tends to "STEAL" a lot of your heat. If you work on them very long they<br />
get to hot to touch. If you have a fireplace store in your area get a few of the new light weight ceramic<br />
bricks. They absorb "NO" heat and glow red as they are reflecting the heat back. I can apply very high<br />
heat for 10 minutes to a 1" thick piece while I hold it on my hand flat and there is never any warmness<br />
comes thru.<br />
There is also a lighter pad available from <strong>Co</strong>ntenti Supply <strong>Co</strong> (casting/dental). It is of the same<br />
material on the nose of the Space Shuttle & not to costly.<br />
These bricks are also very good for making ceramic wicks for Alcohol <strong>fired</strong> engines. They can be<br />
drilled/sawed or carved and a round piece can be drilled out with a piece of K&S tubing to the size<br />
burner tube insert you need.<br />
Reply author: FH&PB<br />
Replied on: 02 Jul 2005 14:47:57<br />
Larry, you got it backwards. You SHOULD add acid to water. I remember with fond alarm one time<br />
when I was working in a chem lab and thought I would take a shortcut and dump a little used acid<br />
down the sink, then wash it down. There wasn't exactly an explosion when I turned on the water, but<br />
there was definitely a lot of heat released in a short period (exothermic reaction). I should have filled<br />
the sink, dumped the acid in, then let the whole batch go down the drain.<br />
Here's a little poem I got off a live steam discussion group, which I felt compelled to print and hand in<br />
my workshop, just in case I ever forgot the lesson:<br />
Add water to acid in haste,<br />
And the resulting solution will baste<br />
Your face and your hands<br />
As the mixture expands<br />
Reducing your skin to a paste.<br />
Reply author: highpressure<br />
Replied on: 05 Jul 2005 09:00:18<br />
Vance'<br />
After all these years I finally figured what's wrong with our face's.<br />
As years come & as years go sometimes when you go fishing you forget your fishing pole.<br />
See ya, missed ya at Haddon's steam up.<br />
Larry<br />
Reply author: highpressure<br />
Replied on: 11 Aug 2005 14:35:45<br />
After some slight modifications I am now getting runs of over an hour. The biggest change is the coal<br />
Bob McHale sent me and a few firing tricks I have learned while running it. One time it wouldn't get<br />
steam up and I found the smokestack stopped up with carbon (CHAMA COAL). I now can get runs of
300 to 350ft between fuel replendishment, don't go any further as it will loose the fire. The lubricator<br />
was always dry so I added an extension leg for more oil. It now still has a bit of oil left after running<br />
for an hour. The small hex thing in the main steam line just to the lower left of the water glass is a<br />
"SNIFTER VALVE", it is to keep a vacuum from forming when coasting with a long train behind it &<br />
pulling cinders into the valve.<br />
Larry SA #2173<br />
Reply author: PeteH<br />
Replied on: 14 Aug 2005 10:06:07<br />
Hello Larry!<br />
Nice work (as usual;) How does it work?<br />
As I understand it in full size work the snifters are located at the cylinder - one on each side of the<br />
piston - so when coasting it doesn't pull a vacuum in the smokebox and draw in cinders. Is this<br />
correct?
BTW, I bought a <strong>Ruby</strong> kit for my daughter's B-day - any suggestions on "must-do" mods to make it<br />
easier to run for her?<br />
Reply author: highpressure<br />
Replied on: 14 Aug 2005 13:50:04<br />
Hi Pete<br />
The only location I have ever seen a snifter valve is in the valve chest, be it piston or "D" valve on full<br />
size or a model. I put mine on the steam (in) line to avoid drilling & tapping a threaded hole in the<br />
steam chest area, I can also get by with a bit larger snifter valve that way as it is hidden in the cab<br />
when the side of the cab is installed.<br />
Larry SA2173<br />
Reply author: PeteH<br />
Replied on: 14 Aug 2005 17:12:56<br />
O.K, makes sense. I noticed that most mainline steamers have two snifters on each side thus my<br />
incorrect reasoning! So is your snifter basically a free floating ball (no spring) with the "vent" oriface at<br />
the bottom of the housing?<br />
Reply author: highpressure<br />
Replied on: 15 Aug 2005 10:38:14<br />
Pete<br />
The ball is free floating, no spring. They can be used in a vertical or horizontal position. In the<br />
horizontal type the ball chamber size is more important than in the vertical type. It has to be of close<br />
tollerance so the vacuum/pressure in the chamber can act upon & move the ball. I have made them as<br />
small as a 1/8" ball and as large as a 3/8" ball. Use a stainless steel ball to avoid rusting.<br />
Larry SA2173<br />
Reply author: PeteH<br />
Replied on: 15 Aug 2005 20:34:49<br />
Thanks for the info Larry, Much appreciated! Do you think it would work if I made some very small<br />
ones (1/16" balls perhaps) for the steam chests? I suppose it's not a good idea to make it vertical with<br />
the ball seat/opening at he top?<br />
Reply author: highpressure<br />
Replied on: 16 Aug 2005 14:23:49<br />
Pete;<br />
That would work. The ball seat can be down, left or right, towards or away but not up.<br />
If you are applying these on anything except a coal <strong>fired</strong> locomotive I feel you are wasteing your time<br />
as they are not needed.<br />
Larry<br />
SA2173
Reply author: PeteH<br />
Replied on: 16 Aug 2005 18:51:38<br />
Thanks Larry!<br />
OK, gotcha - for coal burners only.<br />
Reply author: highpressure<br />
Replied on: 18 Aug 2005 13:51:24<br />
Hi All'<br />
Here's both of em', all done ready to run. The <strong>Ruby</strong> Twins.<br />
Larry SA2173<br />
Reply author: PeteH<br />
Replied on: 19 Aug 2005 20:49:49<br />
It's gonna be kinda hard to keep the fires tended in BOTH of these - perhaps you'll need a second<br />
fireman to help<br />
Nice looking loco's Larry!
Reply author: Chris Scott<br />
Replied on: 22 Nov 2005 14:00:09<br />
There's a parallel thread on the thread: SitG Forum: Live Steam Message Board <strong><strong>Co</strong>al</strong> Fired <strong>Ruby</strong> about<br />
building a boiler and needed parts for converting a <strong>Ruby</strong> to <strong><strong>Co</strong>al</strong> Fired. The discussion resulted in the<br />
following post from David Bailey:<br />
quote:<br />
I have been offered a kit for the <strong>Ruby</strong> to see whats involved in making up a coal <strong>fired</strong> boiler and a kit of parts to alter<br />
it, as Harry Wade says it will cost more than the original kit but where can you get a coal <strong>fired</strong> loco for less than a<br />
$1000<br />
I will keep you all informed of my findings and the costs, I may just supply the boiler with a set of instructions on<br />
converting it and let the builder source the other parts, what do you all think on this one?<br />
David Bailey www.djbengineering.co.uk<br />
--------------------<br />
david bailey<br />
Charles moved to connect these two forum's threads but he was too busy to resurrect this more<br />
lengthy thread. So credit him for pulling all this interest together. So picking up on Charles' efforts, if<br />
any are aware of similar threads on other forums you might connect or point them to this thread so we<br />
build as large an interest group as possible.<br />
Reply author: jmkling<br />
Replied on: 23 Nov 2005 07:24:29<br />
I agree, to have everything needed to build a coal <strong>fired</strong> engine sounds like alot of fun...I'm game if one<br />
was to be offered. I am sure I can find several uses for the left over butane <strong>fired</strong> boiler and<br />
fittings....<br />
Jon<br />
SA #461<br />
Reply author: Tim Hytrek<br />
Replied on: 23 Nov 2005 21:04:10<br />
I would definetly get one if it was offered. It would be nice if Accucraft offered a coal <strong>fired</strong> version of all<br />
their locos. I know that is wishful thinking, but why not?<br />
Tim<br />
Printed from: myLargescale.com Forums http://www.mylargescale.com/forum/<br />
© myLargescale.com / Model Railroads Online, LLC – All Rights Reserved