TCS230-DB COLOR SENSOR DAUGHTERBOARD KIT - Parallax, Inc.
TCS230-DB COLOR SENSOR DAUGHTERBOARD KIT - Parallax, Inc.
TCS230-DB COLOR SENSOR DAUGHTERBOARD KIT - Parallax, Inc.

You also want an ePaper? Increase the reach of your titles
YUMPU automatically turns print PDFs into web optimized ePapers that Google loves.
®<br />
www.parallax.com<br />
www.taosinc.com<br />
T E X A S<br />
A D V A N C E D<br />
O P T O E L E C T R O N I C<br />
S O L U T I O N S ®<br />
TM<br />
<strong>TCS230</strong>-<strong>DB</strong><br />
<strong>COLOR</strong> <strong>SENSOR</strong><br />
<strong>DAUGHTERBOARD</strong> <strong>KIT</strong><br />
TAOS #<strong>TCS230</strong>-<strong>DB</strong> <strong>Parallax</strong> #28302<br />
Out of the Box<br />
The <strong>TCS230</strong>-<strong>DB</strong> Color Sensor Daughterboard<br />
Kit consists of a <strong>TCS230</strong>-<strong>DB</strong> daughterboard<br />
that includes the TAOS <strong>TCS230</strong> color sensor<br />
chip, a lens, and two current-regulated white<br />
LEDs. Also included are four one-inch<br />
aluminum standoffs and four 3/4" screws.<br />
The daughterboard is compatible with all<br />
<strong>Parallax</strong> motherboards, including the<br />
MoBoStamp-pe. It can operate with Vdd set<br />
anywhere between 2.7V and 5.5V. However, a<br />
nominal 5V supply is needed for operation of<br />
the LEDs, which the motherboard<br />
automatically provides. For operation without<br />
a motherboard, such as with <strong>Parallax</strong>'s Board<br />
of Education, an extension cable (p/n 800-<br />
28301) and a SIP adapter ("<strong>DB</strong> Expander", p/n<br />
28325) are available separately to convert the<br />
<strong>TCS230</strong><strong>DB</strong>'s two-row, 2mm header to a more<br />
convenient single-row, 0.1-inch spacing.<br />
Getting Started<br />
If you are using the <strong>TCS230</strong>-<strong>DB</strong> with the<br />
MoBoStamp-pe, make sure that you have the<br />
GPIO3 firmware loaded into the AVR<br />
coprocessors. The MoboStamp-pe comes from<br />
the factory with the GPIO3 firmware installed.<br />
If you have installed other AVR firmware,<br />
reload the GPIO3 hex file using the<br />
LoadAVR.exe utility before proceeding.<br />
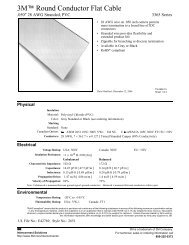
The <strong>TCS230</strong>-<strong>DB</strong> works best with the front<br />
surface of the printed circuit board located<br />
between 1" and 1 1/ 16" from the subject being<br />
sensed. For this reason, aluminum spacers are<br />
included, which can be affixed to form legs. If<br />
you are using your <strong>TCS230</strong>-<strong>DB</strong> with a<br />
<strong>Parallax</strong> motherboard, remove all the screws<br />
from the brass spacers at both ends of the<br />
board, and replace them with the 3/4" screws<br />
included in this kit. The screws should be<br />
installed from the bottom of the motherboard<br />
and protrude through the brass spacers. At<br />
this point, you can install the <strong>TCS230</strong>-<strong>DB</strong> on<br />
the "B" end of the motherboard and attach the<br />
spacers as shown below. The left-over short<br />
screws may also be screwed into the ends of<br />
the legs as a height adjustment.<br />
If you are connecting the <strong>TCS230</strong>-<strong>DB</strong> to the<br />
motherboard via the extension cable (p/n<br />
800-28301), attach the spacers directly to the<br />
<strong>TCS230</strong>-<strong>DB</strong> using the unused short screws<br />
provided with the motherboard.<br />
If you are using the <strong>TCS230</strong>-<strong>DB</strong> with the <strong>DB</strong>-<br />
Expander instead of a motherboard, you will<br />
need to obtain eight 4-40 x 1/4" panhead<br />
machines screws (<strong>Parallax</strong> p/n 700-00028) to<br />
attach the legs, since the 3/4" screws<br />
provided are too long, and to use as a height<br />
adjustment.<br />
Now, assuming you're using the<br />
MoBoStamp-pe, key the following BS2pe<br />
program into the BASIC Stamp Editor. (A<br />
similar program, along with programs for<br />
different BASIC Stamp versions is available<br />
for download at www.parallax.com. )<br />
'{$STAMP BS2pe}<br />
Out CON 7<br />
S3 CON 0<br />
S2 CON 1<br />
LED CON 5<br />
pRED CON 15<br />
pGREEN CON 12<br />
pBLUE CON 9<br />
RED VAR Word<br />
GREEN VAR Word<br />
BLUE VAR Word<br />
Start:<br />
HIGH LED<br />
MainLp:<br />
GOSUB Color<br />
DEBUG "R", DEC3 RED<br />
DEBUG " G", DEC3 GREEN<br />
DEBUG " B", DEC3 BLUE<br />
DEBUG CR<br />
GOTO MainLp<br />
Color:<br />
LOW S2<br />
LOW S3<br />
COUNT Out, pRED, RED<br />
HIGH S3<br />
COUNT Out, pBLUE, BLUE<br />
HIGH S2<br />
COUNT Out, pGREEN, GREEN<br />
RETURN<br />
Next, connect the motherboard to your PC,<br />
and Run the program you've entered. Two<br />
things should now happen: 1) the white LEDs<br />
on the sensor module will come on, and 2)<br />
you will see output appear in the debug<br />
window that looks something like this:<br />
R123 G065 B200<br />
R120 G060 B187<br />
etc.<br />
These numbers are relative values for the<br />
red, green, and blue components of the color<br />
the sensor is looking at. With the <strong>TCS230</strong>-<strong>DB</strong><br />
perched on its legs atop a piece of white<br />
paper, you will notice that the LEDs form a<br />
bright spot of light in front of the lens. You<br />
may need to adjust the LEDs or the height a<br />
bit to make sure that the spots from both<br />
merge into a single round spot.<br />
Hardware Notes<br />
No technical discussion of the <strong>TCS230</strong> sensor<br />
module set would be complete without the<br />
material contained in the TAOS <strong>TCS230</strong><br />
datasheet. If you do not have this datasheet,<br />
you are encouraged to download it from the<br />
TAOS website, www.taosinc.com.<br />
The <strong>TCS230</strong> has an array of photodetectors,<br />
each with either a red, green, or blue filter, or<br />
no filter (clear). The filters of each color are<br />
distributed evenly throughout the array to<br />
eliminate location bias among the colors.<br />
Internal to the device is an oscillator which<br />
produces a square-wave output whose<br />
frequency is proportional to the intensity of<br />
the chosen color. There is one output from<br />
this oscillator, and the color to be read is<br />
selected using two address lines: S2 and S3.<br />
In addition, it is possible to program the<br />
divide rate of the oscillator using two<br />
additional lines, S0 and S1. The settings for<br />
these control lines and their functions are<br />
summarized below:<br />
S0 S1 Divide S2 S3 Color<br />
0 0 Pwr. Down 0 0 Red<br />
0 1 1:50 0 1 Blue<br />
1 0 1:5 1 0 Clear<br />
1 1 1:1 1 1 Green<br />
The <strong>TCS230</strong> chip's data and control lines are<br />
brought directly to the 2mm header, through<br />
which it interfaces to the motherboard or to<br />
another system. The only exception is the<br />
/OE output enable line, which is<br />
permanently asserted low. In addition, both<br />
S0 and S1 are pulled high through resistors<br />
to Vdd, which programs the <strong>TCS230</strong> for its<br />
maximum output frequency. Therefore, to<br />
use this setting, neither S0 nor S1 need to be<br />
connected. There are also jumper pads on the<br />
<strong>TCS230</strong>-<strong>DB</strong> by which either S0 or S1, or both,<br />
can be strapped low.<br />
To program the data rate from a BASIC<br />
Stamp, it will be necessary to connect S0 and<br />
S1 to a programmable port. On the<br />
MoBoStamp-pe, this must be done through<br />
the AVR coprocessor via the OWOUT<br />
instruction, since these signals do not
connect directly to the BASIC Stamp chip. To<br />
set S0 and S1 to the values (0 or 1) contained<br />
in variables of the same name, use the<br />
following PBASIC code:<br />
OWOUT OWIO, 0, [$04 + S0, $14 + S1]<br />
where the value for OWIO is given in the<br />
table below.<br />
The following table maps the <strong>TCS230</strong>-<strong>DB</strong><br />
signals to ports on both the MoBoStamp-pe<br />
and the MoBoProp boards for sockets A and<br />
B, as well as the <strong>DB</strong>-Expander board:<br />
MoBoStamp-pe MoBoProp <strong>DB</strong>-<br />
Signal A B A B Expander<br />
S0 See code above. A8 A1 B<br />
S1 See code above. A9 A0 A<br />
S2 P9 P1 A12 A4 E<br />
S3 P8 P0 A13 A5 F<br />
OUT P11 P7 A10 A2 C<br />
LED P12 P5 A11 A3 D<br />
OWIO P10 P6 —Not Applicable—<br />
When operating the <strong>TCS230</strong>-<strong>DB</strong> using the SIP<br />
adapter (<strong>DB</strong>-Expander) instead of a <strong>Parallax</strong><br />
motherboard, the correspondence between<br />
the signals and SIP pin markings will be that<br />
of the last column in the table above. When<br />
operated in this fashion, the +5V pin supplies<br />
power to the LEDs and must be at least 4.5V<br />
for good current regulation and never more<br />
than 7.5V. The Vdd pin supplies the rest of the<br />
board and can range anywhere from 2.7V to<br />
5.5V. In any event, the LED enable input must<br />
be at least 2.0V to turn the LEDs on. Other<br />
signal level requirements can be obtained<br />
from the <strong>TCS230</strong> datasheet.<br />
Optical Data<br />
With the supplied 5.6mm lens and a subject<br />
distance of 1" (25mm) from the front surface<br />
of the circuit board, the sensor module will<br />
"see" a square area roughly 9/64" (3.5mm) on<br />
a side. This means that any color variation<br />
within an area that size will be averaged by<br />
the <strong>TCS230</strong>.<br />
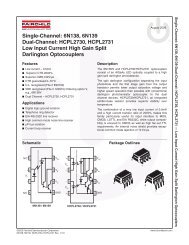
The spectral response of any color sensor<br />
system is a function not only of the sensor's<br />
device response, but also of the system's<br />
optics and illumination. The combined<br />
response of this module, taking into account<br />
the lens' IR filter and the LEDs' emission<br />
curve, is shown below:<br />
Relative Responsivity<br />
1.0<br />
0.8<br />
0.6<br />
0.4<br />
0.2<br />
0.0<br />
400 500 600 700 800<br />
Wavelength - nm<br />
Software Notes<br />
Clear<br />
Blue<br />
Green<br />
Red<br />
When used with a BASIC Stamp, the<br />
<strong>TCS230</strong>'s output frequency can be read using<br />
the Stamp's COUNT statement, as shown in<br />
the example code on the front side of this<br />
sheet. In this example, S0 and S1 were both<br />
pulled "high", enabling the <strong>TCS230</strong>'s fastest<br />
output rate. However, this rate can be as<br />
much as 600KHz or more at maximum light<br />
intensity, which is faster than the BS2 (limited<br />
to 120KHz) or the BS2pe (limited to166KHz)<br />
can count. So, S0 and S1 need to be set<br />
according to the maximum expected light<br />
intensity from the subjects being examined.<br />
On the MoBoStamp-pe, you can also measure<br />
the output frequency using the AVR<br />
coprocessor. This function is built in to the<br />
GPIO3 firmware, which can measure input<br />
frequencies up to 1MHz. See the GPIO3<br />
documentation for the details. The <strong>TCS230</strong>'s<br />
OUT signal will appear on the GPIO3<br />
firmware's port 2.<br />
In order to save power — especially when<br />
battery-operated — you can power off the<br />
<strong>TCS230</strong> chip by setting S0 and S1 low. You<br />
can also operate the LEDs only when reading<br />
color. This works because the LEDs come on<br />
almost instantly, having no warm-up time as<br />
incandescent lamps do. This can be<br />
accomplished by strobing LED high only<br />
when you need to take a reading. This<br />
technique is also useful for cancelling the<br />
effects of ambient light. Take one reading<br />
with the LEDs on and another with them off,<br />
then subtract the second reading from the<br />
first to get a more accurate color measure.<br />
This only works, of course, when the<br />
ambient light doesn't change between<br />
readings. Also, if the ambient light comes<br />
from a fluorescent light source, be sure that<br />
the measurement interval is a multiple of the<br />
mains period (1/60 sec. in the U.S.).<br />
The S2 signal line includes a 0.047µF<br />
capacitor to ground. This can be used to<br />
identify the presence of the <strong>TCS230</strong>-<strong>DB</strong> or to<br />
determine which MoBoStamp-pe socket it's<br />
in, using the following PBASIC code:<br />
LOW S2<br />
PAUSE 20<br />
RCTIME S2, 0, Id<br />
If, after executing this code, the <strong>TCS230</strong>-<strong>DB</strong><br />
is present in the socket tested, the variable Id<br />
will have a value of around 35. An empty<br />
socket will yield a value of 1, and other<br />
TAOS light-to-frequency daughterboards<br />
will identify with different values.<br />
Additional information, applications, and<br />
software examples can be found on both the<br />
TAOS and <strong>Parallax</strong> websites listed on the<br />
front of this sheet.<br />
U2<br />
<strong>TCS230</strong><br />
<strong>TCS230</strong>-<strong>DB</strong> Schematic<br />
Vdd<br />
<strong>TCS230</strong>-<strong>DB</strong> Pinout (Rear View)<br />
1<br />
2<br />
3<br />
S0<br />
S1<br />
/OE<br />
S3<br />
S2<br />
Out<br />
8<br />
7<br />
6<br />
4 Vss Vdd 5<br />
Vdd<br />
C5<br />
0.1µF<br />
C2<br />
0.1µF<br />
+5V<br />
U1<br />
MIC5235<br />
1 IN<br />
2 Gnd<br />
Out 5<br />
C3<br />
2.2µF<br />
LED1 LED2<br />
2 x NSPW500BS<br />
J1<br />
RP1<br />
4 x 33K<br />
R6<br />
330R<br />
+5V<br />
3 En FB 4<br />
R2<br />
10K<br />
GndGnd<br />
C4<br />
10µF<br />
+5V<br />
Vdd<br />
C7<br />
10µF<br />
REF1<br />
2.5V<br />
C1<br />
2.2µF<br />
R1<br />
10K<br />
C6<br />
0.047µF (ID cap)<br />
R3<br />
10K<br />
R4<br />
33R<br />
R5<br />
33R<br />
J2<br />
Texas Advanced Optoelectronic Solutions, 1001 Klein Road, Suite 300, Plano, TX 75074, U.S.A.<br />
<strong>Parallax</strong>, <strong>Inc</strong>., 599 Menlo Drive, Suite 100, Rocklin, CA 95765, U.S.A.<br />
Document Version 2007.04.18