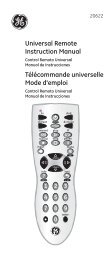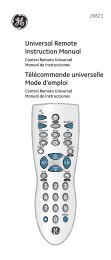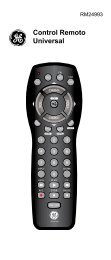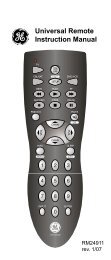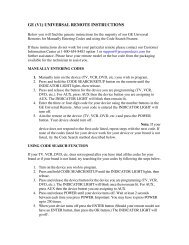
Universal Remote Instruction Manual - Jasco Products
Universal Remote Instruction Manual - Jasco Products
Universal Remote Instruction Manual - Jasco Products

Create successful ePaper yourself
Turn your PDF publications into a flip-book with our unique Google optimized e-Paper software.
<strong>Universal</strong> <strong>Remote</strong><br />
<strong>Instruction</strong> <strong>Manual</strong><br />
24999
Table of Contents<br />
Introduction...........................................................................................................................3<br />
Button Functions.................................................................................................................4<br />
DVD/DVR Punch-Through Feature.....................................................................5<br />
Setup.........................................................................................................................................6<br />
Battery Installation....................................................................................................6<br />
Battery Saver...............................................................................................................6<br />
Code Saver....................................................................................................................6<br />
Power-On default.......................................................................................................6<br />
Liquid Crystal Display (LCD)...................................................................................6<br />
Code Setup....................................................................................................................6<br />
Setup.........................................................................................................................................7<br />
Code Entry..............................................................................................................................8<br />
Code Entry Using On-Screen Code List............................................................9<br />
Direct Code Entry.......................................................................................................8<br />
Searching For Codes................................................................................................9<br />
Code Identification Feature...........................................................................................9<br />
Programming Combo Device Codes.........................................................................9<br />
Volume/Mute Control Feature................................................................................... 10<br />
Setting Volume/Mute Control, Punch-Through.................................................. 10<br />
Setting any Mode to use its own Volume/Mute................................................. 10<br />
Resetting Mute/Volume Control to defaults........................................................ 11<br />
Setting Time of Day......................................................................................................... 12<br />
Setting the Date................................................................................................................ 12<br />
Setting the Backlight Delay......................................................................................... 13<br />
Full System Reset to factory defaults..................................................................... 13<br />
Timer Setup......................................................................................................................... 14<br />
Sleep Timer ............................................................................................................... 14<br />
Setting and Clearing Timers................................................................................ 14-15<br />
Code Learning................................................................................................................... 16<br />
Tips on Learning...................................................................................................... 16<br />
Learning Commands...................................................................................................... 18<br />
Clearing Commands....................................................................................................... 19<br />
Clearing Learned commands for a mode................................................... 19<br />
Master Clear.............................................................................................................. 19<br />
Troubleshooting............................................................................................................... 20<br />
2
Introduction<br />
Congratulations on your purchase of this 24999 <strong>Universal</strong> <strong>Remote</strong><br />
Control. It is one of the most unique looking, and easy to use remote<br />
controls available today. Its stylish looking blue backlight, and metallic<br />
keypad is like no other remote. With the 24999 juggling multiple remote<br />
controls is a thing of the past! Your 24999 <strong>Universal</strong> <strong>Remote</strong> controls<br />
up to 8 devices, including the most popular brands of TV, VCR, DVD, SAT,<br />
CBL, and audio equipment.<br />
Note: Some functions from your original remote may not be controlled<br />
by the 24999 remote. Use the original remote, if available, to control<br />
such functions. Sometimes buttons other than described in these<br />
instructions may actually perform the function. For example, the CHAN<br />
and VOL buttons might be used to navigate through menu choices.<br />
We recommend you experiment with the remote to identify if such<br />
situations pertain to your equipment.<br />
The 24999 <strong>Universal</strong> <strong>Remote</strong> is easy to use, easy to program, and it<br />
gives you total control—at the touch of your fingertips!<br />
3
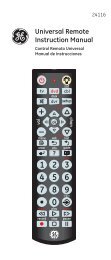
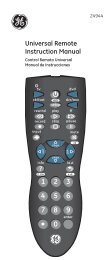
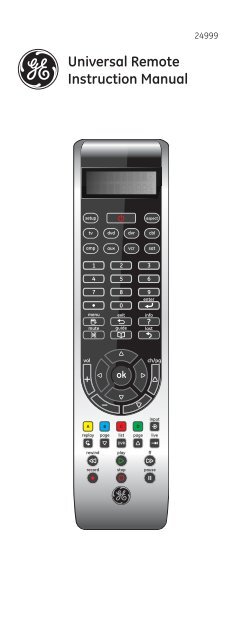
Button Functions<br />
1.<br />
2.<br />
3.<br />
4.<br />
5.<br />
6.<br />
7.<br />
8.<br />
9.<br />
10.<br />
11.<br />
12.<br />
13.<br />
26.<br />
25.<br />
24.<br />
23.<br />
22.<br />
21.<br />
20.<br />
19.<br />
18.<br />
17.<br />
16.<br />
15.<br />
14.<br />
Note: The REC button must be pressed TWICE to record from your<br />
device. For some brands of VCRs, you might need to press the REC<br />
button once, then press it again for three seconds.<br />
Some buttons on the remote might have functions that are referred<br />
to by different names on the device you are controlling. E.G. LAST may<br />
be called RECALL, or ENTER may be called DISPLAY. These differences<br />
depend on the brand and model of your product. Also, this remote can<br />
only operate features that exist on your product. E.G., your product<br />
must have LAST ability for the LAST button to operate this feature.<br />
4
Button Functions, cont.<br />
1. Liquid Crystal Display (LCD): Helps with setup and displays the<br />
Mode the remote is in, and time, etc.<br />
2. SETUP: Used for setting up your remote.<br />
3. TV, DVD, DVR, etc.: Selects product to be operated.<br />
4. EXIT: Exits On-Screen Menus/Returns to previous On-Screen<br />
selection.<br />
5. Dot: Used for digital channels, e.g. 2.3.<br />
6. MENU: Brings up the device Menu screen (if available) - use with<br />
UP, DOWN, LEFT, and RIGHT navigation buttons.<br />
7. MUTE: Turns off the TV sound while the picture remains.<br />
8. UP, DOWN, LEFT & RIGHT: Navigation buttons.<br />
9. VOLUME UP/DOWN: Changes the volume level of the product,<br />
normally the TV.<br />
10. OK: Selects menu items for the device you are controlling.<br />
11. ABCD buttons: Used to store learned commands.<br />
12. REPLAY: On some DVRs, this button replays the last 8 seconds of a<br />
program.<br />
13. PAGE DOWN: Sets your Favorites ratings, and moves one screen<br />
down at a time in guides and menus.<br />
14. RECORD, PLAY, STOP, REW, FF, PAUSE: Control buttons that<br />
operate your DVD/DVR even when the remote is set to operate the<br />
TV. Also operates DVD Scan -/+.<br />
15. LIVE: Returns to live TV.<br />
16. PAGE UP: Sets your Favorites ratings, and moves one screen up at<br />
a time in guides and menus.<br />
17. INPUT: For some TVs, press repeatedly to select available viewing<br />
sources (antenna, cable box, VCR, DVD, etc.).<br />
18. DVR List: Press to display list of recorded shows on your DVR.<br />
19. CHANNEL UP/DOWN: Changes the channels. Also controls DVD/<br />
CD CHAPTER +/- track selection, i.e., DVD/CD Track Skip Up/Down.<br />
Note the DVR buttons also control the DVD when in DVD Mode.<br />
20. LAST: Returns to the previously selected channel, or DVD repeat<br />
toggle.<br />
21. INFO: Displays/selects on-screen channel information.<br />
22. GUIDE: Displays on-screen program or channel guides.<br />
23. ENTER: Used after direct channel number entry to immediately<br />
change to the selected channel.<br />
24. NUMBERS: Enter numbers for direct channel selection. Some<br />
products require Enter to be pressed after channel selection.<br />
25. ASPECT: Aspect Ratio Control selects viewing format for the<br />
displayed picture, e.g., Wide, Zoom, etc.<br />
26. POWER: Turns device on or off.<br />
DVD/DVR Punch-Through Feature<br />
This remote allows the 6 DVD/DVR transport buttons (i.e., PLAY, PAUSE,<br />
STOP, FF, REWIND, and REC) to operate the programmed TV, DVD,<br />
SAT, DVR, Cable device if the code has these button functions e.g. if<br />
you have programmed a SAT/DVR or Cable/DVR, etc. Otherwise the<br />
transport keys will punch-through to the last DVD or VCR programmed<br />
mode you used, i.e., the transport buttons control your DVD or VCR<br />
player even when you are in TV, SAT or Cable mode.<br />
5
Setup<br />
Battery Installation<br />
1. On the back of the remote, push down on the<br />
tab and lift the cover off.<br />
2. Match the batteries to the + and - marks inside<br />
the battery case, then insert 2 AAA Alkaline<br />
batteries.<br />
3. Press the battery cover back into place.<br />
Battery Saver<br />
Your remote automatically turns off if the buttons<br />
are depressed more than 30 seconds. This will<br />
save your batteries should your remote get stuck<br />
in a place where the buttons remain depressed<br />
(e.g., between the sofa cushions).<br />
Code Saver<br />
All user programmed settings, except Time, Day, and Date will be stored<br />
in permanent memory while you are changing batteries, so you will not<br />
lose any codes stored in the remote while you are changing batteries.<br />
Time, Day, and Date, will be cleared to the factory defaults when the<br />
batteries are replaced.<br />
Power-On Default<br />
The remote powers on in TV mode.<br />
Liquid Crystal Display (LCD)<br />
The LCD lets you see at a glance what mode the remote is in. It also<br />
includes a clock that displays the time and day, and a visual indication<br />
that the remote is transmitting when you press a button.<br />
Code Setup<br />
The SETUP button is used to setup the remote. You can either setup the<br />
remote using the code for your brand of product, from the code tables<br />
(on separate sheet), or you can search through the library of codes until<br />
you find a code that works for your product.<br />
You can store any kind of code under any mode (except TV). I.E. you can<br />
store a VCR code under the CBL button, or a DVD code under the VCR<br />
button, etc. However, you can only store TV codes under the TV button.<br />
The SETUP button is used for programming the remote and accessing<br />
any additional features - e.g. Shifted functions, see below. To enter setup<br />
mode, press and hold the SETUP button until “CODE SETUP” appears in<br />
the display. The “SET” symbol will always be shown when the remote is<br />
in Setup. Successive presses of the SETUP button shows available Setup<br />
options in the order shown below.<br />
1. CODE SETUP – press OK here to program a Mode e.g. Code Entry,<br />
Search, etc. See Code Setup options below.<br />
2. SYSTEM SETUP – press OK here to set Time, Date, Volume Control, etc.<br />
3. TIMER SETUP – press OK here to set Timer events.<br />
4. LEARN SETUP – press OK here to program a Mode with Learned<br />
commands.<br />
5. EXIT SETUP – press OK here to Exit Setup routines and return to<br />
normal operation.<br />
Press OK to select the desired programming step required.<br />
Exit from Setup occurs automatically after approximately 15 seconds if<br />
no buttons is pressed. TIME OUT is displayed.<br />
When the remote is busy processing in Setup routines, “Please Wait” is<br />
displayed.<br />
6
Setup, cont.<br />
Setup Screen Navigation Use the SETUP, OK, and Up, Down, Left and<br />
Right navigation buttons for Setup screen navigation and selection.<br />
To exit the Setup routines and return to normal operation, press the<br />
EXIT button or navigate to the “EXIT SETUP” screen and press OK.<br />
Completion of some Setup routines will automatically return the remote<br />
to normal operation.<br />
Mode button press Display Pressing and holding a Mode button<br />
changes to that Mode and displays the active Mode and its code, e.g.,<br />
DVD and the programmed 4-digit code e.g., 0768. The display returns to<br />
normal when you release the button.<br />
SETUP (Shift) Display Pressing and releasing the Setup button displays<br />
the active Mode of the remote e.g. DVD, the Date e.g. 3:26 (Month:Day)<br />
and indicates “Shift” operation with “(S)”. Press and release Exit to return<br />
to normal display. To use the SETUP button for Shift - Press and release<br />
SETUP followed by the desired secondary function button.<br />
7
Code Entry<br />
Code Setup Options: Pressing OK at the CODE SETUP screen presents<br />
3 options for programming a Mode with codes. These are LIST CODES<br />
(lets you enter a 4 digit code from the on-screen code list), ENTER CODES,<br />
(lets you enter a 4 digit code directly from the printed code list) SEARCH<br />
CODES, (lets you search through the codes stored in the remote to find<br />
the correct one for your device).<br />
Code Entry using On-screen Code List<br />
1. <strong>Manual</strong>ly turn on the device to be controlled.<br />
2. Press and hold the SETUP button until CODE SETUP is displayed<br />
(takes about 3 seconds), then release the SETUP button.<br />
3. Press and release OK. LIST CODES is displayed.<br />
4. Press and release OK. MODE KEY? is displayed.<br />
5. Press and release the desired mode button (TV, VCR, DVD, etc.). The<br />
Mode is displayed along with its currently programmed code.<br />
6. Using the UP/DOWN buttons, select the Device type to be<br />
programmed (TV, VCR, DVD, etc. Note - For TV Mode, only a TV<br />
Device can be selected.<br />
7. Press and release OK to confirm selection.<br />
8. The Code List Brand and Code will now be displayed (e.g. Admiral<br />
0000). Use the UP/DOWN buttons to select the Brand and LEFT/<br />
RIGHT buttons to select the Code. Codes can be tested on your<br />
device using VOLUME, MUTE, CHANNEL, POWER, INPUT, PLAY,<br />
STOP, FF, REWIND and PAUSE. Once the correct code has been<br />
found, press and release OK to install the Code.<br />
9. PLEASE WAIT is briefly displayed, followed by SUCCESS and the<br />
remote returns to normal operation.<br />
10. With your device on, press CHANNEL UP. If the device responds,<br />
no further programming is required. Note: If some buttons do not<br />
operate your equipment, try one of the other codes for your brand<br />
of device.<br />
Direct Code Entry<br />
1. <strong>Manual</strong>ly turn on the device to be controlled.<br />
2. Press and hold the SETUP button until CODE SETUP is displayed<br />
(takes about 3 seconds), then release the SETUP button.<br />
3. Press and release OK. LIST CODES is displayed.<br />
4. Press the DOWN navigation button until ENTER CODES is displayed.<br />
5. Press and release OK. MODE KEY? is displayed.<br />
6. Press and release the desired mode button (TV, VCR, DVD, etc.). The<br />
Mode is displayed along with its currently programmed code.<br />
7. Enter the 4 digit code from the code tables (on separate sheet). After<br />
the 4th digit is entered SUCCESS is displayed and the remote returns<br />
to normal operation.<br />
If an invalid code is entered, CODE ERROR is shown in the display and<br />
the remote returns to normal operation.<br />
8. With your device on, press CHANNEL UP. If the device responds,<br />
no further programming is required. Note: If some buttons do not<br />
operate your equipment, try one of the other codes for your brand<br />
of device.<br />
8
Code Entry, cont.<br />
Searching for Codes<br />
If your product does not respond after you have tried all the codes for<br />
your brand, or if your brand is not listed, try searching for your code by<br />
following these steps.<br />
1. <strong>Manual</strong>ly turn on the device (TV, VCR, DVD, etc.) to be controlled.<br />
2. Press and hold the SETUP button until CODE SETUP is displayed<br />
(takes about 3 seconds), then release the SETUP button.<br />
3. Press and release OK. LIST CODES is displayed.<br />
4. Press the down navigation button repeatedly until SEARCH CODES is<br />
displayed.<br />
5. Press and release OK. MODE KEY is displayed.<br />
6. Press and release the desired mode button (TV, VCR, DVD, etc.).<br />
DEVICE? TV is displayed.<br />
7. Using the Up/Down keys, select the Device type to be programmed<br />
(TV, VCR, DVD, etc. Note - For TV Mode, only a TV Device can be<br />
selected.<br />
8. Press and release OK to confirm selection. SEARCH KEY? is displayed.<br />
9. Press the CHANNEL UP button (or POWER, or PLAY for VCRs/<br />
DVDs) repeatedly (up to 300 times) until the Device to be controlled<br />
changes channel, turns off or responds accordingly. SEARCHING<br />
is displayed (along with the Device selection) during the search<br />
process. If the desired Code is accidentally passed then press the<br />
CHANNEL DOWN button to backtrack through the Library. Press<br />
CHANNEL UP (or POWER or PLAY) to change direction forward again.<br />
10. Press and release OK to install the Code. PLEASE WAIT is briefly<br />
displayed, followed by SUCCESS and the remote returns to normal<br />
operation.<br />
Notes:<br />
1. If the Device does not have a CHANNEL UP button, use PLAY (VCR/DVD)<br />
or the POWER button instead.<br />
2. Code Search starts from the currently stored 4-digit number under<br />
that Mode.<br />
3. When all codes have been searched SEARCH END is displayed and<br />
remote returns to normal operation.<br />
Code Identification Feature<br />
Press and hold the respective Mode key in normal operation to display<br />
the programmed code for that Mode e.g., DVD Code 0768.<br />
Programming Combo Device Codes<br />
Some combo (combination) devices (TV/DVR, TV/DVD, DVD/DVR, etc.)<br />
require you to set up 2 different modes to control both parts of the<br />
combo. For example, if you have a TV/DVD combo, you might need to<br />
set up one code under the TV mode to control the TV and a separate<br />
code (under other modes) to control the DVD.<br />
9
Setup, cont.<br />
System Setup Options<br />
Pressing OK at the SYSTEM SETUP screen accesses the System Setup<br />
Options for Volume Punch-Through control Setup, Time Setup, Date Setup,<br />
Backlight Setup and System Reset.<br />
Volume/Mute Control and Punch-Through Feature<br />
Your remote allows you to select which device mode controls VOLUME<br />
and MUTE. This remote is initially set for all device modes to use their<br />
own Volume/Mute control if present. If the programmed code does not<br />
have Volume/Mute operation, then VOLUME and MUTE will “punchthrough”<br />
(hand-over) control to the TV mode device without you<br />
needing to change to TV mode. Note: Any mode chosen for Volume/<br />
Mute control must have its own Volume/Mute function or else VOLUME<br />
and MUTE will not function.<br />
Setting ALL Volume/Mute Control to any one Mode (ALL VOL. SET)<br />
This routine can set all Modes to “punch-through” to any one chosen<br />
Mode for Volume/Mute button control without needing to change to<br />
that Mode.<br />
1. Press and hold the SETUP button until CODE SETUP is displayed<br />
(takes about 3 seconds), then release the SETUP button.<br />
2. Press the down navigation button until SYSTEM SETUP is displayed.<br />
3. Press and release OK. VOL/MUTE SETUP is displayed.<br />
4. Press and release OK. ALL VOL. SET is displayed.<br />
5. Press and release OK. ALL VOL. MODE? is displayed.<br />
6. Press and release desired Mode key (TV, VCR, DVD, etc.) for Volume/<br />
Mute control. PLEASE WAIT is briefly displayed, followed by SUCCESS<br />
and the remote returns to normal operation.<br />
All Modes will now punch-through to your chosen Mode for Volume/<br />
Mute control. If the chosen Mode has no Volume/Mute commands of its<br />
own, “Volume Error” is shown in the display and the remote returns to<br />
normal operation.<br />
Setting any Mode to use its own Volume/Mute Control (MODE VOL.<br />
SET)<br />
This sets any Mode to use only its own Volume/Mute control, i.e.<br />
Volume/Mute punch-through is disabled for this Mode. Note - If your<br />
chosen Mode has no Volume/Mute functions of its own then the<br />
Volume/Mute buttons will do nothing.<br />
1. Press and hold the SETUP button until CODE SETUP is displayed<br />
(takes about 3 seconds), then release the SETUP button.<br />
2. Press the down navigation button until SYSTEM SETUP is displayed.<br />
3. Press and release OK. VOL/MUTE SETUP is displayed.<br />
4. Press and release OK. ALL VOL. SET is displayed.<br />
5. Press the down navigation button until MODE VOL. SET is displayed<br />
6. Press and release OK. MODE VOL. MODE? is displayed.<br />
7. Press and release desired Mode key (TV, VCR, DVD, etc.) to be disabled<br />
for Volume/Mute punch-through control. PLEASE WAIT is briefly<br />
displayed, followed by SUCCESS and the remote returns to normal<br />
operation.<br />
The chosen Mode will now use its own Volume/Mute control.<br />
10
Setup, cont.<br />
Resetting Volume/Mute Control to Factory Defaults (VOL/MUTE<br />
RESET) This resets Volume/Mute control back to its Factory default<br />
settings.<br />
1. Press and hold the SETUP button until CODE SETUP is displayed<br />
(takes about 3 seconds), then release the SETUP button.<br />
2. Press the down navigation button until SYSTEM SETUP is displayed.<br />
3. Press and release OK. VOL/MUTE SETUP is displayed.<br />
4. Press and release OK. ALL VOL. SET is displayed.<br />
5. Press the down navigation button repeatedly until VOL/MUTE RESET<br />
is displayed<br />
6. Press and release OK. CONFIRM RESET is displayed.<br />
7. Press and release OK. PLEASE WAIT is briefly displayed, followed by<br />
SUCCESS and the remote returns to normal operation.<br />
Volume/Mute control is now rest to its Factory default settings.<br />
11
Setup, cont.<br />
Setting the Time of Day (TIME SETUP) To set the Time of day for normal<br />
LCD time display.<br />
1. Press and hold the SETUP button until CODE SETUP is displayed<br />
(takes about 3 seconds), then release the SETUP button.<br />
2. Press the down navigation button until SYSTEM SETUP is displayed.<br />
3. Press and release OK. VOL/MUTE SETUP is displayed.<br />
4. Press the down navigation button until TIME SETUP is displayed.<br />
5. Press and release OK. TIME? is displayed showing current format (12<br />
or 24 hour) flashing and current time.<br />
6. Use the Up/Down navigation buttons to set the format (12Hr or 24Hr)<br />
then press and release OK.<br />
7. The “hours” will be flashing. Use the Up/Down buttons to set the hours<br />
(keep going past 12 to select PM hours) then press and release OK.<br />
8. The “minutes” will be flashing. Use the Up/Down buttons to set the<br />
minutes then press and release OK.<br />
9. SUCCESS is displayed. The remote remains in Setup Mode, returning to<br />
the CODE SETUP screen. Press EXIT then OK to exit Setup Mode. PLEASE<br />
WAIT is briefly displayed, then the remote returns to normal operation.<br />
Setting the Date (DATE SETUP) To set the Month, Date and Day.<br />
1. Press and hold the SETUP button until CODE SETUP is displayed (takes<br />
about 3 seconds), then release the SETUP button.<br />
2. Press the down navigation button until SYSTEM SETUP is displayed.<br />
3. Press and release OK. VOL/MUTE SETUP is displayed.<br />
4. Press the down navigation button repeatedly until DATE SETUP is<br />
displayed.<br />
5. Press and release OK. YEAR? is displayed with the last 2 year digits<br />
flashing.<br />
6. Use the Up/Down buttons to set the Year then press and release OK.<br />
7. MONTH? is displayed with the Month digits flashing. Use the Up/Down<br />
buttons to set the Month then press and release OK.<br />
8. DATE? is displayed with the Date digits flashing. Use the Up/Down<br />
buttons to set the Date then press and release OK.<br />
9. DAY? is displayed with the Day flashing. Use the Up/Down buttons to<br />
set the Day then press and release OK.<br />
10. SUCCESS is displayed, and the remote remains in Setup Mode, returning<br />
to the CODE SETUP screen. Press EXIT then OK to exit Setup Mode.<br />
PLEASE WAIT is briefly displayed, then the remote returns to normal<br />
operation.<br />
12
Setup, cont.<br />
Setting the Backlighting On time (BACKLIGHT SETUP) To set the length<br />
of time the Backlighting remains on after you stop pressing buttons.<br />
1. Press and hold the SETUP button until CODE SETUP is displayed (takes<br />
about 3 seconds), then release the SETUP button.<br />
2. Press the down navigation button until SYSTEM SETUP is displayed.<br />
3. Press and release OK. VOL/MUTE SETUP is displayed.<br />
4. Press the down navigation button repeatedly until BACKLIGHT SETUP<br />
is displayed. Press and release OK.<br />
5. BACKLIGHT TIME? is displayed with the current Backlight On time digits<br />
flashing. Use the Up/Down buttons to set the Backlight On time in<br />
increments of 5 seconds up to a maximum of 60 seconds. The default<br />
Backlight On time is 10 seconds. To turn the Backlighting feature off,<br />
set the time to “00” (zero). Press and release OK.<br />
6. SUCCESS is displayed and the remote remains in Setup Mode, returning<br />
to the CODE SETUP screen. Press EXIT then OK to exit Setup Mode.<br />
PLEASE WAIT is briefly displayed, then the remote returns to normal<br />
operation.<br />
Reset the LCD <strong>Remote</strong> to Factory Defaults (SYSTEM RESET) To reset<br />
the remote back to factory default settings. All User programmed<br />
settings, e.g. code settings, learned commands, etc., are cleared to their<br />
respective default settings.<br />
1. Press and hold the SETUP button until CODE SETUP is displayed (takes<br />
about 3 seconds), then release the SETUP button.<br />
2. Press the down navigation button until SYSTEM SETUP is displayed.<br />
3. Press and release OK. VOL/MUTE SETUP is displayed.<br />
4. Press the down navigation button repeatedly until SYSTEM RESET is<br />
displayed. Press and release OK.<br />
5. CONFIRM RESET is displayed. Press and release OK.<br />
6. PLEASE WAIT is displayed while all settings are Reset then the remote<br />
exits Setup and returns to normal operation.<br />
13
Setup, cont.<br />
Timer Setup<br />
Pressing OK at TIMER SETUP accesses the available Timer Options.<br />
These are a TV Sleep Timer and 4 Timers that can send a sequence of<br />
up to 3 key commands at the preset time.<br />
Setting and Clearing a TV Sleep Timer (TV Sleep Setup)<br />
The remote can be programmed with a TV Sleep Timer. At the end of<br />
the set Timer period, the remote sends the Power command for the<br />
TV Mode device. The TV Sleep Timer can be set for a period of 1-90<br />
minutes. The “Zzz” symbol is displayed when a TV Sleep Timer is set.<br />
To set a TV Sleep Timer (no “Zzz” in normal display)<br />
1. Turn on the TV Mode device.<br />
2. Press and hold the SETUP button until CODE SETUP is displayed (takes<br />
about 3 seconds), then release the SETUP button.<br />
3. Press the down navigation button repeatedly until TIMER SETUP is<br />
displayed. Press and release OK.<br />
4. TV SLEEP SETUP is displayed. Press and release OK.<br />
5. TV SLEEP SET is displayed. Press and release OK.<br />
6. TV SLEEP TIME? is displayed with “minutes” flashing. Use the Up/Down<br />
buttons to set the minutes then press and release OK.<br />
7. SUCCESS is displayed. The remote remains in Setup Mode, returning to<br />
the CODE SETUP screen. Press EXIT then OK to exit Setup Mode. PLEASE<br />
WAIT is briefly displayed, then the remote returns to normal operation.<br />
Zzz is displayed on the screen to indicate that a Sleep Timer is set.<br />
To clear a TV Sleep Timer (“Zzz” in normal display)<br />
1. Press and hold the SETUP button until CODE SETUP is displayed (takes<br />
about 3 seconds), then release the SETUP button.<br />
2. Press the down navigation button repeatedly until TIMER SETUP is<br />
displayed. Press and release OK.<br />
3. TV SLEEP SETUP is displayed. Press and release OK.<br />
4. TV SLEEP CLEAR is displayed. Press and release OK.<br />
5. CONFIRM CLEAR is displayed. Press and release OK.<br />
6. SUCCESS is displayed and the remote remains in Setup Mode, returning<br />
to the CODE SETUP screen. Press EXIT then OK to exit Setup Mode.<br />
PLEASE WAIT is briefly displayed, then the remote returns to normal<br />
operation.<br />
Setting and Clearing Timers (TIMER SETUP)<br />
The remote can be programmed with up to 4 Timers (Timer 1, 2, 3 & 4).<br />
Each Timer can be assigned up to 2 keys to activate at the set time. The<br />
first key must always be a Mode key. Subsequent keys cannot include<br />
Up, Down, Left, Right, OK, Exit, Setup or any Mode key. Timers can only<br />
activate within the following 24-hour period. Timers are automatically<br />
cleared after activation. The “Timer Bell” symbol is displayed when any<br />
Timer is set.<br />
14
Setup, cont.<br />
To set a Timer (Note, the Timer must be cleared first if it was previously<br />
set – see To Clear a Timer below)<br />
1. Press and hold the SETUP button until CODE SETUP is displayed (takes<br />
about 3 seconds), then release the SETUP button.<br />
2. Press the down navigation button repeatedly until TIMER SETUP is<br />
displayed.<br />
3. Press and release OK. TV SLEEP SETUP is displayed.<br />
4. Press the down navigation button until TIMER X SETUP is displayed<br />
(where “X” is 1, 2, 3 or 4). Press and release OK.<br />
5. TIMER X SET is displayed. Press and release OK.<br />
6. TIMER X TIME?” is displayed with the “hours” flashing. Use the Up/Down<br />
buttons to set the hours (keep going past 12 to select PM times) then<br />
press and release OK.<br />
7. The “minutes” will be flashing. Use the Up/Down buttons to set the<br />
minutes then press and release OK.<br />
8. TIMER X MODE? is displayed. Press and release the desired Mode key<br />
(TV, VCR, DVD, etc.).<br />
9. TIMER X Key1? is displayed. Press and release the key required (e.g.<br />
POWER).<br />
10. SUCCESS is displayed. The remote remains in Setup Mode, returning to<br />
the CODE SETUP screen. Press EXIT then OK to exit Setup Mode. PLEASE<br />
WAIT is briefly displayed, then the remote returns to normal operation.<br />
A “Timer Bell” is displayed on the screen to indicate that a timer is set.<br />
To clear a Timer (“Timer Bell” in normal display)<br />
1. Press and hold the SETUP button until CODE SETUP is displayed (takes<br />
about 3 seconds), then release the SETUP button.<br />
2. Press the down navigation button repeatedly until TIMER SETUP is<br />
displayed.<br />
3. Press and release OK. TV SLEEP SETUP is displayed.<br />
4. Press the down navigation button until the desired TIMER X SETUP is<br />
displayed (where “X” is 1, 2, 3 or 4) screen. Press and release OK.<br />
5. TIMER X CLEAR is displayed. Press and release OK.<br />
6. CONFIRM CLEAR is displayed. Press and release OK.<br />
7. SUCCESS is displayed. The remote remains in Setup Mode, returning to<br />
the CODE SETUP screen. Press EXIT then OK to exit Setup Mode. PLEASE<br />
WAIT is briefly displayed, then the remote returns to normal operation.<br />
15
Code Learning<br />
Tips On Learning<br />
You can only learn one device type under any one Mode button e.g.<br />
only learn TV codes under the TV Mode, DVD codes under the DVD<br />
Mode, etc. If you are trying to learn from a “<strong>Universal</strong>” remote, it might<br />
have more than one code type stored under a Mode. Try learning from<br />
another remote to see if there’s a problem with the type or brand of<br />
remote you are trying to learn from.<br />
a. Some functions from some types of remotes might not be able to<br />
be learned.<br />
b. No functions may be stored under the SETUP button.<br />
c. Only one original device type can be learned per individual Mode.<br />
d. Use fresh batteries for both the Learning <strong>Remote</strong> and the Original<br />
<strong>Remote</strong>.<br />
e. Do not attempt to Learn directly under an incandescent or<br />
low-energy light as these can cause interference with the IR<br />
transmissions. Keep at least 3 feet away from any such light sources.<br />
f. Perform a Master Clear (see page 22) before learning and try learning<br />
2 or 3 commands initially. Then carry out a Master Clear before<br />
completely learning your original remote’s commands.<br />
g. Carry out a “Mode Clear” before learning a Mode to make sure there<br />
are no previously learned commands for that Mode.<br />
h. Place the original remote end-to-end with the Learning <strong>Remote</strong> so<br />
the IR transmitters on both remotes are directly in line with each<br />
other. You may need to adjust the height of either remote to achieve<br />
this.<br />
i. Keep the distance between the two remotes to approximately 1 inch<br />
and do not move or change the distance between the two remotes<br />
until you have learned all the required buttons for that Mode.<br />
j. Avoid learning your original remote Volume/Mute buttons unless<br />
you are sure these operate the same device e.g. some original DVD<br />
remotes include TV Volume/Mute button control and can be two<br />
different types of code.<br />
k. Avoid learning your original remote VCR or DVD buttons unless<br />
you are sure these operate the same device e.g. some original TV<br />
remotes include VCR or DVD button control and can be two different<br />
types of code.<br />
l. Learning a button can take up to 3 seconds. Do not release the button<br />
being Learned until SUCCESS or LEARN ERROR has been displayed.<br />
16
Tips On Learning, cont.<br />
Tips On Learning, cont.<br />
m. If learning the first or second buttons for a Mode results in<br />
continuous errors then try the following:<br />
i. End the Learn session by pressing the EXIT button.<br />
ii. Clear out the learned commands for that Mode.<br />
iii. Check the IR transmitters are correctly aligned between the two<br />
remotes.<br />
iv. Adjust the distance between the two remotes to be closer (e.g.<br />
half an inch) or a further away (e.g. 2 inches) from each other.<br />
v. Try learning the original remote for that Mode again.<br />
If problems reoccur with the same button check the original remote<br />
button being learned – does it transmit? Does it operate the target<br />
device? Try learning that button under a different clear Mode. If it learns<br />
okay then it is likely to be a different code type from the others and<br />
cannot be learned under the same Mode.<br />
Learning Notes<br />
1. You cannot learn under the Setup button.<br />
2. All learned commands for a Mode are deleted if the same or a new<br />
4-digit code is entered for that Mode by any Code Entry or Code<br />
Search.<br />
3. The Backlighting is turned off for Learning.<br />
17
Learning Commands<br />
1. Press and hold the SETUP button until CODE SETUP is displayed (takes<br />
about 3 seconds), then release the SETUP button.<br />
2. Press the down navigation button repeatedly until LEARN SETUP is<br />
displayed. Press and release OK.<br />
3. MODE LEARN is displayed. Press and release OK.<br />
4. MODE KEY? is displayed. Press and release the desired Mode button<br />
(TV, VCR, DVD, etc.).<br />
5. LEARN KEY? is displayed. Press and release the key on the 24999 remote<br />
that you want to be taught a code, e.g. POWER.<br />
6. LEARNING is displayed. Pointing the remotes as shown below, press<br />
and hold the original remote key (e.g. POWER) until the SUCCESS or<br />
LEARN ERROR is displayed (see Tips on Learning, page 19) followed by<br />
LEARN MORE? (this process can take up to 2 or 3 seconds to complete).<br />
Release the original remote button.<br />
7. LEARN MORE? is still displayed. To learn more buttons, press and release<br />
OK and repeat from step 5. To exit at this point, press and release EXIT.<br />
8. PLEASE WAIT is displayed briefly and the remote exits Setup Mode and<br />
returns to normal operation.<br />
Line up your remotes (that you’re learning from) in front of the Learning<br />
remote, on a hard surface approx. 1 inch apart.<br />
18
Clearing Commands<br />
To Clear all Learned Commands under a mode<br />
Clearing learned commands is helpful if, for example, you replace your<br />
CD player with another brand or model. If you had learned a feature<br />
from your old CD player’s original remote on to this remote (such as<br />
RANDOM PLAY), that feature would no longer work for your new CD<br />
player. Should you wish to remove or clear one or more “learned”<br />
commands, follow the steps below:<br />
1. Press and hold the SETUP button until CODE SETUP is displayed (takes<br />
about 3 seconds), then release the SETUP button.<br />
2. Press the down navigation button repeatedly until LEARN SETUP is<br />
displayed. Press and release OK. MODE LEARN is displayed.<br />
3. Press the down navigation button until MODE CLEAR is displayed. Press<br />
and release OK.<br />
4. MODE KEY? is displayed. Press and release the desired Mode button<br />
(TV, VCR, DVD, etc.).<br />
5. CONFIRM CLEAR is displayed. Press and release OK.<br />
6. PLEASE WAIT is briefly displayed followed by SUCCESS and the remote<br />
exits Setup Mode and returns to normal operation.<br />
Master Clear - To Clear all Learned Commands under all modes<br />
(recommended on first time Learning)<br />
1. Press and hold the SETUP button until CODE SETUP is displayed (takes<br />
about 3 seconds), then release the SETUP button.<br />
2. Press the down navigation button repeatedly until LEARN SETUP is<br />
displayed. Press and release OK. MODE LEARN is displayed.<br />
3. Press the down navigation button repeatedly until ALL LEARN CLEAR<br />
is displayed. Press and release OK.<br />
4. CONFIRM CLEAR is displayed. Press and release OK.<br />
5. PLEASE WAIT is briefly displayed followed by SUCCESS and the remote<br />
exits Setup Mode and returns to normal operation.<br />
19
Troubleshooting<br />
<strong>Remote</strong> does not operate your product.<br />
• Press the mode button of the product you want to control.<br />
• Program the remote with a new code.<br />
• Install new batteries. (You might have to reprogram your remote after<br />
installing new batteries.)<br />
• <strong>Remote</strong> may not be compatible with your product.<br />
<strong>Remote</strong> does not operate some features of your product.<br />
• Program remote with a new code.<br />
• <strong>Remote</strong> may not be able to operate all features of your product or<br />
button names might be different than your product.<br />
Lost Your Codes?<br />
Should you lose your codes or programming instructions, you can find<br />
available on our website:<br />
www.jascoproducts.com<br />
This device complies with part 15 of the FCC rules. Operation is<br />
subject to the following two conditions: (1) this device may not<br />
cause harmful interference, and (2) this device must accept any<br />
interference received, including interference that may cause<br />
undesired operation.<br />
FCC NOTE: The manufacturer is not responsible for any radio or<br />
TV interference caused by unauthorized modifications to this<br />
equipment. Such modifications could void the user’s authority to<br />
operate the equipment.<br />
90 Day Limited Warranty<br />
<strong>Jasco</strong> <strong>Products</strong> Company warrants this product to be free from<br />
manufacturing defects for a period of ninety days from the original<br />
date of consumer purchase. This warranty is limited to the repair or<br />
replacement of this product only and does not extend to consequential<br />
or incidental damage to other products that may be used with this<br />
unit. This warranty is in lieu of all other warranties express or implied.<br />
Some states do not allow limitations on how long an implied warranty<br />
lasts or permit the exclusion or limitation of incidental or consequential<br />
damages, so the above limitations may not apply to you. This warranty<br />
gives you specific rights, and you may also have other rights which vary<br />
from state to state. If unit should prove defective within the warranty<br />
period, return prepaid with dated proof of purchase to:<br />
<strong>Jasco</strong> <strong>Products</strong> Company<br />
10 E. Memorial Road<br />
Oklahoma City, OK 73114-2205<br />
20
24999<br />
<strong>Universal</strong> <strong>Remote</strong><br />
<strong>Instruction</strong> <strong>Manual</strong><br />
<strong>Jasco</strong> <strong>Products</strong> Company<br />
10 E. Memorial Road<br />
Oklahoma City, OK 73114-2205<br />
Made in China<br />
21<br />
24999-12/10