
You also want an ePaper? Increase the reach of your titles
YUMPU automatically turns print PDFs into web optimized ePapers that Google loves.
English<br />
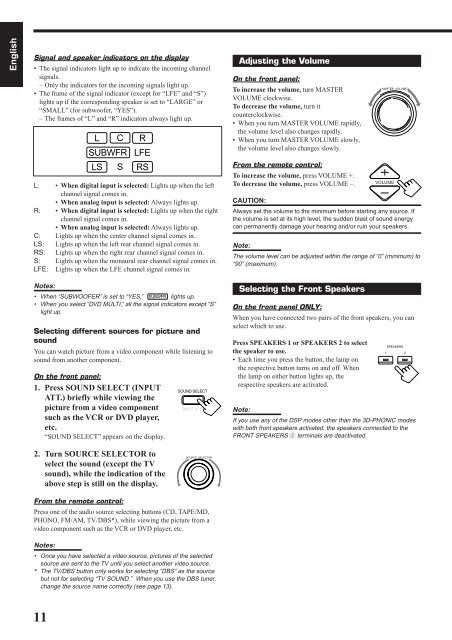
Signal and speaker indicators on the display<br />
• The signal indicators light up to indicate the incoming channel<br />
signals.<br />
– Only the indicators for the incoming signals light up.<br />
• The frame of the signal indicator (except for “LFE” and “S”)<br />
lights up if the corresponding speaker is set to “LARGE” or<br />
“SMALL” (for subwoofer, “YES”).<br />
– The frames of “L” and “R” indicators always light up.<br />
L<br />
C<br />
SUBWFR<br />
LS<br />
S<br />
L: • When digital input is selected: Lights up when the left<br />
channel signal comes in.<br />
• When analog input is selected: Always lights up.<br />
R: • When digital input is selected: Lights up when the right<br />
channel signal comes in.<br />
• When analog input is selected: Always lights up.<br />
C: Lights up when the center channel signal comes in.<br />
LS: Lights up when the left rear channel signal comes in.<br />
RS: Lights up when the right rear channel signal comes in.<br />
S: Lights up when the monaural rear channel signal comes in.<br />
LFE: Lights up when the LFE channel signal comes in.<br />
R<br />
LFE<br />
RS<br />
Adjusting the Volume<br />
On the front panel:<br />
To increase the volume, turn MASTER<br />
VOLUME clockwise.<br />
To decrease the volume, turn it<br />
counterclockwise.<br />
• When you turn MASTER VOLUME rapidly,<br />
the volume level also changes rapidly.<br />
• When you turn MASTER VOLUME slowly,<br />
the volume level also changes slowly.<br />
From the remote control:<br />
To increase the volume, press VOLUME +.<br />
To decrease the volume, press VOLUME –.<br />
CAUTION:<br />
Always set the volume to the minimum before starting any source. If<br />
the volume is set at its high level, the sudden blast of sound energy<br />
can permanently damage your hearing and/or ruin your speakers.<br />
Note:<br />
The volume level can be adjusted within the range of “0” (minimum) to<br />
“90” (maximum).<br />
–<br />
MASTER VOLUME<br />
VOLUME<br />
+<br />
Notes:<br />
• When “SUBWOOFER” is set to “YES,” SUBWFR lights up.<br />
• When you select “DVD MULTI,” all the signal indicators except “S”<br />
light up.<br />
Selecting different sources for picture and<br />
sound<br />
You can watch picture from a video component while listening to<br />
sound from another component.<br />
On the front panel:<br />
1. Press SOUND SELECT (INPUT<br />
ATT.) briefly while viewing the<br />
picture from a video component<br />
such as the VCR or DVD player,<br />
etc.<br />
“SOUND SELECT” appears on the display.<br />
SOUND SELECT<br />
INPUT ATT.<br />
Selecting the Front Speakers<br />
On the front panel ONLY:<br />
When you have connected two pairs of the front speakers, you can<br />
select which to use.<br />
Press SPEAKERS 1 or SPEAKERS 2 to select<br />
the speaker to use.<br />
• Each time you press the button, the lamp on<br />
the respective button turns on and off. When<br />
the lamp on either button lights up, the<br />
respective speakers are activated.<br />
SPEAKERS<br />
1 2<br />
Note:<br />
If you use any of the DSP modes other than the 3D-PHONIC modes<br />
with both front speakers activated, the speakers connected to the<br />
FRONT SPEAKERS 2 terminals are deactivated.<br />
2. Turn SOURCE SELECTOR to<br />
select the sound (except the TV<br />
sound), while the indication of the<br />
above step is still on the display.<br />
SOURCE SELECTOR<br />
From the remote control:<br />
Press one of the audio source selecting buttons (CD, TAPE/MD,<br />
PHONO, FM/AM, TV/DBS*), while viewing the picture from a<br />
video component such as the VCR or DVD player, etc.<br />
Notes:<br />
• Once you have selected a video source, pictures of the selected<br />
source are sent to the TV until you select another video source.<br />
* The TV/DBS button only works for selecting “DBS” as the source<br />
but not for selecting “TV SOUND.” When you use the DBS tuner,<br />
change the source name correctly (see page 13).<br />
11


![TH-V70R[B] revision - JVC](https://img.yumpu.com/23738839/1/184x260/th-v70rb-revision-jvc.jpg?quality=85)