
Create successful ePaper yourself
Turn your PDF publications into a flip-book with our unique Google optimized e-Paper software.
COMPU LINK Remote Control System<br />
English<br />
The COMPU LINK remote control system allows you to operate <strong>JVC</strong> audio components through the remote sensor on<br />
the receiver.<br />
To use this remote control system, you need to connect <strong>JVC</strong> audio<br />
components through the COMPU LINK-3 (SYNCHRO) jacks (see<br />
below) in addition to the connections using cables with RCA pin<br />
plugs (see pages 5 and 6).<br />
• Make sure that the AC power cords of these components are<br />
unplugged before connection. Plug the AC power cords only after<br />
all connections are complete.<br />
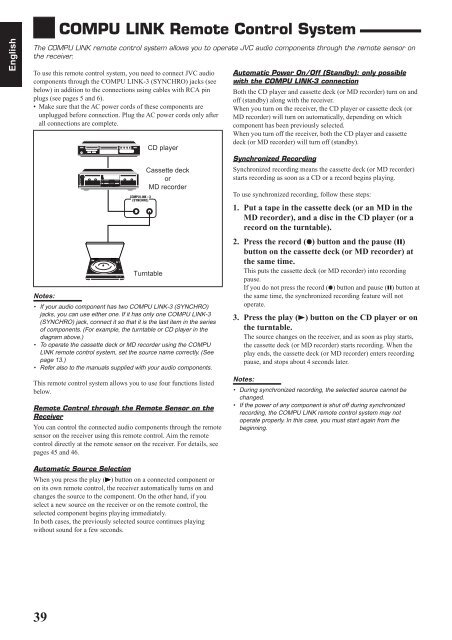
COMPU LINK – 3<br />
(SYNCHRO)<br />
CD player<br />
Cassette deck<br />
or<br />
MD recorder<br />
Turntable<br />
Notes:<br />
• If your audio component has two COMPU LINK-3 (SYNCHRO)<br />
jacks, you can use either one. If it has only one COMPU LINK-3<br />
(SYNCHRO) jack, connect it so that it is the last item in the series<br />
of components. (For example, the turntable or CD player in the<br />
diagram above.)<br />
• To operate the cassette deck or MD recorder using the COMPU<br />
LINK remote control system, set the source name correctly. (See<br />
page 13.)<br />
• Refer also to the manuals supplied with your audio components.<br />
This remote control system allows you to use four functions listed<br />
below.<br />
Remote Control through the Remote Sensor on the<br />
Receiver<br />
You can control the connected audio components through the remote<br />
sensor on the receiver using this remote control. Aim the remote<br />
control directly at the remote sensor on the receiver. For details, see<br />
pages 45 and 46.<br />
Automatic Power On/Off (Standby): only possible<br />
with the COMPU LINK-3 connection<br />
Both the CD player and cassette deck (or MD recorder) turn on and<br />
off (standby) along with the receiver.<br />
When you turn on the receiver, the CD player or cassette deck (or<br />
MD recorder) will turn on automatically, depending on which<br />
component has been previously selected.<br />
When you turn off the receiver, both the CD player and cassette<br />
deck (or MD recorder) will turn off (standby).<br />
Synchronized Recording<br />
Synchronized recording means the cassette deck (or MD recorder)<br />
starts recording as soon as a CD or a record begins playing.<br />
To use synchronized recording, follow these steps:<br />
1. Put a tape in the cassette deck (or an MD in the<br />
MD recorder), and a disc in the CD player (or a<br />
record on the turntable).<br />
2. Press the record () button and the pause (8)<br />
button on the cassette deck (or MD recorder) at<br />
the same time.<br />
This puts the cassette deck (or MD recorder) into recording<br />
pause.<br />
If you do not press the record () button and pause (8) button at<br />
the same time, the synchronized recording feature will not<br />
operate.<br />
3. Press the play (3) button on the CD player or on<br />
the turntable.<br />
The source changes on the receiver, and as soon as play starts,<br />
the cassette deck (or MD recorder) starts recording. When the<br />
play ends, the cassette deck (or MD recorder) enters recording<br />
pause, and stops about 4 seconds later.<br />
Notes:<br />
• During synchronized recording, the selected source cannot be<br />
changed.<br />
• If the power of any component is shut off during synchronized<br />
recording, the COMPU LINK remote control system may not<br />
operate properly. In this case, you must start again from the<br />
beginning.<br />
Automatic Source Selection<br />
When you press the play (3) button on a connected component or<br />
on its own remote control, the receiver automatically turns on and<br />
changes the source to the component. On the other hand, if you<br />
select a new source on the receiver or on the remote control, the<br />
selected component begins playing immediately.<br />
In both cases, the previously selected source continues playing<br />
without sound for a few seconds.<br />
39


![TH-V70R[B] revision - JVC](https://img.yumpu.com/23738839/1/184x260/th-v70rb-revision-jvc.jpg?quality=85)