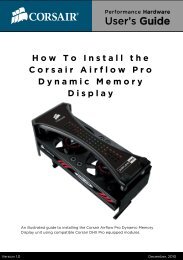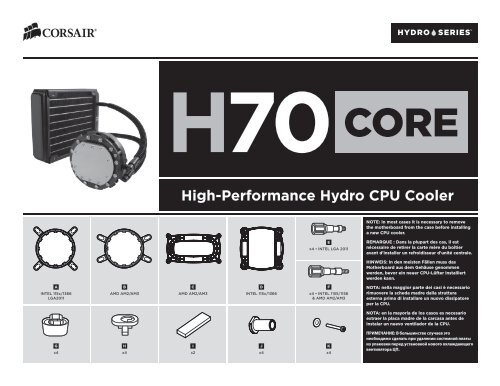
High-Performance Hydro CPU Cooler - Corsair
High-Performance Hydro CPU Cooler - Corsair
High-Performance Hydro CPU Cooler - Corsair

Create successful ePaper yourself
Turn your PDF publications into a flip-book with our unique Google optimized e-Paper software.
A<br />
INTEL 115x/1366<br />
LGA2011<br />
G<br />
x4<br />
B<br />
AMD AM2/AM3<br />
H<br />
x4<br />
<strong>High</strong>-<strong>Performance</strong> <strong>Hydro</strong> <strong>CPU</strong> <strong>Cooler</strong><br />
C<br />
AMD AM2/AM3<br />
I<br />
x2<br />
D<br />
INTEL 115x/1366<br />
J<br />
x4<br />
E<br />
x4 • INTEL LGA 2011<br />
F<br />
x4 • INTEL 1155/1156<br />
& AMD AM2/AM3<br />
K<br />
x4<br />
NOTE: In most cases it is necessary to remove<br />
the motherboard from the case before installing<br />
a new <strong>CPU</strong> cooler.<br />
REMARQUE : Dans la plupart des cas, il est<br />
nécessaire de retirer la carte mère du boîtier<br />
avant d'installer un refroidisseur d'unité centrale.<br />
HINWEIS: In den meisten Fällen muss das<br />
Motherboard aus dem Gehäuse genommen<br />
werden, bevor ein neuer <strong>CPU</strong>-Lüfter installiert<br />
werden kann.<br />
NOTA: nella maggior parte dei casi è necessario<br />
rimuovere la scheda madre dalla struttura<br />
esterna prima di installare un nuovo dissipatore<br />
per la <strong>CPU</strong>.<br />
NOTA: en la mayoría de los casos es necesario<br />
extraer la placa madre de la carcasa antes de<br />
instalar un nuevo ventilador de la <strong>CPU</strong>.<br />
ПРИМЕЧАНИЕ: В большинстве случаев это<br />
необходимо сделать при удалении системной платы<br />
из упаковки перед установкой нового охлаждающего<br />
вентилятора ЦП.
Thank you for purchasing the <strong>Corsair</strong> Cooling<br />
<strong>Hydro</strong> Series H70 <strong>High</strong>-<strong>Performance</strong> <strong>CPU</strong> <strong>Cooler</strong>.<br />
This Quick Start Guide will help you install the H70.<br />
Please visit: www.corsair.com/cooling to download a detailed user<br />
guide or to obtain technical support.<br />
Merci d'avoir acheté le refroidisseur de processeur<br />
hautes performances <strong>Corsair</strong> Cooling <strong>Hydro</strong> Series H70.<br />
Ce guide de démarrage rapide vous aidera à installer le H70.<br />
Rendez-vous sur www.corsair.com/cooling pour télécharger un guide<br />
d'utilisation complet ou pour obtenir de l'assistance technique.<br />
Vielen Dank, dass Sie sich für den <strong>Corsair</strong> Cooling <strong>Hydro</strong><br />
Series H70 <strong>High</strong>-<strong>Performance</strong> <strong>CPU</strong> <strong>Cooler</strong> entschieden haben.<br />
Diese Schnellstartanleitung führt Sie durch die Installation des H70. Auf<br />
www.corsair.com/cooling können Sie ein umfassendes Benutzerhandbuch<br />
herunterladen und technischen Support erhalten.<br />
Grazie per aver acquistato il dissipatore di calore ad alte<br />
|prestazioni per <strong>CPU</strong> <strong>Corsair</strong> Cooling <strong>Hydro</strong> Series H70.<br />
Questa guida introduttiva illustrerà l'installazione di H70. Visitare<br />
www.corsair.com/cooling per scaricare la guida utente completa<br />
o per ottenere supporto tecnico.<br />
Gracias por adquirir el refrigerador<br />
de <strong>CPU</strong> de alto rendimiento <strong>Corsair</strong> Cooling <strong>Hydro</strong> Series H70.<br />
Esta guía breve de inicio le ayudará a instalar el producto. Si desea<br />
descargar una Guía del usuario detallada o solicitar asistencia técnica,<br />
visite www.corsair.com/products/cooling<br />
Благодарим за приобретение высокопроизводительной системы<br />
охлаждения процессора <strong>Corsair</strong> Cooling <strong>Hydro</strong> серии H70.<br />
Здесь приводится краткая информация об установке системы охлаждения H70.<br />
Загрузить подробное руководство пользователя и получить техническую поддержку<br />
можно на веб-сайте www.corsair.com/cooling<br />
E F<br />
Warranty available in other languages at:<br />
Garantie disponible dans d'autres langues à l'adresse:<br />
Übersetzungen der Garantie in andere<br />
Sprachen finden Sie unter:<br />
Garanzia disponibile in altre lingue su:<br />
La garantía está disponible en otros<br />
idiomas en la dirección:<br />
Текст гарантии на других языках доступен по адресу:<br />
www.corsair.com/warranty<br />
H<br />
A B<br />
G<br />
2<br />
This User Agreement (the “Agreement”) is a legal agreement<br />
between you (“You”), and <strong>Corsair</strong> Memory. You are agreeing<br />
to be bound by the terms of this agreement, as defined below,<br />
by using the <strong>Corsair</strong> H70 <strong>High</strong> <strong>Performance</strong> <strong>CPU</strong> <strong>Cooler</strong><br />
(“Product”). If you have any questions or concerns about<br />
the terms of this agreement, please contact us at<br />
http://www.corsair.com/company/contacts.aspx. If, prior to<br />
using the Product, you decide you are unwilling to agree to the<br />
terms of this agreement, promptly return the Product and the<br />
accompanying items (including written materials and binders<br />
or other containers) to <strong>Corsair</strong> Memory or the <strong>Corsair</strong> Memory<br />
authorized distributor from whom you obtained the Product<br />
and accompanying items. If you have already paid for the Product,<br />
provide us with your proof of purchase and we will refund the fees<br />
you have paid for these items to you.<br />
Limited Warranty and Limitation of Liability<br />
The Product is guaranteed for five (5) years from the date<br />
of delivery to the end-user against defects in materials or<br />
workmanship. During this period, the Product will be repaired<br />
or have parts replaced, at our discretion, provided that: (I) the<br />
Product is returned to the agent from whom it was purchased<br />
with shipping prepaid; (II) the Product has been purchased by<br />
the end-user and not used for hire purposes; (III) the Product has<br />
not been misused, handled carelessly, or other than in accordance<br />
with any instructions provided with respect to its use; (IV) the<br />
Product has not been damaged due to acts of nature, such as<br />
lighting, fire, flood, or earthquake; (V) the warranty stickers have<br />
not been removed or tampered with.<br />
<strong>Corsair</strong> Memory’s warranty on the Product is to the first end<br />
user or consumer only, in accordance with the <strong>Corsair</strong> Memory’s<br />
Limited Warranty. All warranties express or implied, including<br />
without limitation the implied warranties of merchantability<br />
and fitness for a particular purpose, shall be limited to the<br />
duration of the guarantee above. The repair, replacement, or<br />
refund as provided under this express limited warranty is the<br />
exclusive remedy of the consumer, and is provided in lieu of all<br />
other warranties, express or implied. In no event shall <strong>Corsair</strong><br />
Memory be liable, whether in contract or tort (including<br />
negligence) for damages in excess of the purchase price of<br />
the product, or accessory, or for any indirect, incidental, special<br />
or consequential damages of any kind, or loss of revenue or<br />
profits, loss of business, loss of information or data, software or<br />
applications or other financial loss arising out of or in connection<br />
with the ability or inability to use the products or accessories<br />
to the full extent these damages may be disclaimed by law.<br />
<strong>Corsair</strong> Memory’s total liability, whether for breach of<br />
contract, warranty, tort (including negligence), indemnification<br />
or otherwise, is limited to the price of the Product sold under<br />
these terms with respect to which losses or damages are claimed.<br />
In no event will <strong>Corsair</strong> Memory be liable for any loss of use, loss<br />
of time, inconvenience, commercial loss, lost profits or savings<br />
or other indirect, incidental, special or consequential damages<br />
to the full extent that may be disclaimed by law. The limitations,<br />
exclusions and disclaimers in these terms shall survive a<br />
fundamental breach or breach or the failure of the essential<br />
purpose of these terms or of any remedy contained herein. No<br />
action will be brought for any breach of these terms more than<br />
one year after the accrual of such cause of action. For the purpose<br />
of this paragraph, "<strong>Corsair</strong> Memory" includes its a�liates and its<br />
and their respective directors, o�cers, employees and agents,<br />
each of whom shall be considered as a trust beneficiary.
1<br />
Install the backplate<br />
Installez la plaque arrière<br />
Rückwand installieren<br />
Installare la piastra posteriore<br />
Instale la placa de soporte<br />
Установка опорной пластины<br />
Remove adhesive backing.<br />
Retirez la protection adhésive.<br />
Ziehen Sie den Schutzfilm<br />
von der Klebefläche ab.<br />
Rimuovere lo strato adesivo.<br />
Retire la cubierta del adhesivo.<br />
Удалите клейкое покрытие.<br />
J<br />
C D<br />
Install the assembled backplate on the back of the motherboard<br />
behind the <strong>CPU</strong> socket. Not required for Intel LGA 2011.<br />
Installez la plaque arrière assemblée au dos de la carte mère, derrière<br />
le socket de processeur. Non requis pour LGA 2011 d'Intel.<br />
Installieren Sie die Rückwand an der Rückseite der Hauptplatine<br />
hinter dem Prozessorsockel. Nicht benötigt für Intel LGA 2011.<br />
Installare la piastra posteriore assemblata sul retro della scheda<br />
madre dietro alla presa <strong>CPU</strong>. Non necessario per Intel LGA 2011.<br />
Instale la placa de soporte (ensamblada) en la parte trasera de la<br />
placa base, detrás de la ranura de la <strong>CPU</strong>. No es necesario para los<br />
Intel LGA 2011.<br />
Собранную опорную пластину установите с обратной стороны материнской<br />
платы напротив слота для ЦП. Не требуется для Intel LGA 2011.<br />
I<br />
2<br />
Install the retention ring<br />
Installez l'anneau de retenue<br />
Halterungsring installieren<br />
Installare l'anello di sicurezza<br />
Instale la anilla de retención<br />
Установка крепежного кольца<br />
<strong>CPU</strong><br />
½<br />
3<br />
Install the cold plate/pump unit<br />
Installez la plaque froide et la pompe<br />
Kühlfläche/-pumpe installieren<br />
Installare la piastra di<br />
ra�reddamento/unità di pompaggio<br />
Instale la unidad de bomba/placa fría<br />
Установка охлаждающей пластины/насоса<br />
3<br />
Carefully remove the plastic shell and insert the cold plate/pump unit into<br />
retention ring, turning clockwise to secure.<br />
Retirez soigneusement l'enveloppe en plastique et insérez la plaque froide<br />
et la pompe dans l'anneau de retenue, en tournant dans le sens des aiguilles<br />
d'une montre pour les fixer.<br />
Nehmen Sie die Plastikabdeckung vorsichtig ab und stecken Sie die<br />
Kühlfläche/-pumpe in den Halterungsring. Arretieren Sie sie durch<br />
Drehen im Uhrzeigersinn.<br />
Rimuovere attentamente l'involucro di plastica e inserire la piastra di<br />
ra�reddamento/unità di pompaggio all'interno dell'anello di sicurezza,<br />
ruotando in senso orario per bloccare.<br />
Extraiga la carcasa de plástico con cuidado e introduzca la placa fría en<br />
la anilla de sujeción; a continuación, gire en el sentido de las agujas del<br />
reloj para fijarla.<br />
Осторожно удалив пластиковое покрытие, вставьте охлаждающую пластину/<br />
насос в крепежное кольцо и закрепите, повернув по часовой стрелке.
4<br />
Tighten screws on retention ring<br />
Serrez les vis sur l'anneau de retenue<br />
Schrauben am Halterungsring festziehen<br />
Avvitare le viti dell'anello di sicurezza<br />
Apriete los tornillos de la anilla de retención<br />
Затяжка винтов на крепежном кольце<br />
Turn each screw 2 to 3 times, in the order shown, repeating until each<br />
screw is fully tightened. Do not overtighten.<br />
Tournez chaque vis 2 ou 3 fois, dans l'ordre indiqué, en répétant<br />
la procédure jusqu'à ce que chaque vis soit serrée à fond. Ne serrez<br />
pas excessivement.<br />
Gehen Sie dazu in der abgebildeten Reihenfolge vor. Ziehen Sie jede<br />
Schraube fest, indem Sie sie zwei- bis dreimal drehen, und fahren Sie dann<br />
mit der nächsten Schraube fort. Wiederholen Sie diesen Vorgang, bis alle<br />
Schrauben fest angezogen sind Ziehen Sie die Schrauben nicht zu fest an.<br />
Avvitare ogni vite 2 o 3 volte, nell'ordine mostrato, ripetendo<br />
l'operazione fino a quando tutte le viti sono completamente avvitate.<br />
Non avvitare eccessivamente.<br />
Gire cada tornillo 2 ó 3 veces, en el orden mostrado, y repita el<br />
procedimiento hasta que todos estén completamente apretados.<br />
No los apriete demasiado.<br />
Поочередно (в указанном порядке) затягивайте винты на 2-3 оборота,<br />
пока все винты не будут затянуты. Не затягивайте слишком сильно.<br />
3<br />
2<br />
1<br />
4<br />
Install the radiator<br />
5 6<br />
Installez le radiateur<br />
Kühler installieren<br />
Installare il radiatore<br />
Instale el radiador<br />
Установка радиатора<br />
K<br />
Airflow<br />
Attach the radiator and fans as shown. NOTE: BOTH FANS MUST POINT<br />
THE SAME DIRECTION. For the best cooling performance, we recommend<br />
mounting the fans as an air-intake to your PC case. Fans not included.<br />
Attachez le radiateur et les ventilateurs, comme illustré. NOTE : LES DEUX<br />
VENTILATEURS DOIVENT ÊTRE MONTÉS DANS LE MÊME SENS. Pour des<br />
performances de refroidissement optimales, nous vous recommandons<br />
d'installer les ventilateurs comme une entrée d'air sur la tour de votre<br />
ordinateur. Ventilateurs non fournis.<br />
Befestigen Sie wie abgebildet den Kühler und die Lüfter. HINWEIS:<br />
BEIDE LÜFTER MÜSSEN IN DIESELBE RICHTUNG ZEIGEN. Für<br />
bestmögliche Kühlleistung empfehlen wir, die Lüfter als Lufteinlass des<br />
PC-Gehäuses zu montieren. Lüfter nicht im Lieferumfang.<br />
Collegare il radiatore e le ventole come illustrato. NOTA: ENTRAMBE LE<br />
VENTOLE DEVONO ESSERE RIVOLTE VERSO LA STESSA DIREZIONE. Per<br />
ottenere le prestazioni di ra�reddamento migliori, si consiglia di montare<br />
le ventole come aspiratori d'aria al case del PC. Ventole non incluse.<br />
Fije el radiador y los ventiladores tal como se muestra. NOTA: AMBOS<br />
VENTILADORES DEBEN ESTAR DIRIGIDOS EN LA MISMA DIRECCIÓN. Para<br />
una refrigeración óptima, recomendamos montar los ventiladores como<br />
entradas de aire en la carcasa del PC. Ventiladores no están incluidos.<br />
Установите радиатор и вентиляторы, как показано на рисунке. ПРИМЕЧАНИЕ. ОБА<br />
ВЕНТИЛЯТОРА ДОЛЖНЫ БЫТЬ ОРИЕНТИРОВАНЫ В ОДНОМ НАПРАВЛЕНИИ. Для более<br />
эффективного охлаждения рекомендуется установить вентиляторы таким образом,<br />
чтобы они нагнетали воздух внутрь корпуса. Вентиляторы не входят в комплект.<br />
Connect power to fan and pump<br />
4<br />
Reliez les ventilateurs et la pompe à l'alimentation<br />
Lüfter und Pumpe anschließen<br />
Collegare ventole e pompa all'alimentazione<br />
Conecte la alimentación de los ventiladores y la bomba<br />
Подключение питания вентиляторов и насоса<br />
Connect pump power connector to any available 3-pin fan header on<br />
the motherboard.<br />
Branchez le fil d'alimentation de la pompe à une fiche à trois broches<br />
libre sur la carte mère.<br />
Verbinden Sie den Stecker der Pumpe mit einem beliebigen,<br />
freien dreipoligen Lüfteranschluss auf der Hauptplatine.<br />
Collegare il connettore di alimentazione della pompa a qualsiasi header<br />
per ventola a 3 pin disponibile sulla scheda madre.<br />
Enchufe el conector de alimentación de la bomba a uno de los cabezales<br />
de ventilador de 3 pines de la placa base.<br />
Разъем питания насоса подключите к любому из имеющихся на материнской<br />
плате 3-контактных разъемов питания вентилятора.
<strong>High</strong>-<strong>Performance</strong> <strong>Hydro</strong> <strong>CPU</strong> <strong>Cooler</strong><br />
EMAIL: support@corsair.com<br />
FACEBOOK: facebook.com/corsairmemory<br />
BLOG: blog.corsair.com<br />
corsair.com<br />
46221 Landing Parkway • Fremont • California • 94538 • USA<br />
FORUM: forum.corsair.com<br />
TWITTER: twitter.com/corsairmemory<br />
AUDIO PAGE: corsair.com/audio<br />
USA and CANADA: (800) 205-7657 | INTERNATIONAL: (510) 657-8747 | FAX: (510) 657-8748<br />
© 2010-2011 <strong>Corsair</strong> Memory, Inc. All rights reserved. <strong>Corsair</strong> and the sails logo are registered trademarks, and <strong>Hydro</strong> Series is a trademark in the United States and/or other countries.<br />
All other trademarks are the property of their respective owners. Product may vary slightly from those pictured. Document Number: 49-000063 rev AA