
You also want an ePaper? Increase the reach of your titles
YUMPU automatically turns print PDFs into web optimized ePapers that Google loves.
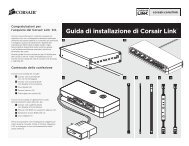
Congratulations on your<br />
purchase of a <strong>Corsair</strong> <strong>Link</strong> Kit.<br />
<strong>Corsair</strong> <strong>Link</strong> replaces manual controls for<br />
fans and lighting with an elegant software interface,<br />
while simultaneously o�ering more advanced control<br />
and expansion options than motherboard BIOS<br />
settings. Everything is available on your screen with<br />
a software interface that’s advanced, intuitive, and<br />
fun to use.<br />
This guide will help you install your <strong>Corsair</strong> <strong>Link</strong> Kit.<br />
It covers installation of both the <strong>Corsair</strong> <strong>Link</strong> Cooling<br />
Kit, and the <strong>Corsair</strong> <strong>Link</strong> Cooling and Lighting Kit.<br />
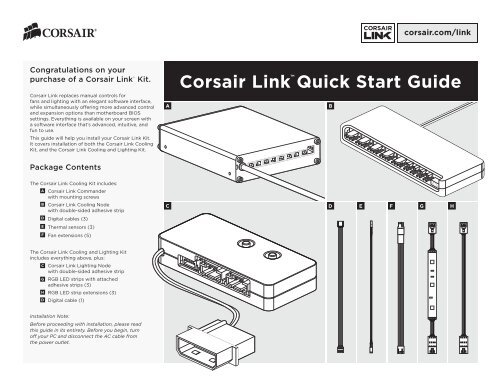
Package Contents<br />
The <strong>Corsair</strong> <strong>Link</strong> Cooling Kit includes:<br />
A <strong>Corsair</strong> <strong>Link</strong> Commander<br />
with mounting screws<br />
B <strong>Corsair</strong> <strong>Link</strong> Cooling Node<br />
with double-sided adhesive strip<br />
D Digital cables (3)<br />
E Thermal sensors (3)<br />
F Fan extensions (5)<br />
The <strong>Corsair</strong> <strong>Link</strong> Cooling and Lighting Kit<br />
includes everything above, plus:<br />
C <strong>Corsair</strong> <strong>Link</strong> Lighting Node<br />
with double-sided adhesive strip<br />
G RGB LED strips with attached<br />
adhesive strips (3)<br />
H RGB LED strip extensions (3)<br />
ED Digital cable (1)<br />
Installation Note:<br />
Before proceeding with installation, please read<br />
this guide in its entirety. Before you begin, turn<br />
o� your PC and disconnect the AC cable from<br />
the power outlet.<br />
corsair.com/link<br />
<strong>Corsair</strong> <strong>Link</strong> <strong>Quick</strong> <strong>Start</strong> <strong>Guide</strong><br />
A B<br />
C<br />
D E F G H
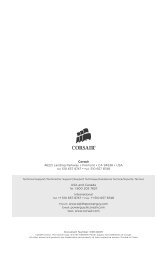
<strong>Corsair</strong> <strong>Link</strong> Diagram<br />
A<br />
D D<br />
B<br />
G<br />
C<br />
E E<br />
UP TO 33 LED STRIPS UP TO 33 LED STRIPS<br />
F<br />
Installing the<br />
<strong>Corsair</strong> <strong>Link</strong> Commander<br />
The <strong>Corsair</strong> <strong>Link</strong> Commander (A) is the hub of<br />
your <strong>Corsair</strong> <strong>Link</strong> system. It is the interface between<br />
the <strong>Corsair</strong> <strong>Link</strong> Dashboard software and all of your<br />
<strong>Corsair</strong> <strong>Link</strong> components.<br />
Mount the <strong>Corsair</strong> <strong>Link</strong> Commander in any empty<br />
3.5" drive bay using the provided screws. Then, connect<br />
the attached cable to any available USB 2.0 header on<br />
your PC’s motherboard. Take care when connecting the<br />
USB cable, as it is keyed to prevent incorrect installation.<br />
A<br />
2
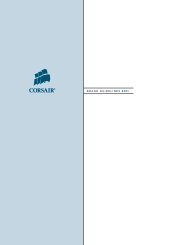
Installing the<br />
<strong>Corsair</strong> <strong>Link</strong> Cooling Node<br />
The Cooling Node (B) may be used to control any PC<br />
case fan which uses a three-pin or four-pin cable. It is also<br />
used to monitor ambient temperatures within your PC<br />
case using the provided thermal sensors.<br />
The Cooling Node may be mounted on any interior<br />
surface of your PC case using the included double-sided<br />
adhesive strip. We recommend making all the required<br />
connections first, and then attaching the Cooling Node<br />
to your PC case as the last step.<br />
1. Connect the Cooling Node (B) to the<br />
<strong>Corsair</strong> <strong>Link</strong> Commander (A) using one<br />
of the provided digital cables (D).<br />
2. Connect any case fans you wish to control to the<br />
Cooling Node, using the four-pin headers on the left<br />
side of the Cooling Node. The provided fan extension<br />
cables (F) can be used if necessary.<br />
3. Connect the thermal sensors (E) to the two-pin<br />
headers on the right side of the Cooling Node.<br />
4. Connect the Cooling Node power cable to a<br />
four-pin molex connector from your power supply.<br />
5. Attach the Cooling Node to an interior surface of<br />
your PC case using the provided double-sided<br />
adhesive tape.<br />
(x5)<br />
Tips for connecting thermal sensors<br />
The thermal sensors (E) are designed to measure<br />
ambient temperatures, so for the most accurate<br />
results, they should not directly touch components.<br />
You may find it useful to mount the thermal sensors<br />
near air intake and exhaust points, and if your PC case<br />
has multiple compartments, you can try placing each<br />
of the sensors in its own compartment. Since the<br />
thermal sensors can easily repositioned, you can try<br />
various locations and use what works best for you.<br />
B<br />
F<br />
E<br />
If you are installing the <strong>Corsair</strong> <strong>Link</strong> Cooling Kit:<br />
Congratulations! You have completed the hardware installation. Please proceed to Downloading <strong>Corsair</strong> <strong>Link</strong> Dashboard.<br />
3
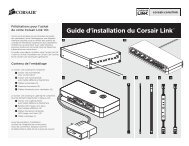
Installing the<br />
<strong>Corsair</strong> <strong>Link</strong> Lighting Node<br />
The Lighting Node (C) is included with the <strong>Corsair</strong> <strong>Link</strong><br />
Cooling and Lighting Kit. This dual-channel lighting<br />
controller can be adjusted with the two buttons built into<br />
the Lighting Node, or with <strong>Corsair</strong> <strong>Link</strong> Dashboard. Three<br />
RGB LED strips (G) are included, and the Lighting Node<br />
can control up to 33 strips (available separately).<br />
C<br />
G<br />
1. Connect the Lighting Node (C) to the<br />
<strong>Corsair</strong> <strong>Link</strong> Commander (A) using one<br />
of the provided digital cables (D).<br />
2. Connect the RGB LED strips (G) to the<br />
connectors on the Lighting Node.<br />
3. Connect the Lighting Node power cable to a<br />
four-pin molex connector from your power supply.<br />
4. Attach the Lighting Node and LED strips to<br />
interior surfaces of your PC case using the provided<br />
double-sided adhesive strips.<br />
Downloading<br />
<strong>Corsair</strong> <strong>Link</strong> Dashboard<br />
The software can be downloaded<br />
from the following locations:<br />
• <strong>Corsair</strong> <strong>Link</strong> Cooling and Lighting Kit<br />
corsair.com/link-cool<br />
• <strong>Corsair</strong> <strong>Link</strong> Cooling Kit<br />
corsair.com/link-light<br />
Installation and operating instructions for<br />
<strong>Corsair</strong> <strong>Link</strong> Dashboard are included in the download.<br />
4
EMAIL: support@corsair.com<br />
FACEBOOK: facebook.com/corsairmemory<br />
BLOG: blog.corsair.com<br />
corsair.com<br />
46221 Landing Parkway • Fremont • California • 94538 • USA<br />
FORUM: forum.corsair.com<br />
TWITTER: twitter.com/corsairmemory<br />
CORSAIR LINK PAGE: corsair.com/link<br />
USA and CANADA: (800) 205-7657 | INTERNATIONAL: (510) 657-8747 | FAX: (510) 657-8748<br />
© 2011 <strong>Corsair</strong> Components, Inc. All rights reserved. <strong>Corsair</strong> and the sails logo are registered trademarks, and <strong>Corsair</strong> <strong>Link</strong> is a trademark in the United States and/or other countries.<br />
All other trademarks are the property of their respective owners. Product may vary slightly from those pictured. Document Number: 49-000087 revAA