Kerio IMAP Migration Tool
Kerio IMAP Migration Tool
Kerio IMAP Migration Tool

Create successful ePaper yourself
Turn your PDF publications into a flip-book with our unique Google optimized e-Paper software.
<strong>Kerio</strong> <strong>IMAP</strong> <strong>Migration</strong> <strong>Tool</strong><br />
Revision: 1.0<br />
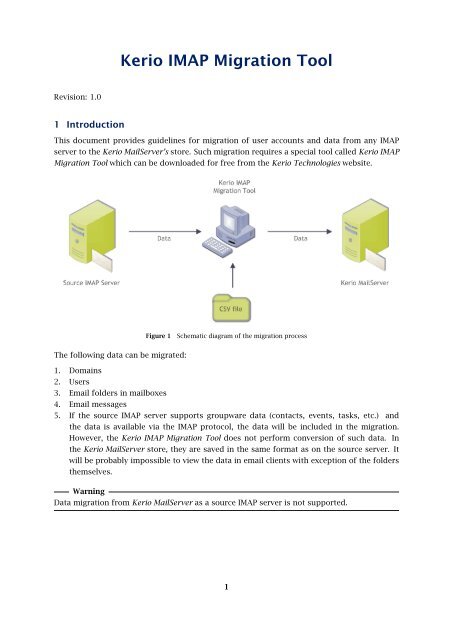
1 Introduction<br />
This document provides guidelines for migration of user accounts and data from any <strong>IMAP</strong><br />
server to the <strong>Kerio</strong> MailServer’s store. Such migration requires a special tool called <strong>Kerio</strong> <strong>IMAP</strong><br />
<strong>Migration</strong> <strong>Tool</strong> which can be downloaded for free from the <strong>Kerio</strong> Technologies website.<br />
Figure 1<br />
Schematic diagram of the migration process<br />
The following data can be migrated:<br />
1. Domains<br />
2. Users<br />
3. Email folders in mailboxes<br />
4. Email messages<br />
5. If the source <strong>IMAP</strong> server supports groupware data (contacts, events, tasks, etc.) and<br />
the data is available via the <strong>IMAP</strong> protocol, the data will be included in the migration.<br />
However, the <strong>Kerio</strong> <strong>IMAP</strong> <strong>Migration</strong> <strong>Tool</strong> does not perform conversion of such data. In<br />
the <strong>Kerio</strong> MailServer store, they are saved in the same format as on the source server. It<br />
will be probably impossible to view the data in email clients with exception of the folders<br />
themselves.<br />
Warning<br />
Data migration from <strong>Kerio</strong> MailServer as a source <strong>IMAP</strong> server is not supported.<br />
1
2 Before you start<br />
Before you start migrating, consider the following:<br />
Duration of the migration process<br />
Before starting a migration, bear in mind that time consumed by the migration process depends<br />
on size on accounts involved. It is recommended to get the network and all users<br />
involved ready for outage of email services and for migration in low-load time. <strong>Migration</strong> can<br />
be also done step by step by smaller groups of users.<br />
CSV file with user accounts<br />
<strong>Migration</strong> requires preparation of a CSV file that would include users and their passwords.<br />
This information is crucial for access to the source <strong>IMAP</strong> server. Make the data in the csv file<br />
follow this pattern: user@domain.com;password;Full Name.<br />
Figure 2<br />
Transformation of the CSV file for <strong>Kerio</strong> MailServer<br />
Public and archive folders<br />
Public and archive folders cannot be migrated by the standard procedure. If you, in spite of<br />
this fact, need to migrate also these folders, move them to the mailbox of any user included<br />
in the migration first. The folders will then be migrated as private folders.<br />
2
3 Preparation<br />
1. Install and run <strong>Kerio</strong> MailServer.<br />
2. In <strong>Kerio</strong> MailServer, the <strong>IMAP</strong> service must be running on port 143 of the <strong>IMAP</strong> server.<br />
3. On a machine which can access both <strong>Kerio</strong> MailServer and the source <strong>IMAP</strong> server, install<br />
<strong>Kerio</strong> <strong>IMAP</strong> <strong>Migration</strong> <strong>Tool</strong>. <strong>Kerio</strong> <strong>IMAP</strong> <strong>Migration</strong> <strong>Tool</strong> can be installed on any of these<br />
systems:<br />
• Windows (all versions supported by <strong>Kerio</strong> MailServer),<br />
• Linux 1 (all distributions supported by <strong>Kerio</strong> MailServer),<br />
• Mac OS X 10.4 Tiger and later.<br />
The migration tool can also be installed on both the source or target mailserver.<br />
4. Before starting the migration, it is recommended to make sure that the source email server<br />
cannot accept new emails temporarily. Otherwise, migrated data might be inconsistent.<br />
The migration requires that both the <strong>Kerio</strong> MailServer and the source <strong>IMAP</strong> server are running.<br />
4 <strong>Migration</strong> process<br />
The following description addresses the procedure of starting of the migration tool especially<br />
on Windows. However, you can follow the guidelines even if you run it on Mac OS X or Linux.<br />
1.<br />
Windows: Run <strong>Kerio</strong> <strong>IMAP</strong> <strong>Migration</strong> <strong>Tool</strong>, for instance from Start → Programs → <strong>Kerio</strong> →<br />
<strong>IMAP</strong> <strong>Migration</strong> <strong>Tool</strong>.<br />
Mac OS X: Double-click on the KIMT icon or drag it to Applications.<br />
Linux:<br />
Unpack thee TGZ file including the <strong>Kerio</strong> <strong>IMAP</strong> <strong>Migration</strong> <strong>Tool</strong> application and run<br />
the program.<br />
Table 1 Installation on individual operating systems<br />
Do not start the migration tool if it is already running.<br />
2. The migration tool is a wizard which will ask for IP address or DNS name of the source<br />
<strong>IMAP</strong> server and login information for <strong>Kerio</strong> MailServer (you will need to log in with the<br />
name and password of the primary administrator).<br />
Note: The migration tool will not affect accounts on the source server, but for security<br />
reasons it uses them just in the read-only mode, so that it is possible to interrupt the<br />
migration process and keep using the original server until migration of other users. Also,<br />
migration does not remove the existing data or settings in <strong>Kerio</strong> MailServer. Migrated data<br />
will be added as extra data. Therefore, beware of possible data duplication (data gets<br />
duplicated if one account is migrated twice).<br />
3. Once you are connected to both servers, use the Load button in the Load and Select Users<br />
users to load the CSV file with users and select user accounts to be migrated (see figure 3).<br />
The migration process may be time-consuming. Therefore, for time-saving reasons it is<br />
recommended to migrate data by parts (see section 2).<br />
1 <strong>Kerio</strong> <strong>IMAP</strong> <strong>Migration</strong> <strong>Tool</strong> requires X Window System<br />
3
Figure 3 User selection dialog<br />
4. At the start of migration, the <strong>Migration</strong> Status window (see figure 4) is opened, showing<br />
the current status of the migration progress.<br />
If the migration process is interrupted (finished without being completed) deliberately, the<br />
following results take effect:<br />
Figure 4 Dialog displaying status of migration of particular mailboxes<br />
• Data of users whose migration has been completed will be saved in <strong>Kerio</strong><br />
MailServer.<br />
• In case of users whose migration was just being in progress in the time of the<br />
interruption, only part of the data (data having been migrated completely at the<br />
moment) is migrated. If the user is migrated again, the data already migrated<br />
gets duplicate. For this reason, it is recommended to remove the partly migrated<br />
users in the <strong>Kerio</strong> MailServer’s administration interface before executing another<br />
migration. To find out which users were involved in an interrupted migration, see<br />
4
the migration report (for details, see section 5).<br />
• Users in the status that indicates they have not been migrated yet do not have<br />
accounts created in <strong>Kerio</strong> MailServer and they can therefore be migrated within<br />
one of the following batches.<br />
5. When the migration is completed, the <strong>Migration</strong> Result page is opened (see figure 5). This<br />
page sums up information about the migration which has just been completed.<br />
To get migration process details and reports of possible errors, click on the Report link.<br />
Figure 5<br />
<strong>Migration</strong> result dialog<br />
Once a migration is completed successfully, it is recommended to create new accounts in<br />
users’ email clients (or profiles, if supported by the applications). This will help you avoid data<br />
inconsistence on the client sides. Details on how to set for example profiles in MS Outlook or<br />
a new account in MS Entourage, refer to <strong>Kerio</strong> MailServer 6, User’s Guide.<br />
5 <strong>Migration</strong> process logs<br />
<strong>Kerio</strong> Exchange <strong>Migration</strong> <strong>Tool</strong> generates various logs addressing the migration process.<br />
On MS Windows, they can be found in the following directory:<br />
%TEMP%\KimtLogs\MMDDRRRR_HHMMSS<br />
on Windows Vista, the path to logs can be for example like this:<br />
C:\Users\jsmith\AppData\Local\Temp\KimtLogs\02182009_154844<br />
On Linux, they can be found in the following directory:<br />
~/KimtLogs/MMDDRRRR_HHMMSS<br />
for example:<br />
/Users/jsmith/KimtLogs/02182009_154844<br />
5
On Mac OS X, they can be found in the following directory:<br />
~/Library/Logs/KimtLogs/MMDDRRRR_HHMMSS<br />
for example:<br />
/Users/jsmith/Library/Logs/KimtLogs/02182009_154844<br />
Each start of the migration tool generates a new log.<br />
Should you contact the <strong>Kerio</strong> Technologies technical support to shoot various migration issues,<br />
please send both logs attached to your report.<br />
The Report log<br />
The Report log is the report.txt file that can be found in the log folder. After completion<br />
of each migration, it is recommended to read through this file to make sure that no errors<br />
occurred and that all user accounts have been migrated correctly.<br />
Debug Log<br />
The Debug log is the debug.log file that can be found in the log folder. Information provided<br />
in this log is useful especially for the software developers. Should any issue arise addressing<br />
migration to <strong>Kerio</strong> MailServer, this log will help choose the right remedy in cooperation with<br />
<strong>Kerio</strong> Technologies technical support.<br />
6