Support for Microsoft Outlook - Kerio Software Archive
Support for Microsoft Outlook - Kerio Software Archive
Support for Microsoft Outlook - Kerio Software Archive

Create successful ePaper yourself
Turn your PDF publications into a flip-book with our unique Google optimized e-Paper software.
<strong>Support</strong> <strong>for</strong> <strong>Microsoft</strong> <strong>Outlook</strong><strong>Kerio</strong> Technologies
C○ 1997-2006 <strong>Kerio</strong> Technologies. All Rights Reserved.Release Date: July 10, 2006This guide provides detailed description on <strong>Kerio</strong> <strong>Outlook</strong> Connector and <strong>Kerio</strong>Synchronization Plug-in in versions 6.2.0. All additional modifications and updatesreserved.For current product versions, check http://www.kerio.com/kms.
Contents1 <strong>Kerio</strong> <strong>Outlook</strong> Connector . . . . . . . . . . . . . . . . . . . . . . . . . . . . . . . . . . . . . . . . . . . . . . . . . . 51.1 <strong>Software</strong> requirements . . . . . . . . . . . . . . . . . . . . . . . . . . . . . . . . . . . . . . . . . . . . . . 52 Installation of <strong>Kerio</strong> <strong>Outlook</strong> Connector . . . . . . . . . . . . . . . . . . . . . . . . . . . . . . . . . . . 72.1 Automatic installation of <strong>Kerio</strong> <strong>Outlook</strong> Connector . . . . . . . . . . . . . . . . . . . 72.2 Manual installation of <strong>Kerio</strong> <strong>Outlook</strong> Connector . . . . . . . . . . . . . . . . . . . . . . 93 Upgrade the <strong>Kerio</strong> <strong>Outlook</strong> Connector . . . . . . . . . . . . . . . . . . . . . . . . . . . . . . . . . . . 194 User login data . . . . . . . . . . . . . . . . . . . . . . . . . . . . . . . . . . . . . . . . . . . . . . . . . . . . . . . . . . 205 Shared and public folders . . . . . . . . . . . . . . . . . . . . . . . . . . . . . . . . . . . . . . . . . . . . . . . 215.1 Sharing and Mapping in MS <strong>Outlook</strong> . . . . . . . . . . . . . . . . . . . . . . . . . . . . . . . . 215.2 Public and archive folders . . . . . . . . . . . . . . . . . . . . . . . . . . . . . . . . . . . . . . . . . . 246 Rules <strong>for</strong> incoming messages . . . . . . . . . . . . . . . . . . . . . . . . . . . . . . . . . . . . . . . . . . . 256.1 Creating or changing a rule . . . . . . . . . . . . . . . . . . . . . . . . . . . . . . . . . . . . . . . . 266.2 Out of office . . . . . . . . . . . . . . . . . . . . . . . . . . . . . . . . . . . . . . . . . . . . . . . . . . . . . . . 317 Spam filter . . . . . . . . . . . . . . . . . . . . . . . . . . . . . . . . . . . . . . . . . . . . . . . . . . . . . . . . . . . . . . 337.1 The Spam tab . . . . . . . . . . . . . . . . . . . . . . . . . . . . . . . . . . . . . . . . . . . . . . . . . . . . . . 338 Address books and contacts . . . . . . . . . . . . . . . . . . . . . . . . . . . . . . . . . . . . . . . . . . . . 368.1 Searching in address books via the MAPI interface . . . . . . . . . . . . . . . . . . 368.2 Searching contacts via the LDAP directory service . . . . . . . . . . . . . . . . . . . 388.3 Contacts <strong>for</strong>warding . . . . . . . . . . . . . . . . . . . . . . . . . . . . . . . . . . . . . . . . . . . . . . . 438.4 Distribution lists . . . . . . . . . . . . . . . . . . . . . . . . . . . . . . . . . . . . . . . . . . . . . . . . . . 449 Usage of the Free/Busy calendar . . . . . . . . . . . . . . . . . . . . . . . . . . . . . . . . . . . . . . . . 459.1 Usage of the Free/Busy calendar . . . . . . . . . . . . . . . . . . . . . . . . . . . . . . . . . . . . 4510 Private items . . . . . . . . . . . . . . . . . . . . . . . . . . . . . . . . . . . . . . . . . . . . . . . . . . . . . . . . . . . . 4711 Notes . . . . . . . . . . . . . . . . . . . . . . . . . . . . . . . . . . . . . . . . . . . . . . . . . . . . . . . . . . . . . . . . . . . 493
12 Troubleshooting . . . . . . . . . . . . . . . . . . . . . . . . . . . . . . . . . . . . . . . . . . . . . . . . . . . . . . . . 5012.1 Spam/Not Spam buttons displaying problems . . . . . . . . . . . . . . . . . . . . . . . 5012.2 Installation and configuration of MS <strong>Outlook</strong> 2000 . . . . . . . . . . . . . . . . . . 5012.3 Messages signed in MS <strong>Outlook</strong> . . . . . . . . . . . . . . . . . . . . . . . . . . . . . . . . . . . . 5112.4 Error in settings of contact folders used as address books . . . . . . . . . . . 5213 <strong>Kerio</strong> Synchronization Plug-in . . . . . . . . . . . . . . . . . . . . . . . . . . . . . . . . . . . . . . . . . . . 5313.1 Installation . . . . . . . . . . . . . . . . . . . . . . . . . . . . . . . . . . . . . . . . . . . . . . . . . . . . . . . . 5413.2 Synchronization . . . . . . . . . . . . . . . . . . . . . . . . . . . . . . . . . . . . . . . . . . . . . . . . . . . 5513.3 SSL-secured traffic . . . . . . . . . . . . . . . . . . . . . . . . . . . . . . . . . . . . . . . . . . . . . . . . . 5814 <strong>Kerio</strong> <strong>Outlook</strong> Connector and <strong>Kerio</strong> Synchronization Plug-in . . . . . . . . . . . . . 60Glossary of terms . . . . . . . . . . . . . . . . . . . . . . . . . . . . . . . . . . . . . . . . . . . . . . . . . . . . . . . 62Index . . . . . . . . . . . . . . . . . . . . . . . . . . . . . . . . . . . . . . . . . . . . . . . . . . . . . . . . . . . . . . . . . . . 654
Chapter 1<strong>Kerio</strong> <strong>Outlook</strong> Connector<strong>Kerio</strong> <strong>Outlook</strong> Connector is an extension to MS <strong>Outlook</strong>. It allows scheduling and sharingdifferent types of data. Thanks to this modification, MS <strong>Outlook</strong> is able to workwith groupware data (contacts, calendar, tasks, notices) stored in <strong>Kerio</strong> MailServer. Themain benefit of the shared data store is that the data is available via the Internet anywherenecessary. To access the data, you’ll need just an Internet connection and a webbrowser (the <strong>Kerio</strong> WebMail interface) or MS <strong>Outlook</strong> with <strong>Kerio</strong> <strong>Outlook</strong> Connector orMS Entourage.<strong>Kerio</strong> MailServer and MS <strong>Outlook</strong> communicate via MAPI. MAPI (Messaging ApplicationProgramming Interface) is a versatile interface <strong>for</strong> email transmission. It is a softwareinterface that enables any MAPI client to communicate with any mailserver (<strong>Microsoft</strong><strong>Outlook</strong> and <strong>Kerio</strong> MailServer in this case).<strong>Kerio</strong> <strong>Outlook</strong> Connector also includes Help which can be triggered from the MS <strong>Outlook</strong>’stoolbar (Help → <strong>Kerio</strong> <strong>Outlook</strong> Connector Help).TIPS:• If you intend to handle your email also offline, follow the instructions in chapter 14.• <strong>Kerio</strong> <strong>Outlook</strong> Connector since version 6.1 provides support <strong>for</strong> digital signatures.The function and settings <strong>for</strong> digital signatures are described in standard MS <strong>Outlook</strong>help.Note: All settings relate to MS Windows XP and MS <strong>Outlook</strong> 2003. If you use a differentversion of MS <strong>Outlook</strong> 2000, the settings may differ (see chapter 12.2).1.1 <strong>Software</strong> requirementsInstallation of the <strong>Kerio</strong> <strong>Outlook</strong> Connector can be run under Windows 2000 Professional(version Service Pack 4), XP (version Service Pack 1 or 2), MS IE 6.0 and later.<strong>Kerio</strong> <strong>Outlook</strong> Connector supports the following email clients:• MS <strong>Outlook</strong> 2000 + version Service Pack 3 (if the service pack version is not installed,<strong>Kerio</strong> <strong>Outlook</strong> Connector installation cannot be started)5
Chapter 1 <strong>Kerio</strong> <strong>Outlook</strong> Connector• MS <strong>Outlook</strong> XP + version Service Pack 3 (the version of MS <strong>Outlook</strong> XP must have this<strong>for</strong>mat: 10.0.6515.xyz)• MS <strong>Outlook</strong> 2003 + version Service Pack 2 (if the service pack version is not installed,<strong>Kerio</strong> <strong>Outlook</strong> Connector installation cannot be started).6
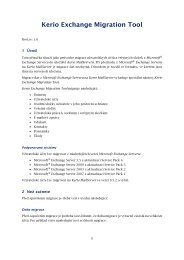
Chapter 2Installation of <strong>Kerio</strong> <strong>Outlook</strong> ConnectorInstallation of the <strong>Kerio</strong> <strong>Outlook</strong> Connector <strong>for</strong> <strong>Kerio</strong> MailServer is per<strong>for</strong>med by theinstallation wizard. Once the <strong>Kerio</strong> <strong>Outlook</strong> Connector installation is completed, it isnecessary to set a profile and an email account manually.Warning:• MS <strong>Outlook</strong> must be installed on the computer prior to the <strong>Kerio</strong> <strong>Outlook</strong> Connectorinstallation, otherwise the application will not function properly.• When the upgrade or downgrade of MS <strong>Outlook</strong> is per<strong>for</strong>med, <strong>Kerio</strong> <strong>Outlook</strong> Connectormust be reinstalled.At this point, the administrator can choose from two options of installation and MS <strong>Outlook</strong>configuration. The first option is to start an automatic installation which can beper<strong>for</strong>med along with migration of accounts from MS Exchange to <strong>Kerio</strong> MailServer. Thesecond option is a manual installation on the user’s computer. The section below describesboth installation types:2.1 Automatic installation of <strong>Kerio</strong> <strong>Outlook</strong> Connector<strong>Kerio</strong> <strong>Outlook</strong> Connector can be installed on client hosts during migration of user accountsfrom MS Exchange to <strong>Kerio</strong> MailServer. Together with the installation, basicsettings of the user profile and account are configured. In this way, administrator canattend all client stations in the network en bloc. Each user whose mailbox has beenmigrated to <strong>Kerio</strong> MailServer receives an en email message with a link to automatic installationof <strong>Kerio</strong> <strong>Outlook</strong> Connector.Click on the link to open a wizard, enter username including the domain (see figure 2.1)and password <strong>for</strong> the email account. After the basic settings have been specified, theinstallation is started. If the installation was completed successfully, profile creationconfirmation appears (see figure 2.2). Check Set it as a default profile to set this profileas the default one. After opening of the selected profile in MS <strong>Outlook</strong>, a MAPI accountnamed <strong>Kerio</strong> <strong>Outlook</strong> Connector Store will be created, where all user folders, messages,events as well as tasks previously used in MS Exchange will be stored.7
Chapter 2 Installation of <strong>Kerio</strong> <strong>Outlook</strong> ConnectorFigure 2.1User profile creatorFigure 2.2Successful profile creation in<strong>for</strong>mationNote: If <strong>Kerio</strong> <strong>Outlook</strong> Connector is installed in MS <strong>Outlook</strong> 2000, additional configurationof the profile created is necessary. The <strong>Outlook</strong> Address Book service must beadded by hand in the profile.Warning: EachMS <strong>Outlook</strong> profile may be used only by one account connected via <strong>Kerio</strong><strong>Outlook</strong> Connector. Functionality of POP3 and IMAP accounts located in the same profileis not affected by <strong>Kerio</strong> <strong>Outlook</strong> Connector Store.8
2.2 Manual installation of <strong>Kerio</strong> <strong>Outlook</strong> Connector2.2 Manual installation of <strong>Kerio</strong> <strong>Outlook</strong> ConnectorManual installation of the <strong>Kerio</strong> <strong>Outlook</strong> Connector <strong>for</strong> <strong>Kerio</strong> MailServer is per<strong>for</strong>med bythe installation wizard. Once the installation is completed, it is necessary to set a profileand an email account explicitly.Warning:• MS <strong>Outlook</strong> must be installed on the computer prior to the <strong>Kerio</strong> <strong>Outlook</strong> Connectorinstallation, otherwise the application will not function properly.• When the upgrade or downgrade of MS <strong>Outlook</strong> is per<strong>for</strong>med, <strong>Kerio</strong> <strong>Outlook</strong> Connectormust be reinstalled.Profile creationThe user profile is a file where personal in<strong>for</strong>mation in MS <strong>Outlook</strong> is stored. The profileis essential in the following situations: either the computer is accessed by multiple usersand each of them needs his/her own email address and personal settings or a user canaccess multiple mailboxes and wants to use different personal settings <strong>for</strong> each of them.Settings <strong>for</strong> a new profile can be configured in the Start → Settings → Control Panel →Mail menu:1. In the just opened Mail Setup — <strong>Outlook</strong> dialog, click on Show Profiles (see figure 2.3)Figure 2.3Profile setup9
Chapter 2 Installation of <strong>Kerio</strong> <strong>Outlook</strong> Connector2. The Mail dialog is opened (see figure 2.4) where profiles and user accounts may beadministered.Figure 2.4Creation of a profile3. Click on Add. A dialog box is opened with a blank entry <strong>for</strong> specification of the newprofile’s name. Any string is allowed as the name. At figure 2.5, the name entered is<strong>Kerio</strong>. Click OK to confirm settings and save the profile.Figure 2.5New profile10
2.2 Manual installation of <strong>Kerio</strong> <strong>Outlook</strong> Connector4. The new profile is empty (i.e. no email account is created in it). There<strong>for</strong>e, the wizardwhere a new account can be created is started automatically once a new profile iscreated.Figure 2.6Account settings — creation of new accountEmail accounts or an address book can be added or changed in the first dialog ofthe wizard. Once you create an account, select — Add a new email account (seefigure 2.6).5. In dialog two, select the Additional server types option (see figure 2.7) and click onNext.6. In the next dialog, server type can be selected (see figure 2.8). Select the <strong>Kerio</strong>MailServer option (it is often the only option offered here).11
Chapter 2 Installation of <strong>Kerio</strong> <strong>Outlook</strong> ConnectorFigure 2.7Account settings — server type selectionFigure 2.8Account settings — <strong>Kerio</strong> MailServer selection7. In the next step, the settings <strong>for</strong> <strong>Kerio</strong> <strong>Outlook</strong> Connector are defined. This can be12
2.2 Manual installation of <strong>Kerio</strong> <strong>Outlook</strong> Connectordone using two tabs in the <strong>Kerio</strong> <strong>Outlook</strong> Connector window:Figure 2.9Account settings — connection settingsServer NameDNS name or IP address of the MailServer.Secure Password AuthenticationThis option allows using the NTLM authentication. When checked, users arenot required to set usernames and passwords — the authentication will be usedinstead.In order <strong>for</strong> the NTLM authentication to be functional, both the computer aswell as the user account have to be parts of the domain used <strong>for</strong> authentication.Warning: NTLM (SPA) can be used only on Windows operating systems.UsernameUsername used <strong>for</strong> logging to the MailServer. If the user does not belong to theprimary domain, a complete email address is required (jwayne@company.com).PasswordUser password.13
Chapter 2 Installation of <strong>Kerio</strong> <strong>Outlook</strong> ConnectorPress the Check connection button to test if correct user data has been specifiedand if the connection to <strong>Kerio</strong> MailServer works properly. If the test is finishedsuccessfully, a corresponding User Name and Email Address are automatically filledin.Figure 2.10Account settings — portsUse the Advanced Settings tab to change some of the communication settings.IMAP and SMTP portPort used <strong>for</strong> communication with the server by IMAP and SMTP protocols. Theport numbers must be the same as the port numbers set in <strong>Kerio</strong> MailServer.HTTP portThe HTTP(S) protocol uses the Free/Busy calendar and applications <strong>for</strong> automaticupdates of <strong>Kerio</strong> <strong>Outlook</strong> Connector. Port number must be identical withthe port number <strong>for</strong> the HTTP(S) service used by <strong>Kerio</strong> MailServer.TimeoutTime spent by the application waiting <strong>for</strong> a response from <strong>Kerio</strong> MailServer.Secured Connection (SSL)This option enables the SSL-encrypted communication using IMAP, SMTP andHTTP.14
2.2 Manual installation of <strong>Kerio</strong> <strong>Outlook</strong> ConnectorThe Default Values button changes all settings to their default values.Connection name<strong>Kerio</strong> <strong>Outlook</strong> Connector Store is used by default. This name can be changed.Name and its visibility, email address and a Reply-To address can be set in the Nametab.Figure 2.11Account settings — sender in<strong>for</strong>mation settingsUse Following NameThis option allows to select any user name which will be used <strong>for</strong> outgoing mail.For better understanding, read the following examples:Example 1:Multiple users can use the email account. Using the Name tab, name of theaccount can be replaced by the name of a corresponding user. The following<strong>for</strong>mat will be used <strong>for</strong> the From item:the.particular.username@company.com Example 2:The Use Following Name option can be also used in the reversed principle. Itmeans that a common in<strong>for</strong>mation can be entered in the Name text field andthe account can belong to a particular user. The <strong>for</strong>mat of the From item will15
Chapter 2 Installation of <strong>Kerio</strong> <strong>Outlook</strong> Connectorbe as follows:Technical support NameThe name that appears in sent email messages.Email AddressThe email address from which the messages are sent.Address <strong>for</strong> repliesAddress to which replies will be sent (the Reply-To: item).Note: If 2000 is used, changes per<strong>for</strong>med on the Sender tab will take effect aftera restart of the application.8. Click OK to confirm and save the settings and to close the wizard. The profilecreated can be found in the list provided on the Mail page. Now, two options ofprofile modes are available (see figure 2.4):• Always use this profile — this option sets the new profile as default. Then, theprofile including the new account is opened automatically upon each startup ofMS <strong>Outlook</strong>.• Prompt <strong>for</strong> a profile to be used — if this option is used, a menu is opened providinga list of all profiles (see figure 2.12). Upon each startup of MS <strong>Outlook</strong>, one ofthese profiles can be selected.Figure 2.12Choose Profile16
2.2 Manual installation of <strong>Kerio</strong> <strong>Outlook</strong> ConnectorWarning: EachMS <strong>Outlook</strong> profile may be used only by one account connected via<strong>Kerio</strong> <strong>Outlook</strong> Connector. Functionality of POP3 and IMAP accounts located in thesame profile is not affected by <strong>Kerio</strong> <strong>Outlook</strong> Connector Store.Note: If you use MS <strong>Outlook</strong> 2000, make sure that you add <strong>Kerio</strong> MailServera <strong>Outlook</strong> Address Book items during configuration. In higher versions of MS<strong>Outlook</strong>, <strong>Outlook</strong> Address Book is added automatically.Data file settingsIn order <strong>for</strong> <strong>Kerio</strong> <strong>Outlook</strong> Connector to work properly, it is necessary to set the [<strong>Kerio</strong><strong>Outlook</strong> Connector Store] as the default data file. If the file has not been selected automaticallybe<strong>for</strong>e, it can be specified in theTools → Email Accounts→ View or ChangeExisting Email Accounts menu. The Email Accounts window contains the Deliver newemail to the following location option, where <strong>Kerio</strong> <strong>Outlook</strong> Connector Store can be selected.Figure 2.13Data file settings17
Chapter 2 Installation of <strong>Kerio</strong> <strong>Outlook</strong> Connector<strong>Kerio</strong> <strong>Outlook</strong> Connector can also check whether the <strong>Kerio</strong> <strong>Outlook</strong> Connector Store isselected as a default message store. By default, the check is enabled and if the <strong>Kerio</strong><strong>Outlook</strong> Connector Store is not selected as a default store when MS <strong>Outlook</strong> is started,a warning is displayed.Figure 2.14The store checking optionThis option can be enabled/disabled in the Tools → Options → Preferences menu (withthe <strong>Kerio</strong> Technologies logo).18
Chapter 3Upgrade the <strong>Kerio</strong> <strong>Outlook</strong> ConnectorUpgrades of <strong>Kerio</strong> <strong>Outlook</strong> Connector are per<strong>for</strong>med automatically. If a new versionof <strong>Kerio</strong> <strong>Outlook</strong> Connector is available, the module is updated immediately upon thestartup of MS <strong>Outlook</strong>.Warning: When the update is completed, MS <strong>Outlook</strong> is restarted automatically.The update process and the restart takes up to two minutes.The automatic update includes check of versions of <strong>Kerio</strong> MailServer and the <strong>Kerio</strong> <strong>Outlook</strong>Connector. If versions of the server and the client do not match, the user is in<strong>for</strong>medthat a different version of <strong>Kerio</strong> MailServer is installed on the server and that the clientshould be updated (see figure 3.1). Upon confirmation by the YES button, the version isupgraded/updated immediately (or downgraded).Figure 3.1Version collision notificationNote: If the server and client differ only in their build numbers (numbers in the notificationare the same), the client will work even if the update is rejected. If, however, versionnumbers are different (<strong>for</strong> example 6.2.0 versus 6.2.1), <strong>Kerio</strong> <strong>Outlook</strong> Connector cannotbe started unless updated.19
Chapter 4User login dataIf a user password has been changed by an administrator in <strong>Kerio</strong> MailServer, it canbe also changed in MS <strong>Outlook</strong>. The password can be changed directly in the accountsettings (click Tools → Email accounts → View / change the email accounts).The password can be also changed in the Login dialog that is displayed in case the<strong>Outlook</strong> application fails to log in with the existing login and password.Figure 4.1Login dialogThe dialog contains the following items:ServerDNS name or IP address of the computer that the user is logging to.UsernameUsername including domain.PasswordA textbox <strong>for</strong> the new password.Note: The settings described relate to cases where password is changed by the networkadministrator. Users can change their user passwords on their own using the <strong>Kerio</strong>WebMail interface. For details on how to change password, refer to the <strong>Kerio</strong> WebMail’suser guide which is available at the <strong>Kerio</strong> Technologies website.20
Chapter 5Shared and public folders5.1 Sharing and Mapping in MS <strong>Outlook</strong><strong>Kerio</strong> MailServer enables creating of shared folders and their mapping. A shared folderis any folder of any user who has decided to share it with other users (or groups ofusers) and grant specific rights to them. Mapping is subscription of shared folders byusers with appropriate rights.Here is an example <strong>for</strong> better understanding of the issue:There are two invoice clerks in a company. Both accept orders by email, so they usespecial email folders <strong>for</strong> these orders. If any of them goes <strong>for</strong> vacations or has to stay athome <strong>for</strong> any reasons, the other one needs to access her order folders.The clerks both need rights to access the work folders of each other. This can be enabledby sharing of the folders. They simply select folders to share and set access rights <strong>for</strong>the other user (the other clerk).If the user rights are set correctly, we can start the mapping. Mapping is always per<strong>for</strong>medby the user with whom the particular folder was shared. The user simply opensa corresponding dialog in MS <strong>Outlook</strong> where she specifies her name. The shared folderthen appears in the user’s folder tree.It only depends on the access rights assigned to the folder.available:Mapped folders can be• <strong>for</strong> reading only,• <strong>for</strong> reading and writing,• <strong>for</strong> administration purposes.Folder SharingIn MS <strong>Outlook</strong> with the <strong>Kerio</strong> <strong>Outlook</strong> Connector, folders can be shared in Propertiesdialog window of the particular folder. To open the Properties window, right-click ona corresponding folder. This opens the context menu, where the Properties option isincluded. In the dialog, use the Sharing and Security tab to set sharing preferences.The Sharing and Security taballows users to share a particular folder with other usersand set their user rights.21
Chapter 5 Shared and public foldersFigure 5.1Folder SharingThe Add button opens a window where a user or a group of users <strong>for</strong> sharing can beadded. To select a user from the address book, click the Address Book button.Click Remove to remove an individual user or a group of users and disable sharing.Permissions <strong>for</strong> a specific user can be set in the menu under the user list:• Admin — users with this level of rights can share a specific folder with other users.and remove items in the group or the group itself. This user is not allowed only toremove access rights <strong>for</strong> the user who created the group.• Editor — the user can edit items in the folder (add and remove items, etc.).• Reader — the user is allowed only to read the folder’s items. No editing is allowed.When setting the access rights, the special anyone or authuser user accounts can beused. This way, the access rights can be granted to all (or logged) users.Shared folder mappingFolder mapping is used <strong>for</strong> connecting the shared folders of other users. Use the Optionsdialog of the root folder to map the selected folder (right-click the <strong>Kerio</strong> <strong>Outlook</strong>Connector Store root folder and select Properties <strong>for</strong> <strong>Kerio</strong> <strong>Outlook</strong> Connector).Use the Folder mapping tab to connect shared folders of a selected user. In theMapping name textbox, the email address of the folder’s owner is specified as~owner@company.com. If one or more folders are shared by the owner, these folderswill be displayed in the Folder menu. To confirm the connection, click the Add button22
5.1 Sharing and Mapping in MS <strong>Outlook</strong>Figure 5.2Context menu of the root folderFigure 5.3Folder mappingnext to the list of folders. If the folder was connected properly, it appears in the listof mapped folders in lower part of the window. From here, the folders can be removedusing the Remove button.Public folders are mapped to all users automatically.23
Chapter 5 Shared and public folders5.2 Public and archive foldersPublic foldersPublic folders can be created only by users with appropriate access rights. By default,these rights are assigned to the admin of the <strong>Kerio</strong> MailServer’s primary domain. Adminis allowed to grant administrator rights to other users.To create a public folder, simply right-click the Public folders folder and select New folderin the pop-up menu. Specify the folder name and type in the corresponding fields of thedialog box that appears.It is also necessary to set the user rights <strong>for</strong> all users that will access the public folder.The rights are added the same way as in case of sharing.Public folders will be shared automatically with all selected users as subfolders of Publicfolders.<strong>Archive</strong> foldersThese folders are available to users with corresponding rights only. By default, only theadmin of the primary domain is allowed to access the folders (the first account createdin the configuration wizard during the installation of <strong>Kerio</strong> MailServer).Figure 5.4<strong>Archive</strong> folders<strong>Archive</strong> folders can also be made available <strong>for</strong> other users. The sharing process is thesame as <strong>for</strong> other folders (<strong>for</strong> description, refer to chapter 5.1). However, since messagesof all users are archived, only a confidential administrator (or a tiny group of confidentialpersons) should be allowed to access these folders.24
Chapter 6Rules <strong>for</strong> incoming messagesRules <strong>for</strong> sorting and filtering mail at the server can be defined using <strong>Kerio</strong> <strong>Outlook</strong>Connector (the same rules that can be defined in the <strong>Kerio</strong> WebMail interface ).Warning: After installation of the <strong>Kerio</strong> <strong>Outlook</strong> Connector, it will not be possible to usethe standard MS <strong>Outlook</strong>’s dialog <strong>for</strong> administration of rules <strong>for</strong> incoming mail and alertsRules and alerts (under Tools → Rules and alerts).Use the special dialog in the root folder options to create rules <strong>for</strong> incoming messages(right-click the <strong>Kerio</strong> <strong>Outlook</strong> Connector root’s → <strong>Kerio</strong> <strong>Outlook</strong> Connector Propertiesfolder).Figure 6.1Rules <strong>for</strong> incoming messages25
Chapter 6 Rules <strong>for</strong> incoming messagesRoot folder options include several tabs. Open the Rules (see figure 6.1). The tab includesrules defined. You can enable or disable rules using appropriate matching fields. Markany rule to view detailed in<strong>for</strong>mation about this rule in the Rule description window.Rules are tested from the top downwards. You can use the Up and Down buttons tomove rules within the list.The following buttons and functions are available:• New — creates a new rule (see below).• Modify — edits selected rule (see below).• Copy — copies an existing rule. This rule must be renamed. This function can beuseful when you intend to create a new rule that differs only in a few parametersfrom the selected rule.• Remove — removes the selected rule.• Edit — edits the rule source using the Sieve code (encoding used <strong>for</strong> sorting rulesdescriptions). We recommend you not to use this function unless you are experiencedin the Sieve code.The Rules tab may include two predefined rules which cannot be edited as describedbelow. These rules are the Spam and Out of office rules.The Spam rule moves any messages recognized by the server as spam to the Spamfolder. If this rule is existing, it was created by the <strong>Kerio</strong> MailServer administrator whilecreating the user account. To set this rule, go to the Tools → Options → Spam menu. Tolearn more on this rule and related spam topics, refer to chapter 7.The Out of office rule provides automatic answers to email messages where the recipientsare absent to do it by themselves. This rule can be set in Tools → Options → Out of office.For details on this topic, see chapter 6.2.6.1 Creating or changing a ruleUse the New or the Modify button to open the Rule Editor dialog which includes thefollowing sections:1. Select the conditions <strong>for</strong> your rule — conditions that must be kept so as the emailadministration meets this rule. One or more conditions from this list can be selected:Where the recipient (To or Cc) line contains addressThe To or the Cc (Copy To) entry includes defined string.26
6.1 Creating or changing a ruleFigure 6.2Rule EditorWhere the From line contains addressThe From entry contains the string.Where the To line contains addressThe To entry contains the string.Where the Cc line contains addressThe Cc (Copy To) entry contains the string.Where the Sender line contains addressThe Sender entry includes the string. This entry is often contained in messagessent automatically (mailing lists, etc.) where it stands <strong>for</strong> the From entry.Where the Subject contains specific wordsThe Subject entry contains defined string(s).<strong>Kerio</strong> MailServer spam filter can be set so that the Subject entry will includeresults of antispam tests (the value is represented by asterisks). Using thisfeature spam may be filtered easily. Simply insert the number of asterisks thatwill specify the rule. Messages that match this rule will accept this specification.27
Chapter 6 Rules <strong>for</strong> incoming messagesWhere the message has an attachmentAt least one attachment must be appended to the message.Where the message size is more than sizeThe message size exceeds the specified value. To specify the size you can selectfrom the following units: bytes (B), kilobytes (KB) and megabytes (MB).Where the message was detected as a spamSpam are undesirable messages sent to users. You can use the <strong>Kerio</strong> MailServerantispam filter to protect your users from such messages. This filter uses specialheader items which include message evaluation and in<strong>for</strong>mation about appliedantispam testing.For all messagesThis rule is valid <strong>for</strong> all incoming messages.2. Select the Actions <strong>for</strong> your rule — select an action that will be taken <strong>for</strong> messagesmatching with condition in section 1Move the message to a specified folderMove the message to the selected folder (you can choose a folder from a list).You can also specify shared or public folders in one of the following <strong>for</strong>ms:~user/shared_folder or #public/public_folder if the appropriate user has writerights <strong>for</strong> this folder.Forward the message to an addressForward to a specified address. In this case no other actions are per<strong>for</strong>med.Reject message (return to sender)The message will not be stored in a local mailbox and the user will never bein<strong>for</strong>med about it.Keep in InboxThis action must be combined with another (i.e. with Move, Forward, Reject,etc.). It cannot be combined with the Discard the message action.Discard the messageThe message will not be stored in any local folder. This action cannot be combinedwith the Keep in INBOX action.Send notificationSends notification (i.e. a short text message) to a specified address, typicallyto a cellular phone. It is necessary to define even cellular phones by emailaddresses, <strong>for</strong> example john.bluemonday@t-mobile.com.The following macros can be used in the message text:28
6.1 Creating or changing a rule• $from$ — the notification will show the message sender or the address containedin the From field.• $from-name$— the notification will show the name of the message sender.• $subject$ — the notification will show the message subject.• $text$ — the notification will show the message text. Only the first 128characters will be displayed. To reduce the number of displayed characters,edit the macro as follows: $text[50]$ (the number in brackets representsthe maximum number of characters displayed in the notification).Send autoreplyThe automatic reply with a specified text. The automatic reply will be sent toeach sender’s address only once a week (so that the automatic reply does notcreate a loop in case there is an automatic reply set at the other end).Stop processing more rulesIf the message complies with this rule, no more rules will be processed. Usingthis function a user can create more complex rule systems <strong>for</strong> individualcondition types. Rules are tested rule by rule from the top downwards.Note: Notifications and autoreplies are protected against looping. This means thatthe system does not send a notification in reply to received notification or automaticreplies. The detection of notification or automatic replies is per<strong>for</strong>med using specialitems in the message header. Only notifications and automatic replies generated by<strong>Kerio</strong> MailServer are detected.3. Rule description — description of the rule function (it is generated automaticallyaccording to the rule definition). Highlighted entries are interactive — click them toset other parameters.Figure 6.3Select People29
Chapter 6 Rules <strong>for</strong> incoming messagesClick on the Options button to open the Rule Condition Options dialog — see above.isThe entry must exactly match with the specification.is notcontainsThe entry must not match with the specification.The entry must contain the (sub)string.does not containmatchesThe entry must not contain the specified (sub)string.The entry must match the expression (the expression can contain the ? and *wildcards that can represent one or more characters).does not matchThe entry must not match the expression.Figure 6.4Rule Condition OptionsNote: If more than one condition is defined, an appropriate logical operator must beused (and — both conditions must be met, or — at least one of the conditions mustbe met).Example: You intend to create a rule that would drop all messages incoming from thespam.com domain which often sends undesirable messages (spam).1. Select the Where the line From contains condition in the first dialog section.2. Select the Discard the message option in the second section.3. Select the contains option in the third section and specify the domain name(spam.com).4. Enter a name <strong>for</strong> the rule (i.e. Drop all messages from the spam.com domain).30
6.2 Out of office6.2 Out of officeA special sieve rule <strong>for</strong> automatic replies can be set on the Out Of Office tab in Tools →Options. This rule can be used when a user is not available in the office <strong>for</strong> a certaintime. Enable the rule and specify the message that will be used as an automatic reply.Figure 6.5The Out of office tabNote: The I’m out of office rule beats the rules <strong>for</strong> incoming messages (see chapter 6.1).If the filter includes a rule which sends automatic replies, the action set in this rule willnot be taken.The I’m out of office rule consists of the following items:• Condition: The rule will apply to all incoming messages except email sent from mailinglists. The automatic answer is not sent where answering to another automaticemail (this should prevent users from email loops).• Action: The text entered will be sent to each sender’s address included in an incomingmessage once a seven days.If the rule is enabled (i.e. the I’m out of office option is on), a question whether theautomatic replies would be on or off is issued (see figure 6.6) upon each startup ofMS <strong>Outlook</strong>. In this case it is supposed that once you run MS <strong>Outlook</strong>, you are not out ofoffice any more and you are now able to reply to your email. This feature also ensuresthat you do not <strong>for</strong>get to turn the rule off once returned to the office.31
Chapter 6 Rules <strong>for</strong> incoming messagesFigure 6.6Possible cancellation of the Out of office rule32
Chapter 7Spam filter<strong>Kerio</strong> MailServer contains the SpamAssassin antispam filter. SpamAssassin is based oncontent analysis (spam messages usually contain specific attributes that can be searched<strong>for</strong> and evaluated by the filter). Each message is assigned a numeric score; if this valueexceeds the limit set in <strong>Kerio</strong> MailServer, the message is marked as spam.The spam filter may let some spam messages through from time to time by mistake(their score is low) and mark some regular messages as spam (their score is too high).For the reasons above, the antispam filter allows modification to the database used <strong>for</strong>recognition of spam messages. This method, however, requires user input. Users haveto reassign the incorrectly evaluated messages to correct types (spam / non-spam) sothat the filter learns to recognize them in the future.<strong>Kerio</strong> <strong>Outlook</strong> Connector uses the Spam and Not spam buttons located in the toolbar tomark the messages correctly. Highlight the incorrectly marked message and click oneof the buttons. The filter receives in<strong>for</strong>mation regarding update of the database. Thisdecreases chance <strong>for</strong> incorrect deliveries.You can add the Spam and Not spam buttons to the toolbar in Tools → Customize menuor remove them. The Toolbars tab includes the <strong>Kerio</strong> <strong>Outlook</strong> Connector option. Simplyselect or unselect it by clicking to enable/disable the bar with the buttons.The Spam button displays a warning message by default. To treat the message as spamand discard it, a confirmation is required. Use the Tools → Options menu on the Spamtab (see figure 7.1) to enable/disable displaying of the warning message.Warning: If the Spam/Not Spam buttons are not available after installation or startup ofMS <strong>Outlook</strong>, it is necessary to remove <strong>Kerio</strong> <strong>Outlook</strong> Connector from all <strong>for</strong>bidden itemsof MS <strong>Outlook</strong> (see chapter 12.1).7.1 The Spam tabThe Spam tab provides several tools to fight spam:Confirm marking mail message as spamThis option enables/disables alert window displayed upon clicking on the Spambutton which is available in the toolbar.33
Chapter 7 Spam filterFigure 7.1The Spam tabMove spam to the Junk E-mail folderIf this option is enabled, all email considered as spam will be delivered to the Spamfolder automatically.Note: The Move spam to the Junk E-mail folder rule beats rules <strong>for</strong> incoming mail(see chapter 6). If the filter includes any rule which in any way handles messagesmarked as spam, the action set in this rule is ignored.This option also enables adding email addresses to the list of trustworthy users(see below).Also trust senders from ...So called Spam whitelist In this list, senders that will automatically be consideredas non-spammers can be added/removed.A new email address can be added in the Add e-mail address entry. This addressmust be specified in the username@domain <strong>for</strong>mat.Also trust senders from my Contacts folderIf this option is enabled, messages marked as spam which were sent from addressesincluded in the main contact folder are not automatically moved to the Spam folder.This option supposes that email addresses in one’s contact list are trustworthy. Ifthis option is enabled, it is not necessary to include addresses saved in the contactlist in the whitelist.34
357.1 The Spam tab
Chapter 8Address books and contacts8.1 Searching in address books via the MAPI interfaceMS <strong>Outlook</strong> extended by the <strong>Kerio</strong> <strong>Outlook</strong> Connector enables searching through the MS<strong>Outlook</strong> Address Book via the MAPI interface. <strong>Outlook</strong> Adress Book is a special folderallowing search email addresses where addresses are filled in automatically. Addressesare filled in automatically <strong>for</strong> example when an address is being specified during a newmail composition. Simply enter initial characters of the first or second name string tothe To:, Cc: or Bcc: entries to make the client search <strong>for</strong> matching items and fill theaddress in automatically. If multiple email addresses matching the string are found,a menu is opened where you can select from the options.To avoid misunderstandings, the following terms must be explained:• <strong>Outlook</strong> Address Book — a special folder where MS <strong>Outlook</strong> looks up email addresses(e.g. when addresses are filled in automatically or where email addresses are searchedby first or second names).Unlike a contact folder, the address book does not include additional in<strong>for</strong>mationto first and second names and the corresponding email address. Address books aresimple lists of possible recipients of email, meetings and delegated tasks.• Contacts — the folder including user contacts. These folders can be private, publicor it is possible to subscribe a shared folder. Each contact item includes first name,second name and additional info such as address, phone numbers, email addresses,dates of birth, etc. Address books do not include this in<strong>for</strong>mation.In MS <strong>Outlook</strong>, any contact folder can be added as a directory to <strong>Outlook</strong> AddressBooks. All contact items included in the subscribed contact folders will then be searchedthrough when the function of automatic completion of email addresses is applied.Once a contact folder is added, full names and an email addresses of all contacts includedin the particular folder are added to the address book. Other in<strong>for</strong>mation associatedwith contacts are not transferred to address books. It is not possible to search incontacts <strong>for</strong> example by date of birth or department.Warning: The search criteria is first and second names in contacts (the Full name item).It is not possible to search by usernames or email addresses.36
8.1 Searching in address books via the MAPI interfaceConnection of a folder as a directory does not influence the contact folder. The data isnot changed or moved. Each contact folder can be used as be<strong>for</strong>e — it is possible to add,remove and contacts, etc. The only effect is that whenever a new contact is added, itsfirst name and surname and email address will be added also to the address book.By default, searches are per<strong>for</strong>med in the <strong>Outlook</strong> Address Book directory. The <strong>Outlook</strong>Address Books administration can be found in the Tools → E-mail accounts → View orchange existing directories or address books menu (see figure 8.1).Figure 8.1Directory managementIt is possible to add to the MS <strong>Outlook</strong> Address Book any folders with contacts wherelookup should be per<strong>for</strong>med.The following settings must be done <strong>for</strong> addition of a contact folder as a directory:1. Right-click on the contact folder.2. In the context menu, select Properties...3. This opens a dialog where the contact folder properties can be edited. Open the<strong>Outlook</strong> Address Book tab (see figure 8.2).37
Chapter 8 Address books and contactsFigure 8.2Show this folder as an e-mail Address Book4. Enable the Show this folder as an e-mail Address Book option.5. Click OK to confirm settings.8.2 Searching contacts via the LDAP directory serviceMS <strong>Outlook</strong> allows searching in contacts via the LDAP service. The LDAP directory serviceallows searching of user in<strong>for</strong>mation (email addresses, above all), as well as automaticfilling of addresses in email headers.<strong>Kerio</strong> MailServer includes a proprietary built-in LDAP database which can also be used<strong>for</strong> this purpose. It is also possible to use any other LDAP database on other servers ifavailable.It is necessary to set properly the address book where contacts will be searched to allowMS <strong>Outlook</strong> use the LDAP service to access contacts stored in <strong>Kerio</strong> MailServer.Creating an LDAP directoryLDAP directories can be added in the Tools → Email accounts menu:1. This opens the wizard where email accounts and address books can be created (seefigure 8.3). Select the Add a new address book option.38
8.2 Searching contacts via the LDAP directory serviceFigure 8.3A new account/directory dialog box — add a new directoryClick on Next.2. The next dialog provides two directory types. Select the Internet Directory Service(LDAP) option (see figure 8.4).Click on Next.3. The third dialog allows specification of basic data which can be used <strong>for</strong> connectionto a corresponding LDAP database (see figure 8.5):39
Chapter 8 Address books and contactsFigure 8.4A new account/directory dialog box — directory type selectionFigure 8.5A new account/directory dialog box — setting of directory service40
8.2 Searching contacts via the LDAP directory serviceServer in<strong>for</strong>mationDNS name (e.g. mail.company.com) or IP address (e.g.) of the host that <strong>Kerio</strong>MailServer is running on.Logon in<strong>for</strong>mationThis data is used by users to log into the LDAP server (equal to the name andpassword <strong>for</strong> user login to mailboxes). The LDAP server in <strong>Kerio</strong> MailServerdoes not support anonymous logins — the user login is always required.4. Click on More Settings (see figure 8.5) to open more options <strong>for</strong> the directory servicesettings. The dialog consists of two tabs:ConnectionThe SSL encryption and port number <strong>for</strong> traffic can be set on the Connectiontab. Default values are predefined, so it is recommended not to edit this dialogunless necessary.If the LDAP service is running on a server’s non-standard port (network administratorsare aware of this in<strong>for</strong>mation), it is necessary to change the portnumber.Port number should be also changed where SSL encryption is to be used. Port636 is used as default <strong>for</strong> the secured version of LDAP service (see figure 8.6).Figure 8.6<strong>Microsoft</strong> LDAP Directory — Connection41
Chapter 8 Address books and contactsSearch <strong>for</strong>:On the Search <strong>for</strong> tab, set Search base.Figure 8.7 <strong>Microsoft</strong> LDAP Directory — Search <strong>for</strong>If you want to access all private and subscribed shared and public folders, leavethe entry blank or enterfn=ContactRootSpecify appropriate branch of the LDAP database in more details to limit accessonly to certain folders. To better understand various alternatives, read thefollowing examples:• cn=jsmith@company.com,fn=ContactRoot— it will be searched only through contact files of the userjohn@company.com• fn=personal,fn=ContactRoot — it will be searched only through contactfiles of users that are logged into the LDAP server. This option is identicalwith the previous one, however, it is not necessary to specify username(or email address) of the user. This feature can be used <strong>for</strong> example <strong>for</strong>configuration of more clients, etc.• fn=public,fn=ContactRoot— it will be searched only through public contact files• fn=Contacts,cn=jsmith@company.com,fn=ContactRootonly the Contacts folder of user jsmith@company.com will be scanned• fn=PublicContacts,fn=public,fn=ContactRoot42
8.3 Contacts <strong>for</strong>warding— it will be searched through the public PublicContacts folder onlyWhen all necessary settings are done, click on OK to save the parameters andthen on Next to open the final dialog of the wizard (see figure 8.8).Figure 8.8A new account/directory dialog box — finalizing a directory creation5. Save the settings by the Finish button.Note: The settings shown here applies to MS <strong>Outlook</strong> 2003. Corresponding settings <strong>for</strong>individual versions can be found in the Tools → Accounts menu.8.3 Contacts <strong>for</strong>wardingIt is recommended to <strong>for</strong>ward the contacts in the vCard <strong>for</strong>mat (Actions → Forward asvCard). When a contact is opened in a client application that supports vCard <strong>for</strong>mat(<strong>Kerio</strong> WebMail, Mozilla Mail, etc.), the received contact can be added to the contactsfolder.And the other way round, If MS <strong>Outlook</strong> receives a message with a contact in vCard<strong>for</strong>mat, the recipient can simply click the link in the message and the standard <strong>for</strong>m <strong>for</strong>creating new messages is opened.43
Chapter 8 Address books and contactsFigure 8.9Forward as vCard8.4 Distribution listsSince 6.2, <strong>Kerio</strong> MailServer supports storage of distribution lists on the server. Thanks tothis fact, distribution lists created in MS <strong>Outlook</strong> can be available also in <strong>Kerio</strong> WebMail,and vice versa.Distribution lists are groups of email addresses used <strong>for</strong> sending of collective email.Simply use a special dialog in MS <strong>Outlook</strong> to complete desired email addresses and savethem under a common name. Any time when sending an email message to such a group,simply enter the name of the corresponding distribution list in the To entry instead offilling in all addresses involved.Distribution lists are helpful if email is often sent to a group of addressees. For example,it can be a group of people wtih whom you often communicate in your work (it isa certain alternative to mailing lists or to group addresses).To learn more on how to create and use distribution lists, refer to any reference guideaddressing MS <strong>Outlook</strong> issues.44
Chapter 9Usage of the Free/Busy calendarThe Free/Busy calendar is a public calendar showing in<strong>for</strong>mation about free and busytime of users involved. It is necessary that these users have an email account in <strong>Kerio</strong>MailServer and that they use a calendar inMS Entourage, MS <strong>Outlook</strong> or in <strong>Kerio</strong> WebMail.The Free/Busy calendar does not display content of events, it only shows when the particularevent takes place and whether a user is free or busy. There<strong>for</strong>e, this calendar issuitable <strong>for</strong> office purposes such as finding out whether people involved in a problemare free <strong>for</strong> a meeting, <strong>for</strong> example. However, it is not possible to view also what theuser is doing at a particular time. The only in<strong>for</strong>mation that can be found is that theuser is either busy or free at a particular moment.This implies that this type of calendar is perfect <strong>for</strong> planning of meetings and sessions.The user who adds a new meeting can view when the people involved are free or busy.It is there<strong>for</strong>e not necessary to ask individual users when they are free. However, thefollowing conditions must be met to enable this function:• all users must have an account in <strong>Kerio</strong> MailServer,• the users involved must use the calendar in MS Entourage, in MS <strong>Outlook</strong> (with the<strong>Kerio</strong> <strong>Outlook</strong> Connector) or in <strong>Kerio</strong> WebMail to handle their events.The Free/Busy calendar displays all meetings and events included in the main calendarfolder and its subfolders. If you want that some events (e.g. items of a private calendar)are not shown in the Free/Busy calendar, create a new calendar folder out of the branchof the main calendar and its subfolders.9.1 Usage of the Free/Busy calendarFeatures of the Free/Busy calendar are most helpful <strong>for</strong> initiation of meetings in thecalendar. Meetings are created in a similar way as events. Open a new event dialog toenter subject and site where the event (meeting) will take place. Switch to the Schedulingtab and enter individual participants of the meeting (see figure 9.1). Once participantsare added, their free/busy calendar items relevant <strong>for</strong> the particular time set <strong>for</strong> themeeting is displayed. The different shades of blue or violet indicate the busyness of theusers. The users with no data on the free/busy server (users with no account, users thatdo not use the calendar) are marked with grey.Warning: It is necessary to specify each user by their usernames and domains(username@domain). Aliases cannot be used to display Free/Busy in<strong>for</strong>mation.45
Chapter 9 Usage of the Free/Busy calendarFigure 9.1Usage of the Free/Busy calendarThe violet box in the schedule represents the time span of the scheduled meeting. Itcan be moved, extended or narrowed down using the cursor. The meeting start time ismarked with green color, end time is marked with red.Warning:• For successful authentication to Free/Busy server, specify the Subject item in theAppointment tab.• If only HTTPS traffic is allowed in <strong>Kerio</strong> MailServer (e.g. <strong>for</strong> security reasons), it is necessarythat a trustworthy <strong>Kerio</strong> MailServer certificate is installed inInternet Explorerof the client station (a self-signed certificate can be used). Otherwise, new versionswill not be updated automatically.46
Chapter 10Private itemsPrivate events, contacts and tasks are useful especially <strong>for</strong> sharing of folders. If a usershares a calendar or a contact folder <strong>for</strong> another user(s), items set as private can beopened and edited only by the folder’s owner.Private contacts and tasks in subscribed folders are not displayed. In case of privateevents, only time <strong>for</strong> which the event is set is displayed. The Private event string isdisplayed as subject. Such events cannot be opened or edited.Private items can be created as follows:1. Open a dialog box where a new event, contact or task can be created.2. Insert relevant in<strong>for</strong>mation.3. On the first tab, enable Private.4. Save changes by clicking Save and Close.Note: As to private events and their displaying in the Free/Busy calendar, time and levelof busyness is displayed if the private event is included in the Calendar folder or in anyof its subfolders.Up to <strong>Kerio</strong> MailServer 6.1.2, events were not classified as public or private. Since 6.1.3,this in<strong>for</strong>mation is distinguished. By default, all events created in <strong>Kerio</strong> MailServer 6.1.2and lower are set as public in 6.1.3 and higher. To make a public event a private one,simply open the event and change the classification by hand.Private events are different from private contacts and tasks:• Private eventsTo enable their display in the calendar, they must be downloaded from the server tothe particular email client. This behaviour might slightly endanger security.Private events are treated as private only if the client where the private event folderis viewed supports this feature. In other client applications, it is possible to view andedit any events without any restrictions by users with appropriate access rights. Thisalso implies that private events are not well secured.• Private contacts and tasks47
Chapter 10 Private itemsPrivate contacts and tasks are kept in a folder on the server. This implies that ifa user shares a folder with another user, private contacts and tasks are not availableto this user. The client application can download only such contacts and tasks whichare not marked as private.48
Chapter 11NotesSince 6.2, <strong>Kerio</strong> MailServer supports also notes folders. This implies that note foldersare stores on the server and you can access them also via <strong>Kerio</strong> WebMail.These folders work the same as the other supported folder types:• note folders are stored on the server in the folder tree,• public note folders can be created,• note folders can be shared with other users and it is also possible to set access rights<strong>for</strong> other users.To learn what note folders are used <strong>for</strong> as well as how to handle them, refer to MS <strong>Outlook</strong>user guides.49
Chapter 12Troubleshooting12.1 Spam/Not Spam buttons displaying problemsSometimes it may happen that the Spam/Not Spam buttons may be missing on the toolbarwhen the <strong>Kerio</strong> <strong>Outlook</strong> Connector or MS <strong>Outlook</strong> is started. In such a case, it isnecessary to allow <strong>Kerio</strong> <strong>Outlook</strong> Connector in <strong>for</strong>bidden items of MS <strong>Outlook</strong>.The dialog <strong>for</strong> <strong>for</strong>bidden items can be found under Help → About <strong>Microsoft</strong> Office <strong>Outlook</strong>.Click Disabled items to open the dialog and simply uncheck <strong>Kerio</strong> <strong>Outlook</strong> Connector.12.2 Installation and configuration of MS <strong>Outlook</strong> 2000The installation of <strong>Kerio</strong> <strong>Outlook</strong> Connector in <strong>Outlook</strong> 2000 is different from the installationin previous versions:1. <strong>Outlook</strong> 2000 must have Service Pack 3 installed; if the Service Pack is missing, theinstallation of <strong>Kerio</strong> <strong>Outlook</strong> Connector will fail.<strong>Outlook</strong> 2000 must be installed in the Corporate or Workgroup mode. If the installationof <strong>Outlook</strong> 2000 is per<strong>for</strong>med in the Internet only mode, change the mode inTools → Options → Email services → Reconfigure email support (the installation discof <strong>Outlook</strong> 2000 might be required).2. Another difference applies to the new profile creation. For more in<strong>for</strong>mation aboutprofiles and their creation in <strong>Outlook</strong>, see chapter 2.2.After a successful installation of <strong>Kerio</strong> <strong>Outlook</strong> Connector, create a new profile. Thiscan be done in the following ways:• Creating of multiple profiles by a migration (per<strong>for</strong>med by the system administrator).• Creating a profile by hand.If a migration tool is used <strong>for</strong> profile creation, click Tools → Services and add the<strong>Outlook</strong> Address Book item to the profile. If the <strong>Outlook</strong> Address Book will not beadded to the profile, contacts folders will not work properly.50
12.3 Messages signed in MS <strong>Outlook</strong>If a profile is created by hand, it is possible to follow the method described in chapter2.2. The only difference is that it is necessary to add the <strong>Kerio</strong> MailServer and<strong>Outlook</strong> Address Book services during creation. Both services can be added to theprofile later in Tools → Services menu.12.3 Messages signed in MS <strong>Outlook</strong>If your messages are digitally signed, check the Send clear text signed message whensending signed messages option under Tools → Options on the Security tab (see figure12.1). This option provides that also <strong>Kerio</strong> WebMail users may read the message.Figure 12.1Settings of verification of signed messages51
Chapter 12 TroubleshootingNote: The settings shown here applies to MS <strong>Outlook</strong> 2003. For MS <strong>Outlook</strong> (2000/XP),the settings may differ slightly.12.4 Error in settings of contact folders used as address booksDuring the startup process of MS <strong>Outlook</strong> extended with the <strong>Kerio</strong> <strong>Outlook</strong> Connector,a warning can be displayed that in<strong>for</strong>ms of an error detected in settings of contactfolders which are used as address books (see figure 12.2).Figure 12.2Error in settings of contact folders used as address booksThis error can be fixed by removing all address books in MS <strong>Outlook</strong>:1. In the Tools menu, select E-mail Accounts to open a wizard where new accountsand address books can be created. In the wizard, select View or change existingdirectories or address books.2. Remove all listed address books and close the wizard.3. Restart MS <strong>Outlook</strong>.Removing address books does not delete contact folders. All contacts are kept intact.Once all address books are removed from MS <strong>Outlook</strong> and the application is restarted,it is possible and recommended to add the address books again (<strong>for</strong> details, see chapter8.1).52
Chapter 13<strong>Kerio</strong> Synchronization Plug-in<strong>Kerio</strong> Synchronization Plug-in is an extension to MS <strong>Outlook</strong> enabling basic groupwarefeatures (calendars and contacts) in private folders. The <strong>Kerio</strong> Synchronization Plug-inwas designed <strong>for</strong> users that travel frequently and need to have access to email, calendar,and contacts locally. Besides that, the main benefit of the plug-in is the offline mode,where it is possible to switch to the online mode and connect to <strong>Kerio</strong> MailServer tosynchronize changed data.<strong>Kerio</strong> Synchronization Plug-in uses the SyncML protocol. SyncML is a versatile protocolused to synchronize data acquired at various types of devices, in any network and in anystore. In <strong>Kerio</strong> Synchronization Plug-in it is based on the HTTP service.Warning: <strong>Kerio</strong> MailServer supports synchronization by the SyncML protocol only <strong>for</strong>the client extension of <strong>Kerio</strong> Synchronization Plug-in.<strong>Kerio</strong> Synchronization Plug-in also includes Help which can be triggered from the MS <strong>Outlook</strong>’stoolbar. This help can also be found in Start → Programs → <strong>Kerio</strong> → SynchronizationPlug-in.<strong>Kerio</strong> Synchronization Plug-in can be applied to the following versions of MS <strong>Outlook</strong>:• MS <strong>Outlook</strong> 2000 + version Service Pack 3• MS <strong>Outlook</strong> XP + version Service Pack 3• MS <strong>Outlook</strong> 2003 + version Service Pack 2Warning: It is not possible to use <strong>Kerio</strong> <strong>Outlook</strong> Connector and <strong>Kerio</strong> SynchronizationPlug-in within the same profile. Both applications can be installed and used in oneMS <strong>Outlook</strong>, however, they cannot be both used by one account simultaneously. <strong>Kerio</strong>Synchronization Plug-in can synchronize only in MS <strong>Outlook</strong>’s private folders. Theseitems folders can be combined only with standard IMAP or POP3 accounts. It is notpossible to use it <strong>for</strong> synchronization of MAPI accounts.TIP: If you want to use all groupware features provided by the <strong>Kerio</strong> <strong>Outlook</strong> Connectorand to work in the mail client offline at the same time, we recommend to set MS <strong>Outlook</strong>as described in chapter 14.53
Chapter 13 <strong>Kerio</strong> Synchronization Plug-in13.1 Installation<strong>Kerio</strong> Synchronization Plug-in is installed only once. Updates are per<strong>for</strong>med automatically(see below).Standard wizard is used <strong>for</strong> the installation.instructions:For successful installation, follow these1. If MS <strong>Outlook</strong> is running, close it.2. Install <strong>Kerio</strong> Synchronization Plug-in.3. In MS <strong>Outlook</strong>, create a new profile (<strong>for</strong> detailed instructions, refer to chapter 2.2).4. A particular POP3 or IMAP account is set withing creation of the profile.5. Start MS <strong>Outlook</strong> and set synchronization as described in section 13.2If more than one user share one MS <strong>Outlook</strong> and they want to use <strong>Kerio</strong> SynchronizationPlug-in <strong>for</strong> their accounts, the following conditions must be met:1. each user uses a proper profile (in each profile, synchronization will be per<strong>for</strong>medat one account),2. each user installs the <strong>Kerio</strong> Synchronization Plug-in separately,3. the first installation is per<strong>for</strong>med under the local administrator’s account,4. each user has the “Power User” rights or at least each user is allowed to write in thedirectory where the <strong>Kerio</strong> Synchronization Plug-in is installed.Warning:• MS <strong>Outlook</strong> must be installed on the computer prior to the <strong>Kerio</strong> SynchronizationPlug-in installation, otherwise the application will not function properly.• If MS <strong>Outlook</strong> version is updated, <strong>Kerio</strong> Synchronization Plug-in must be reinstalled.Automatic updates<strong>Kerio</strong> Synchronization Plug-in is updated automatically. During the update, a progressbar is displayed showing current status of the update process. When the update processis finished, the bar is closed and MS <strong>Outlook</strong> is available.Warning: If only traffic over HTTPS is allowed in <strong>Kerio</strong> MailServer (<strong>for</strong> server’s securityreasons, <strong>for</strong> example), apply settings addressed in section 13.3.54
13.2 SynchronizationNote: <strong>Kerio</strong> Synchronization Plug-in is updated immediately upon startup of MS <strong>Outlook</strong>(be<strong>for</strong>e the profile selection). There<strong>for</strong>e, <strong>Kerio</strong> Synchronization Plug-in is updated evenif you want to work in a profile which is not used by <strong>Kerio</strong> Synchronization Plug-in.13.2 SynchronizationSynchronization is per<strong>for</strong>med in the main personal calendar folder and the main personalcontacts folder only. Optionally, synchronization of the main public calendar/contactsfolder can also be set.Within synchronization, only changed and modified in<strong>for</strong>mation is exchanged betweenthe MailServer and MS <strong>Outlook</strong>. Objects changed both at the server and the client will beduplicated.If the installation is completed successfully, the user is in<strong>for</strong>med by an alert that <strong>Kerio</strong>Synchronization Plug-in must be set first (see figure 13.1). Simply enter required in<strong>for</strong>mationin the configuration dialog (see figure 13.4). To open this dialog, use a specialmenu that was added to the MS <strong>Outlook</strong> toolbar upon the installation (see figure 13.2).Warning: If you decided secure your connections by the SSL encryption, please readsection 13.3Figure 13.1Running MS <strong>Outlook</strong> upon the plug-in installationThe Synchronize menu provides the following options:Figure 13.2Toolbar55
Chapter 13 <strong>Kerio</strong> Synchronization Plug-inStatusThis dialog includes logs providing synchronization process in<strong>for</strong>mation. If the synchronizationis completed successfully, details are provided <strong>for</strong> all folders synchronizedincluding the in<strong>for</strong>mation about which of folders were or were not synchronized successfully.Figure 13.3Synchronization statusIt is recommended to check the log to see whether the synchronization is per<strong>for</strong>medproperly.OptionsThe option opens the <strong>Kerio</strong> Synchronization Plug-in configuration dialog where the followingsettings can be per<strong>for</strong>med:Use in<strong>for</strong>mation about server ...The plug-in in the combo box menu provides all IMAP and POP3 accounts in thecurrent profile.Use own settingsClick Change to open a dialog where parameters <strong>for</strong> a corresponding account canbe set.The dialog allows direct definition of the IP address or the DNS name of the serveragainst which the synchronization will be per<strong>for</strong>med. For authentication at theserver, it is also required to define username and password <strong>for</strong> the correspondinguser account.56
13.2 SynchronizationFigure 13.4Synchronization settingsFigure 13.5Manual account settingThe dialog can also be used to set SSL encryption.57
Chapter 13 <strong>Kerio</strong> Synchronization Plug-inUsing the Connection check button you can easily check whether it is possible to connectto the server using the data specified.The following options define when the synchronization is per<strong>for</strong>med. Optionally, thecriteria may be combined:Synchronize on <strong>Outlook</strong>’s startupThe synchronization is per<strong>for</strong>med upon each startup of MS <strong>Outlook</strong>. If only thisoption is enabled, it is necessary to close and reopen the application when switchingto the online mode to per<strong>for</strong>m the synchronization. There<strong>for</strong>e, it is recommendedto combine this option with one or both of the following ones.Synchronize every ... minutesInterval that will be used <strong>for</strong> the regular synchronization.Synchronize after change...Synchronization will be per<strong>for</strong>med upon any change, i.e. when a new item (contact,event) is added or another is removed.It is not recommended to enable this option if the line used <strong>for</strong> connection to thenetwork is not fast enough <strong>for</strong> frequent synchronization.<strong>Kerio</strong> Synchronization Plug-in also allows synchronization of public folders. Only themain folders of calendars and contacts are synchronized.Synchronize public foldersThis option can be used to synchronize public folders.The Restore synchronization status button per<strong>for</strong>ms synchronization with respect to thecurrent status at the server. It is usually used when an event or a contact is modified inan undesirable way or removed.13.3 SSL-secured trafficFor correct communication over SSL it is necessary to install a trustworthy certificate onthe client station. A trustworthy certificate of <strong>Kerio</strong> MailServer must be installed in theInternet Explorer on the client station (at least a self-signed certificate).Overall traffic of <strong>Kerio</strong> Synchronization Plug-in can be secured by the SSL encryption.Two methods of encryption related to configuration of and account and of <strong>Kerio</strong> SynchronizationPlug-in are available:58
13.3 SSL-secured trafficSynchronization over SSLIf SSL encryption applied to data synchronization is sufficient, follow the instructionsdescribed in this section. Supposing that an IMAP or a POP3 account is set in MS <strong>Outlook</strong>where SSL encryption is set in the configuration, and <strong>Kerio</strong> Synchronization Plug-in isinstalled, per<strong>for</strong>m the settings as follows:1. Select the Options item in the <strong>Kerio</strong> Synchronization Plug-in menu.2. This opens the plug-in configuration dialog. Select the Use in<strong>for</strong>mation about serverand login from account option and set a corresponding account in the menu.3. Click on the Check connection button to find out if everything goes smoothly andsave settings by the OK button.Overall traffic via SSLSupposing that an IMAP or a POP3 account is set in MS <strong>Outlook</strong> where SSL encryptionis set in the configuration, and <strong>Kerio</strong> Synchronization Plug-in is installed, per<strong>for</strong>m thesettings as follows:1. Select the Options item in the Synchronize KSP menu.2. This opens the <strong>Kerio</strong> Synchronization Plug-in dialog (see figure 13.4).3. In tis dialog, select the Use own settings option and click on Change.4. This opens a dialog where a custom account that will be synchronized by <strong>Kerio</strong>Synchronization Plug-in can be set (see figure 13.5). Enter server name, usernameand password (as <strong>for</strong> the account settings) and enable the Use secured connection(SSL) option.59
Chapter 14<strong>Kerio</strong> <strong>Outlook</strong> Connector and <strong>Kerio</strong> SynchronizationPlug-inThis section provides a solution <strong>for</strong> the case when users need to use groupware featuresof <strong>Kerio</strong> <strong>Outlook</strong> Connector and work in the offline mode at the same time.<strong>Kerio</strong> <strong>Outlook</strong> Connector itself does not allow working in the offline mode. However, itis possible to use <strong>Kerio</strong> Synchronization Plug-in.<strong>Kerio</strong> Synchronization Plug-in is an extension <strong>for</strong> MS <strong>Outlook</strong> which allows synchronizationof contacts and the calendar in private folders of MS <strong>Outlook</strong>. Private folders canbe used separately or in association with a POP3 or IMAP account. For more in<strong>for</strong>mationabout <strong>Kerio</strong> Synchronization Plug-in, refer to chapter 13.Follow these instructions to make it possible to use both products in one MS <strong>Outlook</strong>:1. Two profiles must be created in MS <strong>Outlook</strong>(see chapter 2.2).TIP: When defining profiles, do not <strong>for</strong>get to set that the list of profiles is openedupon each startup of MS <strong>Outlook</strong> (see figure 14.1).2. Install the <strong>Kerio</strong> <strong>Outlook</strong> Connector in one profile and create a standard MAPI accountthere (<strong>for</strong> more in<strong>for</strong>mation, see chapter 2.2).3. In the other profile, create a standard IMAP account first that will connect to thesame account as the MAPI account created in the previous step.Install the <strong>Kerio</strong> Synchronization Plug-in in this profile. If both accounts are configuredproperly, all groupware features of a MAPI account are available online in the first profileand the other profile with <strong>Kerio</strong> Synchronization Plug-in can be used <strong>for</strong> working in theoffline mode while working in the IMAP account. The IMAP account will be synchronizedwith the data at the server using the parameters set (see chapter 13.2).60
Figure 14.1Setting the profile list61
Glossary of termsApplication protocolApplication protocols are conveyed by packets of the TCP or the UDP protocol. Itis used to transfer user (application) data. There are many standard applicationprotocols (e.g. SMTP, POP3, HTTP, FTP, etc.), however, it is possible to developa custom (non-standard) communication method.DSNDSN (Delivery Status Notification) is an in<strong>for</strong>mation about the email message deliverystatus. There are a couple of different types of delivery status notification. Unlessotherwise specified, users receive only the error messages from the mailserver(deferred, failure).Email AddressAn email address determines the sender and recipient of a message in electroniccommunication. It consists of a local part (be<strong>for</strong>e the @ character) and a domain part(after the @ character). A domain specifies where email be delivered to (a company),a local part specifies a particular recipient within this domain.IMAPInternet Message Access Protocol (IMAP) enables clients to manage messages storedon a mail server without downloading them to a local computer. This architectureallows the user to access his/her mail from multiple locations (messages downloadedto a local computer would not be available from other locations).It is possible under certain conditions to access the email account using both IMAPand POP3 protocols.IPIP (Internet Protocol) is a protocol which uses its data part to convey all the otherprotocols. The most important in<strong>for</strong>mation in its header is the source and destinationIP address, i.e. by which host the packet was sent and to which host it shouldbe delivered.IP addressIP address is a unique 32-bit number used to identify the host in the Internet. Itis represented by four bytes in the decimal system (0-255) separated by dots (e.g.200.152.21.5). Each packet includes the in<strong>for</strong>mation on where the packet wassent from (source IP address) and to which host it should be delivered (destinationIP address).62
KerberosProtocol <strong>for</strong> secure user authentication in Windows 2000 environments. It was designedby MIT (Massachusetts Institute of Technology) within the Athena project.The protocol is based on such principles where the third side is trustworthy. Usersuse their passwords to authenticate to the central server (KDC, Key DistributionCenter) and the server sends them encrypted tickets which can be used to authenticateto various services in the network.LDAPLDAP (Lightweight Directory Access Protocol) is an Internet protocol used to accessdirectory services. In<strong>for</strong>mation about user accounts and user rights, about hostsincluded in the network, etc. are stored in the directories. Typically LDAP is usedby email applications to search <strong>for</strong> email addresses and to delivery management(<strong>Microsoft</strong> Active Directory).Mailbox AccountA place where email is stored on a server. Clients can download emails from anaccount (using POP3 protocol) or work with messages directly at the server (usingIMAP or Webmail).The account is physically represented by a directory on a disk. The directory iscreated in the <strong>Kerio</strong> MailServer directory (mail/domain/username). Other subdirectoriesrepresenting individual folders are created in this directory.Mailboxes are not created during the definitions of users, the concrete mailbox iscreated after the first email to this mailbox is received.MAPIMAPI (Messaging Application Programming Interface) is an application programminginterface (API) designed by <strong>Microsoft</strong>. Any software that supports MAPI cancommunicate with any mailserver (<strong>Kerio</strong> MailServer) and send and receive data viathis interface regardless of their type and software provider.NNTPNNTP (Network News Transfer Protocol) is a simple text protocol that allows <strong>for</strong>distribution, retrieval and posting of messages on the Internet.NotificationsShort message (notification) about a particular event — e.g. new email. It is usuallysent as a text message (SMS) to a cellular phone.POP3Post Office Protocol is a protocol that enables users to download messages froma server to their local computer. It is suitable <strong>for</strong> clients who don’t have a permanentconnection to the Internet.Unlike Internet Message Access Protocol (IMAP), POP3 does not allow users to manipulatemessages at the server. Mail is simply downloaded to the client where63
Glossary of termsmessages are managed locally. POP3 enables access only to the INBOX folder andit does not support public and shared folders.Port16-bit number (1-65535) used by TCP and UDP <strong>for</strong> application (services) identificationon a given computer. More than one application can be run at a host simultaneously(e.g. WWW server, mail client, FTP client, etc.). Each application is identifiedby a port number. Ports 1-1023 are reserved and used by well known services (e.g.80 = WWW). Ports above 1023 can be freely used by any application.SMTPSimple Mail Transfer Protocol is used <strong>for</strong> sending email between mail servers. TheSMTP envelope identifies the sender/recipient of an email.SpamUnwanted, usually advertisement email. Spam are usually sent in bulk and therecipient addresses are obtained by illegal means (e.g. by tapping the networkcommunication).SSLTLSA protocol used to secure and encrypt the TCP connection. Secure Socket Layer wasoriginally designed by Netscape to secure transmission of web pages using HTTPprotocol. Today it is supported by almost all standard internet protocols — SMTP,POP3, IMAP, LDAP, etc.At the beginning of communication, an encryption key is requested and transferredusing asymmetrical encryption. This key is then used to encrypt (symmetrically) thedata.Transport Layer Security. A later version of SSL, in fact it may be considered as SSLversion 3.1. This version is approved by the IETF and it is accepted by all the topIT companies (i.e. <strong>Microsoft</strong> Corporation).WebMailInterface used by <strong>Kerio</strong> MailServer to enable access to email through a web browser.Several user settings (such as message filtering, password, etc.) can be also changedusing <strong>Kerio</strong> WebMail.64
IndexAaccount settings 11Ccontactscontacts <strong>for</strong>warding 43creating an LDAP directory 38searching via LDAP 38searching via MAPI 36used as address books 52Ddata filesettings 17Distribution list 44Ffoldersarchive 24mapping 22public 24sharing 21Free/Busy calendar 45Iinstallationautomatic 7manual 9K<strong>Kerio</strong> <strong>Outlook</strong> Connectorautomatic update 19help 5installation 7, 5MAPI 5<strong>Outlook</strong> 2000 50password change 20system requirements 5<strong>Kerio</strong> Synchronization Plug-inautomatic update 54automatic update via SSL 59help 53installation 54, 53settings 56SSL 58synchronization 55synchronization over SSL 59synchronization status 56system requirements 53Mmessages signed in MS <strong>Outlook</strong> 51Nnotes 49Pprivate contact 47private event 47private task 47profileRrulenew 9<strong>for</strong> spam 33new 26out of office 31rules <strong>for</strong> incoming messages 2565
IndexSspamNot Spam 50Spam 50SpamAssassin 33spam filter 3366