System installation Brief introduction of system This alarm consists of ...
System installation Brief introduction of system This alarm consists of ...
System installation Brief introduction of system This alarm consists of ...

Create successful ePaper yourself
Turn your PDF publications into a flip-book with our unique Google optimized e-Paper software.
<strong>System</strong> <strong>installation</strong><br />
<strong>Brief</strong> <strong>introduction</strong> <strong>of</strong> <strong>system</strong><br />
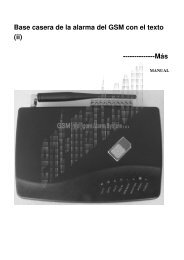
<strong>This</strong> <strong>alarm</strong> <strong>consists</strong> <strong>of</strong> main engine <strong>of</strong> <strong>alarm</strong> and various wireless-connected<br />
accessories. When people enter the defense region illegally, the main engine will give<br />
sound <strong>of</strong> sirens and call the hosts, so hosts can return home or inform neighboring<br />
relatives to cope with the instantly. Also, they can monitor the sound on the spot.<br />
Alarm <strong>installation</strong><br />
Insert the plug <strong>of</strong> telephone outside line into LINE2 <strong>of</strong> the main engine and connect<br />
LINE1 <strong>of</strong> the main engine with telephone using attached telephone wire <strong>of</strong> <strong>alarm</strong>.<br />
Then joint up the power source and warning signal; meanwhile the main engine will<br />
give a sound <strong>of</strong> “B” and light <strong>of</strong> the power source goes on, which means the main<br />
engine starts working.<br />
Gate magnetism <strong>installation</strong><br />
Use the random equipped double-side tape to stick a magnetic stripe on the door and<br />
affix the gate magnetic emission box on the doorframe. Pay attention to put the<br />
magnetic strip close to the side with indicator lights <strong>of</strong> the emission box during<br />
<strong>installation</strong>, assuring proper alignment and the smaller distance the better.<br />
Infrared detector <strong>installation</strong><br />
The principle <strong>of</strong> infrared detectors is to sense people’s movement through sensing<br />
infrared signals generated by bodies and the detection range is usually 5-12 meters.<br />
Infrared sensor should be installed about 2.2 meters away from ground. Aim straight<br />
at the detection ranges. Moreover, the infrared detector can be only installed in the<br />
room, without facing the sunshine, windows and other places where temperature is<br />
easy to change, because the installed location may influence the detection range and<br />
accuracy.<br />
Function settings<br />
All the settings can be carried out under the undefended situation with a long ring for<br />
all the proper operations while two short sounds for wrong settings.<br />
Silent <strong>alarm</strong> # 0 0 # no <strong>alarm</strong> whistle for warning<br />
1
Vocal <strong>alarm</strong> # 0 1 # <strong>alarm</strong> whistles for warning<br />
Set up common <strong>alarm</strong> telephone numbers # (1~5) ?...? # set 1-5 groups<br />
telephone number, “1-5” is the ordinal <strong>of</strong> the telephone number;<br />
“?...?”stands for telephone numbers.<br />
Set up emergency phone numbers # 6 ?...? # The same method as above,<br />
press <strong>alarm</strong> button <strong>of</strong> the main engine and the remote <strong>alarm</strong> button<br />
will call this group number.<br />
Delete telephone numbers # (1~6) # Delete all the selected group telephone numbers.<br />
Set up <strong>alarm</strong> delay # 7 ?? # set up delay warning time in the delay mode zone,<br />
in seconds. Here, “??” stands for the number <strong>of</strong> seconds within the range between 0<br />
and 99.<br />
Alarm ringing time # 9 ?? # The <strong>alarm</strong> ringing time without human<br />
intervention after warning, Here, the range <strong>of</strong> “??” is between 0 and 30 minutes.<br />
Inquiry <strong>alarm</strong> defense area 0-9 Directly press 0-9 to inquiry the 10 latest<br />
<strong>alarm</strong> events and display <strong>alarm</strong> defense area (0 means the latest one).<br />
The state <strong>of</strong> setting up defense area # 8 # Here,“??” stands for the<br />
serial number from 0 to 99. (0-7) designates the setting mode <strong>of</strong> selected defense area.<br />
??<br />
0=not use, 1=common defense area, 2=intelligent defense area, 3=emergency<br />
defense area, 4=multi-checked defense area, 5=delay-<strong>alarm</strong> defense area,<br />
7=repeat triggered defense area. For example, press # 8 2 2 # then you can set up<br />
?? (0~7)<br />
??<br />
defense area 2 as the intelligent area.<br />
Note: When you input “99”, it means all the wireless defense<br />
area will work according to this mode.<br />
Emergency defense area: No matter under the defended or<br />
undefended situations, once triggered it will report to the police<br />
immediately, which is suitable for the gas reaction, smog reaction,<br />
safe, emergency accesses and other special occasions.<br />
Intelligent defense area: After selecting an area as intelligent<br />
defense one, the defense area is not effective (it is still effective<br />
under the normal defense area), which is suitable when hosts at<br />
2
home, because indoor infrared <strong>alarm</strong> function is canceled, while the<br />
gate magnetisms on the door and window are still in a state <strong>of</strong><br />
monitoring.<br />
Multi-checked defense area: Under the situation <strong>of</strong> defense or<br />
intelligent defense, if two or more detectors that set up multi-checked<br />
are all triggered within 30 seconds, the main engine will give an<br />
<strong>alarm</strong>. Therefore, based on this pattern, none <strong>of</strong> the infrared detectors<br />
will misinform the events.<br />
Note: Set up two or more than two defense areas to be<br />
multi-checked and they should be set up respectively.<br />
Delay <strong>alarm</strong> defense area: When the defense area is triggered and<br />
need <strong>alarm</strong>, the main engine can delay the <strong>alarm</strong> (the concrete delay<br />
time is determined by the “Setting up <strong>alarm</strong> delay”); moreover, the<br />
warning behavior can be canceled during delayed time.<br />
Delete defense area: It means delete selected defense areas (only for<br />
wireless defense areas). Note: when you input # 8 99 6 #, all <strong>of</strong> the<br />
wireless defense areas will be deleted.<br />
Repeat triggered defense areas:<br />
When the detector is triggered once,<br />
the <strong>system</strong> will not <strong>alarm</strong> immediately. Only when it is triggered<br />
again within 5-30 seconds after the first trigger, the <strong>system</strong> will<br />
<strong>alarm</strong>.<br />
The selection <strong>of</strong> common defense area and intelligent defense area<br />
has no influence <strong>of</strong> choosing Mode 4, 5, 6, so you choose intelligent<br />
or common defense area, while selecting anyone <strong>of</strong> Mode 4, 5, 6 at<br />
the same time. However, when you reselect Mode 1, 2, 3, Mode 4, 5,<br />
7 will be cleared.<br />
Input password * password * (The designing password is: 0000, which<br />
can be changed to another four numbers as the password)<br />
Learning remote controller * 0 * The intelligent learning remote controller <strong>of</strong><br />
main engine begin to count down 10 seconds When the remote or<br />
3
detector is triggered in 10 seconds, the main engine can distinguish<br />
automatically and give a long sound, presenting the location <strong>of</strong><br />
remove memory, which means successful study(All <strong>of</strong> the code<br />
learning method is the same).<br />
Learning detector * 0 1 * the intelligent learning remote controller <strong>of</strong> main<br />
engine. Learning method is same as above.<br />
Designated serial learning detector * 8 * Connect learning detector to<br />
the designated defense area number and ?? is the defense number.<br />
For example, if you want to designate a detector to Defense Area<br />
?? 16, only input “* 8 16 *”.<br />
Delete all <strong>of</strong> the remote controllers<br />
* 0 2 * means delete all <strong>of</strong> the remote<br />
controllers.<br />
Delete all <strong>of</strong> the defense area detectors<br />
* 8 99 7 * means delete all <strong>of</strong> the defense<br />
area detectors.<br />
Use remote controller to open and close the <strong>alarm</strong> sound<br />
* 2 1/0 * Alarm sounds for opening while buzzer sounds for closing.<br />
Open crack-pro<strong>of</strong> function * 3 1 * Open this function, then none <strong>of</strong> the<br />
wireless remote controllers can cancel defense (except for the<br />
cancel defense button <strong>of</strong> the main engine).<br />
Close crack-pro<strong>of</strong> function * 3 0 * Close this function, then remote<br />
controller <strong>of</strong> main engine can cancel defense normally.<br />
Delayed time <strong>of</strong> setting up defense<br />
Inputting * 4 ?? * can start the delayed time<br />
<strong>of</strong> setting up defense, which means the formal defense will begin<br />
after ?? seconds when you press the button. Here, the range <strong>of</strong> “??”<br />
is between 0 and 99. Although it is in the state <strong>of</strong> delayed defense,<br />
it can enter defense situation immediately if you repress the<br />
defense button,<br />
Open the <strong>alarm</strong> function when telephone lines disconnect * 5 1 * When<br />
phone lines disconnect or failure, it will give <strong>alarm</strong> rings to inform.<br />
Close the <strong>alarm</strong> function when telephone lines disconnect<br />
* 5 0 * means main<br />
4
engine will not detect telephone lines disconnection or fault.<br />
Remote setup telephone ringing times<br />
* 6 ? * If the ring times calling local<br />
fixed-line telephone above the setting times, it will connect remote server<br />
automatically. Here, “?” is the setting ring times, while “0” means no remote setup.<br />
Modify passwords * 7 new password (4 numbers) new password (4 numbers) *<br />
Use it when keyboard is locked and you forget password at the same time.<br />
Recover factory settings * 8 password * The <strong>system</strong> will recover factory settings<br />
(Clear telephone numbers, vocal <strong>alarm</strong>, <strong>alarm</strong> sounds, cancel<br />
<strong>alarm</strong>, delayed setting defense, close the function <strong>of</strong> detecting<br />
disconnected telephone lines, <strong>alarm</strong> ring time last for 5 minutes).<br />
The instruction can not delete remote controller and defense area.<br />
Set up <strong>alarm</strong> voice record * 0 password * It starts to record sounds at the<br />
place where 20 centimeters away from the main engine after<br />
correspond operations and the digital tube begin to countdown. It<br />
will quit automatically and the main engine gives a long sound<br />
which means the record is successful.<br />
Play audio tape<br />
* 9 * Raise the fixed-line telephone connected with the main<br />
engine, and then you can listen to the recording contents. Press any<br />
button, it will quit the play.<br />
Open wired defense area* 0 6 1 *<br />
close wired defense area* 0 6 0 *<br />
Set up wired defense area * 9 (101~109) (0~2) *<br />
101-108 is the number for<br />
wired defense area, 0-2 means state (0=normally close,<br />
1=normally open, 2=trigger when it is against normal) and 109<br />
means all the wired defense areas are established based on this<br />
state.<br />
Normally close: In the state <strong>of</strong> no trigger, the port is short<br />
connected with ground (negative) and brake is the trigger<br />
condition.<br />
Normally open: In the state <strong>of</strong> no trigger, the port is disconnected<br />
5
with ground (negative) and short connection is the trigger<br />
condition.<br />
Trigger when it is against normal: Under these special conditions,<br />
the connection status when the main engine turns from cancel<br />
defense into setting up defense is not triggered, while once the<br />
status is changed, it is the triggered situation.<br />
set up the control <strong>of</strong> 12V power output # 8 0 (0-9)#<br />
0-9 stands for the control<br />
state <strong>of</strong> 12 power supply and selections as below:<br />
0=not output 12V.<br />
1=output 12V in the state <strong>of</strong> “CF”, while close output under other<br />
states.<br />
2=output 12V in the state <strong>of</strong> “SF”, while keeping outputting after<br />
<strong>alarm</strong>.<br />
3=output 12V in the state <strong>of</strong> “SF”, while close output after <strong>alarm</strong>.<br />
4=output 12V in the state <strong>of</strong> “bF”, while keeping outputting after<br />
<strong>alarm</strong>.<br />
5= output 12V in the state <strong>of</strong> “bF”, while close output after <strong>alarm</strong>.<br />
6=output 12V in the state <strong>of</strong> “SF” or “bF”, while keeping<br />
outputting after <strong>alarm</strong>.<br />
7= output 12V in the state <strong>of</strong> “SF” or “bF”, while close output after<br />
<strong>alarm</strong>.<br />
8=output 12V in the state <strong>of</strong> <strong>alarm</strong>ing.<br />
9=keep outputting 12V.<br />
Note: It is only applied to B-type machine.<br />
Application <strong>of</strong> <strong>alarm</strong> <strong>system</strong><br />
1. Set up defenses<br />
Press “<br />
”button on remote controller or “Set up defenses” button on panel and<br />
the main engine will give a sound <strong>of</strong> “B”, then the main engine enter the defense<br />
situation or delayed defense state.<br />
2. Cancel defenses<br />
6
Press “<br />
” button on remote controller or “Cancel defenses” button on panel and<br />
the main engine will give two sounds <strong>of</strong> “B”, then the indicator lamp dies out, so the<br />
main engine is in a state <strong>of</strong> no defenses.<br />
3. Emergency <strong>alarm</strong><br />
Press “<br />
”button on remote controller or “Alarm” button on panel, main engine<br />
will enter the state <strong>of</strong> emergency <strong>alarm</strong> instantly, calling automatically and siren going<br />
<strong>of</strong>f.<br />
Press“<br />
”button on remote controller once is silent <strong>alarm</strong>, while long press or two<br />
presses will open the siren.<br />
4. Intelligent defenses<br />
Press “” button on remote controller or “Intelligent” button on panel, then main<br />
engine will enter the state <strong>of</strong> intelligent defense or delayed defense.<br />
5. Status indication <strong>of</strong> main engine digital tube<br />
Indicate “SF” for defense, “CF” for no defense, “99” for emergency <strong>alarm</strong>, “bF”<br />
for intelligent defense. “F1” for <strong>alarm</strong> when telephone lines disconnect, “F3” means<br />
there is no learning defense area, 1-98 means wireless defense area, L1-L8 means<br />
wired defense area.<br />
6. Operation methods <strong>of</strong> remote setup<br />
You can use any telephone to dial the numbers <strong>of</strong> main engine and it will put on<br />
automatically after <strong>system</strong> detecting the ring times you have been setup. When you<br />
hear the beep, input passwords (two sounds when the password is wrong, while when<br />
the wrong time is above 3, the phone will hang up automatically) and if it is correct,<br />
you can have remote control <strong>of</strong> the <strong>system</strong>.<br />
Please press # after accomplish all operations, then you can implement other<br />
operations and hang up telephone.<br />
Press “1” to monitor the scene Press “2” to ring <strong>alarm</strong>s Press “3” to close arisen<br />
Press “4” to set up defenses Press “5” to cancel defenses Press “6” to play<br />
records<br />
Press “7” to output 12V electric power Press “8” to close 12V output Press “#”<br />
to affirm and hang up<br />
7
If the password is wrong or no any operations within 20 seconds, it will hang up<br />
automatically.<br />
Press “1” button once you can listen for 20 seconds<br />
7. Processing method after receiving <strong>alarm</strong><br />
In case <strong>of</strong> emergency, main machine will dial the setup telephone numbers<br />
automatically and give <strong>alarm</strong> rings based on settings. If the host’s phone is in use or<br />
not able to connect, the <strong>system</strong> will dial next <strong>alarm</strong> phone, until it is dialed and hosts<br />
confirm. It will play records after receiving <strong>alarm</strong> phone and the operation methods<br />
are similar to remote setup.<br />
8