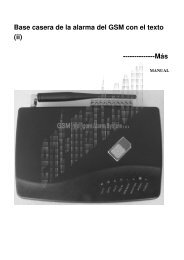
User's manual for GSM Touch Screen Wireless Alarm System
User's manual for GSM Touch Screen Wireless Alarm System
User's manual for GSM Touch Screen Wireless Alarm System
- No tags were found...

Create successful ePaper yourself
Turn your PDF publications into a flip-book with our unique Google optimized e-Paper software.
User’s <strong>manual</strong> <strong>for</strong> <strong>GSM</strong> <strong>Touch</strong> <strong>Screen</strong> <strong>Wireless</strong> <strong>Alarm</strong> <strong>System</strong><br />
I. Foreword<br />
Thank you <strong>for</strong> purchasing and using <strong>GSM</strong> LCD touch screen wireless home alarm system. This is a Hi-tech household<br />
security product. It will make your life safer and colorful.<br />
Please read the below in<strong>for</strong>mation carefully be<strong>for</strong>e using <strong>for</strong> a proper usage.<br />
II. Brief introduction of the Product<br />
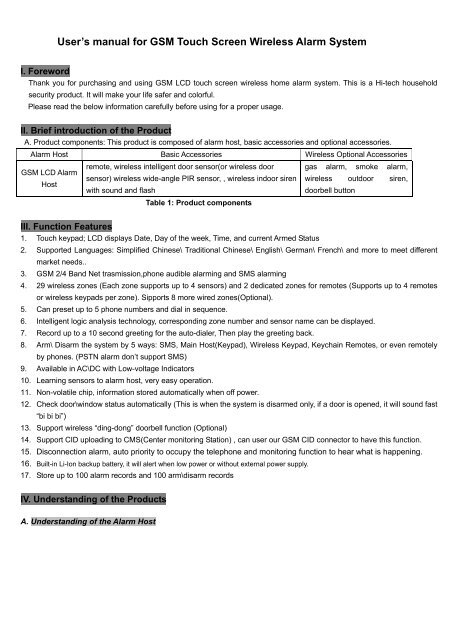
A. Product components: This product is composed of alarm host, basic accessories and optional accessories.<br />
<strong>Alarm</strong> Host Basic Accessories <strong>Wireless</strong> Optional Accessories<br />
remote, wireless intelligent door sensor(or wireless door gas alarm, smoke alarm,<br />
<strong>GSM</strong> LCD <strong>Alarm</strong><br />
sensor) wireless wide-angle PIR sensor, , wireless indoor siren wireless outdoor siren,<br />
Host<br />
with sound and flash<br />
doorbell button<br />
Table 1: Product components<br />
III. Function Features<br />
1. <strong>Touch</strong> keypad; LCD displays Date, Day of the week, Time, and current Armed Status<br />
2. Supported Languages: Simplified Chinese\ Traditional Chinese\ English\ German\ French\ and more to meet different<br />
market needs..<br />
3. <strong>GSM</strong> 2/4 Band Net trasmission,phone audible alarming and SMS alarming<br />
4. 29 wireless zones (Each zone supports up to 4 sensors) and 2 dedicated zones <strong>for</strong> remotes (Supports up to 4 remotes<br />
or wireless keypads per zone). Sipports 8 more wired zones(Optional).<br />
5. Can preset up to 5 phone numbers and dial in sequence.<br />
6. Intelligent logic analysis technology, corresponding zone number and sensor name can be displayed.<br />
7. Record up to a 10 second greeting <strong>for</strong> the auto-dialer, Then play the greeting back.<br />
8. Arm\ Disarm the system by 5 ways: SMS, Main Host(Keypad), <strong>Wireless</strong> Keypad, Keychain Remotes, or even remotely<br />
by phones. (PSTN alarm don’t support SMS)<br />
9. Available in AC\DC with Low-voltage Indicators<br />
10. Learning sensors to alarm host, very easy operation.<br />
11. Non-volatile chip, in<strong>for</strong>mation stored automatically when off power.<br />
12. Check door\window status automatically (This is when the system is disarmed only, if a door is opened, it will sound fast<br />
“bi bi bi”)<br />
13. Support wireless “ding-dong” doorbell function (Optional)<br />
14. Support CID uploading to CMS(Center monitoring Station) , can user our <strong>GSM</strong> CID connector to have this function.<br />
15. Disconnection alarm, auto priority to occupy the telephone and monitoring function to hear what is happening.<br />
16. Built-in Li-Ion backup battery, it will alert when low power or without external power supply.<br />
17. Store up to 100 alarm records and 100 arm\disarm records<br />
IV. Understanding of the Products<br />
A. Understanding of the <strong>Alarm</strong> Host
Connect antenna here<br />
Power /Signal<br />
Low voltage<br />
/<br />
08.08 6<br />
12 26 28<br />
Status indicator<br />
PgUp & PgDn<br />
Program<br />
Mic<br />
Emergency/Back Space Number/Arm Disarm/Delete/Esc Confirm<br />
Front Side<br />
1. Specifications:<br />
• Working power: AC=100~230V, DC=12V 1A<br />
• Static current:
Emergency zone: Detecting the space like Emergency area (such as emergency distress, medical rescue, gas leakage and<br />
fire alarm, etc., this zone keep 24-hour monitoring status automatically. Generally use panic button, wireless gas sensors and<br />
wireless smoke sensors.<br />
3. Modes of arming<br />
• “Away Arm” mode:Once any detectors in perimeter zones or motion zones get triggered, the host will alarm immediately and<br />
meantime dial “#” automatically.<br />
• “Home Arm” mode:Once any detectors in perimeter zones get triggered, the host will alarm immediately and meantime dial “#”<br />
automatically. It will not alarm after any detectors in the motion zone are triggered.<br />
4. How to operate the alarm host<br />
• Preparation<br />
1. Insert SIM card properly.<br />
2. Fix the antenna<br />
3. Connect the telephone cable: connect the telephone cable of telecommunication to “Tel in” port on the alarm host, then<br />
use the telephone cable attached in the package to connect “Tel out” port and telephone set.<br />
4. Connect power: connect the power adaptor to DC port of the alarm host first, then plug it to the AC socket.<br />
5. Turn on the backup battery<br />
6. Check and see if <strong>GSM</strong> signal is good enough<br />
Type<br />
2-Band<br />
(900/1800 MHZ)<br />
4-Band<br />
(850/900/1800/900 MHZ)<br />
<strong>GSM</strong> Signal OK<br />
Signal indicator keeps flash about<br />
every 2 seconds<br />
Signal indicator keeps flash about<br />
every 3 seconds<br />
Signal is not normal or SIM card not<br />
inserted properly<br />
Signal indicator keeps on<br />
Signal indicator keeps flash about<br />
every 1 seconds<br />
• Signal level status<br />
When standby, press“▲”or“▼”and you can see the signal status as below.<br />
Signal Level:<br />
XX: 0 …..31 indicates the signal from weak to strong,99 indicates unknown.<br />
XX YY<br />
YY: Indicates signal status, OK is good, No is a little weak and need to adjust installation position.<br />
Press “ESC” to get back <strong>for</strong> standby status. Or get back to standby status automatically after 30 seconds without no operation.<br />
Note: If SIM card is not insert properly, it will shows:<br />
• How to program<br />
Notes:<br />
• The host will exit programming mode if without any operation within 30 seconds<br />
• It will exit to the previous menu if press “ESC”<br />
• If enter codes by mistake <strong>for</strong> 3 times, the host panel will resume to the standby mode<br />
• you can press “▲▼” to adjust programming info. Or to find alarming info.<br />
NO SIM CARD:<br />
XX YY<br />
1. Menu preview<br />
Main menu Sub-Menu1 Sub-Menu2 Sub-Menu3 Sub-Menu4 Sub-Menu5 Remark<br />
Set Time Set time Hour/minute/second<br />
Set Date Set Date Year/Month/Day/Week<br />
Auto-dialer#’s<br />
Call Center<br />
Personal Nbr<br />
Call by phone<br />
SMS reportng<br />
<strong>Alarm</strong>ing phone number,<br />
Group 2~5 <strong>for</strong> personal<br />
Entry Delay Entry delay Time delay <strong>for</strong> enter<br />
Exit Delay Exit Delay Time delay <strong>for</strong> exit
Siren On/Off<br />
Siren off<br />
Siren on<br />
Emergency<br />
siren<br />
Perimeter siren<br />
Motion siren<br />
Duration time<br />
of alarming sound<br />
Arm/Disarm<br />
Beep<br />
Arm/Disarm<br />
Beep<br />
Yes No<br />
No need to setup<br />
<strong>for</strong> personal use<br />
User Id<br />
Enter Usercode<br />
No need to setup<br />
<strong>for</strong> personal use<br />
Upload Satus<br />
Upload status<br />
Yes No<br />
No need to setup<br />
<strong>for</strong> personal use<br />
Zone Attribute<br />
Set Smart Zone<br />
Zone number<br />
XX<br />
Zone number<br />
XX Zone type<br />
2 1 0<br />
Smart Sensor<br />
ON<br />
Yes No<br />
<strong>Alarm</strong> Type<br />
XX<br />
Smart Sensor<br />
ON<br />
Yes No<br />
Bypass Zone<br />
Yes No<br />
Zone Indicator<br />
Yes No<br />
Entry Delay<br />
Set<br />
Yes No<br />
Needed when adding<br />
wireless sensors<br />
Detect and indicate<br />
open/close states of<br />
doors/windows<br />
Program Sensor Zone number Group Number<br />
ActivateSensor<br />
Delete Sensor<br />
For Adding or<br />
deleting wireless sensor<br />
<strong>Wireless</strong> Code <strong>Wireless</strong> Code Usually no need <strong>for</strong> users<br />
<strong>Alarm</strong> History<br />
Status History<br />
XX: Button<br />
Call Failed<br />
DISARM<br />
00:<br />
01.01 03:39<br />
XX: 01.01<br />
00:08:52<br />
Table 2: Menu Preview<br />
For checking<br />
alarming history records.<br />
For checking<br />
working records<br />
2. Detailed program instructions:<br />
For any program, you should start with【SET + Enter code + input the 6-digit code (default: 888888)+ENT】<br />
【Set time】:<br />
【ENT + press “ ” to delete the old record + input current time+ENT】→ “X X X X X X”:6 digits, means “hour, minute, second”,<br />
each takes 2 digits space, e.g. you may press 142120, now the host time will be 14:21:20.<br />
【Set date】:<br />
【ENT + press “ ” to delete the old record + input current date and week +ENT】→ “X X X X X X”: 7 digits, means “year,<br />
month, day and week”, e.g.:0701174, means Jan 17th, 2007, Thursday. (“0” means Sunday.)<br />
【Auto Dialer#’s】:<br />
• Totally 5 telephone/mobile numbers<br />
• The first group is fixed <strong>for</strong> management center,other 4 groups are fixed <strong>for</strong> personal numbers<br />
• Press“▲▼” to select the report method: ”SMS Phone No.” <strong>for</strong> voice alarming, ”SMS reporting” <strong>for</strong> SMS text alarming<br />
• Notes: if you choose “SMS Reporting”, it will just sent to mobile numbers not include PSTN(landline) phone numbers.<br />
• Press ENT to confirm each phone(telephone/mobile) number<br />
---【1: Call Center】:<br />
【ENT + 1: Call Center + press “ ” to delete the old record + input the number you want to preset+ENT+ Press “▲▼” set as<br />
Call by phone or SMS Reporting】<br />
---【2: Personal Nbr】:<br />
【Press ENT continously till you see “2: Personal Nbr” + press “ ” to delete the old record + input the number you want to<br />
preset+ENT+ Press “▲▼” set as Call by phone or SMS Reporting】→ personal number is fixed from Group No. 2 to 5, press<br />
ENT to set next personal number.<br />
【Entry delay】:<br />
【ENT + Entry Delay+ press “ ” to delete old record + X X + ENT】 → “X X”: 2 digits, you can set 00~59 seconds.( default:<br />
“00”)<br />
Very important notes: If you hope the “Entry delay” to be function, you need to set from 2 places, one is from above “Entry<br />
delay” menu, the second is to set from “Zone attribute” (Details: Set—Pw- Zone attribute—Zone Number—Zone Type—<strong>Alarm</strong><br />
type—Bypass zone—Enter delay set) , you need to choose “YES” in the step of “Enter delay set”<br />
【Exit delay】:<br />
【ENT + press “ ” to delete the old record + X X + ENT】 → “X X”: 2 digits,you can set 00~59 seconds.(default is: “15”)<br />
【Siren On/Off】:<br />
【ENT + Siren On/Off, press “▲▼” to choose ON or OFF. 】<br />
If choose ON, the system will have alarm sound when alarm trigered. You need to setup the alarming delay time(seconds)
Zone<br />
Number<br />
in the next sub-menus. Please do as following:<br />
ENT +press “ ” to delete old record + input new time X X + ENT. You can set 00~60 minutes, the default is “03”<br />
If choose OFF, just press ENT to confirm is ok. Then the system will not alarm when sensors trigered.<br />
【Arm/Disarm Beep】:<br />
ENT + Arm/Disarm Beep, press “▲▼” to choose YES or NO. The default set be<strong>for</strong>e shipment is “YES”.<br />
【User ID】:<br />
Here need to setup only based on linking network. Operations: ENT + press “ ” button to delete old record + X X X X +<br />
ENT】 → “X X X X”: 4 digits, you can set 0000~9999. Default set be<strong>for</strong>e shipping is at ransom.<br />
【Upload status】:<br />
This is <strong>for</strong> uploading Arm/Disarm/<strong>Alarm</strong> in<strong>for</strong>mation to the Managing Centre. Operations:【ENT + “▲▼” + ENT】 → “▲▼”<br />
choose “yes” or “no” <strong>for</strong> upload or not upload. The defaulted is “No”.<br />
【Zone Attribute】:<br />
Here is <strong>for</strong> setting【Zone number】,【Zone type】, 【<strong>Alarm</strong> Type】【Bypass Zone】 &【Entry Delay Set】.<br />
---【Zone number】:<br />
Here has 39 zones<strong>for</strong> your settings. 2 dedicated zones <strong>for</strong> remotes(Supports up to 4 remotes or wireless keypads per zone).29<br />
wireless zones(Each zone supports up to 4 sensors) and 8 optional wired zones. Each zone needs to setup “Zone Type”, “<strong>Alarm</strong><br />
Type” ,“Bypass Zone” & “Entry Delay”.<br />
Table 3: “Zones Number” setting<br />
Sensor Type<br />
Zone<br />
Type<br />
Applicable sensor names<br />
00、01 —— <strong>Wireless</strong> remote & <strong>Wireless</strong> Keypad<br />
Notes<br />
02 ~ 10 Emergency zone<br />
<strong>Wireless</strong> sensors<br />
11 ~ 20 Perimeter zone<br />
<strong>Wireless</strong> Smoke <strong>Alarm</strong>,<br />
<strong>Wireless</strong> Gas <strong>Alarm</strong>& Panic button etc.<br />
<strong>Wireless</strong> Door/Window Sensor &<br />
<strong>Wireless</strong> Curtain PIR etc.<br />
Each zone<br />
support up to 4<br />
sensors<br />
21 ~ 30<br />
Motion zone<br />
<strong>Wireless</strong> Wide-Angle PIR Motion Sensor etc.<br />
31 ~ 38 Wired sensor ——<br />
31,32,33 are Perimeter zone<br />
34,35 are Motion zone<br />
36,37,38 are Emergency zone<br />
See Table 4:<br />
<strong>Wireless</strong>/wired<br />
sensor code<br />
----【Zone Type】:<br />
You can see “2”, “1”, “0”.( “2” mean motion zone, “1” means perimeter zone, “0” means emergency zone)<br />
Press “▲▼” to choose the one you desire to setup, then press ENT to confirm your settings.<br />
----【<strong>Alarm</strong> Type】:<br />
【ENT + <strong>Alarm</strong> Type+ press “ ” button to delete old record + X X + ENT】→ “X X”: 2 digits. <strong>Alarm</strong> type code. 2 digits.( See<br />
below table. )<br />
Table 4: <strong>Wireless</strong>/wired sensor code<br />
Code 00 01 02 03 04 05 06 07<br />
Sensor<br />
Name<br />
Button0 Button1 Gas Smoke Door Window Glass Motion<br />
Code 08 09 10 11 12 13 14 15 20<br />
Sensor<br />
Name<br />
IR Perimeter Perimeter Motion Sensor Sensor Sensor Sensor (doorbell)<br />
Table 5: Default set be<strong>for</strong>e shipment<br />
<strong>Wireless</strong> sensors<br />
<strong>Wireless</strong><br />
remote<br />
<strong>Wireless</strong> door<br />
sensor<br />
<strong>Wireless</strong><br />
wide-angle<br />
PIR sensor<br />
<strong>Wireless</strong> gas<br />
sensor<br />
<strong>Wireless</strong><br />
smoke sensor<br />
Zone Number 00 11 21 02 03<br />
---【Bypass Zone】:
This setting is <strong>for</strong> make zones enable or disable. Here has “Yes” & “No” <strong>for</strong> your alternatives. “Yes” means make this zone’s<br />
sensors silent, “No” means keep this zone’s sensors working. Press “▲▼” to choose “Yes” or “No”, then press ENT to confirm<br />
your settings.<br />
-----【Entry Delay Set】:<br />
This is <strong>for</strong> settings delay time of alarming. Here has “Yes” & “No” <strong>for</strong> your selection.The delay duration time please refer to what<br />
you have prest in the menu【Entry delay】.Press “▲▼” to choose “Yes” or ‘No” to setup entry delay or without entry delay.<br />
Note:.Press “ESC” to exit from the programming status after finish settings.<br />
【Set Smart Zone】:<br />
---【Zone Numner】:<br />
【ENT + Zone Number+ press “<br />
---【Smart Sensor ON】:<br />
This is <strong>for</strong> open and close the intelligent door/window sensor function.<br />
” button to delete old record + X X + ENT】→ “X X”, zone number, 2 digits.<br />
【ENT + Smart Sensor ON, press “▲▼” to choose YES or NO. 】”Yes” <strong>for</strong> open, “NO” <strong>for</strong> closed.<br />
---【Smart SensorON】:<br />
This is <strong>for</strong> open and close the status of the zone( no need to set <strong>for</strong> wired zones).<br />
【ENT + Smart SensorON, press “▲▼” to choose YES or NO. 】”Yes” <strong>for</strong> open, “NO” <strong>for</strong> closed.<br />
---【Zone Indicator】:<br />
This is <strong>for</strong> setting if the zone needs sound indication while disarmed status.<br />
【ENT + Smart SensorON, press “▲▼” to choose YES or NO. 】”Yes” <strong>for</strong> open, “NO” <strong>for</strong> closed..<br />
【Program Sensor】<br />
This setting is <strong>for</strong> adding or deleting Sensors in the above mentioned Zones(Includes Zone 00, 01).<br />
【ENT + Zone Number+ press “ ” button to delete old record + X X + ENT】→ “X X”, zone number, 2 digits. Refer to Table 3.<br />
【ENT + Group Number+ press “<br />
” button to delete old record + X X + ENT】→ “X X”,group number , 2 digits.<br />
This Group Number is <strong>for</strong> Sensors’ numbers, each zone can be connected up to 4 sensors, the Group Number is from 00 to 03.<br />
“00” means Sensor 1, “01” means Sensor 2, “02” means Sensor 3, “03” means Sensor<br />
【ENT + press “▲▼” to choose “ActivateSensor” or “Delete Sensor” 】<br />
If choose Activate Sensor<br />
This means adding Sensors to this host. Operations:<br />
Get a sensor learning to the host, the word “learning” will show on the LCD <strong>Screen</strong>, if have been learned, the word “success”<br />
will show on the LCD <strong>Screen</strong>.<br />
Note: If a word “update” shows on the screen, which means this sensor has been added be<strong>for</strong>e, you may choose<br />
“Yes” or “No” to decide going on programming or not <strong>for</strong> this sensor.<br />
If choose Delete Sensor,<br />
This means deleting the added sensors from the host. Operations:<br />
Get into the Program Sensor menu, choose Zone Number and Group Number you desire to delete, press “▲▼” to choose<br />
Delete Sensor, press ENT, the host will give a long beep sound. Then the words “Deleting Sensors Success” will show on the<br />
LCD <strong>Screen</strong>, which means you have deleted the sensors successfully.<br />
【<strong>Wireless</strong> Code】<br />
【ENT + press “ ” button to delete old record + X XXX + ENT】→ “XXXXX”, range of code , 5 digits. Default setting be<strong>for</strong>e<br />
shipment is at random.<br />
【<strong>Alarm</strong> History】<br />
【ENT + <strong>Alarm</strong> History, press “▲▼” to review.】<br />
【Status History】<br />
【ENT + Status History, press “▲▼” to review.】<br />
Note:Press “ESC” to exit from the programming status after finish settings<br />
3. How to Revise Master code<br />
This setting is <strong>for</strong> changing the “Enter Code” of the host. (The defaulted “Enter Code” is “888888”. )<br />
【ENT + 999999 + ENT + Enter New Code + Input 6-digit new code + ENT + Re-Enter Code】The host panel will be back to the standby<br />
mode after successful programming.<br />
Note: If input the codes 3 times by mistake, the host will be back to the standby mode automatically.<br />
4. How to operate the <strong>Alarm</strong> Host<br />
1.Record:Keep pressing the “record button” on the back of the alarm host and speak close to the speaker of host. Then release, the
voice recorded.<br />
2. Play:Keep pressing the “play button” on the back of the alarm host and you will hear the previous record.<br />
3. Arm:BY wireless remote:press the corresponding arm button and the host will beep once to successfully complete the operation<br />
By Host panel(Keypad): 【0 + master code + ENT + “▲▼” + ENT】 → “▲▼” to choose “armed home” or “armed away”<br />
4. Disarm: By wireless remote: press the corresponding disarm button and the host will beep twice to successfully complete the<br />
operation<br />
By Host panel(Keypad): 【ESC + master code + ENT 】 →the host will beep twice to successfully complete the operation<br />
5. Emergency: By wireless remote: Press Emergency key and the host will alarm immediately;<br />
By host panel(Keypad): press ” ”, and the host will alarm immediately.<br />
6. Telephone alarm: After receiving the call, you will hear the recorded voice message immediately, it can be played <strong>for</strong> 30 seconds<br />
repeatedly, then follow the below instruction:<br />
6.1. Input “8” to enter into the listening status <strong>for</strong> 20 seconds automatically, you can hear the alarming event sounds<br />
from phone. Each extra press of “8” can prolong 20 second listening in.<br />
6.2. Input”#” to play the recorded voice message <strong>for</strong> one time automatically<br />
6.3. Input “*”, the host will end the call and stop dialing any auto dialer#.<br />
6.4. Directly hang off the telephone, the host will end the call and automatically dial the next auto dialer#.<br />
7. SMS reporting: Mobile will get SMS like “ <strong>System</strong> <strong>Alarm</strong>ing XX, YYYY”, “XX” means zone number, “YYYY” means the detailed sensor.<br />
8. Arm remotely by phone: 30 seconds after successfully dial the telephone number of host, enter the password of host after the<br />
beep---enter 1 after beep—the host will automatically hang up after beep to successfully complete the<br />
operation.<br />
Notes: You can set “Armed Away” remotely by phone, but keep notes that you can’t set “Armed Home” by<br />
this way.<br />
9. Disarm remotely by phone: 30 seconds after successfully dial the telephone number of host, enter the password of host after the<br />
beep---enter 0 after beep—the host will automatically hang up after beep to successfully complete the<br />
operation.<br />
10. Arm by SMS: You can edit SMS “ XXXXXXBF” to host panel, the host panel would arm automatically when getting this SMS, and<br />
also will message back to mobile “Arm successfully”.<br />
Notes: Arm by SMS is only <strong>for</strong> “Armed away”!<br />
11. Disarm by SMS: You can edit SMS “ XXXXXXCF” to host panel, the host panel would disarm automatically when getting this SMS,<br />
and also will message back to mobile “Disarm successfully”.<br />
12. Monitoring of door/window status: When the smart zone is ON, the arm operation is normal if all the doors or windows<br />
are closed. But if any door or window is open, the host will sounds “Di Di Di” and at the same time it has below<br />
displays alternately:<br />
Not Ready<br />
XX YYYYY<br />
“XX”: zone number;<br />
Arm Anyway Y N<br />
Arm Anyway Y N<br />
“YYYYY”: sensor name;<br />
Note: 1. This function is available only with wireless intelligent door sensor programmed.<br />
2. If arm by SMS or phone call, the operation is same as original.<br />
3. If arm by remote controller or wireless keypad, it will arm successfully after two succsessive arm operation.<br />
13. <strong>Wireless</strong> “Ding Dong” doorbell: the alarm host will sounds “Ding Dong” three times after each press of the doorbell button.<br />
Note: This is an optional function. To have this function, need to add and program a wireless doorbell button.<br />
5.Operation notice<br />
1. <strong>Alarm</strong> processing mode: immediately after the system alarms, it starts to dial (or send SMS) in sequence from the 1st<br />
group number to the 5 th group number(skip empty numbers) automatically. It dials (or send SMS ) circularly <strong>for</strong> three<br />
times, the answered number (or the number which received the SMS) will not dial (or send SMS) repeatedly.<br />
2. Exit delay alert: the alarm host sounds “Di” every 1 second (door/window is closed) within preset exit delay time.<br />
3. <strong>Alarm</strong> delay alert: the alarm host sounds “Di” every 1 second within preset alarm delay time.<br />
4. <strong>Alarm</strong> priority: A. If the alarm host’s own telephone line is accupied when it is alarming, it will cut it and make it<br />
unoccupied, at the same time dial out to report alarm event.<br />
B. The alarm host’s “Ding Dong” sound will switch to alarm sound and dial to report if it receives<br />
alarms signal when sounds “Ding Dong” .
5. External power supply cut alert: the alarm host sounds “Di” every 8 seconds.<br />
6. Lower voltage alert: the alarm host sounds”Di Di Di” every 8 seconds when power gets very low.<br />
How to connect optional wired sensors (2.2K balance resistor is necessary)<br />
1<br />
10<br />
Red + sensor +12V power output<br />
Black - GND<br />
White Zone 31 door sensor<br />
Yellow Zone 32 curtain PIR sensor<br />
Blue Zone 33 curtain PIR sensor<br />
Green Zone 34 wide-angle PIR sensor<br />
Purple Zone 35 wide-angle PIR sensor<br />
Brown Zone 36 panic button<br />
Grey Zone 37 gas sensor<br />
Orange Zone 38 smoke sensor<br />
B. Understanding of Basic Accessories (<strong>Wireless</strong>)<br />
<strong>Wireless</strong> Remote<br />
Features:<br />
Specifications:<br />
• To control the alarm host to arm and disarm.<br />
• With the emergency key <strong>for</strong> urgent help.<br />
• Operating power: 27A 12V alkaline battery<br />
• Emitting distance: ≥100m (in open area)<br />
• Service life: ≤1 year<br />
Installation and Usage:<br />
• For users to take along.<br />
Away<br />
Disarm<br />
Home<br />
Emergency<br />
• Generally, press the “Away” key to arm be<strong>for</strong>e leaving home; and press the “Disarm” key to disarm; “Home” is setting<br />
“Armed home”, please take notes that “Arm Home” is only effective <strong>for</strong> sensors in Perimeter Zone (door<br />
sensor\curtain PIR sensor) and sensors in Emergency Zone (Like Gas sensor\Smoke<br />
sensor\Emergency button), it is not effective all sensors in Motion zone(Like wide-angle PIR).<br />
• Please replace the batteries after one year usage and when you feel shorter control distance.<br />
sensor\Glass<br />
How to program<br />
Please refer to the descriptions of 【Program Sensor】or Table 6.<br />
Note:<br />
• You can only add 1 remote each time, totally 8 available to be added.<br />
• Each serial number is available to study 1 remote, the latter configured remote will be workable and the <strong>for</strong>mer<br />
one becomes not workable automatically.<br />
<strong>Wireless</strong> Intelligent Door Sensor<br />
Features:<br />
• Generally set as Perimeter zone.<br />
• If any door or window is opened, it will transmit the alarm signals to the alarm host.<br />
Specifications:<br />
• Operating power: 23A 12V alkaline battery<br />
• Frequency: 433MHZ
• Emitting distance: ≥100m (in open area)<br />
• Service life: ≤1 year<br />
• <strong>Alarm</strong> Distance:
once every 5 seconds; short circuit “5MIN”: The sensor will detect once every 5 minutes;<br />
Suggestion: short circuit “5S” <strong>for</strong> testing and “5MIN” <strong>for</strong> normal use;<br />
• Fix the sensor onto the bracket;<br />
• Adjust the sensor to a proper angle and then slide the power switch on the side to “ON”, and it will enter into the<br />
normal working state after 30 seconds;<br />
• Upon the working light flashes frequently in green, please replace the batteries.<br />
How to program<br />
Please refer to the descriptions of 【Program Sensor】or Table 6.<br />
Note:<br />
• You can only add 1 wireless wide-angle PIR sensor each time, totally 4 available to be added.<br />
• Each serial number is available to study 1 wireless wide-angle PIR sensor, the latter configured wireless<br />
wide-angle PIR sensor will be workable and the <strong>for</strong>mer one becomes not workable automatically.<br />
<strong>Wireless</strong> Indoor Siren<br />
Features:<br />
• Work with alarm host, wireless receiving alarm signals, spot alarming with<br />
sound and flash<br />
• With power plug, usually <strong>for</strong> indoor use.<br />
Specifications:<br />
• Operating Power: 100~240VAC<br />
• Receiving Distance:≥100 M(In open area)<br />
Installation and Usage:<br />
• Plug the wireless siren into suitable indoor power socket<br />
• Suggestion: Generally around 1.8M from the ground<br />
How to program<br />
Please refer to the descriptions of 【Program Sensor】or Table 6.<br />
Notes:<br />
• You can only add 1 wireless siren each time.<br />
• When configure the wireless siren, you can only operation on the keypad of the alarm host.<br />
• One siren can be studied to at most 10 wireless alarm hosts, multi wireless sirens are available to be added <strong>for</strong><br />
each alarm host.<br />
C. Understanding of Optional Accessories (<strong>Wireless</strong>)<br />
<strong>Wireless</strong> Gas <strong>Alarm</strong><br />
Features:<br />
• Mainly monitor and control indoor gas leak, generally set as<br />
Emergency Zone.<br />
• Usually installed in kitchen<br />
Specifications::<br />
• Operating power: 110~240VAC,50~60HZ<br />
• Emitting distance::≥100m (in open area)<br />
• Inductive gas: Natural gas: 0.1%-0.5%<br />
Liquefied petroleum gas (LPG): 0.1%-0.3%<br />
Installation and Usage:<br />
• Fix the gas alarm onto proper wall surface inside the kitchen.<br />
Working Light<br />
Test Button<br />
Power Light<br />
• Connect the alarm to the power and it will be ready to detect after two minute<br />
Air Hole<br />
How to program<br />
Please refer to the descriptions of 【Program Sensor】or Table 6.<br />
Note:<br />
• You can only add 1 wireless gas alarm each time, totally 4 available to be added.<br />
• Each serial number is available to study 1 wireless gas alarm, the latter configured wireless gas alarm will be<br />
workable and the <strong>for</strong>mer one becomes not workable automatically.<br />
<strong>Wireless</strong> Smoke <strong>Alarm</strong>
Features:<br />
• Mainly monitor and control indoor fire risks, generally set as Emergency Zone.<br />
• Replace the batteries <strong>for</strong> every 1 or 2 year.<br />
• Usually installed on the ceilings of living room and aisles.<br />
Working Light<br />
Specifications:<br />
• Operating power: 9V alkaline battery<br />
• Emitting distance: ≥100m (in open area)<br />
• Service life: ≤1 year<br />
• Monitoring range: 20m<br />
Air Hole<br />
Test Button<br />
How to program<br />
Please refer to the descriptions of 【Program Sensor】or Table 6.<br />
Note:<br />
• You can only add 1 wireless smoke alarm each time, totally 4 available to be added.<br />
• Each serial number is available to study 1 wireless smoke alarm, the latter configured wireless smoke<br />
sensor will be workable and the <strong>for</strong>mer one becomes not workable automatically.<br />
<strong>Wireless</strong> outdoor siren<br />
Features:<br />
• Nice, exquisite and waterproof<br />
• Mico-computer controlling, steady per<strong>for</strong>mance and high-class quality<br />
• Study to at most 10 pcs of wireless alarm host<br />
• With inbuilt charging circuit and back up accumulators, automatic AC power and DC power trans<strong>for</strong>mation<br />
• Low standby power consumption, self-inspection of lower battery voltage, automatic charging<br />
• Wall hanging installtion<br />
Specifications:<br />
• Operating power:110~240VAC, 50Hz<br />
• Static power consumption:≤40 mA<br />
• Working power consumption:≤450 mA<br />
• The maximum alarm sound with flash:<br />
3 Minutes<br />
• Receiving distance:≥100M(In open area)<br />
• <strong>Alarm</strong>ing volume:≥105db<br />
Installation and usage<br />
• Press down the green power switch on the back after connecting to the AC power<br />
• Study the siren to the alarm host according to the instruction below<br />
• Unplug from the AC power, fix it in the proper outdoor place with handing hook, and then plug to the AC power<br />
• The max time <strong>for</strong> alarming sound with flash is 3 minutes, it will stop automatically after the alarm host is disarmed<br />
• When the back-up battery has a lower voltage than 5VDC, the charging indicator turns on, the back-up accumulators<br />
will be charged automatically, the approximate charging time is 20 hours, when the charging indicator off, it means it<br />
has finished charging<br />
How to program<br />
Activate<br />
• (Siren) connect the siren to power by plugging in to the socket------ press red studying switch on the back, siren lights<br />
on<br />
• (<strong>Alarm</strong> host) Press on the alarm host to let the alarm host goes off------ Let it stop alarming ( -----Input<br />
programming password---ENT)---you will hear “DIDI” from the alarm host after 5 seconds<br />
• One siren can be studied to at most 10 wireless alarm hosts, multi wireless sirens are available to be added <strong>for</strong> each<br />
alarm host.<br />
Deactivate
• Keep pressing the red button <strong>for</strong> 10 seconds and a successful deactivation will be followed by a flash of the alarming<br />
light<br />
Note:all the alarm hosts will become invalid to this siren after this operation<br />
<strong>Wireless</strong> doorbell button<br />
Features<br />
Installed in the entrance, the alarm host will sounds “Ding Dong” if someone press it.<br />
Specifications:<br />
• Operating power:3.7V Li-Ion battery.<br />
• Emitting frequency: 433Mhz<br />
• Emitting distance: ≥100M(In open area)<br />
• Service life: ≤1 year<br />
Installation and usage<br />
1. Fix the base on the wall in a position of 1.6m above the ground.<br />
2. Then fasten the main part with the base.<br />
3. Change batteries when indicator flashes frequently in green.<br />
How to program<br />
Please refer to the descriptions of 【Program Sensor】 (The doorbell button has its fixed zone number---“20”)<br />
Note:<br />
• You can only add 1 wireless doorbell button each time, totally 4 available to be added.<br />
• Each serial number is available to study 1 wireless doorbell button, the latter configured wireless doorbell button<br />
will be workable and the <strong>for</strong>mer one becomes not workable automatically.<br />
Table 6 : Preview of how to activate and deactivate “Basic accessories (<strong>Wireless</strong>)” and “Optional accessories (<strong>Wireless</strong>)”<br />
Type<br />
Zone<br />
No.<br />
Max. no. to<br />
be<br />
programmed<br />
How to activate<br />
How to deactivate<br />
Remote 00、01 8<br />
1) 【SET +Programming code + “▲▼”<br />
“Program sensor” + ENT + “ ” + Y Y + 1) 【SET +Programming code + “▲▼”<br />
ENT + “ ” + X + ENT + “▲▼””Activate “Program sensor” + ENT + “ ” + Y Y<br />
sensor” + ENT 】(The screen would say + ENT + “ ” + X + ENT +<br />
learning)<br />
“▲▼”Delete sensor” + ENT 】<br />
2) Press any key on the remote twice 2) The alarm host will beep once and<br />
successively, the host LCD will press ESC to exit.<br />
display ”Success”;<br />
Basic<br />
accessories<br />
(<strong>Wireless</strong>)<br />
Optional<br />
Accessories<br />
(<strong>Wireless</strong>)<br />
Door<br />
Sensor<br />
Wide-Angle<br />
PIR Sensor<br />
1.Same as above<br />
11~20 4 2.Trigger the door sensor twice<br />
successively<br />
21~30 4<br />
Indoor siren N/A ——<br />
Gas alarm 02~10 4<br />
Smoke<br />
Sensor<br />
1.Same as above<br />
2.Trigger the PIR sensor by pressing<br />
”Learning Emitting Switch” on the panel<br />
twice successively<br />
Same as above<br />
Same as above<br />
1.After connecting to the power, press the<br />
After connecting to the power, keep<br />
“learning switch on the side of the siren<br />
pressing the “Learning” switch on the<br />
2. Press“ ” key on the alarm host, disarm<br />
side of the siren <strong>for</strong> 5 seconds and<br />
by keypad on the alarm host after about 5<br />
release, lights on the siren flashes 1<br />
seconds.<br />
time and then off indicate successful<br />
3. Lights of the siren flashes 5 times and<br />
deavtivating<br />
then off indicates successful activating<br />
1. Same as above<br />
2. Trigger gas alarm by releasing gas, Same as above<br />
the host LCD will display “Success”<br />
1.Same as above<br />
02~10 4 2.Trigger smoke alarm by releasing Same as above<br />
smoke, the host LCD will display “Success”
Outdoor<br />
Siren<br />
N/A —— Same as wireless indoor siren Same as wireless indoor siren<br />
V. Common Problems and Solutions<br />
Symptoms of Faults Possible Cause Solution<br />
The alarm host can’t fully record Did not keep pressing the record all<br />
the time while recording<br />
Keep pressing the record all the time while<br />
recording<br />
Repeatedly receiving the alarm<br />
telephone<br />
Can’t receive alarm sms or can’t<br />
receive sms reply after made arm<br />
or disarm operation by sms<br />
The host does not alarm after the<br />
detector is triggered in arm state<br />
The PIR sensor doesn’t work<br />
The detecting distance of PIR<br />
sensor gets shorter<br />
The host does not alarm after the<br />
new added wireless detector is<br />
triggered.<br />
The PIR sensor flashes frequently<br />
in green.<br />
The door sensor’s indicator flashes<br />
frequently.<br />
The distance of the remote<br />
controller gets shorter.<br />
Fail to operate according to the operation<br />
instruction of the telephone alarm<br />
1. SIM card is not insert properly<br />
2. <strong>GSM</strong> signal is not good enough<br />
1. Caused by the functions of arm mode<br />
(Armed Away and Armed Home);<br />
2. Have already setup time <strong>for</strong> Entry<br />
Delay or Exit Delay<br />
1. Not properly connected to the power<br />
2. Port of the detector is in the<br />
power-down mode.<br />
The ambient temperature in the<br />
detecting area is too high.<br />
Failed to follow the operation instruction<br />
of “Adding and deleting sensors” to add<br />
the new wireless sensor<br />
Batteries are running out.<br />
Batteries are running out.<br />
Batteries are running out.<br />
Follow the below instructions after answering the alarm<br />
phone calls and hearing the recorded message:<br />
(See Point 6 of “How to operate the <strong>Alarm</strong> Host”)<br />
1. Insert SIM card properly<br />
2. Adjust alarm host’s installation position till the signal<br />
status shows “OK”<br />
1.“Armed Away” mode: alarm goes off when any sensor<br />
is triggered;<br />
2. “Armed Home” mode: alarm goes off when any sensor<br />
in Perimeter zone is triggered and it won’t alarm when<br />
any sensor in Motion zone is triggered<br />
3. Program to adjust the time <strong>for</strong> Entry Delay or Exit<br />
Delay<br />
1. Open the sensor shells to install the batteries well<br />
and slide the power switch to “On”;<br />
2. “5S”: detect once every 5 seconds;<br />
“5MIN”: detect once every 5 minutes;<br />
When the ambient temperature in the detecting area<br />
exceeds the human body temperature, the detecting<br />
distance will get shorter, it’s normal.<br />
Follow the operation instruction of “How to program” to<br />
activate the new wireless sensor<br />
Replace with new batteries of the same specification.<br />
Replace with new batteries of the same specification.<br />
Replace with new batteries of the same specification.<br />
VI. Daily Maintenance and Care<br />
This alarm is the hi-tech product with the outstanding design and sophisticated technique, and shall be used carefully. To make the alarm to<br />
operate <strong>for</strong> a long term stably and to prolong the service life, it is recommended that:<br />
• Try to put the alarm host in the dry and well-ventilated places.<br />
• Do not put the host and any wireless detectors in too cold, too hot or dusty places to prevent it from curtailing the service lives of<br />
electric parts and preventing the plastic shell from distorting and accelerating to age.<br />
• Do not put the host and any wireless detectors in low and too exposed places to prevent the children from touching them or the<br />
thieves from finding them.<br />
• Regular testing is necessary <strong>for</strong> finding and resolving problems in time.<br />
• Regularly check the batteries in all wireless sensors and replace the running out batteries to ensure the normal operation of them.<br />
• You’d better keep the power of the alarm host and all wireless accessories off while a long-time vacancy of the system.