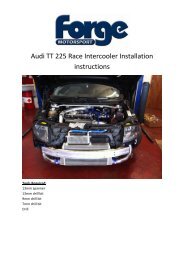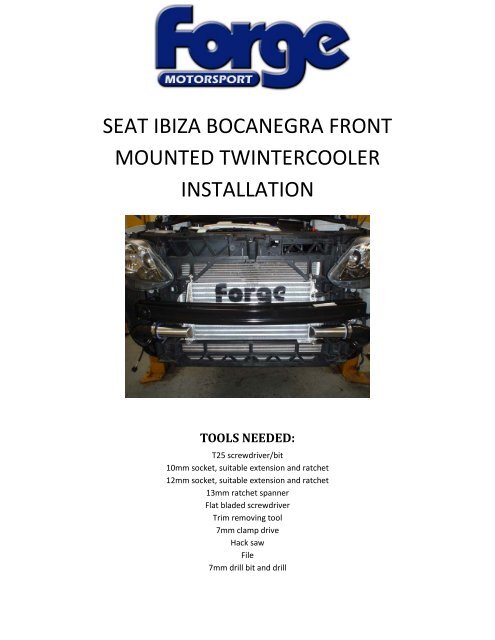
seat ibiza bocanegra front mounted twintercooler ... - Forge Motorsport
seat ibiza bocanegra front mounted twintercooler ... - Forge Motorsport
seat ibiza bocanegra front mounted twintercooler ... - Forge Motorsport

Create successful ePaper yourself
Turn your PDF publications into a flip-book with our unique Google optimized e-Paper software.
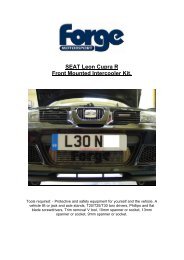
SEAT IBIZA BOCANEGRA FRONT<br />
MOUNTED TWINTERCOOLER<br />
INSTALLATION<br />
TOOLS NEEDED:<br />
T25 screwdriver/bit<br />
10mm socket, suitable extension and ratchet<br />
12mm socket, suitable extension and ratchet<br />
13mm ratchet spanner<br />
Flat bladed screwdriver<br />
Trim removing tool<br />
7mm clamp drive<br />
Hack saw<br />
File<br />
7mm drill bit and drill
Kit Contents<br />
1 x Twintercooler<br />
2 x custom silicon hose<br />
2 x 60 diameter jubilee clip<br />
4 x 70 diameter jubilee clip<br />
4 x 6mm Penny washers<br />
4 x M6x12 long bolts<br />
4 x M6 nyloc nuts
1. Park vehicle securely, jack the <strong>front</strong> of car and support on axle stands so that the <strong>front</strong> wheels<br />
are clear of the ground and raise bonnet. Starting on the driver’s side turn steering wheel so<br />
the wheels are on full lock to gain access to the arch liner. Undo the four T25 screws and<br />
repeat this on the passenger side.
2. Undo the three T25 screws on the bottom of the bumper and repeat this on the passenger<br />
side.
3. Undo the six T25 screws on the under tray and remove.<br />
4. Using a screw driver rotate the four clips on the top edge of the bumper by half a turn and pull<br />
out using a trim removing tool.
5. By applying even but firm pressure from behind the bumper, pull it away from the wing taking<br />
care not to bend the bumper too much as this can crack the top edge. Repeat this on the<br />
passenger side and pull bumper away from car.<br />
6. Pull out the fog light connection on both sides and remove bumper.
7. Place a jack under the radiator pack and pump jack up so it can take the weight when the<br />
crash bar is removed. This is to prevent the radiator pack from dropping down!<br />
8. Undo the two 10mm bolts and the eight 12mm bolts on both sides of the crash bar and<br />
remove.<br />
10mm bolt<br />
12mm bolt<br />
12mm bolt
9. Pull out the three plastic fixings by prying off with a screw driver, and remove plastic ducting.<br />
Plastic ducting<br />
10. Pull out the air temperature sensor and repeat step 9 to remove plastic ducting.<br />
Air temperature<br />
sensor<br />
Plastic ducting
11. Mark a line following the contour of the radiator pack and cut out using a hack saw. Clean<br />
rough edges with a file and repeat on passenger side. This is to allow clearance for the silicon<br />
hoses.
12. Place the <strong>twintercooler</strong> into the radiator pack. It will need to rest on the bottom and fit<br />
between the plastic moldings on the top. Mark the position of the slots, remove the<br />
<strong>twintercooler</strong> and drill four 7mm holes in the appropriate positions.<br />
13. Reinstall the <strong>twintercooler</strong> and attach using the four M6 bolts, penny washers and nyloc nuts<br />
supplied in kit.
14. Push the air temperature sensor into the <strong>twintercooler</strong> bracket.<br />
15. Undo the horn and rotate by 90 degrees and tighten to keep in place, undo the jubilee clips on<br />
OEM rubber hoses and remove from the OEM intercooler. Install the silicon <strong>twintercooler</strong><br />
hoses and the six jubilee clips supplied in kit. Follow points 1-8 in reverse order to refit the<br />
bumper, installation is complete!<br />
ENGINEERED FOR PERFORMANCE