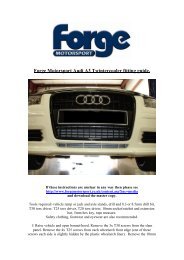
SEAT Ibiza mk4 PD130 FMIC. - Forge Motorsport
SEAT Ibiza mk4 PD130 FMIC. - Forge Motorsport
SEAT Ibiza mk4 PD130 FMIC. - Forge Motorsport

Create successful ePaper yourself
Turn your PDF publications into a flip-book with our unique Google optimized e-Paper software.
<strong>SEAT</strong> <strong>Ibiza</strong> <strong>mk4</strong> <strong>PD130</strong> <strong>FMIC</strong>.<br />
Tools required:-<br />
Relevant protective and safety equipment. Vehicle lift or jack and axle stands. 13mm spanner, 10mm<br />
spanner, T25 Torx driver, T30 Torx driver, 4mm Allen key, 3mm Allen key, Hacksaw or trimming<br />
knife, pozzidrive screwdriver.<br />
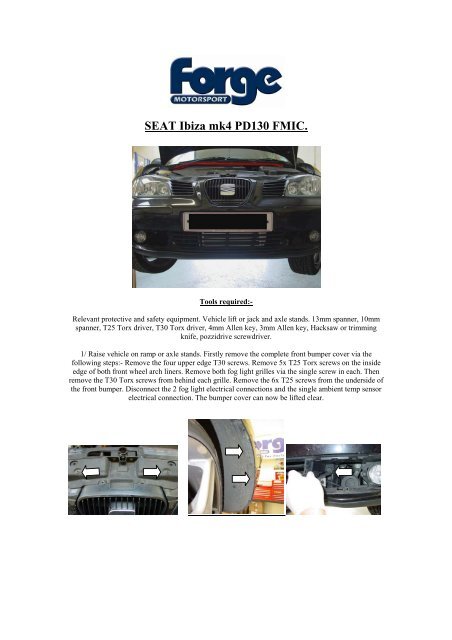
1/ Raise vehicle on ramp or axle stands. Firstly remove the complete front bumper cover via the<br />
following steps:- Remove the four upper edge T30 screws. Remove 5x T25 Torx screws on the inside<br />
edge of both front wheel arch liners. Remove both fog light grilles via the single screw in each. Then<br />
remove the T30 Torx screws from behind each grille. Remove the 6x T25 screws from the underside of<br />
the front bumper. Disconnect the 2 fog light electrical connections and the single ambient temp sensor<br />
electrical connection. The bumper cover can now be lifted clear.
2/ Remove the ducting to the standard side mount intercooler by unclipping the top plastic mounts and<br />
then feeding the fog light wiring harness through the ducting. There are also 2 plastic trim clips to<br />
remove. Disconnect the electrical connector from the MAP sensor mounted on the top tank of the<br />
intercooler. Loosen the hose clips of the upper and lower hose joints and then remove the 2x 10mm<br />
nuts that secure the intercooler, fully remove the intercooler from the vehicle. Remove the right side<br />
plastic bumper trim as pictured on the right below. This is secured with 2x plastic trim clips.<br />
3/ Remove the right side headlight completely, this is fixed with T35 torx screws, also remove<br />
electrical connections. Remove the upper and lower intercooler pipes; these have a horseshoe type<br />
metal spring clip, prize this clip away from the pipework and the hoses will pull out of their fixings.<br />
Remove the seals from two of the original hose connectors. Clean these seals and then refit them to the<br />
two aluminium couplings supplied in the <strong>FMIC</strong> kit. Clean out the pipe connectors on the vehicle and<br />
then insert these couplings in to place.<br />
4/ Now remove the front crash bar, this is secured with several 13mm and 10mm bolts.
5/ Fit the 2x 300mm silicone tubes to Intercooler inlet and outlet connectors using the hose clips<br />
supplied. Fit the aluminium hose joiner to the lower tube as pictured, secure using the hose clip<br />
supplied. Mount the new intercooler to the Bumper bar using the cap screws, washers and nuts<br />
supplied. Now refit the complete bumper bar and intercooler assembly to the vehicle using the original<br />
13mm and 10mm bolts.<br />
6/ Fit a 45 degree silicone pipe to the upper boost hose coupling as pictured below. (Be sure to route<br />
this so you have enough space for the headlight to be refitted later). Remove the original Map sensor<br />
from the stock intercooler and fit this in to the new aluminium pipe as pictured below. Connect the<br />
remainder of the hoses as pictured and secure them all using the hose clips supplied. Check and secure<br />
all hose clips that have been fitted to the whole new <strong>FMIC</strong> pipe run. (If any of these become dislodged<br />
at a later stage then it will require the complete bumper removal in order to gain access). Connect the<br />
electrical connection to the Map sensor.<br />
7/ Cut a section (as pictured below) from the right side inner bumper cover.
8/ Refit headlight and complete bumper cover. Be sure to connect the fog light electrical connections.<br />
Lower the vehicle to the ground and clear away all tools and old parts.<br />
You are now ready to enjoy the new found performance of your vehicle.<br />
Engineered for performance.