Forge Motorsport Audi A3 Twintercooler fitting guide.
Forge Motorsport Audi A3 Twintercooler fitting guide.
Forge Motorsport Audi A3 Twintercooler fitting guide.
You also want an ePaper? Increase the reach of your titles
YUMPU automatically turns print PDFs into web optimized ePapers that Google loves.
<strong>Forge</strong> <strong>Motorsport</strong> <strong>Audi</strong> <strong>A3</strong> <strong>Twintercooler</strong> <strong>fitting</strong> <strong>guide</strong>.<br />
If these instructions are unclear in any way then please see<br />
http://www.forgemotorsport.co.uk/content.asp?inc=media<br />
and download the master copy.<br />
Tools required:-vehicle ramp or jack and axle stands, drill and 8.3 or 8.5mm drill bit,<br />
T30 torx driver, T25 torx driver, T20 torx driver, 10mm socket/ratchet and extension<br />
bar, 5mm hex key, tape measure.<br />
Safety clothing, footwear and eyewear are also recommended.<br />
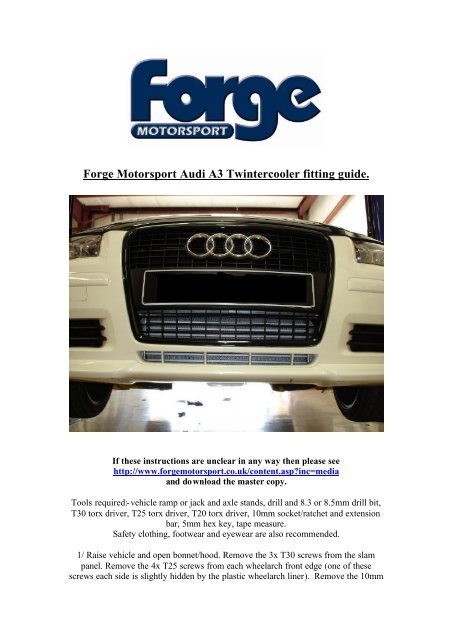
1/ Raise vehicle and open bonnet/hood. Remove the 3x T30 screws from the slam<br />
panel. Remove the 4x T25 screws from each wheelarch front edge (one of these<br />
screws each side is slightly hidden by the plastic wheelarch liner). Remove the 10mm
olt from behind the liner that retains the bumper just below the headlight, see largest<br />
picture below. Remove the 7x T25 screws from the underside of the front bumper.<br />
The front bumper can now be lifted clear of the car, disconnect the fog lights whilst<br />
removing the bumper.<br />
2/ Remove the 2x radiator air deflectors. These are fixed with a single T20 screw in<br />
each. These will not be refitted later.
3/ Remove the 8x T25 screws in order to remove the complete engine under tray.<br />
Remove both lower standard intercooler hoses; these are just clipped in via a spring<br />
clip. Prize this away with a flat end screwdriver to aid removal of the hose end <strong>fitting</strong>,<br />
these will not be refitted but the seals are required later so place to one side for now.
4/ Now measure the full length of the crash bar and make a centre line reference<br />
point. Measure 290mm either way from this centre line and mark again with a<br />
horizontal line. Measure 10mm up from each of these lines and make a centre point<br />
for a drill hole. Drill each of these points with an 8mm to 9mm hole. Clean away all<br />
the swarf from drilling making sure none enters the open intercoolers or the new<br />
hoses.<br />
5/ Fit the brackets to the crash bar with the bolts/nuts supplied, fit the intercooler to<br />
these brackets as shown below. Tighten all the brackets and intercooler fixings once<br />
the intercooler is positioned centrally.
6/ Remove the horns from their brackets, now remove each bracket from the car and<br />
refit the horns as per the pictures below with the new brackets supplied so they are<br />
now sited higher. This is to allow the new hoses a free routing below the horns.<br />
7/ Remove the oil seals from the original intercooler hoses and fit these to the<br />
corresponding new aluminium hose couplings as pictured below, these are different<br />
sizes so make sure you fit the correct seal to the correct adapter. Fit the hose<br />
couplings into the respective <strong>fitting</strong>s on the original intercooler and the turbo outlet<br />
pipe on the right side running alongside the engine sump. Make sure the spring clips<br />
are located securely to prevent these couplings from being blown out of the fixings<br />
under boost.
8/ Now fit the new hoses to join all the couplings and the new intercooler. The hoses<br />
may require a test fit to make sure they do not foul on any other engine or front panel<br />
components. A small amount of trimming may be required on the hoses at the new<br />
intercooler joints. Once you are satisfied with the fitment then secure all the hoses<br />
with the hose clips supplied.
9/ Refit the undertray and bumper in reverse of removal. The lower outer grilles may<br />
require a small amount of trimming to be able to fit them back in to place, see below<br />
for a <strong>guide</strong>.<br />
Clear away all tools, close the bonnet/hood and lower the vehicle to the ground. You<br />
are now ready to enjoy the new found performance of your vehicle.<br />
Engineered for performance


