
You also want an ePaper? Increase the reach of your titles
YUMPU automatically turns print PDFs into web optimized ePapers that Google loves.
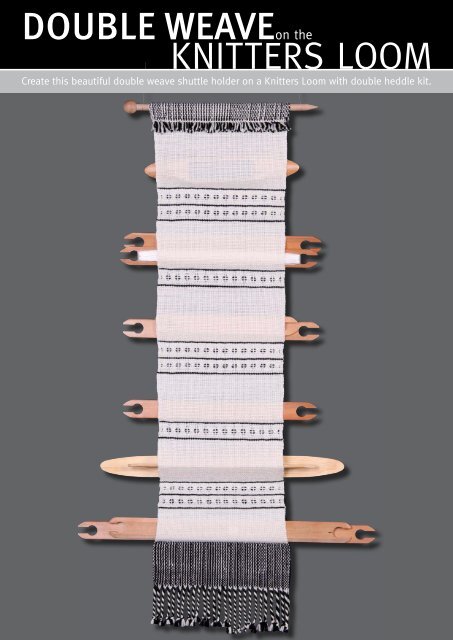
DOUBLE WEAVEon the<br />
KNITTERS LOOM<br />
Create this beautiful double weave shuttle holder on a Knitters Loom with double heddle kit.
<strong>Double</strong> <strong>Weave</strong> on the Rigid Heddle or Knitters Loom<br />
<strong>Double</strong> <strong>Weave</strong> and Brooks Bouquet on the<br />
Rigid Heddle or Knitters Loom using the<br />
Second Heddle Kit.<br />
You will need<br />
Loom: Rigid Heddle Loom 40cm (16ins)<br />
or Knitters Loom 30cm (12ins)<br />
Reed: 2 x 40/10cm (10dpi)<br />
Warp & Weft Yarns: <strong>Ashford</strong> McKenzie 4 ply<br />
(100% Merino; 385m/421yds;100gms net) White<br />
1 ball, Black 1 ball<br />
Other: Two pick-up sticks (or shuttles)<br />
5. Place the reed in the up position<br />
6. Place the second reed in the front heddle<br />
rest position<br />
black pair down and the white pair up<br />
12. Take 1 white end from the pair of white<br />
ends (choose the one that is to the top or left<br />
of the pair) and thread through the eye to the<br />
left<br />
Warping<br />
1. Place one reed in the back heddle rest<br />
position<br />
2.Excluding the first three and last three slots,<br />
warp across reed in the normal way but place<br />
two loops in each slot (one loop of black and<br />
one of white)<br />
13. Continue across the reed<br />
14. Check there are no crosses between the<br />
reeds. If the ends are crossed remove and<br />
repeat step 11 and 12. Your threading will look<br />
7. Drape all ends from the back reed over the front<br />
reed (this will help to make the threading easier)<br />
8. Take the first group of 4 ends (2 white ends<br />
and 1 black end from the slot and 1 end from the<br />
eye to the right and thread all 4 ends through<br />
the slot directly in front in the front reed<br />
3. Roll the warp onto the back roller and cut<br />
the loops<br />
4. With the front of the loom facing you and<br />
starting from the left use a heddle hook to take<br />
one of the black ends from the slot and thread<br />
it through the eye to the right. Continue across<br />
the reed<br />
9. Continue across the reed. Now you will have<br />
4 ends (2 black and 2 white) in each slot in<br />
the front reed<br />
like diagram below<br />
15. Tie to the front warp stick<br />
Creating the additional sheds<br />
Pick Up Stick A<br />
1. Place both reeds in down position. Behind<br />
the back reed lift up all the white threads on<br />
the top and insert a pick up stick (A)<br />
10. Place both reeds in the rest position<br />
11. Take the first group of 4 ends and pull the<br />
2. Slide the pick up stick A to the back beam<br />
Pick Up Stick B<br />
1. Place both reeds in the up position. Slide<br />
Pick up stick A forward and insert pick up stick<br />
B into the bottom shed that is formed<br />
2. Slide both pick up sticks to the back beam
<strong>Double</strong> <strong>Weave</strong> on the Rigid Heddle or Knitters Loom continued...<br />
Hint: When changing the shed leave the front<br />
reed hanging<br />
Plain weaving - one layer double the ends<br />
per cm/in<br />
1. Place both reeds in up position, weave one<br />
pick<br />
2. Place both reeds in the down position,<br />
weave one pick. Repeat step 1.<br />
Two Layered Weaving<br />
It is easy to create two separate layers of cloth<br />
at the same time.<br />
Top Layer<br />
The top layer is white warp and weft.<br />
1. With both reeds in the rest position, slide<br />
pick up stick A forward and turn on side to<br />
create shed 1 of the top layer<br />
2. <strong>Weave</strong> one pick of white. Slide pick up stick<br />
A to the back<br />
3. Create shed 2 of the top layer with front<br />
reed up<br />
4. <strong>Weave</strong> one pick of white<br />
Bottom layer<br />
The bottom layer is black warp and weft.<br />
1. With both reeds in the rest position, slide<br />
pick up stick B forward and turn on side to<br />
create shed 1 of bottom layer<br />
2. <strong>Weave</strong> one pick of black. Slide pick up stick<br />
B to the back<br />
3. Create shed 2 of bottom layer with back<br />
reed down<br />
4. <strong>Weave</strong> one pick of black<br />
Repeat weaving one top layer one bottom<br />
layer until weaving reaches the desired length.<br />
To join the layers at anytime place the back<br />
reed up and weave one pick of either black or<br />
white<br />
Hint: When weaving two separate layers do<br />
not go around the alternate weft thread<br />
Brooks Bouquet<br />
The beautiful lace of Brooks Bouquet is<br />
enhanced by the black second layer backing<br />
cloth.<br />
1. <strong>Weave</strong> 4 picks on the bottom black layer<br />
and four picks top white layer (see instructions<br />
above)<br />
2. <strong>Weave</strong> 4 more picks on the bottom black<br />
layer<br />
3. Place both reeds in the rest position and<br />
slide pick up stick A forward and turn on side<br />
4. Slide the shuttle with the white yarn under<br />
the first 6 ends and back over and around<br />
the last 4 ends and pull the yarn to make a<br />
“bunch”<br />
5. Pick up the next 4 ends with the shuttle and<br />
take it back over and around these 4 ends and<br />
under the next 4 (you will be going under 8<br />
ends).<br />
6. Continue across row (check that the number<br />
of ends will make equal-sized bunches).<br />
7. When there are 6 ends left use the shuttle<br />
to pick up 4 ends and take the shuttle around<br />
the 4 and under the 2 ends to finish the row<br />
8. <strong>Weave</strong> 4 more picks bottom and top layers<br />
9. Join the two layers (see above)<br />
10. Repeat instructions 1-9 for desired result<br />
Hint: Use your fingers to adjust the<br />
“bouquets” so they are level<br />
To make a Shuttle holder wall hanging weave<br />
sections as in diagram below:<br />
Secure top end with hemstitch or machine<br />
zigzag stitch. Do a twisted fringe at the<br />
beginning of the weaving, which will become<br />
the bottom of the hanging. Handwash in warm<br />
water. Lay flat to dry. Fold top over 3cm(1<br />
1/2”ins) stitch down to make pocket to insert<br />
hanging needle.<br />
Plain Weaving<br />
Two layer weaving<br />
Brooks bouquet<br />
Two layer weaving<br />
Brooks bouquet<br />
Two layer weaving<br />
Brooks bouquet<br />
Two layer weaving<br />
Brooks bouquet<br />
Two layer weaving<br />
Brooks bouquet<br />
Two layer weaving<br />
Plain weaving