Download - Obd2be.com
Download - Obd2be.com
Download - Obd2be.com

Create successful ePaper yourself
Turn your PDF publications into a flip-book with our unique Google optimized e-Paper software.
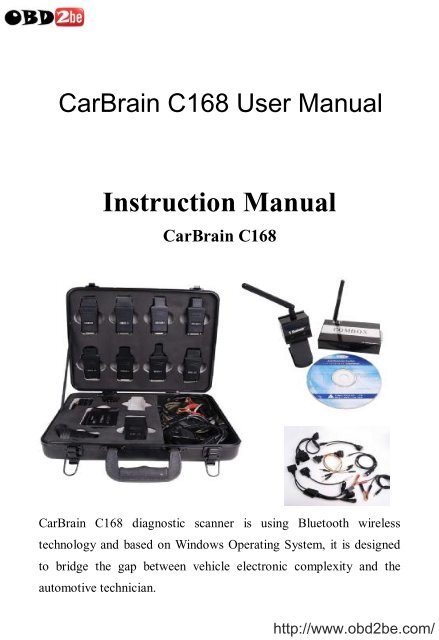
CarBrain C168 User Manual<br />
Instruction Manual<br />
CarBrain C168<br />
CarBrain C168 diagnostic scanner is using Bluetooth wireless<br />
technology and based on Windows Operating System, it is designed<br />
to bridge the gap between vehicle electronic <strong>com</strong>plexity and the<br />
automotive technician.<br />
http://www.obd2be.<strong>com</strong>/
CarBrain C168 Instruction Manual<br />
1. CarBrain C168 Software<br />
1.1 Software requirement<br />
windows95/98/me/2000/XP,suggest to use windows 2000/XP<br />
1.2 Software part<br />
Software part consists of vehicle failure diagnosis software,<br />
maintenance data and driver procedure of USB converting to RS232.<br />
Automobile failure diagnosis software: all kinds of vehicle types<br />
diagnosis software including tens of thousands of Asian, European<br />
and American automobile types.<br />
Maintenance data: all kinds of automobile types mantenance data<br />
including maintenance light reseting to zero etc.<br />
USB to RS232 driver: driver of <strong>com</strong>puter and <strong>com</strong>munication<br />
equipment port.<br />
http://www.obd2be.<strong>com</strong>/<br />
2
2.1 Hardware requirement<br />
2. CarBrain C168 Hardware<br />
,<br />
‣ One USB port at least<br />
‣ P II or above processor<br />
‣ 64M or above EMS memory<br />
‣ Suggest to use CRT or LCD screen<br />
‣ Suggest to use mobile PC<br />
‣ Resolution is 640*480/800*720/1024*768, suggest to use<br />
800*600/1024*768<br />
2.2 Hardware accessory<br />
CarBrain C168 Hardware consists of <strong>com</strong>munication equipment、<br />
diagnosis adaptor and several cables.<br />
Communication equipment:<br />
COMBOX<br />
RF-BOX<br />
Diagnosis adaptor:<br />
http://www.obd2be.<strong>com</strong>/<br />
3
CarBrain C168 Instruction Manual<br />
BMW-20<br />
BENZ-38<br />
Chrysler-6<br />
GM-12<br />
KIA-20<br />
CANBUS-II<br />
NISSAN-14<br />
OBDII-16<br />
TOYOTA-17F<br />
TOYOTA/MAZDA-17R<br />
http://www.obd2be.<strong>com</strong>/<br />
4
,<br />
HONDA-3<br />
Cable:<br />
AUDI-4<br />
CITROEN-2<br />
FIAT/SUZUKI/DAIHATSU<br />
MITSUBISHI/HYUNDAI<br />
LIGHT CABLE<br />
UNIVERSAL L-3<br />
UNIVERSAL S-3<br />
http://www.obd2be.<strong>com</strong>/<br />
5
CarBrain C168 Instruction Manual<br />
USB<br />
Packing:<br />
Plastic box with strong resistance<br />
Installation CD<br />
Note:<br />
There is interior wireless <strong>com</strong>munication module, automobile port module and<br />
<strong>com</strong>puter port module in the COMBOX.<br />
Main cable is using to connect <strong>com</strong>puter and COMBOX.<br />
Diagnosis extend line is connected to COMBOX and diagnosis socket.<br />
Light cable is using to supply power from automobile to COMBOX.<br />
Clipper cable is using to supply power from automobile storage battery to<br />
Wireless signal indicator<br />
COMBOX<br />
Reset button<br />
Power indicator<br />
Main unit jack<br />
Antenna<br />
RF-BOX<br />
http://www.obd2be.<strong>com</strong>/<br />
6
,<br />
Note:<br />
1. When the power LED is red, then it is under normal condition, whereas<br />
under abnormal condition.<br />
2. The blue LED is wireless signal indicator,It shows the signal is stable when<br />
the LED lights constantly and is unstable when the LED lights flickeringly.<br />
3. USB jack connects the main cable to <strong>com</strong>puter.<br />
Antenna<br />
Power indicator<br />
Main unit jack<br />
Power jack<br />
Communication LED<br />
Fixture rotary switch<br />
Diagnosis adaptor<br />
COMBOX<br />
Note:<br />
1. When the power LED is red, then it is under normal condition,whereas under<br />
abnormal condition.<br />
2. Other LEDs are <strong>com</strong>munication indicator, will flicker when <strong>com</strong>municating<br />
3. USB jack as the wire <strong>com</strong>munication connects the main cable to <strong>com</strong>puter.<br />
4. DB26 socket is diagnosis socket connecting to diagnosis adpator or<br />
diagnostic extend cable.<br />
5. The rotary switch is using to connect diagnosis adpator or diagnostic extend<br />
line<br />
Diagnostic extend cable<br />
Note:<br />
Connect one jack of diagnostic extend cable to diagnosis adpator, and the other side<br />
http://www.obd2be.<strong>com</strong>/<br />
7
to COMBO<br />
CarBrain C168 Instruction Manual<br />
USB cable<br />
Note:<br />
Connect one jack of main cable to <strong>com</strong>puter and the other jack to COMBOX when<br />
it is under wired connection or RF box when it is under wireless connection.<br />
BMW-20 diagnosis adaptor<br />
Note:<br />
Connect one jack of BMW-20 diagnosis adaptor to the automobile<br />
diagnosis jack, and other jack to the COMBOX or diagnosis extend cable。<br />
http://www.obd2be.<strong>com</strong>/<br />
8
3. Hardware connection sketch map<br />
,<br />
http://www.obd2be.<strong>com</strong>/<br />
9
CarBrain C168 Instruction Manual<br />
Note:<br />
1. The location of automobile diagnosis jack is not fixed, some are under the<br />
control board, some are in the engine storehouse, and some are under the cab<br />
seat.<br />
2. Please insert the diagnosis adaptor to the automobile diagnosis jack directly.<br />
3. You can connect the COMBOX and diagnosis adaptor directly. If the<br />
COMBOX jack can’t be connected with the diagnosis adaptor conveniently,<br />
you can use the diagnostic extend cable to connect.<br />
4. In the above drawing, there are two cables, the end user can select any one to<br />
connect according to the actual situation.<br />
5. Wire <strong>com</strong>munication: You can connect the COMBOX and <strong>com</strong>puter by the<br />
main cable, and the main cable can be connected to the USB jack on the<br />
<strong>com</strong>puter directly, please refer to the above drawing 1.<br />
6. Wireless <strong>com</strong>munication: You can connect the COMBOX and <strong>com</strong>puter by<br />
the RF-BOX, and connect the RF-BOX with the USB jack on the <strong>com</strong>puter by<br />
the main cable, please refer to the above drawing 2.<br />
7. If there is no power supply from the automobile adaptor, please obtain power<br />
source from the automobile through the light cable or alligator clip of the<br />
double pliers’ light cable; connect one jack of light cable to the automobile jack,<br />
and connect other jack to the power jack of COMBOX.<br />
10<br />
http://www.obd2be.<strong>com</strong>/
4. Install CD introduction<br />
There are automobile failure diagnosis software, maintenance help documents<br />
and USB to RS232 driver in the CD.<br />
CarBrain_XX.exe......................automobile failure diagnosis software<br />
CarDocs.exe.............................maintenance help documents<br />
USB to RS232(2.0) Driver..........USB to RS232 driver<br />
Note:<br />
1. If the XX in the CarBrain_XX is SD, it means Carbrain C168’s install<br />
software is simple Chinese version for all vehicles.<br />
2. If the XX in the CarBrain_XX is CN, it means Carbrain C168’s install<br />
software is simple Chinese version for the vehicles made in China.<br />
3. If the XX in the CarBrain_XX is TW, it means Carbrain C168’s install<br />
software is <strong>com</strong>plicated Chinese version for Taiwan user.<br />
4. In the XX in the CarBrain_XX is HK, it means Carbrain C168’s install<br />
software is <strong>com</strong>plicated Chinese version for Hongkong user.<br />
4.1. Install Carbrain C168<br />
4.1.1 Install<br />
‣ Lay the Carbrain C168 install CD in the <strong>com</strong>puter driver<br />
‣ Operate CarBrain_XX file in the disc。<br />
‣ It will show the installation inferface, please refer to the below drawing:<br />
Click the next step button to continue the installation or the cancel button<br />
11<br />
http://www.obd2be.<strong>com</strong>/
CarBrain C168 Instruction Manual<br />
to quit installation<br />
‣ Click the next step button to show the installation permissive agreement,<br />
refer to the below drawing.<br />
Please read the permissive agreement carefully, if you don’t agree with the<br />
permission agreement, please click the Cancel button to quit installation; if<br />
you agree with the permission agreement, please select “I agree with the<br />
permission agreement” and click the next step to continue the installation.<br />
‣ Click the next step button to show the end user’s information interface,<br />
refer to the below drawing.<br />
Please imput your information and click the Next step button to continue the<br />
installation, or click the Cancel button to quit the installation.<br />
‣ Click the Next step button to show the installation folder interface,refer<br />
to the below drawing.<br />
12<br />
http://www.obd2be.<strong>com</strong>/
Please imput or select the installation file path, and click the Next step to<br />
continue the installation or click the Cancel button to quit the installation.<br />
‣ Click the Next step button to show the installation shortcut folder<br />
interface, refer to the below drawing;<br />
Click the Next step button to continue the installation or click Cancel<br />
to quit the installation.<br />
‣ Click the Next step to show the ready installation interface, refer to the<br />
below drawing:<br />
13<br />
http://www.obd2be.<strong>com</strong>/
CarBrain C168 Instruction Manual<br />
Click the Next step button to continue the installation or click Cancel to<br />
quit the installation.<br />
‣ Click the Next step button to show the installation progress interface,<br />
refer to the below drawing:<br />
If want to quit the installation, please click the Cancel button, or please<br />
wait for the successful installation interface, refer to the below drawing:<br />
14<br />
http://www.obd2be.<strong>com</strong>/
,<br />
Click the Finish button to finish the installation of automobile failure<br />
diagnosis system, and continue to install the USB to RS232 driver.<br />
Install USB to RS232 driver automatically:<br />
‣ The installation procedure will install the USB to RS232 driver<br />
automatically after finishing the installation of automobile failure<br />
diagnosis software, refer to the below drawing:<br />
OK<br />
‣ Click the Confirm button to install USB to RS232 driver, refer to the<br />
below drawing:<br />
‣ Click Browse button to select the installation path for USB to RS232<br />
driver, and click Cancel button to quit this installation or click Install to<br />
process the USB to RS232 driver.<br />
After a few minutes, the successful installation interface will be showed on<br />
15<br />
http://www.obd2be.<strong>com</strong>/
screen, refer to the below drawing:<br />
CarBrain C168 Instruction Manual<br />
‣ Click Confirm button to finish the installation of USB to RS232 dirver,<br />
and continue to install the maintenance data.<br />
‣ Installation <strong>com</strong>plete<br />
After finishing the software installation, the below icon will be created in<br />
theWinwdows Desktop.<br />
4.1.2 Registration<br />
C168 software is copyright software; only the user that has been authorized by<br />
our <strong>com</strong>pany can use this software. After register, users can use this software<br />
freely and without any limitation. Without our <strong>com</strong>pany’s permission and<br />
authorization, please don’t release or diffuse C168 software.<br />
The detailed register procedure is blow:<br />
1. Operate C168 software, and system will show the register interface<br />
automatically.<br />
2. Input the equipment code in the equipment code column.<br />
3. Input the register code in the register code column<br />
4. Click the register button to register, and system will show register success of<br />
failure.<br />
After successful register, then have no need to register again when enters into<br />
next time.<br />
Note:<br />
1. The equipment code and register code are in the packing box.<br />
2. Please get the register code from our <strong>com</strong>pany, and provide the equipment<br />
code and identifier code, it will be displayed when start the software.<br />
3. Please keep your equipment code and register code safely.<br />
4. If you reinstall your system, then you need to register again. (Inputting the<br />
original equipment code and register code is OK)<br />
16<br />
http://www.obd2be.<strong>com</strong>/
Method 1:<br />
5. Operate Carbrain C168<br />
Click the Start menu of Windows, and select Start → Programs→ CarBrain<br />
→CarBrain, please refer to the below diagram:<br />
,<br />
Method 2:<br />
Click the shortcut Iconon your <strong>com</strong>puter’s desktop directly.<br />
17<br />
http://www.obd2be.<strong>com</strong>/
CarBrain C168 Instruction Manual<br />
6. Uninstall Carbrain C168<br />
1. Click the Start menu of Windows, and select Start→ Programs→ CarBrain→<br />
Uninstall CarBrain, refer to the below drawing:<br />
2. After selecting Uninstall Carbrain, then the “uninstall Carbrain interface”<br />
will be showed on screen, refer to the below drawing:<br />
Click the Next step button to continue, or click Cancel button to quit uninstall.<br />
18<br />
http://www.obd2be.<strong>com</strong>/
3. Click the Next step button, the below message will appear on screen.<br />
,<br />
If select Yes, then all the user information、the relative diagnosis records and<br />
system self-learn data will be deleted. If select No, then the above data will<br />
be kept, we suggest you to select No.<br />
4. After selecting Yes or No, then start to uninstall Carbrain file, and the<br />
uninstall progress interface will appear on screen refer to the below drawing:<br />
It may take a few minutes to <strong>com</strong>plete this uninstall, and the successful<br />
uninstall interface will appear on screen, refer to the below drawing:<br />
5. Click Confirm button the finish uninstall<br />
19<br />
http://www.obd2be.<strong>com</strong>/
CarBrain C168 Instruction Manual<br />
7. Carbrain C168 software upgrade<br />
If you use the upgrade disc provided by our <strong>com</strong>pany, please refer to the<br />
Carbrain C168 to install, if you download the upgrade software, please refer to<br />
the below steps to upgrade.<br />
1. Log on our <strong>com</strong>pany’s website<br />
2. Register or log on from the member column.(Only the customers have the<br />
member qualification can download the upgrade software)<br />
3. Select upgrade on-line, then select upgrade software.<br />
4. <strong>Download</strong> the diagnosis installation program (CarBrain_En.exe).<br />
5. Run CarBrain_En.exe program, if you’ve already installed Carbrain C168,<br />
the system will remind you to uninstall Carbrain C168 (refer to Uninstall<br />
Carbrain C168 on page18)firstly, and if not, then the system will remind you to<br />
install Carbrain C168(refer to Install Carbrain C168 on page 10).<br />
6. Thus, the upgrade is <strong>com</strong>pleted.<br />
20<br />
http://www.obd2be.<strong>com</strong>/
,<br />
8. USB TO RS232<br />
Explanation:<br />
Carbrain C168 is using RS232 to <strong>com</strong>municate with <strong>com</strong>puter. In view of some<br />
notebook don’t have RS232 jack, but almost all the PC and notebook<br />
<strong>com</strong>puters have RS232 jack, so we use USB as the exterior jack, and RS232 as<br />
the interior <strong>com</strong>munication mode. Then we need to install a dummy RS232<br />
jack to <strong>com</strong>plete the <strong>com</strong>munication. So we install USB to RS232 driver to<br />
simulate RS232 jack. Consideration of the convenience of USB jack, USB to<br />
RS232 can be connected to the peripheral equipment of the serial port (RS232)<br />
and provide an easy <strong>com</strong>munication environment, the transmitted speed is up to<br />
12Mbps. The working theory is that after the installation of USB to RS232, it<br />
will simulate one serial COM port in your <strong>com</strong>puter automatically. For example:<br />
there are two serial ports COM1 & COM2, after the installation of USB to<br />
RS232 driver, then it will simulate one COM3 jack automatically. In general,<br />
the driver will allot the detailed COM number automatically. If there is no<br />
RS232 jack in your <strong>com</strong>puter such as the newer notebook <strong>com</strong>puter, then the<br />
driver will simulate one COM1 port automatically. This simulated COM port is<br />
same as the original COM port in <strong>com</strong>puter for the applied software. If your<br />
applied software can select this simulated COM port, then the <strong>com</strong>munication<br />
to RS232 will be <strong>com</strong>e true.<br />
1. Performance<br />
‣ Communication between(ASIC)USB jack and serial port.<br />
‣ Support Windows 98/ME and Windows 2000/XP<br />
‣ Accord with USB V1.1 and USB V2.0 criterion<br />
‣ USB full speed connection (12Mbps)<br />
‣ No need to get power supply from external cable, just using USB cable<br />
to get.<br />
‣ Standard USB jack (4pin), and have symbol.<br />
21<br />
http://www.obd2be.<strong>com</strong>/
2. Check<br />
CarBrain C168 Instruction Manual<br />
If want to check the USB to RS232 driver is installed successful or not, you just<br />
need to check whether there is dummy RS232 jack in your <strong>com</strong>puter. Please<br />
follow the below steps to check:<br />
‣ Using main cable to connect the COMBOX or RF-box to your<br />
<strong>com</strong>puter.<br />
‣ Follow the below steps to check whether there is CP2101 USB to Uart<br />
Bridge Controller (COMx): Start→ Setting→ Control panel→<br />
System→<br />
Hardware→ Device Manager→ Ports(COM & LPT)→CP2101 USB to<br />
UART Bridge Controller(COMx). If it exits, then the driver is installed<br />
successfully, if it doesn’t exit, please refer to Step c. If X in COMx is<br />
number such as 1、2、3, then they are corresponding to COM1、COM2<br />
and COM3,etc.<br />
‣ Please check the connection between your <strong>com</strong>puter and COMBOX or<br />
RF-Box is OK or not, if it isn’t fine, please correct it and return to Step<br />
b; if it is OK, then refer to Stepd.<br />
‣ Please check if “Universal Serial Bus controllers” appears “Cygnal<br />
USB Composite Device” or if “other devices” appears “CP2102 USB<br />
to UART Bridge Controller” like diagrams below please refer to<br />
3.Installation.<br />
3. Installation<br />
Here below is the introduction of how to install USB to RS232 driver, taking<br />
Windows2000 as the example:<br />
After connecting COMBOX or RF-Box to <strong>com</strong>puter, please click the right key<br />
on the mouse, and follow the below steps Attribute→Driver→Update driver to<br />
select Update driver, then the guide interface of hardware installation will be<br />
displayed, refer to the below diagram:<br />
22<br />
http://www.obd2be.<strong>com</strong>/
,<br />
Click the Next step button, then the below drawing will be displayed.<br />
Select “Searching the suitable driver for me”, and click the Next step button,<br />
refer to the below drawing:<br />
23<br />
http://www.obd2be.<strong>com</strong>/
CarBrain C168 Instruction Manual<br />
Select “Specify a location”, and click the Next step button, refer to the below<br />
drawing:<br />
Select Browse under “Copy manufacture’s file from”, find the directory of your<br />
USB to RS232(2.0) saved. Click “Open” to next step.<br />
Please click the Next step button, then the successful installation.<br />
Thus, USB to RS232 driver is installed <strong>com</strong>pletely, after successful installation<br />
of USB to RS232 driver in your <strong>com</strong>puter, it creates one dummy COM port<br />
(CP2101 USB to Bridge Controller ) automatically under COM &<br />
LPT port of equipment manager, and you can find the installed Cygnal USB<br />
Composite Device under “Ports(COM & LPT)”.<br />
24<br />
http://www.obd2be.<strong>com</strong>/
If the driver is installed unsuccessfully, then it will return to the above 3. Check<br />
step on page22, and please repeat the operation again.<br />
Note:<br />
In order to protect the normal use of serial port, please make sure it is under<br />
closing condition when pull or plug RS232C because RS232C can’t be pulled<br />
and plugged when it is working.<br />
9. Common Question<br />
1. System shows “connect to COMBOX unsuccessfully”<br />
Here below are the reasons of such issue:<br />
‣ Check the hardware connection is OK or not, refer to Hardware<br />
connection on page 9&10.<br />
‣ Check the power led (red) is light or not, refer to COMBOX on page 7.<br />
‣ Check USB to RS232 jack is working normally or not, refer to USB to<br />
RS232 on page 21.<br />
‣ When it is under wireless <strong>com</strong>munication, check the power led (red) and<br />
signal indicator are light or not, refer to RF-Box on page 7.<br />
2. System shows “<strong>com</strong>municate unsuccessfully”<br />
Here below are the reasons of such issue:<br />
‣ Whether the vehicle installed the <strong>com</strong>puter control system or not.<br />
‣ Whether the ignition switch is open or not.<br />
‣ Whether the diagnosis adaptor is correct or not.<br />
‣ Whether the <strong>com</strong>munication equipment is normal.<br />
‣ When it is under wireless <strong>com</strong>munication, please check the signal<br />
indicator of main unit is light or not, if it is flickering or unlighted, then the<br />
signal is unstable or missing.<br />
‣ Check the voltage of battery in vehicle, whether the voltage is too low.<br />
25<br />
http://www.obd2be.<strong>com</strong>/
’<br />
26<br />
http://www.obd2be.<strong>com</strong>/