Theory Building Tips
Theory Building Tips
Theory Building Tips

You also want an ePaper? Increase the reach of your titles
YUMPU automatically turns print PDFs into web optimized ePapers that Google loves.
[ ] R6 27k Ω (red, violet, orange)<br />
[ ] C17 1µF (105)<br />
[ ] R7 Panel mounted, dual gang 50k Ω potentiometer-Take care that the wiper<br />
connection (middle pin on pot) goes to the designated W connections on<br />
circuit board. The circuit board is labeled R7a and R7a_w for the first<br />
'gang' or section, and R7b and R7b_w for the second. The W stands for wiper<br />
(middle tab on each potentiometer section). Looking at the front of the<br />
potentiometers, connect the center tab of each gang to the correct circuit<br />
board location labeled W. The center tab (wiper) and the left tab are<br />
connected together with a short piece of wire. Next, connect the right tab<br />
of each gang to the correct circuit board location for each gang( R7a and<br />
R7b). So, if you connect the center tab (wiper) of the pot section closest<br />
to the shaft to R7a_w, then connect the right tab of that same pot section<br />
to R7a. Twist the two leads to each pot separately as it makes it easier to<br />
keep track on the PCB. Some components already mounted on the circuit board<br />
might ‘hide’ the W so be familiar with the PC board layout.<br />
[ ] IC1 MF10, LMF100 or LTC1060 IC chip Make sure pins are parallel to each other when inserting (if<br />
using sockets) and pin 1 is toward the top of the PC board.<br />
The SCAF filter at this point could be connected to an audio generator at the SCAF audio input point. Connect<br />
a small speaker to the audio output (using the appropriate grounds); connect power; the tone should be audible<br />
to your ear. If there is no audio, turn the bandwidth potentiometer (double pot) extreme left or right, and then<br />
turn the center frequency pot to hear audio At this point, you should hear an audio signal..<br />
Stage 5 Final Things<br />
The NEScaf should now be fully populated. Some panel connections need to be made.<br />
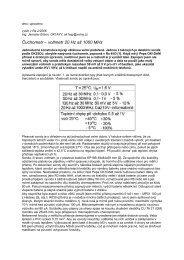
• DPDT SW1: This switch is two switches in parallel: one to control power to the NEScaf and the other to<br />
control audio to the headphones. (See below.) Section A controls power, with the center connection<br />
coming from the battery to the unit. The lower contact of section A will be connected to Vcc on the PC<br />
board. The upper contact of section A is not connected--nc. Section B controls audio with the center tab<br />
from the audio source—the rig. The lower connection of section B will connect to ‘audio in’ on the<br />
NEScaf circuit board. The upper connection of section B will go to the ‘audio out’ on the NEScaf<br />
connector--to the headphones. The ‘audio out’ of the circuit board should also be connected to the ‘audio<br />
out’ connector to the headphones. Connected this way, and when power is on, ‘audio in’ is routed from<br />
the rig through the switch to the audio input of the NEScaf. When power is off, ‘audio in’ is routed<br />
directly to the ‘audio out’ connector--the headphones.<br />
Figure 1 SWITCH #1 DPDT<br />
Review your wiring.<br />
Wiring Manual NEScaf Page -5-<br />
New England QRP Club