06 - Chassis Suspension - The Old Car Manual Project
06 - Chassis Suspension - The Old Car Manual Project
06 - Chassis Suspension - The Old Car Manual Project

Create successful ePaper yourself
Turn your PDF publications into a flip-book with our unique Google optimized e-Paper software.
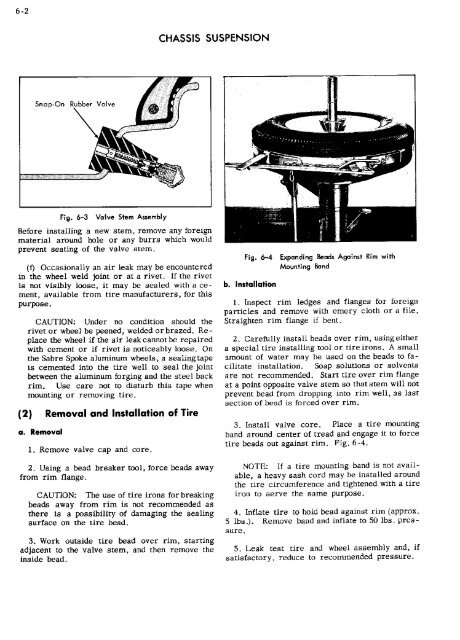
CHASSIS SUSPENSION<br />
Fig. 6-3 Valve Stem Assembly<br />
Before installing a new stem, remove any foreign<br />
material around hole or any burrs which would<br />
prevent seating of the valve stem.<br />
f Occasionally an air leak may be encountered<br />
in the wheel weld joint or at a rivet. If the rivet<br />
is not visibly loose, it may be sealed with a ce<br />
ment, available from tire manufacturers, for this<br />
purpose.<br />
CAUTION: Under no condition should the<br />
rivet or wheel be peened, welded or brazed. Re<br />
place the wheel if the air leak cannot be repaired<br />
with cement or if rivet is noticeably loose. On<br />
the Sabre Spoke aluminum wheels, a sealingtape<br />
is cemented into the tire well to seal the joint<br />
between the aluminum forging and the steel back<br />
rim. Use care not to disturb this tape when<br />
mounting or removing tire.<br />
2 Removal and Installation of Tire<br />
a. Removal<br />
1. Remove valve cap and core.<br />
2. Using a bead breaker tool, force beads away<br />
from rim flange.<br />
CAUTION: <strong>The</strong> use of tire irons for breaking<br />
beads away from rim is not recommended as<br />
there is a possibility of damaging the sealing<br />
surface on the tire bead.<br />
3. Work outside tire bead over rim, starting<br />
adjacent to the valve stem, and then remove the<br />
inside bead.<br />
Fig. 6-4 Expanding Beads Against Rim with<br />
Mounting Band<br />
b. Installation<br />
1. Inspect rim ledges and flanges for foreign<br />
particles and remove with emery cloth or a file.<br />
Straighten rim flange if bent.<br />
2. <strong>Car</strong>efully install beads over rim, usingeither<br />
a special tire installing tool or tire irons. A small<br />
amount of water may be used on the beads to fa<br />
cilitate installation. Soap solutions or solvents<br />
are not recommended. Start tire over rim flange<br />
at a point opposite valve stem so that stem will not<br />
prevent bead from dropping into rim well, as last<br />
section of bead is forced over rim.<br />
3. Install valve core. Place a tire mounting<br />
band around center of tread and engage it to force<br />
tire beads out against rim. Fig. 6-4.<br />
NOTE: If a tire mounting band is not avail<br />
able, a heavy sash cord may be installed around<br />
the tire circumference and tightened with a tire<br />
iron to serve the same purpose.<br />
4. Inflate tire to hold bead against rim approx.<br />
S lbs.. Remove band and Inflate to 50 lbs. pres<br />
sure.<br />
5. Leak test tire and wheel assembly and, if<br />
satisfactory, reduce to recommended pressure.