

T2 Ankle Arthrodesis Nail - Stryker
T2 Ankle Arthrodesis Nail - Stryker
T2 Ankle Arthrodesis Nail - Stryker

Create successful ePaper yourself
Turn your PDF publications into a flip-book with our unique Google optimized e-Paper software.
Operative Technique<br />
Target Device Assembly<br />
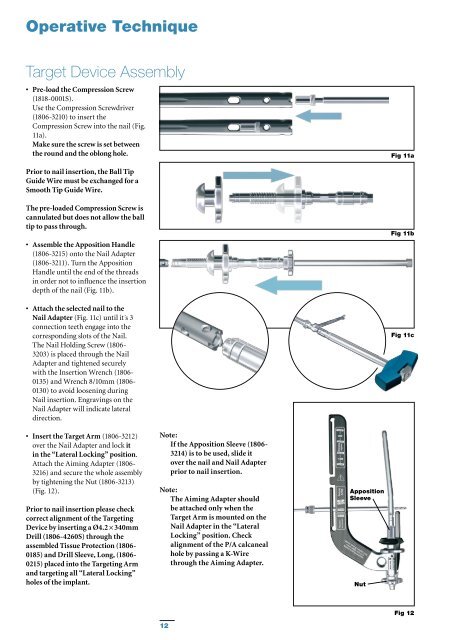
• Pre-load the Compression Screw<br />
(1818-0001S).<br />
Use the Compression Screwdriver<br />
(1806-3210) to insert the<br />
Compression Screw into the nail (Fig.<br />
11a).<br />
Make sure the screw is set between<br />
the round and the oblong hole.<br />
Fig 11a<br />
Prior to nail insertion, the Ball Tip<br />
Guide Wire must be exchanged for a<br />
Smooth Tip Guide Wire.<br />
The pre-loaded Compression Screw is<br />
cannulated but does not allow the ball<br />
tip to pass through.<br />
• Assemble the Apposition Handle<br />
(1806-3215) onto the <strong>Nail</strong> Adapter<br />
(1806-3211). Turn the Apposition<br />
Handle until the end of the threads<br />
in order not to influence the insertion<br />
depth of the nail (Fig. 11b).<br />
• Attach the selected nail to the<br />
<strong>Nail</strong> Adapter (Fig. 11c) until it´s 3<br />
connection teeth engage into the<br />
corresponding slots of the <strong>Nail</strong>.<br />
The <strong>Nail</strong> Holding Screw (1806-<br />
3203) is placed through the <strong>Nail</strong><br />
Adapter and tightened securely<br />
with the Insertion Wrench (1806-<br />
0135) and Wrench 8/10mm (1806-<br />
0130) to avoid loosening during<br />
<strong>Nail</strong> insertion. Engravings on the<br />
<strong>Nail</strong> Adapter will indicate lateral<br />
direction.<br />
Fig 11b<br />
Fig 11c<br />
• Insert the Target Arm (1806-3212)<br />
over the <strong>Nail</strong> Adapter and lock it<br />
in the “Lateral Locking” position.<br />
Attach the Aiming Adapter (1806-<br />
3216) and secure the whole assembly<br />
by tightening the Nut (1806-3213)<br />
(Fig. 12).<br />
Prior to nail insertion please check<br />
correct alignment of the Targeting<br />
Device by inserting a Ø4.2 × 340mm<br />
Drill (1806-4260S) through the<br />
assembled Tissue Protection (1806-<br />
0185) and Drill Sleeve, Long, (1806-<br />
0215) placed into the Targeting Arm<br />
and targeting all “Lateral Locking”<br />
holes of the implant.<br />
Note:<br />
If the Apposition Sleeve (1806-<br />
3214) is to be used, slide it<br />
over the nail and <strong>Nail</strong> Adapter<br />
prior to nail insertion.<br />
Note:<br />
The Aiming Adapter should<br />
be attached only when the<br />
Target Arm is mounted on the<br />
<strong>Nail</strong> Adapter in the “Lateral<br />
Locking” position. Check<br />
alignment of the P/A calcaneal<br />
hole by passing a K-Wire<br />
through the Aiming Adapter.<br />
Apposition<br />
Sleeve<br />
Nut<br />
Fig 12<br />
12


