

T2 Ankle Arthrodesis Nail - Stryker
T2 Ankle Arthrodesis Nail - Stryker
T2 Ankle Arthrodesis Nail - Stryker

You also want an ePaper? Increase the reach of your titles
YUMPU automatically turns print PDFs into web optimized ePapers that Google loves.
Operative Technique<br />
Step 2:<br />
Guided Locking of the<br />
Proximal Screws<br />
Note:<br />
Guided Locking of the Proximal<br />
Screws must be performed with<br />
the Target Arm locked in the<br />
“Medial Locking” position.<br />
Do not attempt to use the Target<br />
Arm in the “Lateral Locking”<br />
position for proximal locking as<br />
this will lead to miss-drilling.<br />
The 300mm <strong>Nail</strong>s can be locked<br />
proximally only with the<br />
free-hand technique.<br />
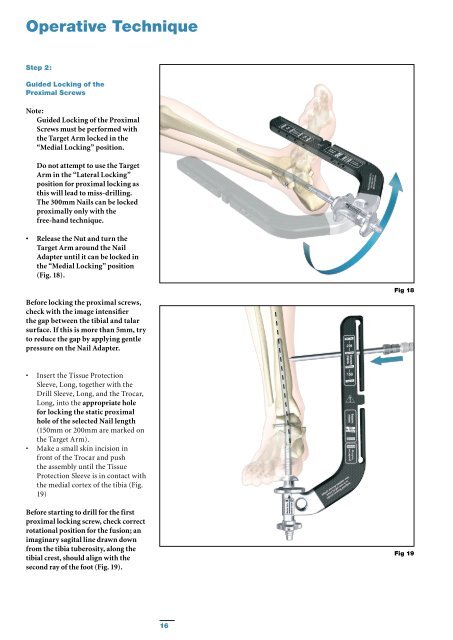
• Release the Nut and turn the<br />
Target Arm around the <strong>Nail</strong><br />
Adapter until it can be locked in<br />
the “Medial Locking” position<br />
(Fig. 18).<br />
Before locking the proximal screws,<br />
check with the image intensifier<br />
the gap between the tibial and talar<br />
surface. If this is more than 5mm, try<br />
to reduce the gap by applying gentle<br />
pressure on the <strong>Nail</strong> Adapter.<br />
Fig 18<br />
• Insert the Tissue Protection<br />
Sleeve, Long, together with the<br />
Drill Sleeve, Long, and the Trocar,<br />
Long, into the appropriate hole<br />
for locking the static proximal<br />
hole of the selected <strong>Nail</strong> length<br />
(150mm or 200mm are marked on<br />
the Target Arm).<br />
• Make a small skin incision in<br />
front of the Trocar and push<br />
the assembly until the Tissue<br />
Protection Sleeve is in contact with<br />
the medial cortex of the tibia (Fig.<br />
19)<br />
Before starting to drill for the first<br />
proximal locking screw, check correct<br />
rotational position for the fusion; an<br />
imaginary sagital line drawn down<br />
from the tibia tuberosity, along the<br />
tibial crest, should align with the<br />
second ray of the foot (Fig. 19).<br />
Fig 19<br />
16


