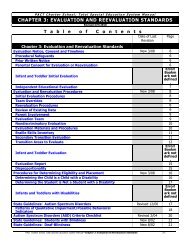
Teacher Technology Handbook-6 - PACT Charter School
Teacher Technology Handbook-6 - PACT Charter School
Teacher Technology Handbook-6 - PACT Charter School

Create successful ePaper yourself
Turn your PDF publications into a flip-book with our unique Google optimized e-Paper software.
<strong>PACT</strong> CHARTER SCHOOL<br />
TEACHER TECHNOLOGY<br />
HANDBOOK<br />
October 26, 2009<br />
Updated January 6, 2010<br />
Reviewed and Updated June 29, 2010
<strong>Technology</strong> Coordinator: Guy Winters, ext 211<br />
Tech Support: Shari Melin, ext 223<br />
Tech Support: Garrett Gunderson, ext 223<br />
Email: <strong>PACT</strong>ech4008@gmail.com<br />
Room 223
<strong>Teacher</strong> <strong>Technology</strong> <strong>Handbook</strong><br />
VIEWING A DVD FROM COMPUTERS..................................................................... 5<br />
COMPUTER ACCOUNTS FOR SUB TEACHERS..................................................... 6<br />
SUBS WILL HAVE ACCESS TO:............................................................................................... 6<br />
SUBS WILL NOT HAVE ACCESS TO:...................................................................................... 6<br />
SCHOOL-WIDE TV BROADCASTS ............................................................................ 7<br />
ROOMS 162, 164, 165, 190, 261, 262, 263, 265 ................................................................... 7<br />
ROOMS 161, 191 (ISC), 205, 212......................................................................................... 7<br />
ROOMS 133, 134, 135, 136, 137, 163, 171 (MUSIC), 206, 232, 233, 234, 235, 236, 237, 264,<br />
266....................................................................................................................................... 7<br />
JMC IP GRADEBOOK BASICS.................................................................................... 8<br />
START JMC IP GRADEBOOK................................................................................................ 8<br />
UPDATE COURSE LIST AND CLASS ROSTER ......................................................................... 8<br />
UPDATE COURSE LIST AND CLASS ROSTER ......................................................................... 9<br />
GRADE CUTOFFS.................................................................................................................. 9<br />
CATEGORIES AND ASSIGNMENTS ......................................................................................... 9<br />
ASSIGNMENT SCORES ........................................................................................................ 11<br />
OTHER SCORE SCREEN FEATURES ..................................................................................... 12<br />
ENDING THE PROGRAM ...................................................................................................... 12<br />
JMC IP GRADEBOOK ADVANCED.......................................................................... 13<br />
ADDING COMMENTS .......................................................................................................... 13<br />
ASSIGNMENT SCORE NOTES .............................................................................................. 15<br />
CATEGORIES: STAND-ALONE & EXTRA CREDIT CATEGORIES............................................ 16<br />
CATEGORIES: LOW SCORES TO DROP................................................................................. 18<br />
CATEGORIES: CALCULATE USING WEIGHTS OR TOTAL POINTS......................................... 18<br />
SENDING GRADES TO THE OFFICE (SECONDARY TERM-END REPORT CARDS)................... 19<br />
GRADE REPORTS ........................................................................................................ 21<br />
TERM-END REPORT CARDS ............................................................................................... 21<br />
MIDTERM GRADES (SECONDARY) ..................................................................................... 21<br />
SET THE MIDTERM DATE ................................................................................................... 22<br />
REVIEW MIDTERM GRADES AND LOCK GRADES ............................................................... 23<br />
ADD MIDTERM COMMENTS ............................................................................................... 25<br />
PRINTING MIDTERM GRADES............................................................................................. 26<br />
Page 3 of 46 <strong>Teacher</strong> <strong>Technology</strong> <strong>Handbook</strong>, updated 6/29/10
SENDING MIDTERM GRADE TO THE OFFICE ....................................................................... 26<br />
PROGRESS REPORTS........................................................................................................... 28<br />
CREATE A NEW PROGRESS REPORT ................................................................................... 28<br />
EDIT PROGRESS REPORT SETUP ......................................................................................... 30<br />
SENDING PROGRESS REPORTS TO OFFICE .......................................................................... 31<br />
ELEMENTARY REPORT CARDS ............................................................................. 33<br />
CALCULATING OVERALL GRADES ..................................................................................... 33<br />
ENTERING WPM, ACCURACY, AND COMMENTS FOR COMPUTER CLASSES ....................... 34<br />
HOW TO ENTER ATTITUDES AND WORK HABITS ............................................................... 34<br />
HOW TO ENTER ATTITUDES AND WORK HABITS ............................................................... 35<br />
HOW TO ADD COMMENTS.................................................................................................. 36<br />
ONLINE PROGRESS REPORTS ................................................................................ 38<br />
ONLINE PARENT AND/OR STUDENT ACCESS ...................................................................... 38<br />
UPDATED SCORES AND COMMENTS................................................................................... 39<br />
VIEWING ASSIGNMENT SCORE NOTES ............................................................................... 41<br />
PUBLISHING SCORES ON-LINE ........................................................................................... 41<br />
USING THE GRADEBOOK PROGRAM FROM HOME........................................ 43<br />
QUESTIONS AND HELP ....................................................................................................... 43<br />
COMPUTER LAB AVAILABILITY 2010-11............................................................. 44<br />
GENERAL INFORMATION........................................................................................ 45<br />
TECHNOLOGY REQUISITIONS ............................................................................................. 45<br />
SOFTWARE ......................................................................................................................... 45<br />
PUBLIC COMPUTERS / SCANNERS....................................................................................... 45<br />
NETWORKED PRINTERS...................................................................................................... 45<br />
EQUIPMENT FOR CHECKOUT .............................................................................................. 46<br />
USING MOODLE ................................................................................................................. 46<br />
Page 4 of 46 <strong>Teacher</strong> <strong>Technology</strong> <strong>Handbook</strong>, updated 6/29/10
VIEWING A DVD FROM COMPUTERS<br />
VLC Media Player has been installed on all <strong>Teacher</strong> Computers and some staff<br />
(including Room 190) and a student computer in the Library (LIB005) and in ISC<br />
(ISC006). The student computers are intended for PSEO Student use.<br />
The double clicking on the player icon:<br />
Opens the player:<br />
To display the video in FULL SCREEN, go to Video and choose FULL SCREEN.<br />
Shortcut: right click in the window, check FULL SCREEN.<br />
VIDEO PLAYING<br />
To exit the full screen mode, RIGHT CLICK on the screen and uncheck FULL SCREEN.<br />
When you eject the video, it will automatically stop playing.<br />
Note: Speakers are required to hear audio. However, audio will come through the<br />
projector.<br />
ISC & Media Center:<br />
Headphones are required to hear audio with the DVD.<br />
Page 5 of 46 <strong>Teacher</strong> <strong>Technology</strong> <strong>Handbook</strong>, updated 6/29/10
COMPUTER ACCOUNTS FOR SUB TEACHERS<br />
Prepared by Tech Support<br />
December 6, 2007<br />
<strong>Teacher</strong> computers have been setup with a Guest Account (not password protected).<br />
Please remove any passwords that may be present in your sub folder.<br />
Subs will have access to:<br />
• Attendance (secondary only)<br />
• Shared Documents<br />
• Printers<br />
• Internet<br />
• Programs and folders available to ‘All Users’<br />
Subs will NOT have access to:<br />
• IP Gradebook<br />
• Documents or files NOT placed in the SHARED folder<br />
• <strong>Teacher</strong>s Favorites (internet)<br />
When a sub is requested to use the teacher computer (i.e.: to show a<br />
Powerpoint), be sure to place the file into the Shared Documents<br />
folder (on the desktop).<br />
It is suggested that teachers open the GUEST Account to verify the sub will have access<br />
to the files they are expected to use.<br />
Page 6 of 46 <strong>Teacher</strong> <strong>Technology</strong> <strong>Handbook</strong>, updated 6/29/10
SCHOOL-WIDE TV BROADCASTS<br />
Rooms 162, 164, 165, 190, 261, 262, 263, 265<br />
Set-up: No switch, cable directly from wall to VCR.<br />
VCR is hooked up to TV by RCA or antenna cable.<br />
FOR BROADCAST<br />
Set VCR to Channel 3<br />
NOTE: The VCR MUST BE SHOWING ON THE TV (e.g. insert a videotape<br />
and it plays on the TV)<br />
If necessary, use the VCR remote to change from TV to VCR, OR insert and play<br />
a videotape for a moment then stop.<br />
FOR LATER VCR USE<br />
No change is necessary.<br />
Rooms 161, 191 (ISC), 205, 212<br />
Set-up: No switch, cable directly from wall to TV.<br />
VCR is hooked up to TV by RCA cable.<br />
FOR BROADCAST<br />
Set TV to Channel 3<br />
FOR LATER VCR USE<br />
Set TV to correct Line Input for VCR/DVD.<br />
Rooms 133, 134, 135, 136, 137, 163, 171 (music), 206, 232, 233, 234,<br />
235, 236, 237, 264, 266<br />
Set-up: Switch between wall/VCR and TV.<br />
VCR is hooked up to TV by antenna cable.<br />
FOR BROADCAST<br />
Set TV to Channel 3<br />
Slide switch from “ANT” to “CABLE”<br />
FOR LATER VCR USE<br />
Slide switch from “CABLE” to “ANT”.<br />
Page 7 of 46 <strong>Teacher</strong> <strong>Technology</strong> <strong>Handbook</strong>, updated 6/29/10
JMC IP GRADEBOOK BASICS<br />
Revised February 2008<br />
Reviewed and updated June 29, 2010<br />
The next few pages will lead you through your first use of the Gradebook program.<br />
Customized video’s and information for <strong>PACT</strong> is available at the <strong>PACT</strong> Moodle site<br />
(http://pact.erdc.k12.mn.us) under Professional Development, and full User Guides are<br />
online at JMC’s website (www.jmcinc.com).<br />
Topics covered will be:<br />
Starting the JMC Gradebook Program<br />
Setting Grade Cutoffs<br />
Creating Grade Categories by Course<br />
Creating Assignments within Categories<br />
Entering Assignment Scores<br />
Start JMC IP Gradebook<br />
The Gradebook program is already installed on your computer and ready for you to<br />
logon.<br />
The logon names for teachers are typically the first initial followed by a period and then<br />
their last name (with some exceptions for exceptional names). You must have a user<br />
name and initial password assigned by the tech staff. Without a valid user name and<br />
password you cannot access the internet Gradebook data.<br />
After you logon you’ll see the main Gradebook screen.<br />
If you get the box below, it means that<br />
you have been using the program on a<br />
different computer and forgot to exit the<br />
program. When you override, you may<br />
lose data. ALWAYS remember to exit<br />
the IP Gradebook program when not in<br />
use!<br />
Page 8 of 46 <strong>Teacher</strong> <strong>Technology</strong> <strong>Handbook</strong>, updated 6/29/10
Update Course List and Class Roster<br />
To get the current list of courses and students, choose File then Office to <strong>Teacher</strong>.<br />
You’ll see two progress bars, one after the other, as data files are downloaded from the<br />
Office server, followed by a “completed successfully” message. Click the OK button for<br />
the “completed successfully” message.<br />
You’ll need to follow this step whenever the office changes your class assignment<br />
(adding, removing, or changing a course assigned to you), when your class enrollment<br />
changes, or when standards and benchmarks used for one (or more) of your classes are<br />
changed. You will do this frequently the first 2 weeks of classes at the beginning of the<br />
year and at the beginning of 2 nd semester.<br />
It's easy to see your current class lists. Start from the main screen and click on “Reports”<br />
then select “Blank Score Sheets”. You'll be able to select a single course or print pages<br />
for all courses currently assigned to you.<br />
Students who move out of your class will remain in your roster but will be grayed out. To<br />
remove these permanently, at the top of the screen, choose ‘Options…’ then select<br />
‘remove inactive students permanently.’<br />
Grade Cutoffs<br />
The next step is to enter the letter grade symbols and percentage cutoffs.<br />
From the main Gradebook screen click on Scores then on Grade Cutoffs. Enter the letter<br />
grades and percentage cutoffs as summarized in the following table:<br />
1 st & 2 nd Grade MATH Symbol Cutoff Symbol Cutoff<br />
Symbol Cutoff Symbol Cutoff A 4 O 93% D+ 1+ U+ 67%<br />
4 100% 2- 77% A- 4- O- 90% D 1 U 63%<br />
4- 97% 1+ 73% B+ 3+ S+ 87% D- U- 60%<br />
3+ 93% 1 70% B 3 S 83% F 59%<br />
3 90% 1- 1% B- 3- S- 80% 1- 1%<br />
3- 87% 0 0% C+ 2+ I+ 77% 0 NA 0%<br />
2+ 83% Approved by C 2 I 73% Approved by Steering<br />
Administration<br />
2 80%<br />
C- 2- I- 70%<br />
Italicized symbols and cutoffs pertain to elementary use only.<br />
Click on the “Copy to Other Classes” button, then “Copy to ALL classes”. Click on the<br />
“Done” button to complete Grade Cutoff entry and return to the main screen.<br />
Categories and Assignments<br />
The nest step is to set up your Categories into which Assignments will be organized.<br />
From the main screen select “Scores” then “Categories and Assignments”.<br />
Page 9 of 46 <strong>Teacher</strong> <strong>Technology</strong> <strong>Handbook</strong>, updated 6/29/10
First, we'll create a Category. Select a Course, e.g. “E MATH”. In the “Category Name”<br />
field enter the text “Daily Work”. Enter 10.0 as the Category “Weight”. Click the<br />
“Enter” button to save this Category and continue.<br />
Next, click the “Add Category” button.<br />
Next, click the “Add Assignment” button.<br />
Into the “Assignment Name” field enter “Day 1” as the descriptive name. Enter “10” as<br />
the “Max Score” and “6-1-06” as the Date. Click on the “Enter” button. That's it. For one<br />
Page 10 of 46 <strong>Teacher</strong> <strong>Technology</strong> <strong>Handbook</strong>, updated 6/29/10
Course you've just created your first grading Category and your first Assignment in that<br />
Category.<br />
Assignment Scores<br />
Now we'll enter an Assignment Score. From the main screen click “Scores” then<br />
“Assignment Scores”. You'll see a class list with enrolled Student Names in the left<br />
column and Assignment names across the top row. The Assignments for this Course will<br />
be listed by Date, left to right; this is one reason why the Assignment Date is important<br />
when creating the Assignment.<br />
If it's not already selected, first select the desired Course from the pull-down list. Select<br />
“E MATH” again.<br />
If it's not already highlighted, click in the cell under the “Daily Work” Assignment<br />
column and in the first student's row.<br />
Notice that the Maximum Score for this Assignment is also in the Assignment cell, just<br />
beneath the Date. Now enter a Score for this first Student. First, enter “12” and press the<br />
“Enter” key (or the down-arrow key, or click in the next student's cell). The program will<br />
warn you that this score is greater than the Assignment's maximum score. If the student<br />
earned more than the maximum (e.g. through an optional problem) you can tell the<br />
Gradebook to use the higher score, or you can click “No” and change that entry. Click<br />
“Yes” and continue.<br />
Page 11 of 46 <strong>Teacher</strong> <strong>Technology</strong> <strong>Handbook</strong>, updated 6/29/10
At any point when entering scores you may click the “Save” button to preserve your data<br />
entry, then return to change or enter additional scores later. You will be prompted to save<br />
your work whenever you change to a new Course, too.<br />
Before you enter the score for a student the cell has a score of “none” and shows a small<br />
dot. A “none” score does not immediately reduce the student's Course grade. Processing<br />
grades later you'll be able to convert missing scores to zeros, so they will then affect the<br />
student's grade. If this score is not to be changed to a zero, enter an “x” (for “excused”)<br />
to remove this score from grade calculations.<br />
As you enter scores, if the button above the right-hand column shows “Current” then the<br />
right-hand column will automatically update after each score to show the student's<br />
current grade, including the newly entered score.<br />
When finished entering scores click the “Done” button to return to the main screen.<br />
Other Score Screen Features<br />
Double-click on a student name and you'll see a printable Progress Report for that student<br />
(you can also click the “Print Student” button at the bottom of this window). This will<br />
show all assignments and scores for this student in this Course.<br />
In the Student Name cell, at the right side, you'll notice a blue circle with an “i” in the<br />
middle. Click on this blue button and the program will pop-up a window with the<br />
student's parent or guardian (“primary contact”) information from the office, including<br />
the parent's email address and telephone number, if available.<br />
Ending the Program<br />
From the main screen just click “File” then “Exit”. The program will upload your<br />
changed data files with assignments and scores, then pop-up a window titled “Update<br />
Online Progress Reports”. In this window is a field for the “Publish Reports Through”<br />
date. This is how you can control which scores and assignments are available for parents<br />
to see online.<br />
This completes the detailed directions for preparing JMC IP Gradebook Basics.<br />
Page 12 of 46 <strong>Teacher</strong> <strong>Technology</strong> <strong>Handbook</strong>, updated 6/29/10
JMC IP GRADEBOOK ADVANCED<br />
Revised February 2008<br />
Reviewed and updated June 29, 2010<br />
Assuming that you are familiar with at least the basics, now we will cover these topics:<br />
Adding Comments<br />
Adding Course Comments for Progress Reports<br />
Adding Course Comments for Midterm Reports<br />
Adding Course Comments for Term End Report Cards (Secondary Only)<br />
Adding Standards Comments for Report Cards (Elementary Only)<br />
Assignment Score Notes<br />
Assignment Categories:<br />
Stand-alone Categories<br />
Extra Credit Categories<br />
Low Scores to Drop<br />
Calculate Using Weights or Total Points<br />
Sending Grades and/or Standards and Benchmarks to Office<br />
Sending Progress Reports to Office<br />
Online Parent Access<br />
Known Stumbling Points<br />
Sending Progress Reports, Midterm, or Term-end Grades<br />
Category Weights<br />
Updating Class Lists<br />
Manually Selecting Grades<br />
Customized video’s and information for <strong>PACT</strong> is available at the <strong>PACT</strong> Moodle site<br />
(http://pact.erdc.k12.mn.us) under Professional Development, and full User Guides are<br />
online at JMC’s website (www.jmcinc.com).<br />
Adding Comments<br />
Comments are short messages you either select from a pre-defined list or enter as a<br />
custom value to be printed on progress reports or report cards, which are sent to the<br />
students' parents or guardians.<br />
For periodic Progress Reports you can select a comment from a pre-defined list, or enter<br />
a custom comment in the “Additional Comments” field. When entering or editing a<br />
progress report you select the desired course then highlight the individual student name.<br />
When the name is highlighted click on one or more lines in the “Comments” box; a check<br />
mark will appear next to each comment to be printed (multiple comments may be<br />
selected). If the pre-defined comments don't quite match what you want to say, just click<br />
in the “Additional Comments” box and type your message.<br />
Page 13 of 46 <strong>Teacher</strong> <strong>Technology</strong> <strong>Handbook</strong>, updated 6/29/10
For Midterm and Secondary Term-End Report Cards, you can select only one<br />
comment from a list defined by the office. The teacher cannot add or change these<br />
comments, and you cannot enter a “custom” comment.<br />
For Elementary Term-End Report Cards, custom comments are used through the<br />
Standard and Benchmark feature. Comments are covered on pages 34 (computer), 36-37<br />
(all other classes).<br />
Page 14 of 46 <strong>Teacher</strong> <strong>Technology</strong> <strong>Handbook</strong>, updated 6/29/10
To select a comment for the midterm or term-end, start the Gradebook program and click<br />
on “Edit” in the top menu, then select either “Midterm” or “Course” (for term-end<br />
grades). Click in the cell under the “Cm” column across from the desired student name to<br />
select (highlight) the cell, then click on the desired comment from the right side of the<br />
window.<br />
After you select comments just click the “Save” button to save your changes, then click<br />
“Done” to return to the main menu. If you want to quit without saving the changes, then<br />
click “Done” and click “No” when asked, “Do you want to save changes you made?”<br />
Assignment Score Notes<br />
Related to Comments are your notes for individual assignment scores. When you are in<br />
the score entry screen (from the main screen click on “Scores” then “Assignment<br />
Scores”) as you enter scores you may also enter a free-hand Score Note to which you<br />
may later refer and which will be printed on student Progress Reports.<br />
To enter a Score Note just select the desired score (the “12” in the illustration below),<br />
click on “Options” and select “Edit Score Note.” Enter the note text and click “OK.”<br />
Page 15 of 46 <strong>Teacher</strong> <strong>Technology</strong> <strong>Handbook</strong>, updated 6/29/10
Scores which have an associated note will display with an asterisk (*) following each<br />
score. This is your visual cue that you've left a note with this score. If you want to<br />
remove a score note just select the score, click “Options” and “Edit Score Note” then just<br />
erase the note text and click “OK”. The asterisk will disappear along with the note text.<br />
Refer to pages 38-42 to see how using Assignment Score Notes will be available to the<br />
online progress report.<br />
Categories: Stand-alone & Extra Credit Categories<br />
In the Categories and Assignments screen (from the “Scores” menu choice) you'll notice<br />
several choices when you create or edit a category.<br />
One choice is to click on the box labeled “stand-alone category” and this is useful for a<br />
category which will have only one score for each student, such as a final exam, and will<br />
count as a single item toward the course grade. You'll be able to enter the category weight<br />
toward course grade, the maximum score, and the date of scoring (which is used to order<br />
this item in the list for student score entry and to determine if it should be included in<br />
mid-term reports).<br />
Page 16 of 46 <strong>Teacher</strong> <strong>Technology</strong> <strong>Handbook</strong>, updated 6/29/10
Stand-alone or not, you can also make this an “extra credit category”. This category will<br />
benefit students who receive a score, but will not result in a penalty for students who do<br />
not receive a score.<br />
Unless you note it in the category name you'll see no indication that this is extra credit<br />
item when you enter scores, nor is it noted on the student progress report. When you are<br />
in the “Categories and Assignments” screen you will see a “Categories Total” and an<br />
“Extra Credit Total” at the bottom-left corner of the window. Just click on each bold<br />
Category name to see if it is marked as an extra credit category.<br />
Page 17 of 46 <strong>Teacher</strong> <strong>Technology</strong> <strong>Handbook</strong>, updated 6/29/10
An extra credit category may be a stand-alone or it may have individual assignments.<br />
Categories: Low Scores to Drop<br />
Enter a number in the “# of low scores to drop” box and this many of the lowest scores in<br />
this category will be dropped before a grade is calculated. If this number is larger than the<br />
number of assignment scores in this category you will effectively remove this category<br />
from impacting your grades.<br />
Categories: Calculate Using Weights or Total Points<br />
When you create or edit a category you can indicate if this course's grade will be<br />
calculated with weighted categories, or if everything will be calculated by total points. If<br />
“Total Points” is selected in the top-left corner of the Categories and Assignments screen,<br />
then each point awarded will be equal; five points for daily work will be equal to five<br />
points on a test.<br />
If the course grade will be calculated by weights, then each category will contribute a<br />
weighted value toward the final grade, regardless of the number of items in the category,<br />
or the point value of each item. For example, you might want tests to count 30% of the<br />
final grade, but you may want each test to be graded with ten points each. You might also<br />
want to evaluate projects with a detailed rubric which would allow up to 100 points per<br />
project, but the projects in total will only count as 25% of the final grade. With weighted<br />
categories you won't worry about how many project or tests are completed, or how they<br />
are scored.<br />
Page 18 of 46 <strong>Teacher</strong> <strong>Technology</strong> <strong>Handbook</strong>, updated 6/29/10
Selecting to calculate the course grade by weights will allow you to also select whether<br />
the assignments within the category are to carry equal weight toward the category (again,<br />
regardless of individual point values), weight by points (proportional to the maximum<br />
points per item), or “user defined” weights. User defined weights allow you to weigh<br />
important projects more than others, even if they are scored on the same scale.<br />
Sending Grades to the Office (Secondary Term-End Report Cards)<br />
With the JMC IP Gradebook program it is fairly easy to<br />
prepare and submit your term-end grades to the office. Since<br />
the Gradebook links to the school's web server you do not need<br />
to tell it where on the network to send your grades; the<br />
program already knows this. Under the “Edit” menu you can<br />
select the “Calculate All Classes”, where the program<br />
calculates each student's grade based on the scores and weights<br />
you've specified. You can also select the “Course Grades” item<br />
under “Edit” and calculate the grades for each class one at a<br />
time.<br />
We recommend that you calculate individual classes; you can<br />
review each calculated grade to be sure that they are<br />
reasonable. You can also select the report card comments for<br />
students (discussed above).<br />
Once you know you have your term-end grades and<br />
comments ready, just select “File” and “<strong>Teacher</strong> to Office”,<br />
select any combination or items to send, and click “OK”.<br />
The web server will deliver your grade file to prepare it for<br />
processing by the office staff.<br />
This completes the detailed directions for preparing JMC IP Gradebook Advanced and<br />
Term End Report Cards.<br />
Page 19 of 46 <strong>Teacher</strong> <strong>Technology</strong> <strong>Handbook</strong>, updated 6/29/10
Known Stumbling Points<br />
We've found several common stumbling points in processing student grades.<br />
First, please be sure to update your class lists before submitting grades to the office. If<br />
there are any enrollment changes in the office, the changes will not be reflected in your<br />
Gradebook data until after you do the “Office to <strong>Teacher</strong>” operation. If a student is<br />
moving between two sections of the same course, be sure you have a record of their<br />
scores; their old scores are lost and can't be copied to the other class.<br />
Remember the difference between sending Progress Reports and Grades (Term-End<br />
or Midterm). Since you will send Term-End grades and Midterm grades (both) twice a<br />
year, you may forget a few steps of the procedure. We've had teachers send progress<br />
reports when we needed mid-term grades, or term-end grades when we needed progress<br />
reports. Please check the instructions and follow the printed steps each time a report is<br />
due.<br />
When preparing Progress Reports be sure there is a checkmark left of each student's<br />
name before you send the report. Often teachers will check students in only one class, or<br />
check no students, and the progress report which is then sent is empty.<br />
Grade deadlines are critical for coordinating processing with the office staff. We have<br />
had occasions in which we've needed to send out corrected report cards when the teacher<br />
sent incomplete grades by the deadline, then send updated grades several days later,<br />
without notifying the office staff. In the meantime the office staff told the office program<br />
to read the submitted grades and began preparing report cards. If there is any failure to<br />
meet the deadline be sure to notify the office staff.<br />
Weighted grades have also caused some confusion. Consider the weighting carefully,<br />
consider how much weight each assignment will have in the final grade. We had an<br />
incident in which a teacher inadvertently created two Essay categories, each marked to be<br />
30% of the final grade; one of the categories had only one essay in it, and the other<br />
category had seven or eight essays. This resulted in that first essay by itself counting 30%<br />
of the final grade (rather than the intended 3-4% as one of about ten essays), The other<br />
essays had the same 30% weight toward the final grade, even though there were eight<br />
times as many as that first category. The first essay scores had to be re-entered into a new<br />
assignment under the correct category before the wrong category could be deleted.<br />
Calculated grades may be locked to a teacher-selected value rather than calculated. When<br />
you manually enter grades you should remember that parents can still see progress<br />
reports which include the grade calculations as a percentage, just like the grade cutoffs<br />
you entered in the first session. This can result in some confusion, especially if the<br />
teacher is not available to answer questions (such as early Summer). We'd suggest<br />
sending the office staff a note to indicate why you manually entered a student's grade<br />
rather than using the calculated grade. Again, this will save time and embarrassment.<br />
Page 20 of 46 <strong>Teacher</strong> <strong>Technology</strong> <strong>Handbook</strong>, updated 6/29/10
GRADE REPORTS<br />
October, 2007<br />
There are two types of grade reporting which we conduct: Term-End Report Cards and<br />
Midterm Grades. We also produce Progress Reports on occasion, and parents can view<br />
up-to-date progress reports on-line.<br />
In every case we are assuming that you have a current course and class roster using the<br />
“File” → “Office to <strong>Teacher</strong>” function.<br />
Term-End Report Cards<br />
Secondary Term-End Report Cards<br />
(For Secondary, see ‘Sending Grades to the Office’ Section, on page 19)<br />
Elementary Term-End Report Cards<br />
Report Cards are done quarterly, with a Term-End (semester end) score along with<br />
Quarter 2 grades and again at the end of Quarter 4 (the end of the school year). To permit<br />
the use of many custom comments on the report card, and to include Character Qualities,<br />
we will make very limited use of the Standards and Benchmarks features of JMC. SEE<br />
PAGES 33-37.<br />
Although we’ll cover this in more detail elsewhere, in summary you will be able to use<br />
a “Comment 1” standard in most Elementary courses to enter unique comments for each<br />
student, “Comment 2” for your Math courses, and for Computer courses a standard for<br />
comments and two standards for WPM and accuracy values. “Comment 3” is for 5 th and<br />
6 th grade Social Studies, and “Comment 4” is for 5 th and 6 th grade Science.<br />
Grades for courses will be calculated from the assignment scores and the appropriate<br />
symbol will be printed on the Elementary Report Card.<br />
Midterm Grades (Secondary)<br />
We will prepare and report midterm grades in two steps and assemble the results into the<br />
final packets of materials.<br />
First we will prepare midterm grades, then we will prepare progress reports for the same<br />
period of time, based on the cut-off date assigned by the administrative offices.<br />
Summary of Steps for Midterm Grades:<br />
Enter Assignment Scores.<br />
Set midterm cutoff date in the Assignment Scores<br />
window.<br />
Review grades and select comments in the Edit →<br />
Midterm Grades window for each course.<br />
Send Midterm Grades to Office (File → <strong>Teacher</strong> to Office).<br />
Page 21 of 46 <strong>Teacher</strong> <strong>Technology</strong> <strong>Handbook</strong>, updated 6/29/10
We cover creating Categories and Assignments in which to enter scores in great detail<br />
elsewhere. Please review the relevant materials for items like grade cutoffs and other<br />
pieces like this.<br />
Set the Midterm Date<br />
From the Main GradeBook screen open the “Scores” menu and select “Assignment<br />
Scores.”<br />
If you do not see the correct term, click the “Done” button to return to the main screen,<br />
open the “Term” menu and select the appropriate term (Q1, Q2, Q3, Q4, T1, T2, or T3)<br />
then return to the Assignments Scores window.<br />
Near the top-right corner of the Assignments Scores window, to the right side of the<br />
assignment name row, is a button which will read either “Current” or “Midterm.” Click<br />
on this button if you need to change it. It must read “Midterm” to proceed.<br />
Page 22 of 46 <strong>Teacher</strong> <strong>Technology</strong> <strong>Handbook</strong>, updated 6/29/10
When the button reads “Midterm” them you will see a date field just below the button.<br />
Into this field you must enter the office-assigned Midterm date for each course. The<br />
GradeBook program will compare this date to your Assignment dates to decide which<br />
assignments to include in the midterm grade. Assignments dated after this date will not<br />
contribute to the midterm grade, but will be included in the term-end grade.<br />
If a grade (or a "no grade") is enclosed in a box (as with the top grade in the image<br />
above), then the grade is "locked" -- it is selected directly by the teacher rather than<br />
calculated from scores. Click on the box (or calculated grade) and the program will<br />
present a list of all defined grade symbols for this course; select the desired grade if you<br />
want to override the calculation, or select "Calculated" to unlock the grade and have the<br />
program determine a grade from the scores.<br />
After you enter the midterm date for each course then just click "Save." Click "Done"<br />
after the last course to return to the main menu screen.<br />
Review Midterm Grades and Lock Grades<br />
From the main screen open the “Edit” menu and select “Midterm Grades.”<br />
You select a course from the pull-down list, just like on the "Assignment Scores" window<br />
or the "Categories and Assignments" window. For each course you'll see the list of<br />
enrolled students with the current grade (calculated or locked). Review the grades for<br />
Page 23 of 46 <strong>Teacher</strong> <strong>Technology</strong> <strong>Handbook</strong>, updated 6/29/10
your class. If any of the grades do not appear reasonable, based upon your knowledge of<br />
your students and class, please return to the Assignment Scores window and check that<br />
student's data for errors.<br />
You can override ("lock") individual student grades from this "Midterm Grades" window,<br />
but the process is a little different than in the Assignment Scores window. Click on a<br />
student grade. If the selected grade is calculated, then the button near the bottom-left<br />
corner of the window will read "Lock Grade". You can click this button to lock the<br />
currently displayed grade (score changes will not recalculate this student's grade), or you<br />
can select a different Grade symbol from the column down the center of the window. If<br />
the selected grade is "locked," not calculated, then the bottom-left button will change to<br />
read "Unlock Grade".<br />
If a grade is locked, just click the “Unlock Grade” button to use the calculated value.<br />
Page 24 of 46 <strong>Teacher</strong> <strong>Technology</strong> <strong>Handbook</strong>, updated 6/29/10
Add Midterm Comments<br />
While you are in this "Midterm Grades" window you may also select report card<br />
comments to include for any of your students. Unlike Progress Reports, the midterm and<br />
term-end comments are restricted to a list defined by the administrative office, and you<br />
can select only one comment per student (per course). You cannot enter a free-form<br />
comment. If you feel a strong need for additional comments, or you believe that some of<br />
the included comments should never be used at <strong>PACT</strong>, please advise the administrative<br />
assistant as a suggested change.<br />
To add a comment for a student, first go to the desired course. Click in the "Cm" column<br />
adjacent to the student name and term grade. While this cell is highlighted click on the<br />
desired comment from the right-hand column (scroll up and down if necessary). The<br />
program will enter the ID number for the comment, and the text for this comment will be<br />
printed on the student's report card, next to this course grade. Some of these comments are<br />
longer than this column is wide, so you might want to confirm the current wording before<br />
you use a new comment. These comments are totally separate from the Progress Report<br />
comments.<br />
Page 25 of 46 <strong>Teacher</strong> <strong>Technology</strong> <strong>Handbook</strong>, updated 6/29/10
Printing Midterm Grades<br />
You may want a printed record of the midterm grades and comments you send to the<br />
office. This can provide a backup and reminder of the grades which were sent, especially<br />
if a student later receives a score for an assignment which would have been included in<br />
grade calculations. This may also be important to help you review the comments which<br />
you selected for students.<br />
While you are in the "Midterm Grades" window first select the desired course, then open<br />
the "Options" window (near the top-left corner of the window) and select "Print This<br />
Class".<br />
This will produce a report for this course with your name, the course information , and<br />
the date and time the report was printed. Student names are alphabetical and the<br />
comments are not truncated.<br />
Sending Midterm Grade to the Office<br />
Send midterm grades and term-end grades in the same way.<br />
From the main screen open the “File” menu and select<br />
“<strong>Teacher</strong> to Office.”<br />
Page 26 of 46 <strong>Teacher</strong> <strong>Technology</strong> <strong>Handbook</strong>, updated 6/29/10
You’ll need to tell the program what to send – be sure to check at least “Grades” and<br />
“Standards and Benchmarks.” Checking “MN High Standards” won’t matter whether<br />
checked or not. Click the “OK” button to actually send the data.<br />
Unless the program reports an error during this process, you are done.<br />
In the office we will be able to combine the information sent by all teachers and produce<br />
a simple midterm report like this:<br />
As you’ll notice, there is not a lot of detail in the midterm reports. For more detail we’ll<br />
be using Progress Reports in addition to midterm reports.<br />
This completes the detailed directions for preparing secondary Midterm Report Cards.<br />
Page 27 of 46 <strong>Teacher</strong> <strong>Technology</strong> <strong>Handbook</strong>, updated 6/29/10
Progress Reports<br />
Using this Progress Report process the office can prepare report for each student (or<br />
selected students) to show their progress in the current term through a specified date. The<br />
reports include all grading details such as category weights and individual assignment<br />
details.<br />
Summary of Steps for Progress Reports:<br />
Enter Assignment Scores.<br />
Create a new Progress Report in the Reports → New<br />
Progress Reports Setup window.<br />
Set Report Date for each Course.<br />
Select Print All for each Course.<br />
Include Score Summary For Each Student.<br />
Review grades and select comments for each student as<br />
appropriate.<br />
Send Progress Reports to Office (Reports → Send Progress<br />
Reports to Office).<br />
Create a New Progress Report<br />
From the main screen open the “Reports” menu and select “New Progress Report Setup.”<br />
You’ll need to give the progress report a name (to edit it later, if necessary, and to select<br />
the correct one to send to the office).<br />
Page 28 of 46 <strong>Teacher</strong> <strong>Technology</strong> <strong>Handbook</strong>, updated 6/29/10
Just enter an appropriate name and click the OK button. Once named you’ll see a<br />
Progress Report screen similar to the one below.<br />
For mid-term use you’ll select a Course from the pull-down list in the top-right corner;<br />
the button will show the currently selected course name. Enter the office-assigned<br />
Report Date in the field near the top-left corner. Click on the boxes by “Include Present<br />
Grade For Each Student” and “Include Score Summary For Each Student” to select<br />
both options (a “√” checkmark should display in each box when selected).<br />
Click on the “Print All” button near the bottom-left corner of the screen; this should<br />
display a checkmark next to every student name for this Course. The program will<br />
prepare progress reports only for students selected with a checkmark by their names.<br />
Highlight an individual student’s name and click on one (or more) Comments in the right<br />
column; Click in the “Additional Comments” box to type a comment for this student;<br />
you can have several selected Comments plus the typed Additional Comments for any<br />
Page 29 of 46 <strong>Teacher</strong> <strong>Technology</strong> <strong>Handbook</strong>, updated 6/29/10
students. These comments are totally separate from the Report Card comments (midterm<br />
or term-end).<br />
Repeat these steps for each Course. Especially note that the “Print All” button affects<br />
only this Course; you need to “Print All” for each Course. Be sure “Include a Summary<br />
for Each Student” is checked, in order to get the detail.<br />
When you are finished setting up this Progress Report, or if you need to interrupt the<br />
operation, click on the “Done” button to return to the main screen.<br />
Edit Progress Report Setup<br />
If you have a Progress Report you’d previously started but now need to finish, or you<br />
want to use an old progress report with a new Report Date, from the main screen open the<br />
“Reports” menu and select “Edit Progress Report Setup.”<br />
You’ll be given a chance to select one of your previously defined Progress Reports.<br />
Page 30 of 46 <strong>Teacher</strong> <strong>Technology</strong> <strong>Handbook</strong>, updated 6/29/10
Choose the appropriate Progress Report by name. You’ll see the same screen as when<br />
you created a new Progress Report, but with all of the selections and comments you’d<br />
previously entered.<br />
Sending Progress Reports to Office<br />
From the main screen open the “Reports” menu and select “Send Progress Reports to<br />
Office.”<br />
Select the appropriate Progress Report which you’ve previously created (and, perhaps,<br />
edited) and click on the “Choose” button.<br />
Page 31 of 46 <strong>Teacher</strong> <strong>Technology</strong> <strong>Handbook</strong>, updated 6/29/10
When you click the “Choose” button, the GradeBook program will send the information<br />
to a network location from which the Office can retrieve it.<br />
If everything goes well you should see a confirmation message, “The Progress Report<br />
was sent successfully.”<br />
Click the “OK” button and you’ll return to the GradeBook main screen.<br />
This completes the detailed directions for preparing Progress Reports.<br />
Page 32 of 46 <strong>Teacher</strong> <strong>Technology</strong> <strong>Handbook</strong>, updated 6/29/10
ELEMENTARY REPORT CARDS<br />
Note: Tutorial step-by-step video CD is available that covers elementary report cards.<br />
2<br />
Calculating Overall Grades<br />
Calculations will be determined by your graded assignments.<br />
1<br />
1. Verify Term [Quarter]<br />
2. Select Course Grades from the Edit menu<br />
3. Choose the class from the Course drop menu<br />
4. Next, weights will have to be set for EACH<br />
QUARTER for EACH COURSE (class) before<br />
calculating grades.<br />
a. Click on the Weights-><br />
b. The Edit Course Weights box appears. Set<br />
each Quarter to 1 – this gives equal weight to<br />
the quarters. Click OK.<br />
(Consult with Administration if you desire to set different<br />
weights per quarter)<br />
3<br />
4 b 4 a<br />
5<br />
5. The Course Grades window for the class appears. Next,<br />
select Options… and Calculate for the current Quarter.<br />
6. At the end of a term (Q2 & Q4) Select Calculate the<br />
current Semester Grades. This generates the Semester<br />
grade. (All grades [Q1,Q2, S1, etc.] will appear on the<br />
student Report Card.) Click DONE or SAVE after each<br />
class.<br />
DO NOT SELECT ANY COMMENTS! Only typed comments appear on the report card.<br />
6<br />
Page 33 of 46 <strong>Teacher</strong> <strong>Technology</strong> <strong>Handbook</strong>, updated 6/29/10
Entering WPM, Accuracy, and Comments for Computer Classes<br />
7. Again, VERIFY term [Quarter]<br />
8. Select Edit, then Edit Assessments for a Student<br />
a. Used with Computer Classes<br />
b. Used with Character Qualities (See Section C )<br />
9. Again, find the Course from drop down menu<br />
10. By default, TODAY’S DATE and the first student in the class list appears.<br />
8<br />
9<br />
10<br />
11. CHANGE the<br />
DATE if it<br />
does not match<br />
the CUTOFF<br />
DATE<br />
provided by<br />
the office.<br />
Follow steps in<br />
#4 above.<br />
12. Choose each student thru the drop down list.<br />
12<br />
13. The Subject Area: Enri Enrichment Studies.<br />
Standards: All Standards are displayed.<br />
a. Use the STD Elem Computer<br />
comment field to type freehand<br />
comments.<br />
b. Use the other fields for AWPM &<br />
Typing Accuracy. DO NOT TYPE<br />
THE % SIGN (It will appear on the<br />
report card; Do not try to enter data<br />
into the Result ID)<br />
13<br />
13 a<br />
13 b<br />
Page 34 of 46 <strong>Teacher</strong> <strong>Technology</strong> <strong>Handbook</strong>, updated 6/29/10
How to Enter Attitudes and Work Habits<br />
14. Select Edit, then Edit Assessments for a Student<br />
15. From the Course/Grade drop menu, select the Grade 0x (found at the bottom of<br />
the list)<br />
16<br />
15<br />
16 a<br />
Q1<br />
16. In Student view, it is required to Add Initial Assessment Set. Use the CUTOFF<br />
DATE supplied by the office.<br />
a. The Term needs to be Quarter 1, 2, 3,<br />
or 4, not semesters S1 or S2.<br />
b. The Add a new Assessment Set Box<br />
appears. Enter the quarter Cut-off date,<br />
then CHOOSE the Quarter from the<br />
drop menu.<br />
(Note: if there are mixed terms – S1 and Q1, you will need to<br />
delete the assessment set date, and add a new one, but use a<br />
different date – the next day)<br />
17. All the Standards (Character Qualities) and<br />
Benchmarks (Attitudes and Work Habits) are<br />
displayed.<br />
a. Place the cursor in the Result ID box<br />
b. Then click on the Results symbols.<br />
16 b<br />
17<br />
17 a<br />
17 b<br />
TIP: The cursor will<br />
advance to the next<br />
benchmark<br />
automatically.<br />
Page 35 of 46 <strong>Teacher</strong> <strong>Technology</strong> <strong>Handbook</strong>, updated 6/29/10
How to Add Comments<br />
Applies to all elementary teachers for Report Cards<br />
18. Verify term [Quarter]<br />
19. Select Edit, then Edit Assessments for a Course or Grade<br />
• Used with majority of reporting<br />
• NOT used with Computer class or Character Qualities<br />
20. Find the class from the Course/Grade drop down menu<br />
21. Select Add; the Assessment Settings box appears.<br />
a. In the Choose Assessment Date, type in the CUT OFF DATE for end of<br />
the Quarter Grades – date provided by the office<br />
b. UNCHECK Cumulative …<br />
c. Then choose Hand-enter Results<br />
20<br />
21<br />
21 a<br />
21 b<br />
21 c<br />
22. Verify:<br />
a. Date is the set CUT OFF Date<br />
If returning to finish, use the drop down menu to select the correct date!<br />
b. Subject Area is set: COMM Comments; and Standard: 0001 Comment 1<br />
i. Math Courses, the Standard will be: 0002 Comment 2<br />
ii. 5/6 Social Studies Standard will be: 0003 Comment 3<br />
iii. 5/6 Science Standard will be: 0004 Comment 4<br />
c. Term [Current Quarter]<br />
Page 36 of 46 <strong>Teacher</strong> <strong>Technology</strong> <strong>Handbook</strong>, updated 6/29/10
23. Type your comments in the Comment field. The curser will stop when it has<br />
reached the maximum data entry for the field. It is approximately 50<br />
characters/spaces.<br />
FYI: Use TAB key to move between students.<br />
22 a<br />
22 b<br />
22 c<br />
23<br />
IMPORTANT: Comments will not be removed between quarters, but will be<br />
overwritten by entering a NEW COMMENT or a SPACE in the comment field.<br />
FINALLY, after repeating this for ALL COURSES, perform the TEACHER TO<br />
OFFICE, with GRADES and STANDARDS & BENCHMARKS checked.<br />
Page 37 of 46 <strong>Teacher</strong> <strong>Technology</strong> <strong>Handbook</strong>, updated 6/29/10
ONLINE PROGRESS REPORTS<br />
Information for <strong>Teacher</strong>s<br />
November 2007<br />
Reviewed and updated 6/29/10<br />
The JMC GradeBook program can be an effective way to keep parents and students up to<br />
date on current student progress. There are just a few simple steps to follow to make best<br />
use of this software.<br />
Online Parent and/or Student Access<br />
As you may already know, parents can view student progress reports through the internet.<br />
Parents will be able to view their student's progress, course by course, with the maximum<br />
scores for assignments, weights toward course grades, and the student's actual scores and<br />
score notes. Parents must be the student's “primary contact” and they must register a<br />
password with the tech office to gain access to this information. The Online Parent<br />
Access form is available online in the Forms area.<br />
Students have all been set up to view their progress reports. They access their progress<br />
reports from <strong>PACT</strong>’s website through the Student Online Access Page (FOR<br />
STUDENTS>Progress Reports or directly through their Moodle page.)<br />
Note: The actual internet address for online access changes every school year. The Tech<br />
Office can provide this to anyone having problems accessing the service.<br />
Page 38 of 46 <strong>Teacher</strong> <strong>Technology</strong> <strong>Handbook</strong>, updated 6/29/10
Updated Scores and Comments<br />
Perhaps the most important action is to enter scores promptly after assignments are<br />
turned in. Assignments provide us with assessments of student progress and scores<br />
provide the feedback they need to either keep on-track or to change course. Without<br />
prompt feedback through scores a student may continue to lose ground for weeks and be<br />
unable to make necessary improvements.<br />
The JMC GradeBook allows you to enter comments (“score notes”) for individual<br />
assignment scores. These comments are available to parents and students through the online<br />
progress reports, and they’ll print in the detailed progress reports for students.<br />
In the Assignment Scores window just select the score to which to attach a note, then<br />
click “Options” and select “Edit Score Note…”<br />
A small window will pop up which will show the assignment score and you’ll have space<br />
in which to write a brief note. Please keep in mind that this note is available to<br />
parents on-line; it will be convenient for you to keep notes to yourself about a<br />
student’s score (e.g. “late”), but remember that these notes may be read by others.<br />
Page 39 of 46 <strong>Teacher</strong> <strong>Technology</strong> <strong>Handbook</strong>, updated 6/29/10
If you have entered a note for a score, then that score will display with a small apostrophe<br />
after it, as shown in this enlarged image.<br />
As a teacher you can easily read these notes by selecting the score, then select Options,<br />
and Edit Score Note, just as when you first created the note. To delete a note just use<br />
Edit Score Note and delete contents of the note (the program will remove the note if it is<br />
left blank).<br />
Page 40 of 46 <strong>Teacher</strong> <strong>Technology</strong> <strong>Handbook</strong>, updated 6/29/10
Viewing Assignment Score Notes<br />
As a teacher you can view score notes from the Assignment Scores window by just<br />
editing the notes, one at a time.<br />
You can also view these notes through the different Progress Report screens. For<br />
example, from the Assignment Scores window you can highlight a student name in a<br />
course and click the “Print Student” button at he bottom of the window; this prepares a<br />
progress report for the selected student in the selected course for the selected term, as<br />
shown in the next image.<br />
This same information will be included in the Progress Report submissions prepared<br />
through the office, and through the On-Line Progress Reports available to parents and<br />
students.<br />
Publishing Scores On-Line<br />
Now we know how to enter a comment (“note”) for an individual assignment score and<br />
what it looks like in progress reports. The only thing left is to “publish” it on-line.<br />
When you select File then Exit in the JMC GradeBook program, first you’ll see a<br />
progress window showing your GradeBook files being transferred back to the server. The<br />
next window, “Update Online Progress Reports,” lets you, the teacher, determine the<br />
date through which completed or pending assignments will be available on-line to parents<br />
and administrators. If you click the “Cancel” button, then your newly entered<br />
assignments, scores, and notes will not be available online.<br />
Page 41 of 46 <strong>Teacher</strong> <strong>Technology</strong> <strong>Handbook</strong>, updated 6/29/10
If you’ve created assignments with future due dates, you may choose to change this date<br />
to include those upcoming assignments (to help parents help students with time<br />
management planning).<br />
This completes the detailed directions for Score Notes and Online Progress Reporting.<br />
Page 42 of 46 <strong>Teacher</strong> <strong>Technology</strong> <strong>Handbook</strong>, updated 6/29/10
Using the GradeBook Program from Home<br />
It is fairly easy to use the GradeBook program from home, if you have a computer<br />
available and Internet access. You can download and install the “IP GradeBook” (for<br />
Macintosh or Windows) from www.jmcinc.com -- use the address<br />
http://206.131.150.58:8080/JMC/JMC_CGI_YYYY.DLL<br />
(Y=school year, ie: 0910) for the “Server URL” when you start the program<br />
Guy and Shari have a small program (a “self extracting zip file”) which we can email to<br />
you to automate most of this installation. It will place the program on your C: drive,<br />
create a Start Menu shortcut, and pre-set the Server URL.<br />
Perhaps the most important thing to remember when using the GradeBook from multiple<br />
locations is to exit the program at the end of each session. Whether you use the<br />
program from a school computer or from home, the program will copy your current<br />
GradeBook files from the server to your local workstation, then work with this local<br />
copy. When you exit the program it will transfer these files back to the server and remove<br />
them from your local computer (the program file is not affected).<br />
If you have the program open on one computer, then start it again from a second<br />
computer, then you will not see any changes you made on the first computer; and changes<br />
you make from the second computer will be lost when you later close the program on the<br />
first computer. Please exit the GradeBook program when you are not actively using<br />
it.<br />
Questions and Help<br />
If you have questions about this program, please check the on-line resources at the school<br />
website and the manuals at www.jmcinc.com; you may also ask peers at school or Guy<br />
and Shari for help.<br />
Page 43 of 46 <strong>Teacher</strong> <strong>Technology</strong> <strong>Handbook</strong>, updated 6/29/10
Period/<br />
Hour<br />
1-8:00<br />
1-8:15<br />
1-8:30<br />
1-8:45<br />
2-9:00<br />
2-9:15<br />
2-9:30<br />
2-9:45<br />
3-10:00<br />
3-10:15<br />
3-10:30<br />
3-10:45<br />
4-11:00<br />
4-11:15<br />
4-11:30<br />
4-11:45<br />
4-12:00<br />
5-12:15<br />
5-12:30<br />
5-12:45<br />
5-1:00<br />
6-1:15<br />
6-1:30<br />
6-1:45<br />
6-2:00<br />
7-2:15<br />
7-2:30<br />
7-2:45<br />
3:00<br />
3:15<br />
3:30<br />
3:45<br />
4:00<br />
4:30<br />
5:00<br />
Computer Lab Availability 2010-11<br />
You must sign up in advance to use the upper computer lab (room 212). Weekly<br />
availability sheets are posted outside the main classroom door, three weeks in advance.<br />
Daily announcements list upcoming field trips, you may sign up for classroom space<br />
when elementary classes are on a field trip. Secondary teachers: the times listed are in<br />
15 minute increments and do not reflect the secondary schedule. Below is the general<br />
schedule for 10-11 (this is subject to change).<br />
Any “Open” times require teacher supervision!<br />
Mon Tue Wed Thu Fri<br />
Swinnerton Klismith Hale Ahrendt 1 / 2 Grade Class<br />
Wagner Lambert Wagner Lambert 6 th Grade Class<br />
DeLong<br />
Maki<br />
Oliversen<br />
M T W<br />
Class<br />
R<br />
Open<br />
Barry Mattson 3 / 4 Grade Class<br />
Backowski Backowski Barry<br />
Lemeshevskiy<br />
Lemeshevskiy<br />
M W R<br />
Class<br />
M W<br />
Class<br />
T<br />
Open<br />
T R<br />
Open<br />
Page 44 of 46 <strong>Teacher</strong> <strong>Technology</strong> <strong>Handbook</strong>, updated 6/29/10
GENERAL INFORMATION<br />
<strong>Technology</strong> Requisitions<br />
Salmon colored “Tech Req’s” are available in the forms center in the work room and<br />
outside room 223. Provide as much detail as possible. All requisitions are logged and<br />
assist the technology department determine recurring issues, develop training, schedule<br />
priorities and work flow. Priority is given to completed requisitions.<br />
Note: Order blank CD’s or DVD’s along with other supplies through the office.<br />
Software<br />
When purchasing software, be aware of software licensing! The technology department<br />
will install software and retain the original and provide a copy to be used when the<br />
program requires the use of a CD. Tech requisitions received for installing software on<br />
more than one computer will be subject to the licensing.<br />
It is strongly discouraged to have personal software installed on the school computer.<br />
Public Computers / Scanners<br />
There are scanner’s connected to select computers throughout the building. Each<br />
computer that has a scanner connected to it also has a separate <strong>Teacher</strong>/Staff account.<br />
Labels are on the front of each computer with the computer name. Be sure to log off of<br />
the computer when done using the staff account. The password to access these accounts<br />
are available from the technology department.<br />
Lower/Upper Secondary Commons computers with <strong>Teacher</strong>/Staff accounts:<br />
S1C003, S1C008, S2C003, S2C007<br />
Lower/Upper Elementary Commons computers with <strong>Teacher</strong>/Staff accounts:<br />
E1C005, E2C002, E2C005, E2C007<br />
ISC Rm 191 / Media Center computers with <strong>Teacher</strong>/Staff accounts:<br />
ISC002, ISC003, ISC010, ISC017, LIB003<br />
Networked Printers<br />
There are several printers set-up around the building. Printer access is determined by<br />
location and has been installed on most computers.<br />
HP 8100 172.16.0.4 Upper Elementary Commons<br />
Brother 5250 172.16.0.33 Lower Elementary Commons<br />
HP 8100 172.16.0.3 Lower Secondary Commons<br />
HP 8100 172.16.0.5 Upper Secondary Commons<br />
Brother 5250 172.16.0.32 ISC<br />
HP CP2020 172.16.0.11 Workroom (color printer)<br />
ir5065 Copier 172.16.0.23 Upstairs Copier (outside media center)- need a copier code<br />
ir7095 Copier 172.16.0.24 Downstairs Copier in Workroom<br />
Reference documents for using the Canon Copier are found in the shared<br />
folder on teacher desktops.<br />
Page 45 of 46 <strong>Teacher</strong> <strong>Technology</strong> <strong>Handbook</strong>, updated 6/29/10
Equipment for Checkout<br />
There are digital cameras, camcorders, TV/VCR/DVD carts, and video projectors<br />
available to be checked out. Complete a Tech Request for cameras and camcorders at the<br />
time of checkout and in advance for video projectors, TV/VCR/DVD. Video projectors<br />
will be delivered to the requested location. It is asked that you return the items promptly<br />
when done.<br />
Using Moodle<br />
Beginning school year 2010-11, <strong>PACT</strong> teachers will be required to use the Moodle online<br />
learning program to provide assignments, study resources and new learning experiences<br />
for our students 24 hours a day!<br />
Using Moodle –Teaching with the Popular Open Source Course Management System<br />
Second Edition, by Jason Cole & Helen Foster is provided separately.<br />
<strong>PACT</strong>’s Moodle website: http://pact.erdc.k12.mn.us/<br />
Page 46 of 46 <strong>Teacher</strong> <strong>Technology</strong> <strong>Handbook</strong>, updated 6/29/10