Operators G & MG & ID Series Granita
Operators G & MG & ID Series Granita
Operators G & MG & ID Series Granita

Create successful ePaper yourself
Turn your PDF publications into a flip-book with our unique Google optimized e-Paper software.
G23-2B ELECTRONIC MODEL GU<strong>ID</strong>E:<br />
MAIN POWER SWITCH:<br />
1. Turns unit ON.<br />
2. Selects 12/24 time or FÞ/CÞ temperature display when turned ON<br />
while simultaneously depressing the auger button.<br />
3. Sets current time when turned ON while simultaneously depressing<br />
the “Mode/Press To Select Function” button.<br />
AUGER ON/OFF BUTTON:<br />
1. Turns auger ON and OFF when main power switch is ON.<br />
2. Must be ON to permit defrost time to be reset.<br />
3. Must be ON to activate the “Mode/Press To Select Function” button<br />
to select manual “OFF”, “FREEZE” or “COOLING” functions.<br />
MODE/PRESS TO SELECT FUNCTION BUTTON:<br />
1. Use to manually select “OFF”, “FREEZE” or “COOLING” functions<br />
when auger is turned ON.<br />
2, Accesses defrost timer reset mode when depressed for an extended<br />
period when auger is turned ON.<br />
3. Locks in hours, minutes and final time settings after they are reset<br />
using the “Auto Timer” button.<br />
4. Does not function when light on “Auto Timer” button is illuminated.<br />
“AUTO TIMER” BUTTON:<br />
1. Turns auto defrost mode ON or OFF (light on switch indicates when<br />
auto defrost mode is activated).<br />
2, Used to adjust the hours and minutes settings when readjusting<br />
current time or auto defrost timer.<br />
ENTER TIME PROGRAMMING ON INITIAL INSTALLATION OR IN THE<br />
EVENT OF A TIME CHANGE:<br />
1. Turn OFF power switch.<br />
2. While pressing left “Press to Select Function” button, turn ON power<br />
switch while continuing to hold the “Press To Select Function” button<br />
until the display illuminates (hour digits will start to blink).<br />
3. First set hour by pressing the “Auto Timer” clock button until the<br />
appropriate hour is shown.<br />
Note: When using a 12 hour clock the time is P.M. when the dot at the bottom<br />
right corner of the LED is lit; when dot is not lit it is A.M.)<br />
4. To set the minutes press the left “Press To Select Function” button,<br />
then press the “Auto Timer” clock button until the appropriate minutes<br />
are set.<br />
5. To save your settings press the “Press To Select Function” button<br />
one more time.<br />
G23-2B SETTING DEFROST TIMER (Night Setting):<br />
1. Turn the power switch on.<br />
2. Then press “Auger ON/OFF” button on for the side you are setting.<br />
3. Then press and hold the “Press to Select Function” button until you<br />
hear a long beep and the LED and clock light begins to blink.<br />
4. Press the “Auto Timer” clock button to set the hour you want it to turn<br />
to refrigeration mode and then press “Press to Select Function” to<br />
save the setting.<br />
5. Then press the “Auto Timer” clock to set the minutes to complete<br />
time<br />
setting that you want it to turn to refrigeration mode. Then press the<br />
“Press to Select Function” button to save the setting.<br />
6. Proceed to setting the time you want the machine to turn to freezing<br />
mode by following steps 4 and 5 above. Then press the “Press to<br />
Select Function” button to save the time settings for freeze mode.<br />
Note: Once the settings have been saved, the unit will save the settings,<br />
even when the power switch is turned off.<br />
When the light on the “Auto Timer” clock button is “on”, the defrost timer is<br />
activated. To turn off the defrost timer, press the clock buttons until the<br />
lights on the clock buttons turn off.<br />
G23-2B - TO OPERATE IN AUTOMATIC MODE (WITH DEFROST TIMER<br />
ACTIVATED)<br />
1. Turn power switch on and wait for LED to light up.<br />
2. To operate in defrost mode the light on the “Auto Timer” clock button<br />
should be illuminated.<br />
3. If it is not, press the “Auto Timer” clock button<br />
to turn on automatic mode.<br />
G23-2B OPERATE IN MANUAL MODE (WITHOUT<br />
DEFROST TIMER ACTIVAT-<br />
ED)<br />
1. Turn power switch on<br />
and wait for LED to light<br />
up.<br />
2. Make sure clock button<br />
is off (LED light on clock<br />
button should not be lit<br />
up).<br />
3. First turn auger on by<br />
pressing “Auger<br />
ON/OFF” button until it<br />
beeps. (Note: The auger<br />
-To access the operating panel, open the cover on the right side<br />
PROGRAMMING of the unit.<br />
To access the control panel, open the cover on the right side of the unit<br />
must be on before unit will allow the cooling or freezing mode to activate.)<br />
4. Then select refrigeration or freezing mode by pressing the “Press to<br />
Select Function” button until the light under the selection you desire is lit<br />
up. Note: In the cooling mode the LED will read the actual temperature of<br />
the product (The temperature setting is preset to NSF standards and is<br />
not adjustable.) In the freezing mode the LED will read the current time.<br />
ERROR MESSAGES<br />
“FILTER CLEANING” ALARM<br />
A filter cleaning alarm will activate when the unit is running hot due to insufficient<br />
internal air circulation. When this occurs a “Filtr” message will appear on<br />
the touchpad LED readout and an intermittent audible tone will also sound to<br />
alert the operator of this condition.<br />
The “Filtr” message will appear when the alarm activates (a beeping sound<br />
every 4-5 seconds). To determine the condition that caused the alarm and correct<br />
problem, see list of conditions below:<br />
• Condition: Filter is dirty and needs to be cleaned<br />
Corrective Action: Clean and replace filter following instructions.<br />
• Condition: Unit is positioned too close to a wall or other objects restricting<br />
air flow and causing the machine to run at a higher temperature.<br />
Corrective Action: Reposition unit to maximize ventilation space.<br />
• Condition: Filter is not properly installed.<br />
Corrective Action: Properly install filter.<br />
• Condition: Unit has been installed near a heat source, such as a coffee<br />
machine, ice maker or cold beverage machine which expels hot air from its<br />
vents, causing the machine to run at a high temperature. (Installation near<br />
a heat source should be avoided)<br />
Corrective Action: Reposition unit to maximize ventilation.<br />
“SYSTEM OVER TEMPERATURE” ALARM<br />
• A system over temperature alarm will activate as a safety when the unit has<br />
overheated to protect the compressor.<br />
• The system automatically goes to “OFF” status where the compressor’s operations<br />
are stopped, while augers will keep working to avoid forming ice<br />
blocks.<br />
• When this “Err” message will appear on the touch pad LED readout accompanied<br />
by a continuous buzzer sound to alert the operator of this condition.<br />
• When this alarm activates, turn off all switches. Then determine the condition<br />
from the list above.<br />
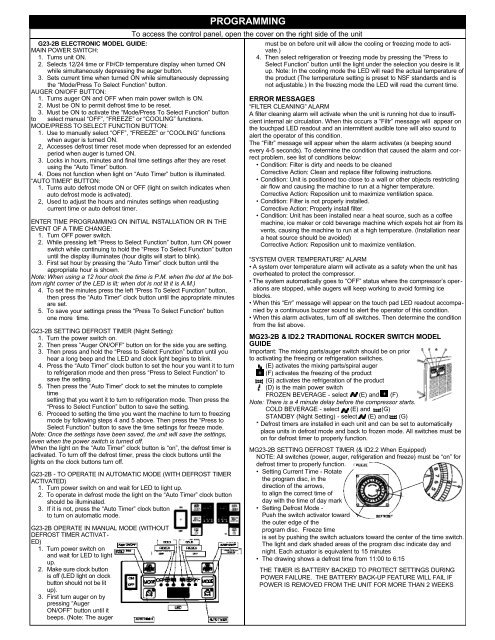
<strong>MG</strong>23-2B & <strong>ID</strong>2.2 TRADITIONAL ROCKER SWITCH MODEL<br />
GU<strong>ID</strong>E<br />
Important: The mixing parts/auger switch should be on prior<br />
to activating the freezing or refrigeration switches.<br />
(E) activates the mixing parts/spiral auger<br />
(F) activates the freezing of the product<br />
(G) activates the refrigeration of the product<br />
(D) is the main power switch<br />
FROZEN BEVERAGE - select (E) and (F)<br />
Note: There is a 4 minute delay before the compressor starts.<br />
COLD BEVERAGE - select (E) and (G)<br />
STANDBY (Night Setting) - select (E) and (G)<br />
* Defrost timers are installed in each unit and can be set to automatically<br />
place units in defrost mode and back to frozen mode. All switches must be<br />
on for defrost timer to properly function.<br />
<strong>MG</strong>23-2B SETTING DEFROST TIMER (& <strong>ID</strong>2.2 When Equipped)<br />
NOTE: All switches (power, auger, refrigeration and freeze) must be “on” for<br />
defrost timer to properly function.<br />
• Setting Current Time - Rotate<br />
the program disc, in the<br />
direction of the arrows,<br />
to align the correct time of<br />
day with the time of day mark<br />
• Setting Defrost Mode -<br />
Push the switch activator toward<br />
the outer edge of the<br />
program disc. Freeze time<br />
is set by pushing the switch actuators toward the center of the time switch.<br />
The light and dark shaded areas of the program disc indicate day and<br />
night. Each actuator is equivalent to 15 minutes<br />
• The drawing shows a defrost time from 11:00 to 6:15<br />
THE TIMER IS BATTERY BACKED TO PROTECT SETTINGS DURING<br />
POWER FAILURE. THE BATTERY BACK-UP FEATURE WILL FAIL IF<br />
POWER IS REMOVED FROM THE UNIT FOR MORE THAN 2 WEEKS