Operators G & MG & ID Series Granita
Operators G & MG & ID Series Granita
Operators G & MG & ID Series Granita

Create successful ePaper yourself
Turn your PDF publications into a flip-book with our unique Google optimized e-Paper software.
c<br />
d<br />
a<br />
b<br />
g<br />
h<br />
e<br />
f<br />
m<br />
n<br />
i<br />
j<br />
k<br />
l<br />
o<br />
p<br />
q<br />
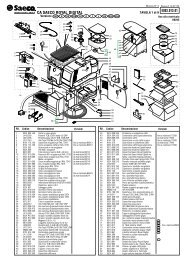
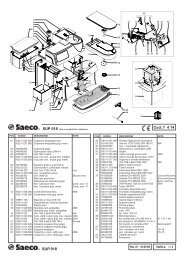
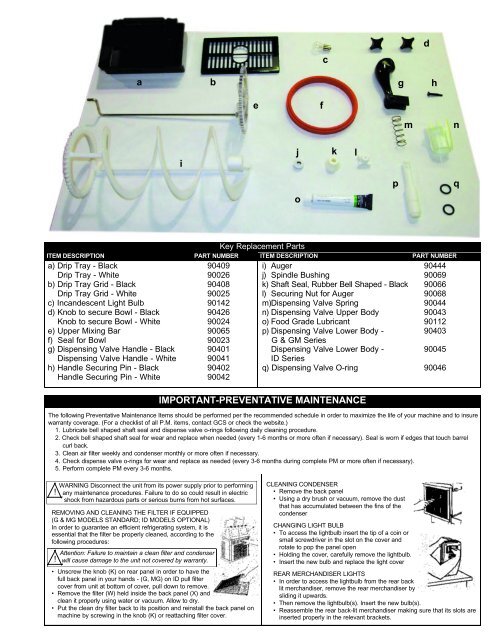
ITEM DESCRIPTION<br />
PART NUMBER<br />
a) Drip Tray - Black 90409<br />
Drip Tray - White 90026<br />
b) Drip Tray Grid - Black 90408<br />
Drip Tray Grid - White 90025<br />
c) Incandescent Light Bulb 90142<br />
d) Knob to secure Bowl - Black 90426<br />
Knob to secure Bowl - White 90024<br />
e) Upper Mixing Bar 90065<br />
f) Seal for Bowl 90023<br />
g) Dispensing Valve Handle - Black 90401<br />
Dispensing Valve Handle - White 90041<br />
h) Handle Securing Pin - Black 90402<br />
Handle Securing Pin - White 90042<br />
Key Replacement Parts<br />
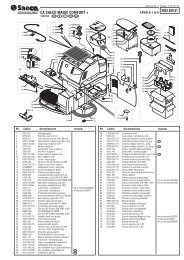
ITEM DESCRIPTION<br />
i) Auger 90444<br />
j) Spindle Bushing 90069<br />
k) Shaft Seal, Rubber Bell Shaped - Black 90066<br />
l) Securing Nut for Auger 90068<br />
m)Dispensing Valve Spring 90044<br />
n) Dispensing Valve Upper Body 90043<br />
o) Food Grade Lubricant 90112<br />
p) Dispensing Valve Lower Body - 90403<br />
G & GM <strong>Series</strong><br />
Dispensing Valve Lower Body - 90045<br />
<strong>ID</strong> <strong>Series</strong><br />
q) Dispensing Valve O-ring 90046<br />
IMPORTANT-PREVENTATIVE MAINTENANCE<br />
PART NUMBER<br />
The following Preventative Maintenance Items should be performed per the recommended schedule in order to maximize the life of your machine and to insure<br />
warranty coverage. (For a checklist of all P.M. items, contact GCS or check the website.)<br />
1. Lubricate bell shaped shaft seal and dispense valve o-rings following daily cleaning procedure.<br />
2. Check bell shaped shaft seal for wear and replace when needed (every 1-6 months or more often if necessary). Seal is worn if edges that touch barrel<br />
curl back.<br />
3. Clean air filter weekly and condenser monthly or more often if necessary.<br />
4. Check dispense valve o-rings for wear and replace as needed (every 3-6 months during complete PM or more often if necessary).<br />
5. Perform complete PM every 3-6 months.<br />
!<br />
WARNING Disconnect the unit from its power supply prior to performing<br />
any maintenance procedures. Failure to do so could result in electric<br />
shock from hazardous parts or serious burns from hot surfaces.<br />
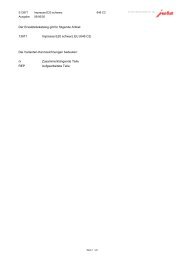
REMOVING AND CLEANING THE FILTER IF EQUIPPED<br />
(G & <strong>MG</strong> MODELS STANDARD; <strong>ID</strong> MODELS OPTIONAL)<br />
In order to guarantee an efficient refrigerating system, it is<br />
essential that the filter be properly cleaned, according to the<br />
following procedures:<br />
!<br />
Attention: Failure to maintain a clean filter and condenser<br />
will cause damage to the unit not covered by warranty.<br />
• Unscrew the knob (K) on rear panel in order to have the<br />
full back panel in your hands - (G, <strong>MG</strong>) on <strong>ID</strong> pull filter<br />
cover from unit at bottom of cover, pull down to remove.<br />
• Remove the filter (W) held inside the back panel (X) and<br />
clean it properly using water or vacuum. Allow to dry.<br />
• Put the clean dry filter back to its position and reinstall the back panel on<br />
machine by screwing in the knob (K) or reattaching filter cover.<br />
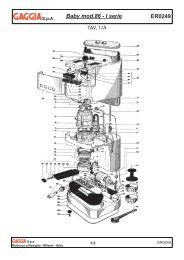
CLEANING CONDENSER<br />
• Remove the back panel<br />
• Using a dry brush or vacuum, remove the dust<br />
that has accumulated between the fins of the<br />
condenser<br />
CHANGING LIGHT BULB<br />
• To access the lightbulb insert the tip of a coin or<br />
small screwdriver in the slot on the cover and<br />
rotate to pop the panel open<br />
• Holding the cover, carefully remove the lightbulb.<br />
• Insert the new bulb and replace the light cover<br />
REAR MERCHANDISER LIGHTS<br />
• In order to access the lightbulb from the rear back<br />
lit merchandiser, remove the rear merchandiser by<br />
sliding it upwards.<br />
• Then remove the lightbulb(s). Insert the new bulb(s).<br />
• Reassemble the rear back-lit merchandiser making sure that its slots are<br />
inserted properly in the relevant brackets.