Operators G & MG & ID Series Granita
Operators G & MG & ID Series Granita
Operators G & MG & ID Series Granita

You also want an ePaper? Increase the reach of your titles
YUMPU automatically turns print PDFs into web optimized ePapers that Google loves.
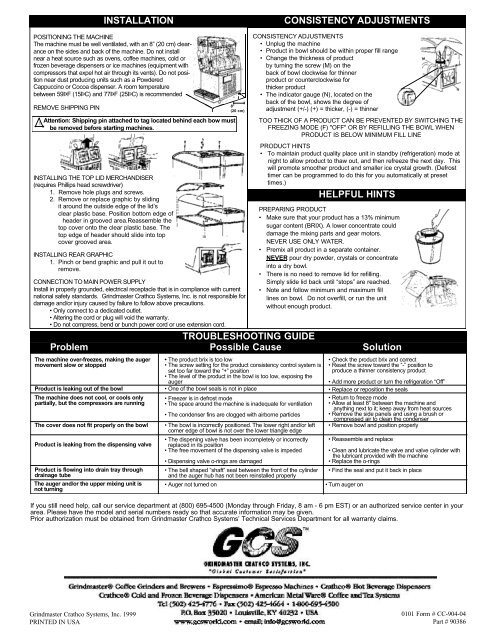
INSTALLATION<br />
CONSISTENCY ADJUSTMENTS<br />
POSITIONING THE MACHINE<br />
The machine must be well ventilated, with an 8” (20 cm) clearance<br />
on the sides and back of the machine. Do not install<br />
near a heat source such as ovens, coffee machines, cold or<br />
frozen beverage dispensers or ice machines (equipment with<br />
compressors that expel hot air through its vents). Do not position<br />
near dust producing units such as a Powdered<br />
Cappuccino or Cocoa dispenser. A room temperature<br />
between 59ÞF (15ÞC) and 77ÞF (25ÞC) is recommended<br />
REMOVE SHIPPING PIN<br />
!<br />
Attention: Shipping pin attached to tag located behind each bow must<br />
be removed before starting machines.<br />
INSTALLING THE TOP L<strong>ID</strong> MERCHANDISER<br />
(requires Phillips head screwdriver)<br />
1. Remove hole plugs and screws.<br />
2. Remove or replace graphic by sliding<br />
it around the outside edge of the lid’s<br />
clear plastic base. Position bottom edge of<br />
header in grooved area.Reassemble the<br />
top cover onto the clear plastic base. The<br />
top edge of header should slide into top<br />
cover grooved area.<br />
INSTALLING REAR GRAPHIC<br />
1. Pinch or bend graphic and pull it out to<br />
remove.<br />
TROUBLESHOOTING GU<strong>ID</strong>E<br />
Problem Possible Cause Solution<br />
The machine over-freezes, making the auger<br />
movement slow or stopped<br />
Product is leaking out of the bowl<br />
The machine does not cool, or cools only<br />
partially, but the compressors are running<br />
The cover does not fit properly on the bowl<br />
Product is leaking from the dispensing valve<br />
Product is flowing into drain tray through<br />
drainage tube<br />
The auger and/or the upper mixing unit is<br />
not turning<br />
• The product brix is too low<br />
• The screw setting for the product consistency control system is<br />
set too far toward the “+” position<br />
• The level of the product in the bowl is too low, exposing the<br />
auger<br />
• One of the bowl seals is not in place<br />
• Freezer is in defrost mode<br />
• The space around the machine is inadequate for ventilation<br />
• The condenser fins are clogged with airborne particles<br />
• The bowl is incorrectly positioned. The lower right and/or left<br />
corner edge of bowl is not over the lower triangle edge<br />
• The dispening valve has been incompletely or incorrectly<br />
replaced in its position<br />
• The free movement of the dispensing valve is impeded<br />
• Dispensing valve o-rings are damaged<br />
• The bell shaped “shaft” seal between the front of the cylinder<br />
and the auger hub has not been reinstalled properly<br />
• Auger not turned on<br />
8"<br />
(20 cm)<br />
CONNECTION TO MAIN POWER SUPPLY<br />
Install in properly grounded, electrical receptacle that is in compliance with current<br />
national safety standards. Grindmaster Crathco Systems, Inc. is not responsible for<br />
damage and/or injury caused by failure to follow above precautions.<br />
• Only connect to a dedicated outlet.<br />
• Altering the cord or plug will void the warranty.<br />
• Do not compress, bend or bunch power cord or use extension cord.<br />
CONSISTENCY ADJUSTMENTS<br />
• Unplug the machine<br />
• Product in bowl should be within proper fill range<br />
• Change the thickness of product<br />
by turning the screw (M) on the<br />
back of bowl clockwise for thinner<br />
product or counterclockwise for<br />
thicker product<br />
• The indicator gauge (N), located on the<br />
back of the bowl, shows the degree of<br />
adjustment (+/-) (+) = thicker, (-) = thinner<br />
TOO THICK OF A PRODUCT CAN BE PREVENTED BY SWITCHING THE<br />
FREEZING MODE (F) "OFF" OR BY REFILLING THE BOWL WHEN<br />
PRODUCT IS BELOW MINIMUM FILL LINE<br />
PRODUCT HINTS<br />
• To maintain product quality place unit in standby (refrigeration) mode at<br />
night to allow product to thaw out, and then refreeze the next day. This<br />
will promote smoother product and smaller ice crystal growth. (Defrost<br />
timer can be programmed to do this for you automatically at preset<br />
times.)<br />
HELPFUL HINTS<br />
PREPARING PRODUCT<br />
• Make sure that your product has a 13% minimum<br />
sugar content (BRIX). A lower concentrate could<br />
damage the mixing parts and gear motors.<br />
NEVER USE ONLY WATER.<br />
• Premix all product in a separate container.<br />
NEVER pour dry powder, crystals or concentrate<br />
into a dry bowl.<br />
• There is no need to remove lid for refilling.<br />
Simply slide lid back until “stops” are reached.<br />
• Note and follow minimum and maximum fill<br />
lines on bowl. Do not overfill, or run the unit<br />
without enough product.<br />
• Check the product brix and correct<br />
• Reset the screw toward the “-” position to<br />
produce a thinner consistency product<br />
• Add more product or turn the refrigeration “Off”<br />
• Replace or reposition the seals<br />
• Return to freeze mode<br />
• Allow at least 8" between the machine and<br />
anything next to it; keep away from heat sources<br />
• Remove the side panels and using a brush or<br />
compressed air to clean the condenser<br />
• Remove bowl and position properly<br />
• Reassemble and replace<br />
• Clean and lubricate the valve and valve cylinder with<br />
the lubricant provided with the machine<br />
• Replace the o-rings<br />
• Find the seal and put it back in place<br />
• Turn auger on<br />
If you still need help, call our service department at (800) 695-4500 (Monday through Friday, 8 am - 6 pm EST) or an authorized service center in your<br />
area. Please have the model and serial numbers ready so that accurate information may be given.<br />
Prior authorization must be obtained from Grindmaster Crathco Systems’ Technical Services Department for all warranty claims.<br />
Grindmaster Crathco Systems, Inc. 1999<br />
PRINTED IN USA<br />
0101 Form # CC-904-04<br />
Part # 90386