Retractable Y Strap
Retractable Y Strap
Retractable Y Strap

Create successful ePaper yourself
Turn your PDF publications into a flip-book with our unique Google optimized e-Paper software.
SERVICE BULLETIN: #20132005<br />
ISSUE DATE: May 20 th 2013<br />
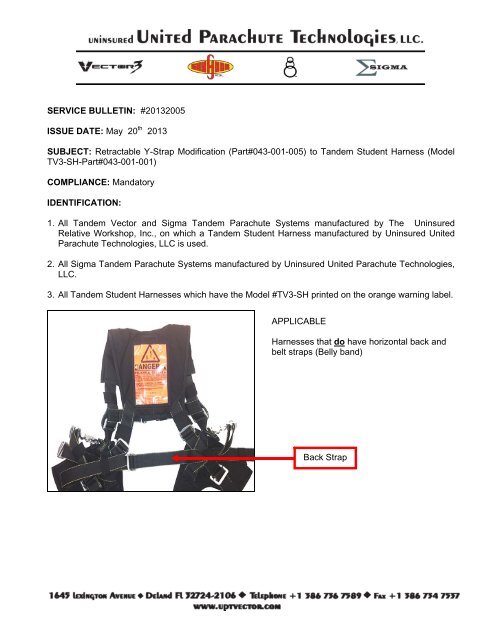
SUBJECT: <strong>Retractable</strong> Y-<strong>Strap</strong> Modification (Part#043-001-005) to Tandem Student Harness (Model<br />
TV3-SH-Part#043-001-001)<br />
COMPLIANCE: Mandatory<br />
IDENTIFICATION:<br />
1. All Tandem Vector and Sigma Tandem Parachute Systems manufactured by The Uninsured<br />
Relative Workshop, Inc., on which a Tandem Student Harness manufactured by Uninsured United<br />
Parachute Technologies, LLC is used.<br />
2. All Sigma Tandem Parachute Systems manufactured by Uninsured United Parachute Technologies,<br />
LLC.<br />
3. All Tandem Student Harnesses which have the Model #TV3-SH printed on the orange warning label.<br />
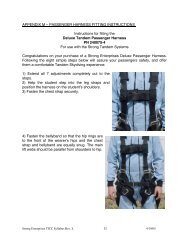
APPLICABLE<br />
Harnesses that do have horizontal back and<br />
belt straps (Belly band)<br />
Back <strong>Strap</strong>
BACKGROUND: At Uninsured United Parachute Technologies, LLC. (UUPT), we are always<br />
striving to produce the best and safest Tandem system available.<br />
With regard to the student harness, the present design has been in use for over 13 years.<br />
Based on field experience, we know that, if it is fitted and adjusted correctly, it is highly unlikely<br />
that a student can fall out of the harness. However, we also know that this type of incident has<br />
happened once before with a Tandem Vector harness, and we have had two incidents where<br />
students came close to falling out.<br />
In each of these cases, it was determined that the harness was grossly misadjusted. But, no<br />
matter what the cause, this scenario is unacceptable. To further minimize the risk of such an<br />
event, UUPT has developed the “<strong>Retractable</strong> Y-<strong>Strap</strong> Retrofit”. This Y-<strong>Strap</strong> modification has<br />
been in use for several years with only a slight decrease in student comfort, in some cases.<br />
The <strong>Retractable</strong> Y-<strong>Strap</strong> was designed to allow the student to still lift their legs for landing.<br />
COMPLIANCE: UUPT now mandates the use of a <strong>Retractable</strong> Y-<strong>Strap</strong> Retrofit on all affected tandem<br />
student harnesses.<br />
Of course, both prior to and after the retrofit, it is imperative that each tandem instructor ensure that the<br />
tandem student harness and the instructor harness are properly adjusted, prior to each tandem jump,<br />
and that the proper adjustment is verified again just prior to exiting the aircraft.<br />
Retrofit and installation instructions are available upon request from UPT or can be downloaded from<br />
our web site at the following location:<br />
COMPLIANCE DATE: The modification must be completed no later than December 1st, 2013. After<br />
that date, no tandem student harness which does not have the Y-<strong>Strap</strong> Retrofit installed is approved for<br />
use on any jump.<br />
COMPLIANCE PROCEDURE: In an effort to reduce the financial impact on system owners, UUPT is<br />
selling the Y-<strong>Strap</strong> Retrofit components kit at its cost. The cost of a Y-<strong>Strap</strong> Retrofit components kit is<br />
$50.00 (Part#043-001-005). It can be installed by any certificated rigger with minimal effort.<br />
(Reference INSTRUCT-020-Student Harness-<strong>Retractable</strong> Y <strong>Strap</strong> Installation attached)<br />
To order the Y-<strong>Strap</strong> Retrofit component kit, or if you have any questions, please contact Mike Maguire,<br />
at Uninsured United Parachute Technologies, LLC, 1645 Lexington Avenue, Deland Florida 32724,<br />
Telephone: 386-736-7589; Fax: 386-734-7537;<br />
Email: mike@uptvector.com.<br />
AUTHORITY:<br />
Mark Procos, General Manager<br />
United Parachute Technologies LLC<br />
1645 Lexington Avenue<br />
DeLand, FL 32724-2106 USA<br />
Telephone: +1 386 736 7589<br />
FAX: +1 386 734 7537<br />
DISTRIBUTION:<br />
- All identified owners of Tandem Vector and Sigma Tandem Equipment (to be notified by<br />
publication and through our dealers).
- All United Parachute Technologies, Inc. dealers.<br />
- Parachute Industry Association.<br />
- All identified parachuting publications.<br />
- All identified parachuting Federations and Associations<br />
- All National Aero Clubs, Parachuting Section.<br />
- IPC Technical Committee.<br />
- FAA MIDO<br />
- DGAC-France<br />
REVISIONS:
INSTRUCT–020 REV 2 Page 1 of 11 5/6/2013<br />
STUDENT HARNESS-RETRACTABLE Y STRAP INSTALLATION<br />
INSTRUCT.STUDENT HARNESS-RETRACTABLE Y STRAP INSTALLATION Rev 2.doc
INSTRUCT–020 REV 2 Page 2 of 11 5/6/2013<br />
Outline:<br />
This document covers two major areas:<br />
1. Retrofit instructions for preparation of Y strap installation on Student Harness’s.<br />
2. Installation of the Y strap.<br />
Who can do this work:<br />
Qualified Senior Rigger, Master Rigger or Foreign equivalent<br />
Parts:<br />
Purchase UPT Part Number:<br />
043-001-005 TANDEM STUDENT HARNESS-RETRACTABLE Y STRAP<br />
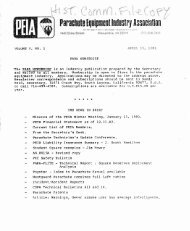
1<br />
3<br />
The Y <strong>Strap</strong> system includes the following<br />
components:<br />
1. Upper Y <strong>Strap</strong><br />
2. Bungee cords – 31” & 38”<br />
3. Lower Y strap assembly with elastic<br />
keepers.<br />
2<br />
Tools:<br />
Seam ripper<br />
Rifle Cleaning rod or similar rigging tool<br />
Snips<br />
Scissors<br />
Binding machine 301<br />
Bartacker or Zigzag 304-308<br />
Hot knife<br />
Basting Tip<br />
Clamps<br />
INSTRUCT.STUDENT HARNESS-RETRACTABLE Y STRAP INSTALLATION Rev 2.doc
INSTRUCT–020 REV 2 Page 3 of 11 5/6/2013<br />
Information:<br />
The Tandem Student Harness has 2 variations in back pad construction method. The specific area of<br />
this difference is on the harness back pad cover. Each one is compatible with the Y strap. The two<br />
versions are described below. The first part of this document will focus on modifying the first version.<br />
The second version requires no additional work.<br />
BACK PAD COVER<br />
BACK PAD<br />
Version 1:<br />
The back pad cover has the bottom<br />
edge captured in the binding tape at<br />
the bottom of the back pad.<br />
Version 2:<br />
The back pad cover has the bottom<br />
edge taped. It is then aligned with the<br />
bottom taped edge of the back pad<br />
with 2 bar tacks installed. This back<br />
pad was designed for easy installation<br />
of the Y strap.<br />
Before you begin:<br />
Unthread the diagonal back straps from the lower junctions and remove the elastic keepers. This<br />
applies to both versions.<br />
INSTRUCT.STUDENT HARNESS-RETRACTABLE Y STRAP INSTALLATION Rev 2.doc
INSTRUCT–020 REV 2 Page 4 of 11 5/6/2013<br />
For Back pad Version 1 only:<br />
Step 1<br />
Using scissors or hot knife, carefully<br />
separate the back pad cover below warning<br />
label at the binding tape edge.<br />
Step 2<br />
Tape the raw edge of the back pad cover,<br />
leaving approx ¾” tails.<br />
Binding tape tails<br />
Fold back the tape ends and tack down<br />
using a basting tip or hot glue as shown.<br />
Step 3<br />
Install 2 bar tacks at the corners of the<br />
back pad cover.<br />
The back pad is now ready for Y strap<br />
installation<br />
INSTRUCT.STUDENT HARNESS-RETRACTABLE Y STRAP INSTALLATION Rev 2.doc
INSTRUCT–020 REV 2 Page 5 of 11 5/6/2013<br />
Install the Y strap<br />
Step 1<br />
Thread one of the diagonal straps back<br />
through the back pad cover, exiting out of<br />
the other side.<br />
Pull the strap all the way out as shown.<br />
Step 2<br />
Identify the adjuster strap which is part of<br />
the Y strap assembly. Make sure both the<br />
bungee loops are facing down wards.<br />
Thread the loop end inside the opening at<br />
the bottom of the back pad cover.<br />
INSTRUCT.STUDENT HARNESS-RETRACTABLE Y STRAP INSTALLATION Rev 2.doc
INSTRUCT–020 REV 2 Page 6 of 11 5/6/2013<br />
Step 3<br />
Exit the loop at the same location as both<br />
the diagonal back straps. Thread each<br />
diagonal strap through the loop from<br />
different sides making sure there are no<br />
twists.<br />
Carefully return the diagonal through the<br />
back pad cover to its original location,<br />
feeding the loop of the Y <strong>Strap</strong> adjuster<br />
with it.<br />
Cover<br />
NOTE: It is important that the<br />
configuration of the webbing under the<br />
back pad cover is correct.<br />
*Picture shows a lifted back pad cover for<br />
instructional purposes only.<br />
Back pad<br />
INSTRUCT.STUDENT HARNESS-RETRACTABLE Y STRAP INSTALLATION Rev 2.doc
INSTRUCT–020 REV 2 Page 7 of 11 5/6/2013<br />
Step 4<br />
Identify the bungee cords; 2 pieces of<br />
1/8” black braided shock cords that are<br />
included with the kit.<br />
1 x 31”<br />
1 x 38”<br />
Tie one end of each together with an<br />
overhand knot as shown. The knot MUST<br />
be cinched down tight<br />
Step 5<br />
Locate a rifle cleaning rod of similar<br />
rigging tool. Pass the rod up through the<br />
back pad starting the opening where the<br />
adjuster strap is located.<br />
Exit the rod from under the cover at one<br />
of the shoulder pad area’s as shown. Exit<br />
on the outboard side first.<br />
Inboard<br />
side<br />
NOTE: The short bungee (31”) will<br />
installed inboard side and long bungee<br />
(38”) will be installed outboard side.<br />
Outboard<br />
side<br />
INSTRUCT.STUDENT HARNESS-RETRACTABLE Y STRAP INSTALLATION Rev 2.doc
INSTRUCT–020 REV 2 Page 8 of 11 5/6/2013<br />
Step 5 (Cont)<br />
Attach the 38” bungee to the rod and<br />
pull down through the back pad as shown<br />
exiting on the outboard side of yoke.<br />
The knot should remain in the same side<br />
and bottom out against the cover as<br />
indicated.<br />
Pass the rod back through the back<br />
cover, exiting on the inboard side. Attach<br />
the 31” bungee and repeat.<br />
Make sure that the Bungees are<br />
UNDERNEATH the diagonal webbing.<br />
Step 6<br />
With both bungees installed under the<br />
cover, they are now attached to the Y<br />
strap adjuster assembly. Thread the 38”<br />
bungee through the Type-8 Loop closest<br />
to the adjuster as indicated and the 31”<br />
through the Type-4 loop.<br />
Type-4<br />
Loop<br />
¾”<br />
Type-8<br />
Loop<br />
INSTRUCT.STUDENT HARNESS-RETRACTABLE Y STRAP INSTALLATION Rev 2.doc
INSTRUCT–020 REV 2 Page 9 of 11 5/6/2013<br />
Step 7<br />
Using the cleaning rod, the other ends of<br />
the bungees are now installed into the<br />
back pad cover, exiting on the other<br />
shoulder pad.<br />
Secure the first bungee you install with a<br />
clamp or something similar so stop it from<br />
retracting back inside.<br />
As before, make sure the short bungee<br />
(31”) will exit on the inboard side and<br />
long bungee (38”) will be exit on the<br />
outboard side.<br />
Step 8<br />
Before the bungees are tied together,<br />
make sure the adjuster is located<br />
correctly so the hardware sits/rests just<br />
below the bottom edge of the back pad.<br />
The ends of the bungees are now tied<br />
together using an overhand knot. You may<br />
have to do this step multiple times to get<br />
the adjustment of the adjuster correct.<br />
The knot MUST be cinched down tight<br />
Once the adjustment is set, trim any<br />
excess bungee cord leaving 1 ½” to 2”<br />
as shown.<br />
INSTRUCT.STUDENT HARNESS-RETRACTABLE Y STRAP INSTALLATION Rev 2.doc
INSTRUCT–020 REV 2 Page 10 of 11 5/6/2013<br />
Step 8 (Cont)<br />
31” Bungee<br />
passes through<br />
Typ4-4 loop<br />
Cover<br />
Back pad<br />
38” Bungee<br />
passes<br />
through ¾”<br />
Type-8 loop<br />
NOTE: The configuration of the Bungees<br />
and the Type-8 shows how it “S-folds”<br />
behind the diagonal straps.<br />
*Picture shows a lifted back pad for<br />
instructional purposes only.<br />
Step 9<br />
Reconnect the diagonal back straps to<br />
the lower harness. Do not forget the<br />
elastic keepers removed earlier.<br />
Step 10<br />
The lower part of the Y strap is now<br />
installed. Thread the running end through<br />
the adapter and back through the 2<br />
elastic keepers as shown.<br />
INSTRUCT.STUDENT HARNESS-RETRACTABLE Y STRAP INSTALLATION Rev 2.doc
INSTRUCT–020 REV 2 Page 11 of 11 5/6/2013<br />
Step 10 (Cont)<br />
Disconnect the leg straps of the harness<br />
and thread the entire leg pad though the<br />
loop of the Y strap. Repeat this on the<br />
other side.<br />
Confirm that the Y strap functions by<br />
extending and releasing. If there is any<br />
issue, double check that the bungees or<br />
straps are not entangled or crossed<br />
incorrectly.<br />
The leg straps should be reconnected,<br />
completing installation of the Y strap.<br />
The horizontal back strap must pass over<br />
the Y strap<br />
INSTRUCT.STUDENT HARNESS-RETRACTABLE Y STRAP INSTALLATION Rev 2.doc