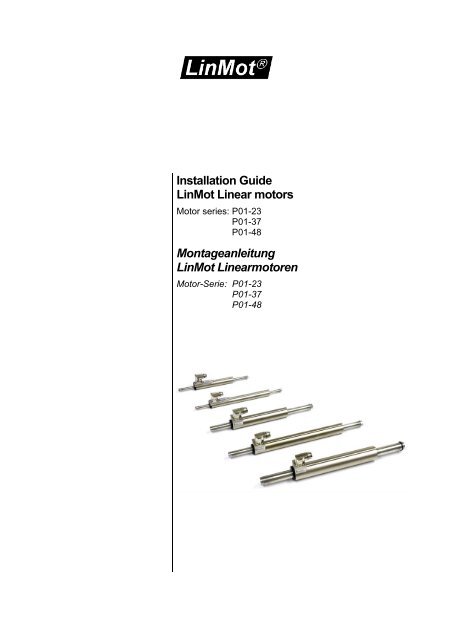
Installation Guide LinMot Linear motors Montageanleitung LinMot ...
Installation Guide LinMot Linear motors Montageanleitung LinMot ...
Installation Guide LinMot Linear motors Montageanleitung LinMot ...

Create successful ePaper yourself
Turn your PDF publications into a flip-book with our unique Google optimized e-Paper software.
<strong>Installation</strong> <strong>Guide</strong><br />
<strong>LinMot</strong> <strong>Linear</strong> <strong>motors</strong><br />
Motor series: P01-23<br />
P01-37<br />
P01-48<br />
<strong>Montageanleitung</strong><br />
<strong>LinMot</strong> <strong>Linear</strong>motoren<br />
Motor-Serie: P01-23<br />
P01-37<br />
P01-48
Version 3.0 / Mi 20140130<br />
Dok.-Nr. 0185-0001-E-D
<strong>Installation</strong> guide<br />
Content<br />
1 General information ......................................... 2<br />
1.1 Introduction ............................................. 2<br />
1.2 Explanation of symbols ........................... 2<br />
1.3 Liability .................................................... 3<br />
1.4 Copyright ................................................. 3<br />
2 Safety instructions ........................................... 4<br />
3 <strong>Installation</strong> instructions .................................... 7<br />
3.1 Operating conditions ............................... 7<br />
3.2 Instructions for installing the linear motor 7<br />
3.3 Mounting the stator ................................. 8<br />
3.4 Mounting the payload to the slider .......... 9<br />
3.5 "Moving slider" installation .................... 10<br />
3.6 "Moving stator" installation .................... 11<br />
3.7 Minimum distance from slider ............... 14<br />
4 Electrical connection ...................................... 15<br />
4.1 Cable type stators ................................. 16<br />
4.2 Mounting clips ....................................... 17<br />
4.3 Shrink tubing ......................................... 17<br />
5 Accessories ................................................... 18<br />
5.1 Wipers ................................................... 18<br />
5.2 Mounting flanges .................................. 20<br />
5.3 Fan kits for flanges ............................... 22<br />
5.4 Slider mounting kits .............................. 23<br />
6 Maintenance and test instructions ................. 26<br />
6.1 Stator connector assignment ................ 26<br />
6.2 Stator checking ..................................... 27<br />
6.3 Maintenance of linear <strong>motors</strong> ............... 32<br />
6.4 Lubricating instructions ......................... 34<br />
7 Storage, transport, installation altitude .......... 34<br />
8 Stator dimensions .......................................... 35<br />
8.1 Stator PS01-23x80 ............................... 35<br />
8.2 Stator PS01-23x80-R ............................ 35<br />
8.3 Stator PS01-23x160 ............................. 36<br />
8.4 Stator PS01-23x160-R .......................... 36<br />
8.5 Stator PS01-37x120 ............................. 37<br />
8.6 Stator PS01-37x120-C .......................... 37<br />
8.7 Stator PS01-37x240 ............................. 38<br />
8.8 Stator PS01-37x240-C .......................... 38<br />
8.9 Stator PS01-48x240-C .......................... 39<br />
8.10 Stator PS01-48x360-C ......................... 39<br />
9 Declaration of Conformity and CE-marking ... 40<br />
Inhalt<br />
1 Allgemeines ......................................................2<br />
1.1 Einleitung .................................................2<br />
1.2 Symbolerklärung ......................................2<br />
1.3 Haftung ....................................................3<br />
1.4 Urheberschutz .........................................3<br />
2 Warnhinweise ...................................................4<br />
3 Montagehinweise .............................................7<br />
3.1 Betriebsbedingungen ...............................7<br />
3.2 <strong>Montageanleitung</strong> <strong>Linear</strong> Motor ...............7<br />
3.3 Montage des Stators ...............................8<br />
3.4 Montage der Last am Läufer ...................9<br />
3.5 Einbauart „Bewegter Läufer“ ................ 10<br />
3.6 Einbauart „Bewegter Stator“ ................. 11<br />
3.7 Minimalabstände zum Läufer ............... 14<br />
4 Motorkabel ..................................................... 15<br />
4.1 Kabel Typ Statoren ............................... 16<br />
4.2 Montageclips......................................... 17<br />
4.3 Schrumpfschlauch ................................ 17<br />
5 Zubehör ......................................................... 18<br />
5.1 Abstreifer .............................................. 18<br />
5.2 Montage-Flansche ................................ 20<br />
5.3 Ventilator Kits für Flansche ................... 22<br />
5.4 Montage-Kits Läufer ............................. 23<br />
6 Wartungs- und Prüfhinweise ......................... 26<br />
6.1 Steckerbelegung der Statoren .............. 26<br />
6.2 Funktionsprüfung Statoren ................... 27<br />
6.3 Wartung <strong>Linear</strong> Motoren ....................... 32<br />
6.4 Schmiervorschrift .................................. 34<br />
7 Lagerung, Transport, Aufstellhöhe ................ 34<br />
8 Stator Abmessungen ..................................... 35<br />
8.1 Stator PS01-23x80 ............................... 35<br />
8.2 Stator PS01-23x80-R ........................... 35<br />
8.3 Stator PS01-23x160 ............................. 36<br />
8.4 Stator PS01-23x160-R ......................... 36<br />
8.5 Stator PS01-37x120 ............................. 37<br />
8.6 Stator PS01-37x120-C ......................... 37<br />
8.7 Stator PS01-37x240 ............................. 38<br />
8.8 Stator PS01-37x240-C ......................... 38<br />
8.9 Stator PS01-48x240-C ......................... 39<br />
8.10 Stator PS01-48x360-C ......................... 39<br />
9 CE-Konformitätserklärung ............................. 40<br />
NTI AG / <strong>LinMot</strong> ® www.<strong>LinMot</strong>.com 1 / 41
<strong>Montageanleitung</strong><br />
1 General information<br />
1 Allgemeines<br />
1.1 Introduction<br />
1.1 Einleitung<br />
This manual includes instructions for the assembly, installation, maintenance, transport, and<br />
storage of linear <strong>motors</strong>.<br />
Two language versions are included in this manual. The English version is characterized by<br />
regular font. The German version has a grey background and the font is italic.<br />
The document is intended for electricians, mechanics, service technicians, and warehouse<br />
staff.<br />
Be sure to observe the general safety instructions as well as those in each chapter at all times.<br />
Keep this manual accessible to the assigned staff.<br />
Dieses Handbuch beschreibt den Zusammenbau, die Montage, die Wartung sowie den<br />
Transport und Lagerung von <strong>Linear</strong>motoren.<br />
Es sind zwei Sprachversionen (englisch, deutsch) in dem Handbuch eingeschlossen. Englisch<br />
ist durch eine reguläre Schrift gekennzeichnet. Die deutsche Übersetzung ist anhand der<br />
grauen Umrahmung und der kursiven Schriftart erkennbar.<br />
Das Dokument wendet sich an Elektriker, Monteure, Servicetechniker und Lagerpersonal.<br />
Halten Sie die allg. Sicherheitshinweise sowie jene im betreffenden Abschnitt jederzeit ein.<br />
Bewahren Sie diese Betriebsanleitung zugänglich auf, und stellen Sie sie dem beauftragten<br />
Personal zur Verfügung.<br />
1.2 Explanation of symbols<br />
1.2 Symbolerklärung<br />
Triangular warning symbols warn against a danger.<br />
Dreieckige Warnzeichen warnen vor einer Gefahr.<br />
Round command symbols tell what to do.<br />
Mit dem runden Gebotszeichen werden bestimmte Verhaltensweisen vorgeschrieben.<br />
2 / 41 www.<strong>LinMot</strong>.com NTI AG / <strong>LinMot</strong> ®
<strong>Installation</strong> guide<br />
1.3 Liability<br />
1.3 Haftung<br />
NTI AG (as the manufacturer of <strong>LinMot</strong> and MagSpring products) is not responsible for any<br />
damage caused by improper use, application, or handling of materials manufactured or<br />
supplied by NTI AG and is not responsible for any consequential damages of any sort relating<br />
to the use of <strong>LinMot</strong> or MagSpring products.<br />
NTI AG’s warranty is limited to repair or replacement as stated in our standard warranty policy<br />
as described in our "terms and conditions" previously supplied to the purchaser of our<br />
equipment (please request copy of same if not otherwise available). Product warranties are<br />
void if products are used with stators, sliders, or controllers not manufactured by NTI AG<br />
unless such use was specifically approved by NTI AG.<br />
Further reference is made to our general terms and conditions.<br />
NTI AG (als Hersteller von <strong>LinMot</strong> <strong>Linear</strong>motoren) lehnt jede Haftung für Schäden ab, die<br />
durch die unsachgemässe Handhabung der <strong>Linear</strong>motoren entstehen. Ebenso entfällt jeglicher<br />
Garantieanspruch beim Einsatz bzw. in Kombination mit Fremdprodukten wie Statoren, Läufer<br />
und Controllern. Mit dem Kauf bestätigen Sie, dass Sie die in der <strong>Montageanleitung</strong><br />
aufgeführten Warnungen gelesen und verstanden haben. Zu jeder Lieferung wird ein Hinweis-<br />
Blatt mit demselben Inhalt geliefert. Bitte fügen Sie dieses Hinweisblatt auch bei, falls Sie<br />
<strong>LinMot</strong> Motoren als Komponenten oder in Maschinen weiterverkaufen.<br />
Im Übrigen verweisen wir auf unsere "Allgemeinen Geschäftsbedingungen" in der jeweils<br />
gültigen Ausgabe.<br />
1.4 Copyright<br />
1.4 Urheberschutz<br />
This work is protected by copyright.<br />
Under the copyright laws, this publication may not be reproduced or transmitted in any form,<br />
electronic or mechanical, including photocopying, recording, microfilm, storing in an information<br />
retrieval system, not even for training purposes, or translating, in whole or in part, without the<br />
prior written consent of NTI AG.<br />
<strong>LinMot</strong>® is a registered trademark of NTI AG.<br />
Dieses Werk ist urheberrechtlich geschützt.<br />
Alle Rechte, auch die der Übersetzung, des Nachdrucks und der Vervielfältigung des<br />
Handbuches oder Teilen daraus, sind vorbehalten. Kein Teil des Werks darf ohne schriftliche<br />
Genehmigung von NTI AG in irgendeiner Form (Fotokopie, Mikrofilm oder einem anderen<br />
Verfahren), auch nicht für Zwecke der Unterrichtgestaltung, reproduziert oder unter<br />
Verwendung elektronischer Systeme verarbeitet, vervielfältigt oder verbreitet werden.<br />
<strong>LinMot</strong>® ist ein registriertes Markenzeichen von NTI AG.<br />
NTI AG / <strong>LinMot</strong> ® www.<strong>LinMot</strong>.com 3 / 41
<strong>Montageanleitung</strong><br />
2 Safety instructions<br />
2 Warnhinweise<br />
Contusions<br />
Sliders contain neodynium magnets and have a strong attractive force.<br />
Careless handling could cause fingers or skin to become pinched between sliders. This may<br />
lead to contusions, bruises, and bone fractures.<br />
Wear heavy protective gloves when handling sliders.<br />
Quetschungen<br />
Läufer bestehen aus Neodym Magneten und haben eine starke Anziehungskraft.<br />
Bei unvorsichtiger Handhabung können Sie sich die Finger oder Haut zwischen zwei Läufern<br />
einklemmen. Das kann zu Quetschungen, Blutergüssen bis zu Knochenbrüchen an den<br />
betroffenen Stellen führen.<br />
Tragen Sie bei der Handhabung von Läufern dicke Schutzhandschuhe.<br />
Pacemaker<br />
Sliders could affect the functioning of pacemakers and implanted heart defibrillators.<br />
A pacemaker could switch into test mode and cause distress.<br />
A heart defibrillator may stop working.<br />
If you wear these devices keep sufficient distance (> 1 m) away from sliders.<br />
Warn others who wear these devices to avoid getting too close to sliders.<br />
Herzschrittmacher<br />
Läufer können die Funktion von Herzschrittmachern und implantierten Defibrillatoren<br />
beeinflussen.<br />
Ein Herzschrittmacher kann in den Testmodus geschaltet werden und Unwohlsein<br />
verursachen.<br />
Ein Defibrillator funktioniert unter Umständen nicht mehr.<br />
<br />
Halten Sie als Träger solcher Geräte einen genügenden Abstand (> 1 m) zum Läufer ein.<br />
Warnen Sie Träger solcher Geräte vor der Annäherung an den Läufer.<br />
Magnetic field<br />
Magnets integrated in the sliders produce a strong magnetic field. They could damage TVs and<br />
laptops, computer hard drives, credit and ATM cards, data storage media, mechanical<br />
watches, hearing aids, and speakers.<br />
Keep magnets away from devices and objects that could be damaged by strong magnetic<br />
fields.<br />
Please keep a minimum distance of 1 m from the above mentioned objects.<br />
Magnetisches Feld<br />
Die in den Läufern verbauten Magnete erzeugen ein weit starkes Magnetfeld. Sie können unter<br />
anderem Fernseher und Laptops, Computer-Festplatten, Kreditkarten und EC-Karten,<br />
Datenträger, mechanische Uhren, Hörgeräte und Lautsprecher beschädigen.<br />
Halten Sie Magnete von allen Geräten und Gegenständen fern, die durch starke<br />
Magnetfelder beschädigt werden können.<br />
Halten Sie für die oben aufgeführten Objekte einen Sicherheitsabstand von min. 1 m ein.<br />
4 / 41 www.<strong>LinMot</strong>.com NTI AG / <strong>LinMot</strong> ®
<strong>Installation</strong> guide<br />
Combustibility<br />
When machining magnets, the drilling dust could easily ignite.<br />
Machining the sliders and the magnets they contain is not permitted.<br />
Entflammbarkeit<br />
Beim mechanischen Bearbeiten von Neodym-Magneten kann sich der Bohrstaub leicht<br />
entzünden.<br />
Das Bearbeiten von Läufern und den darin enthaltenen Magneten ist nicht gestattet.<br />
Burn hazard<br />
The sliders of <strong>LinMot</strong> <strong>motors</strong> can reach temperatures of 80 °C, which may cause burns upon<br />
contact.<br />
Verbrennungsgefahr<br />
Im Betrieb kann sich der Läufer bis auf 80 °C erwärmen, was bei Berührung zu Verbrennungen<br />
führen kann.<br />
Fast-moving machine parts<br />
The sliders of <strong>LinMot</strong> linear <strong>motors</strong> are fast-moving machine parts. The user must take all<br />
necessary precautions to prevent access during operation (provide covers, guards, etc.)<br />
Bewegte Maschinenelemente<br />
Linmot <strong>Linear</strong>motoren sind hochdynamische Maschinenelemente. Der Kunde muss alle<br />
notwendigen Vorkehrungen treffen, um Berührungen im Betrieb durch Abdeckungen,<br />
Verschalungen, etc. auszuschliessen.<br />
Mechanical handling<br />
Neodymium magnets are brittle, heat-sensitive, and easily oxidized.<br />
Colliding magnets could crack. Sharp splinters could be catapulted for several meters and<br />
cause eye injury.<br />
When drilling or sawing a magnet with improper tools, the magnet may break.<br />
The heat that arises may demagnetise the magnet.<br />
The magnet will oxidise and disintegrate due to the damaged coating.<br />
Machining the sliders and the magnets they contain is not permitted.<br />
Mechanische Bearbeitung<br />
Neodym-Magnete sind spröde, hitzeempfindlich und oxidieren leicht.<br />
Wenn zwei Magnete kollidieren können sie zersplittern. Scharfkantige Splitter können<br />
meterweit geschleudert werden und Ihre Augen verletzen.<br />
Beim Bohren oder Sägen eines Magneten mit ungeeignetem Werkzeug kann der Magnet<br />
zerbrechen.<br />
Durch die entstehende Wärme kann der Magnet entmagnetisiert werden.<br />
Wegen der beschädigten Beschichtung wird der Magnet oxidieren und zerfallen.<br />
Das mechanische Bearbeiten von Läufern und den darin enthaltenen Magneten ist nicht<br />
gestattet.<br />
NTI AG / <strong>LinMot</strong> ® www.<strong>LinMot</strong>.com 5 / 41
<strong>Montageanleitung</strong><br />
Slider<br />
<strong>Linear</strong> Motor sliders must be handled with care, especially when not mounted inside the stator.<br />
Damaging or warping the slider can result in shortened life and/or failure of the motor. The<br />
slider is essentially a high-precision machine component consisting of neodymium magnets<br />
and plastic materials assembled in a thin steel tube. Do not use sliders which are already<br />
damaged on the surface (scratches, deformation, etc.). This can cause further damage to the<br />
stator.<br />
Läufer<br />
Läufer bestehen aus einem hochpräzisen, dünnwandigen Edelstahlrohr in dem die<br />
Antriebsmagnete untergebracht sind. Die <strong>LinMot</strong> Läufer sind mit Vorsicht zu behandeln.<br />
Vermeiden Sie den Kontakt zu anderen Läufern oder Eisenteilen, da dadurch die Magnete und<br />
die Läuferoberfläche beschädigt werden kann. Läufer mit bereits beschädigter Oberfläche<br />
(Kratzer, Verformungen, etc.) sollten nicht weiterverwendet werden (kann zu Beschädigung<br />
des Stators führen).<br />
Effects on people<br />
According to the current level of knowledge, magnetic fields of permanent magnets do not<br />
have a measurable positive or negative effect on people. It is unlikely that permanent magnets<br />
constitute a health risk, but it cannot be ruled out entirely.<br />
For your own safety, avoid constant contact with magnets.<br />
Store large magnets at least one meter away from your body.<br />
Wirkung auf Menschen<br />
Magnetfelder von Dauermagneten haben nach gegenwärtigem Wissensstand keine messbare<br />
positive oder negative Auswirkung auf den Menschen. Eine gesundheitliche Gefährdung durch<br />
das Magnetfeld eines Dauermagneten ist unwahrscheinlich, kann aber nicht vollkommen<br />
ausgeschlossen werden.<br />
Vermeiden Sie zu Ihrer Sicherheit einen dauernden Kontakt mit den Magneten.<br />
Bewahren Sie grosse Magnete mindestens einen Meter von Ihrem Körper entfernt auf.<br />
Temperature resistance<br />
Keep slider away from unshielded flame or heat.<br />
Temperature of greater than 120°C will cause demagnetization.<br />
Temperaturbeständigkeit<br />
Halten Sie die Läufer vor offener Flamme und Hitze fern.<br />
Bei Temperaturen ab 120°C wird der Läufer entmagnetisiert.<br />
6 / 41 www.<strong>LinMot</strong>.com NTI AG / <strong>LinMot</strong> ®
<strong>Installation</strong> guide<br />
3 <strong>Installation</strong> instructions<br />
3 Montagehinweise<br />
3.1 Operating conditions<br />
3.1 Betriebsbedingungen<br />
Maximum ambient temperature limits are for :<br />
Standard <strong>motors</strong> : -10 °C…80 °C<br />
HP <strong>motors</strong> : -10 °C…110 °C<br />
Internal temperature sensor error occurs at :<br />
Standard <strong>motors</strong> : > 90 °C<br />
HP <strong>motors</strong> : > 120 °C<br />
Die Grenze der Umgebungstemperatur liegt bei :<br />
Standard Motoren: -10 °C…80 °C<br />
HP Motoren: -10 °C…110 °C<br />
Die maximale Sensortemperatur liegt bei :<br />
Standard Motoren: > 90 °C<br />
HP Motoren: > 120 °C<br />
3.2 Instructions for installing the linear motor<br />
3.2 <strong>Montageanleitung</strong> <strong>Linear</strong> Motor<br />
Please attend to the safety instructions on pages 4 - 6 during the assembling!<br />
Beachten Sie unbedingt die Sicherheitshinweise auf S. 4 - 6 während der Montage!<br />
1. Clean the slider with a paper towel.<br />
1. Reinigen des Läufers mit einem Papiertuch.<br />
2. Lubricate the slider in accordance with the<br />
‘lubrication order’ (see ‘maintenance’ section)<br />
2. Schmieren des Läufers (siehe Kapitel Wartung der<br />
Motoren).<br />
3. Insert the slider in the defined direction (see<br />
Assembly step 4.).<br />
3. Einführen des Läufers in den Stator nach definierter<br />
Einbaurichtung (siehe Montageschritt 4.).<br />
NTI AG / <strong>LinMot</strong> ® www.<strong>LinMot</strong>.com 7 / 41
<strong>Montageanleitung</strong><br />
Slider Frontend with ring<br />
/ notch<br />
Vorderes Läuferende mit<br />
Sicherungsring bzw. Nut<br />
4. Checking the installed direction of slider:<br />
After the installation, the front end of the slider is<br />
located at the opposite side of the stator from the<br />
cable connector or cable exit.<br />
4. Prüfung der Einbaurichtung des Läufers:<br />
Nach dem Einbau befindet sich das vordere<br />
Läuferende auf der gegenüberliegenden Seite vom<br />
Steckergehäuse bzw. vom Kabelgang.<br />
3.3 Mounting the stator<br />
3.3 Montage des Stators<br />
The stator is mounted by clamping. The <strong>LinMot</strong> flange (see the Accessories section) or a<br />
similar flange can be used for this purpose. Most important is a broad clamping surface in<br />
order to provide good heat dissipation. Forced air cooling can also increase the continuous<br />
force of the linear motor by up to a factor of 1.8.<br />
Der Stator wird mithilfe einer Klemmung montiert. Dafür können die <strong>LinMot</strong> Flansche (siehe<br />
Kapitel Zubehör) oder eigene Flansche verwendet werden. Zur ausreichenden<br />
Wärmeableitung muss eine möglichst grossflächige Klemmung vorhanden sein. Zusätzlich<br />
kann die Kühlung durch einen Lüfter gesteigert werden, so dass die kontinuierliche Kraft bis zu<br />
80 % verbessert wird.<br />
The flange clamp must not deform the stator.<br />
Make sure the torque on the clamp plate screws does not exceed the maximum value.<br />
Der Stator darf durch die Klemmung nicht deformiert werden!<br />
Max. Anzugsmoment muss beachtet werden.<br />
Type of flange<br />
Flansch-Typ<br />
PF02-23<br />
PF02-37<br />
PF01-48<br />
Max. torque for screws<br />
Max. Anzugsmoment der Schrauben<br />
4 Nm<br />
8 Nm<br />
12 Nm<br />
Incorrect mounting -> Small contact area prevents<br />
cooling of the linear motor<br />
Falsche Montage -> Kleine Montagefläche verhindert<br />
eine gute Kühlung des <strong>Linear</strong><strong>motors</strong><br />
Correct mounting -> Better heat dissipation with the<br />
<strong>LinMot</strong> flange<br />
Richtige Montage -> <strong>LinMot</strong> Flansch für bessere<br />
Wärmeabführung<br />
Forced air cooling with <strong>LinMot</strong> fan to increase the<br />
continuous force rating<br />
Forcierte Kühlung mit <strong>LinMot</strong> Lüfterflansch zur Erhöhung<br />
der kontinuierlichen Kraft<br />
8 / 41 www.<strong>LinMot</strong>.com NTI AG / <strong>LinMot</strong> ®
<strong>Installation</strong> guide<br />
3.4 Mounting the payload to the slider<br />
3.4 Montage der Last am Läufer<br />
The load is mounted as a fixed bearing using spherical washers and conical seats (see the<br />
section on Slider accessories / mounting kits)<br />
To avoid shear force on slider and wear on stator, the payload has to be beared by a linear<br />
guide.<br />
Die Lastmasse wird mit Kugelscheiben und Kegelpfannen als Festlager fixiert, siehe Kapitel<br />
Zubehör / Montage Kits Läufer.<br />
Durch eine <strong>Linear</strong>führung muss die Last gelagert werden, damit Querkräfte am Läufer und der<br />
entstehende Verschleiss am Stator und Läufer vermieden wird.<br />
When attaching the load, the wrench for tightening the load must be used only on the loadfacing<br />
side of the slider.<br />
It is important to avoid torsional stress on slider (note figure below).<br />
Bei der Montage der Last darf der Gabelschlüssel für das Anziehen der Schraube nur auf der<br />
Last zugewandten Seite des Läufers angesetzt werden (siehe Abbildung unten).<br />
Slider<br />
Thread<br />
Max. torque for screw<br />
Läufer<br />
Gewinde<br />
Max. Anzugsmoment der Schraube<br />
12 mm M 5 6 Nm<br />
20 mm M 8 25 Nm<br />
28 mm M 10 47 Nm<br />
Incorrect attachment -> Torsional stress on slider<br />
Falsche Montage! -> Torsion auf dem Läufer<br />
NTI AG / <strong>LinMot</strong> ® www.<strong>LinMot</strong>.com 9 / 41
<strong>Montageanleitung</strong><br />
Correct attachment<br />
Richtige Montage<br />
3.5 "Moving slider" installation<br />
3.5 Einbauart „Bewegter Läufer“<br />
Stator /<br />
Stator<br />
Slider /<br />
Läufer<br />
Spherical washer and<br />
conical seat /<br />
Kugelscheibe und<br />
Kegelpfanne<br />
<strong>Linear</strong> guide /<br />
<strong>Linear</strong>führung<br />
<strong>Linear</strong> bearing /<br />
<strong>Linear</strong>lager<br />
In a "moving slider" installation, the stator is fixed and the slider is the moving part.<br />
The load, borne by a linear guide, is attached directly to the end of the slider. In order to<br />
compensate for misalignment, spherical axial bearings consisting of spherical washers and<br />
conical seats (see chapter accessories / monting kits slider) are used to connect to the load.<br />
The mounting kit of slider and an oversized hole for the screw make it possible to adjust a<br />
radial and angle offset.<br />
Bei der Einbauart “Bewegter Läufer” ist der Stator fest eingebaut und der Läufer ist das sich<br />
bewegende Teil. Die, mittels <strong>Linear</strong>führung, gelagerte Last wird direkt am Läuferende befestigt.<br />
Um Fluchtungsfehler auszugleichen, werden zur Lastanbindung sphärische Axiallager,<br />
bestehend aus Kugelscheiben und Kegelpfannen (siehe Kap. Zubehör / Montage Kits Läufer),<br />
eingesetzt. Durch eine grosse Durchgangsbohrung für die Befestigungsschraube wird der<br />
Läufer bei Radial- und / oder Winkelversatz spielfrei montiert.<br />
Mounted payload with radial and angle offset.<br />
Montierte Last mit Winkelversatz.<br />
10 / 41 www.<strong>LinMot</strong>.com NTI AG / <strong>LinMot</strong> ®
<strong>Installation</strong> guide<br />
3.6 "Moving stator" installation<br />
3.6 Einbauart „Bewegter Stator“<br />
Spherical washer and<br />
conical seat /<br />
Kugelscheibe und<br />
Kegelpfanne<br />
Stator /<br />
Stator<br />
Slider /<br />
Läufer<br />
Floating<br />
bearing /<br />
Loslager<br />
<strong>Linear</strong> bearing /<br />
<strong>Linear</strong>lager<br />
<strong>Linear</strong> guide /<br />
<strong>Linear</strong>führung<br />
In "moving stator" applications, the slider is fixed and the stator is the moving part.<br />
The load is attached to the stator, which is mounted on a linear guide. In order to avoid an<br />
overconstrained bearing mount and compensate for alignment errors, the slider may be<br />
mounted on one end in a fixed bearing with a spherical axial bearing. On the opposite end, the<br />
slider is mounted in a floating bearing. Mounting kits are available for mounting the slider (see<br />
the chapter on Slider accessories / mounting kits).<br />
Bei der Einbauart “Bewegter Stator” ist der Läufer fest eingebaut und der Stator ist das sich<br />
bewegende Teil. Die Last wird direkt am Stator befestigt, welcher über ein <strong>Linear</strong>lager geführt<br />
wird. Um eine überbestimmte Lagerung und Fluchtungsfehler auszugleichen, wird der Läufer<br />
auf einer Seite in einem Festlager mittels sphärischem Axiallager befestigt. Auf der<br />
gegenüberliegenden Seite wird der Läufer in einem Loslager befestigt. Für die Befestigung<br />
bietet <strong>LinMot</strong> die entsprechenden Montagesätze an (siehe Kapitel Zubehör / Montage Kits<br />
Läufer).<br />
NTI AG / <strong>LinMot</strong> ® www.<strong>LinMot</strong>.com 11 / 41
<strong>Montageanleitung</strong><br />
3.6.1 Assembling instruction<br />
3.6.1 <strong>Montageanleitung</strong><br />
Please attend to the safety instructions on pages 4 - 6 during the assembling!<br />
Beachten Sie unbedingt die Sicherheitshinweise auf S. 4 - 6 während der Montage!<br />
High flex trailing chain cable, with cable track, must be used in moving stator<br />
applications.<br />
Bei bewegtem Stator muss das High-Flex Kabel für Schleppkettanwendungen eingesetzt<br />
werden.<br />
1. Mount stator to its support bearing<br />
1. Montage des Stators auf dem Führungswagen<br />
2. Insert slider into stator<br />
2. Einschieben des Läufers in den Stator<br />
3. Put a spacer (wood, plasic, aluminium with thickness<br />
15 mm) between slider and linear guide.<br />
The spacer prevents injuries to the hands and<br />
damage to the slider surface!<br />
3. Platzieren eines Abstandshalters (Holz, Kunststoff,<br />
Aluminium mit Mindestdicke von 15 mm) zwischen<br />
Läufer und <strong>Linear</strong>führung. Der Abstandshalter<br />
vermeidet Verletzungen an der Hand und an der<br />
Läuferoberfläche!<br />
12 / 41 www.<strong>LinMot</strong>.com NTI AG / <strong>LinMot</strong> ®
<strong>Installation</strong> guide<br />
4. Mount fixed end of slider to its support using ball &<br />
socket washers – do not tighten the screw.<br />
Important:<br />
Install the Stator with the back end (cable or connector<br />
end) towards the ‘fixed’ end of the slider in order to<br />
make alignment easier. The stator bore diameter is<br />
bigger at this end.<br />
4. Montage des Läufers mittels Festlager<br />
Schraube noch nicht festziehen!<br />
Wichtig:<br />
Um die Ausrichtung zu vereinfachen sollte das<br />
Festlager auf der Seite vom hinteren Statorende<br />
(Seite mit Kabelgang bzw. Stecker) montiert werden.<br />
Dort weist die Statorbohrung einen grösseren<br />
Durchmesser auf.<br />
5. Place the floating bearing on the slider and attach to<br />
its support – do not tighten the screws.<br />
Note:<br />
The slider is allowed to extend into the floating<br />
bearing no more than 15 mm.<br />
5. Montage des Loslagers<br />
Schrauben noch nicht festziehen!<br />
Wichtig: Der Läufer darf max. 15 mm ins Loslager<br />
hineinragen.<br />
6. Move stator (back end) to the fixed end of slider,<br />
center slider in stator and tighten the screw.<br />
6. Verschieben des Stators zum Festlager und<br />
Festziehen der Befestigungsschraube.<br />
7. Move stator (front side) to the floating bearing and<br />
tighten screws<br />
7. Verschieben des Stators zum Loslager und<br />
Festziehen der Befestigungsschrauben.<br />
After the installation of the slider a safety label must be placed close to the slider.<br />
Nach dem Einbau des Läufers muss der Warnkleber “Achtung Mangnete” in der Nähe des<br />
Läufers auf der Maschine angebracht werden.<br />
NTI AG / <strong>LinMot</strong> ® www.<strong>LinMot</strong>.com 13 / 41
<strong>Montageanleitung</strong><br />
3.7 Minimum distance from slider<br />
3.7 Minimalabstände zum Läufer<br />
When installing linear <strong>motors</strong> in modules with metal parts near the slider, undesired forces can<br />
arise due to magnetic attraction or eddy currents. These generally manifest as erratic and jerky<br />
positioning, or reduced dynamics of the linear motor.<br />
In order to avoid this, minimum distances between the slider and any metal parts are to be<br />
observed whenever metal materials are used nearby.<br />
Beim Einbau von <strong>Linear</strong>motoren in Module mit metallischen Teilen in unmittelbarer Nähe des<br />
Läufers können aufgrund der magnetischen Anziehung oder aufgrund von Wirbelströmen<br />
unerwünschte Kräfte auftreten. Diese äussern sich meist in einer holprigen und ruckartigen<br />
Positionierung oder einer reduzierten Dynamik des <strong>Linear</strong><strong>motors</strong>.<br />
Um dies zu verhindern, sind bei der Konstruktion mit metallischen Materialien in unmittelbarer<br />
Nähe zum Läufer Minimalabstände zu berücksichtigen.<br />
<strong>Linear</strong><br />
motor<br />
Minimum distance from slider surface to<br />
ferromagnetic parts (iron, steel, etc.)<br />
Minimalabstand von Läuferoberfläche zu<br />
ferromagnetischen Teilen<br />
(Eisen, Stahl, etc.)<br />
Minimum distance from slider surface to nonferromagnetic<br />
parts (aluminum, bronze,<br />
stainless steel, etc.):<br />
Minimalabstand von Läuferoberfläche zu<br />
nicht ferromagnetischen metallischen Teilen<br />
(Aluminium, Bronze, Edelstahl, etc.)<br />
P01-23x… 10 mm 5 mm<br />
P01-37x… 15 mm 7 mm<br />
P01-48x… 20 mm 10 mm<br />
14 / 41 www.<strong>LinMot</strong>.com NTI AG / <strong>LinMot</strong> ®
<strong>Installation</strong> guide<br />
4 Electrical connection<br />
4 Motorkabel<br />
Do not connect or disconnect motor when there is power on the servo drive.<br />
Use only double-shielded original <strong>LinMot</strong> cable. Cables from other sources must be checked<br />
precisely before commissioning.<br />
Incorrect connections can destroy the drive and stator.<br />
Motorstecker nur ein- oder ausstecken wenn keine Spannung am Servo Drive anliegt!<br />
Für die Motorverkabelung darf nur das doppelt geschirmte Originalkabel von <strong>LinMot</strong> verwendet<br />
werden! Selbst konfektionierte Kabel müssen vor der Inbetriebnahme genau geprüft werden!<br />
Eine falsche Motorverkabelung kann den Motor und / oder den Servo Drive beschädigen!<br />
Three types of cables are available for linear <strong>motors</strong>. The cable attached to the stator is not a<br />
high flex cable. For moving cable applications please use the special <strong>LinMot</strong> KS high flex<br />
(suitable for cable tracks) or KR robot cable.<br />
Für die <strong>Linear</strong>motoren sind 3 Kabelarten verfügbar. Das Standard-Motorkabel ist für die<br />
stationäre Verlegung bestimmt. Das High-Flex Kabel (Schleppkettentauglich) sowie das<br />
Roboterkabel kommen bei bewegten Kabelanwendungen zum Einsatz.<br />
Type of cable /<br />
Kabeltyp<br />
Minimum bending radius for<br />
fixed installation /<br />
Min. Biegeradius statisch<br />
Minimum bending radius when<br />
moving /<br />
Minimaler Biegeradius bewegt<br />
Standard cable /<br />
Standard Kabel<br />
K05- K15-<br />
04/05 04/05<br />
25 mm<br />
(1 in)<br />
50 mm<br />
(2 in)<br />
Do not use in<br />
applications with<br />
moving cable /<br />
Nicht geeignet für<br />
Anwendungen mit<br />
bewegtem<br />
Motorkabel<br />
High-flex cable /<br />
High-Flex Kabel<br />
KS05- KS10-<br />
04/05 04/05<br />
30 mm<br />
(1.2 in)<br />
60mm<br />
(2.4in)<br />
No<br />
torsion<br />
50 mm<br />
(2 in)<br />
100mm<br />
(4in)<br />
No<br />
torsion<br />
Robot cable/<br />
Roboter Kabel<br />
KR05- KR10-<br />
04/05 04/05<br />
30 mm<br />
(1.2 in)<br />
60mm<br />
(2.4in)<br />
Max.<br />
Torsion:<br />
±270°<br />
per 0.5m<br />
50 mm<br />
(2 in)<br />
100mm<br />
(4in)<br />
Max.<br />
Torsion:<br />
±270°<br />
per 0.5m<br />
NTI AG / <strong>LinMot</strong> ® www.<strong>LinMot</strong>.com 15 / 41
<strong>Montageanleitung</strong><br />
4.1 Cable type stators<br />
4.1 Kabel Typ Statoren<br />
Maintain the minimum bending radius of the stator cable (see figure below).<br />
In moving applications, the stator cable must not be moved.<br />
Mounting clips can be used to secure the cable in a fixed installation.<br />
Bei Kabel Typ Statoren ist darauf zu achten, dass der minimale Biegeradius des Kabels nicht<br />
unterschritten wird (siehe Abbildung unten). Wird der Stator beweglich eingesetzt, so darf sich<br />
das Kabel nicht bewegen. Zur festen, stationären Fixierung können Montage Clips verwendet<br />
werden.<br />
WRONG !<br />
Violates minimum bending radius<br />
FALSCH !<br />
Minimaler Biegeradius nicht eingehalten<br />
CORRECT !<br />
In accordance with the minimum bending radius of 25<br />
mm<br />
RICHTIG !<br />
Minimaler Biegeradius von 25 mm eingehalten<br />
16 / 41 www.<strong>LinMot</strong>.com NTI AG / <strong>LinMot</strong> ®
<strong>Installation</strong> guide<br />
4.2 Mounting clips<br />
4.2 Montageclips<br />
M, C, and R cable type <strong>motors</strong> are supplied with mounting clips to fix the motor cables.<br />
In moving stator applications, these clips prevent damage due to vibrations of the cable. The<br />
clips help to attach the cable connection to the flange.<br />
M, C und R-Kabel Typ Motoren werden mit Montageclips für die Befestigung der Kabelstecker<br />
ausgeliefert. Mit diesen Clips kann der Stecker auf dem Flansch befestigt werden. In<br />
Anwendungen mit bewegtem Stator verhindern die Clips Beschädigungen durch auftretende<br />
Schwingungen.<br />
Mounting clip<br />
Material: Polypropylene, grey<br />
Item no.: 0150-3076<br />
Montageclip<br />
Material: Polypropylen, grau<br />
Art-Nr.: 0150-3076<br />
<strong>LinMot</strong> ® PS01-37x120-M stator in a moving stator<br />
application with clips for M, C, R- connectors.<br />
Note:<br />
Motor cable does not move<br />
Minimal bending radius is maintained<br />
<strong>LinMot</strong> PS01-37x120-M Stator in einer Anwendung mit<br />
bewegtem Stator. Die Stecker werden mit den<br />
Montageclips am Flansch befestigt. Das am Motor<br />
befestigte Kabel wird nicht bewegt und der minimale<br />
Biegeradius wird eingehalten<br />
4.3 Shrink tubing<br />
4.3 Schrumpfschlauch<br />
The special shrink tubing is a heat activated sealant used to increase resistance to water<br />
infiltration.<br />
Der spezielle Schrumpfschlauch schützt die M, C und R-Typ Steckverbindung in<br />
Anwendungen mit sehr schwierigen Umgebungsbedingungen.<br />
Shrink tubing<br />
Material: Polyolefin<br />
Item no.: 0150-3089<br />
Schrumpfschlauch<br />
Material: Polyolefin<br />
Art-Nr.: 0150-3089<br />
NTI AG / <strong>LinMot</strong> ® www.<strong>LinMot</strong>.com 17 / 41
<strong>Montageanleitung</strong><br />
5 Accessories<br />
5 Zubehör<br />
5.1 Wipers<br />
5.1 Abstreifer<br />
Rear Wiper / Front Wiper /<br />
Hinterer Abstreifer<br />
Vorderer Abstreifer<br />
Stators can be equipped with front and rear wipers. Wipers increase the maintenance interval<br />
time and make maintenance easy because a grease gun can be used. In addition wipers keep<br />
the lubricant cleaner and control the amount of lubricant.<br />
Werden die Statoren mit Abstreifern ausgerüstet, vereinfacht sich die Wartung und die<br />
Wartungszyklen können verlängert werden. Da der Schmierstoff durch die Abstreifer im Stator<br />
bleibt, wird er in dosierten Mengen abgegeben und zugleich weniger verschmutzt. Zudem<br />
bleibt der Läufer ausserhalb des Stators frei von Schmierstoff.<br />
PA01-37: 12mm (0.47in)<br />
PA01-48: 14mm (0.55in)<br />
PA01-23: 14mm (0.55in)<br />
PA01-37: 12mm (0.47in)<br />
PA01-48: 14mm (0.55in)<br />
Attaching the wipers increases the length of the stator, increasing the required installation<br />
space by 12 to 14 mm.<br />
Pro Abstreifer vergrösserte sich, der in Längsrichtung benötigte Einbauraum für den Stator, um<br />
12mm bzw. 14mm.<br />
Mounting the wiper<br />
Montage des Abstreifers<br />
The wipers are inserted into the ends of the installed stator and secured with screws on the<br />
side. The stator is then lubricated using the lube nipple in the housing of the wiper.<br />
Die Abstreifer werden bei montiertem Stator auf die Enden aufgeschoben und mit den<br />
seitlichen Schrauben fixiert. Die anschliessende Schmierung erfolgt mittels Fettpresse über<br />
die, am Abstreifer-Gehäuse angebrachten, Schmierbuchsen.<br />
18 / 41 www.<strong>LinMot</strong>.com NTI AG / <strong>LinMot</strong> ®
<strong>Installation</strong> guide<br />
Dimensions and material of wiper<br />
Material<br />
Casing: POM<br />
Wiper: H-PU<br />
Abmessungen und Material des Abstreifers<br />
Material<br />
Gehäuse: POM<br />
Abstreifer: H-PU<br />
Casing / Wiper /<br />
Gehäuse<br />
Abstreifer<br />
Item<br />
D L A Weight<br />
Artikel<br />
Gewicht<br />
PA01-23/12-F 29mm (1.14in) 33mm (1.30in) 14mm (0.55in) 0.014kg<br />
PA01-37/19-F* 45mm (1.77in) 32mm (1.26in) 12mm (0.47in) 0.028kg<br />
PA01-37/19-R* 45mm (1.77in) 37mm (1.45in) 12mm (0.47in) 0.026kg<br />
PA01-37/19-R cable* 45mm (1.77in) 40mm (1.57in) 12mm (0.47in) 0.030kg<br />
PA01-37/20-F 45mm (1.77in) 32mm (1.26in) 12mm (0.47in) 0.028kg<br />
PA01-37/20-R 45mm (1.77in) 37mm (1.45in) 12mm (0.47in) 0.026kg<br />
PA01-37/20-R cable 45mm (1.77in) 40mm (1.57in) 12mm (0.47in) 0.030kg<br />
PA01-48/27-F* 58mm (2.28in) 32mm (1.26in) 14mm (0.55in) 0.056kg<br />
PA01-48/27-R* 58mm (2.28in) 32mm (1.26in) 14mm (0.55in) 0.050kg<br />
PA01-48/28-F 58mm (2.28in) 32mm (1.26in) 14mm (0.55in) 0.056kg<br />
PA01-48/28-R 58mm (2.28in) 32mm (1.26in) 14mm (0.55in) 0.050kg<br />
Item<br />
Description<br />
Part Number<br />
Artikel<br />
Beschreibung<br />
PA01-23/12-F Wiper for PS01-23x... Front side /<br />
Abstreifer für PS01-23x... Vorderseite<br />
PA01-37/19-F* Wiper for PS01-37x... Front side /<br />
Abstreifer für PS01-37x... Vorderseite<br />
PA01-37/19-R* Wiper for PS01-37x...-C Rear side /<br />
Abstreifer für PS01-37x...-C Rückseite<br />
PA01-37/19-R cable* Wiper for PS01-37x... Cable rear side /<br />
Abstreifer für PS01-37x... Kabel Rückseite<br />
PA01-37/20-F Wiper for PS01-37x... Front side /<br />
Abstreifer für PS01-37x... Vorderseite<br />
PA01-37/20-R Wiper for PS01-37x...-C Rear side /<br />
Abstreifer für PS01-37x...-C Rückseite<br />
PA01-37/20-R cable Wiper for PS01-37x...-Cable rear side /<br />
Abstreifer für PS01-37x...-Kabel Rückseite<br />
PA01-48/27-F* Wiper for PS01-48x... Front side /<br />
Abstreifer für PS01-48x... Vorderseite<br />
PA01-48/27-R* Wiper for PS01-48x...-C Rear side /<br />
Abstreifer für PS01-48x...-C Rückseite<br />
PA01-48/28-F Wiper for PS01-48x... Front side /<br />
Abstreifer für PS01-48x... Vorderseite<br />
PA01-48/28-R Wiper for PS01-48x...-C Rear side /<br />
Abstreifer für PS01-48x...-C Rückseite<br />
* Wipers for linear <strong>motors</strong> with high-clearance sliders<br />
Abstreifer für Statoren mit untermassigen Läufern<br />
Artikelnummer<br />
0150-3125<br />
0150-3225<br />
0150-3226<br />
0150-3227<br />
0150-3126<br />
0150-3201<br />
0150-3221<br />
0150-3228<br />
0150-3229<br />
0150-3127<br />
0150-3202<br />
NTI AG / <strong>LinMot</strong> ® www.<strong>LinMot</strong>.com 19 / 41
<strong>Montageanleitung</strong><br />
5.2 Mounting flanges<br />
5.2 Montage-Flansche<br />
PF02-23<br />
Sliding block M6 / Nutenstein M6<br />
Art. No. 0150-3245<br />
Max torque for clamp plate<br />
screws: 4Nm (2.95 lbf ft)<br />
Max. Anzugsmoment<br />
Schrauben: 4Nm (2.95 lbf ft)<br />
Article Description L [mm] A [mm] B [mm] Weight [g] [oz] Item- No<br />
PF02-23x50 Flange 23x50 mm 50 15 10 115 / 4.1 0150-2102<br />
PF02-23x90 Flange 23x90 mm 90 30 15 450 / 15.9 0160-0751<br />
PF02-23x120 Flange 23x120 mm 120 30 30 280 / 9.9 0150-2103<br />
PF02-23x170 Flange 23x170 mm 170 45 40 390 / 13.8 0150-2117<br />
PF02-37<br />
Max torque for clamp plate<br />
screws: 8Nm (5.9 lbf ft)<br />
Sliding block M6 / Nutenstein M6<br />
Art. No. 0150-3245<br />
Max. Anzugsmoment<br />
Schrauben: 8Nm (5.9 lbf ft)<br />
Article Description L [mm] A [mm] B [mm] Weight [g] [oz] Item- No<br />
PF02-37x100 Flange 37x100 mm 100 25 25 450 / 15.9 0150-1998<br />
PF02-37x140 Flange 37x140 mm 140 50 20 630 / 22.2 0150-2105<br />
PF02-37x200 Flange 37x200 mm 200 50 50 920 / 32.5 0150-1999<br />
20 / 41 www.<strong>LinMot</strong>.com NTI AG / <strong>LinMot</strong> ®
<strong>Installation</strong> guide<br />
PF01-48<br />
Sliding block M6 / Nutenstein M6<br />
Art. No. 0150-3245<br />
Max torque for clamp plate screws: 12Nm (8.85 lbf ft)<br />
Max. Anzugsmoment Schrauben: 12Nm (8.85 lbf ft)<br />
Article Description L [mm] B [mm] Weight [g] / [oz] Item- No<br />
PF01-48x120 Flange 48x120 mm 120 25 970 / 34.2 0150-1976<br />
PF01-48x226 Flange 48x226 mm 226 85 1855 / 65.4 0150-2108<br />
PF01-48<br />
Sliding block M6<br />
Nutenstein M6<br />
Art. No. 0150-3245<br />
Max torque for clamp plate screws: 12Nm (8.85 lbf ft)<br />
Max. Anzugsmoment Schrauben: 12Nm (8.85 lbf ft)<br />
Article Description L [mm] Weight [g] [oz] Item- No<br />
PF01-48x346 Flange 48x346 mm 346 2840 / 100.2 0150-2145<br />
NTI AG / <strong>LinMot</strong> ® www.<strong>LinMot</strong>.com 21 / 41
<strong>Montageanleitung</strong><br />
5.3 Fan kits for flanges<br />
5.3 Ventilator Kits für Flansche<br />
Option Fan for PF02-23<br />
Power Supply Fan :<br />
24VDC, 70mA<br />
Speisespannung:<br />
24VDC, 70mA<br />
Air flow:<br />
15m3/h<br />
Luftfluss:<br />
15m3/h<br />
Article Description Item- No<br />
HV01-23 Fan Kit for H01-23 und PF02-23 0150-5050<br />
Option Fan for PF02-37<br />
Power Supply Fan :<br />
24VDC, 120mA<br />
Speisespannung:<br />
24VDC, 120mA<br />
Air flow:<br />
80m3/h<br />
Luftfluss:<br />
80m3/h<br />
Article Description Item- No<br />
HV01-37/48 Fan Kit for H01-37, B01-37 und PF02-37 0150-5051<br />
Option Fan for PF01-48<br />
Power Supply Fan :<br />
24VDC, 120mA<br />
Speisespannung:<br />
24VDC, 120mA<br />
Air flow:<br />
80m3/h<br />
Luftfluss:<br />
80m3/h<br />
Article Description Item- No<br />
HV01-37/48 Fan Kit for H01-48, B01-48 und PF01-48 0150-5051<br />
22 / 41 www.<strong>LinMot</strong>.com NTI AG / <strong>LinMot</strong> ®
<strong>Installation</strong> guide<br />
5.4 Slider mounting kits<br />
5.4 Montage-Kits Läufer<br />
Fixed bearing<br />
Festlager<br />
Slider mounting kit consists of a spring washer, a pair of<br />
spherical washers, and a pair of conical seats. It allows<br />
the slider to be fixed in the direction of motion. It also<br />
helps to compensate for radial and angle offset.<br />
Das Festlager bestehend aus zwei Kugelscheiben und<br />
zwei Kegelpfannen erlaubt die feste Montage des<br />
Läufers in Bewegungsrichtung. Zudem ermöglicht es<br />
den Ausgleich von Radial- und Winkelversatz.<br />
Dimensions and material of fixed bearing kit<br />
Material<br />
Spherical washer / conical seat: case hardened steel<br />
Abmessungen und Material des Festlager Zubehörs<br />
Material<br />
Kugelscheibe / Kegelpfanne: Stahl einsatzgehärtet<br />
Part list<br />
Teile-Liste<br />
2 Spherical washer<br />
Kugelscheiben<br />
2 Conical seat<br />
Kegelpfanne<br />
1 Spring washer<br />
Spannscheibe<br />
PLF01-12<br />
(Item-no. 0150-3085)<br />
PLF01-20<br />
(Item-no. 0150-3083)<br />
PLF01-28<br />
(Item-no. 0150-3087)<br />
DIN 6319 C / M5 DIN 6319 C / M8 DIN 6319 C / M10<br />
DIN 6319 D / M5 DIN 6319 D / M8 DIN 6319 D / M10<br />
DIN 2093 A / M5 10 DIN 2093 A / M8 16 DIN 2093 A / M10 20<br />
Ordering information<br />
Bestell-Informationen<br />
Item /<br />
Artikel<br />
Item No. /<br />
Artikel-Nr.<br />
Slider /<br />
Läufer<br />
Thread /<br />
Gewinde<br />
PLF01-12 0150-3085 12mm M5 5.2mm<br />
(0,20in)<br />
PLF01-20 0150-3083 20mm M8 8.4mm<br />
(0.33in)<br />
PLF01-20-SS<br />
(Stainless-st.)<br />
0150-3296 19mm<br />
20mm<br />
M8<br />
d1 d2 d3 h<br />
8.4mm<br />
(0.33in)<br />
PLF01-28 0150-3087 28mm M10 10.5mm<br />
(0.41in)<br />
PLF01-28<br />
(Stainless-st.)<br />
0150-3297 27mm<br />
28mm<br />
M10<br />
10.5mm<br />
(0.41in)<br />
6.0mm<br />
(0.24in)<br />
9.6mm<br />
(0.38in)<br />
9.6mm<br />
(0.38in)<br />
12mm<br />
(0.47in)<br />
12mm<br />
(0.47in)<br />
10.5mm<br />
(0.41in)<br />
17mm<br />
(0.67in)<br />
17mm<br />
(0.67in)<br />
21mm<br />
(0.83in)<br />
21mm<br />
(0.83in)<br />
3.2mm<br />
(0.13in)<br />
5.5mm<br />
(0.22in)<br />
5.5mm<br />
(0.22in)<br />
6.5mm<br />
(0.26in)<br />
6.5mm<br />
(0.26in)<br />
NTI AG / <strong>LinMot</strong> ® www.<strong>LinMot</strong>.com 23 / 41
<strong>Montageanleitung</strong><br />
Floating bearing<br />
Loslager<br />
Floating bearing assembly that permits radial adjustment<br />
of slider position and permits a small amount of radial<br />
and axial movement.<br />
Im Loslager wird der Läufer axial gelagert. Das Loslager<br />
lässt kleine Bewegungen in Radial- und Längsrichtung<br />
zum Läufer zu.<br />
Dimensions and material of floating bearing kit<br />
Material<br />
Housing: Stainless steel 1.4305<br />
Bearing:: Nitrile butadiene rubber<br />
Spring steel DIN17223<br />
Abmessungen und Material des Loslagers<br />
Material<br />
Gehäuse: Edelstahl 1.4305<br />
Lager: Nitril-Butadien-Rubber<br />
Mit Federstahl DIN17223<br />
Ordering information<br />
Bestell-Informationen<br />
Item<br />
Artikel<br />
Item-No.<br />
Artikel-Nr.<br />
Slider<br />
Läufer<br />
Thread<br />
Gewinde<br />
PLL02-12 0150-3111 12mm - 12mm<br />
(0.47in)<br />
PLL01-19 0150-3335 19mm M5 20mm<br />
(0.79in)<br />
PLL01-20 0150-3084 20mm M5 20mm<br />
(0.79in)<br />
d1 d2 d3 D4 L<br />
Gummiring<br />
23mm<br />
(0.90in)<br />
23mm<br />
(0.90in)<br />
-<br />
-<br />
30mm<br />
(1.18in)<br />
30mm<br />
(1.18in)<br />
22mm<br />
(0.87in)<br />
37mm<br />
(1.46in)<br />
37mm<br />
(1.46in)<br />
6.6mm<br />
(0.26in)<br />
20mm<br />
(0.79in)<br />
20mm<br />
(0.79in)<br />
PLL01-27 0150-3294 27mm M5 28mm<br />
(1.10in)<br />
PLL01-28 0150-3094 28mm M5 28mm<br />
(1.10in)<br />
32mm<br />
(1.26in)<br />
32mm<br />
(1.26in)<br />
40mm<br />
(1.57in)<br />
40mm<br />
(1.57in)<br />
48mm<br />
(1.89in)<br />
48mm<br />
(1.89in)<br />
20mm<br />
(0.79in)<br />
20mm<br />
(0.79in)<br />
24 / 41 www.<strong>LinMot</strong>.com NTI AG / <strong>LinMot</strong> ®
<strong>Installation</strong> guide<br />
Complete mounting kit<br />
Montagekit Komplett<br />
This kit provides one set of mounting parts for each end<br />
of the slider.<br />
Der komplette Läufer-Montagesatz beinhaltet ein Festund<br />
ein Loslager für die beidseitige Montage des<br />
Läufers.<br />
Ordering Information<br />
Bestell-Informationen<br />
Pcs. PLM01-20-MK (Item no. 0150-3079) PLM01-28-MK (Item no. 0150-3095)<br />
1 PLF01-20 Spherical washer & conical seat<br />
Item no. 0150-3083<br />
PLF01-28 Spherical washer & conical seat<br />
Item no. 0150-3087<br />
1 PLL01-20 Floating Bearing<br />
Item no. 0150-3084<br />
PLL01-28 Floating Bearing<br />
Item no. 0150-3094<br />
1 Socket hd. cap screw DIN 912/M8 L=35 mm<br />
(1.38 in)*<br />
Socket hd. cap screw DIN 912/M10 L=35 mm<br />
(1.38 in)*<br />
4 Socket hd. cap screw DIN 912/M5 L=20 mm<br />
(0.78 in)*<br />
Socket hd. cap screw DIN 912/M5 L=20 mm<br />
(0.78 in)*<br />
* for use with 12 mm (1/2 in) thick mounting plates<br />
Stk. PLM01-20-MK (Art. Nr. 0150-3079) PLM01-28-MK (Art. Nr. 0150-3095)<br />
1 PLF01-20 Festlager<br />
PLF01-28 Festlager<br />
Art. Nr. 0150-3083<br />
Art. Nr. 0150-3087<br />
1 PLL01-20 Loslager<br />
PLL01-28 Loslager<br />
Art. Nr. 0150-3084<br />
Art. Nr. 0150-3094<br />
1 M8x35 Innensechskantschraube DIN 912/M8 * M10x35 Innensechskantschraube DIN<br />
912/M10 *<br />
4 M5x20 Innensechskantschraube DIN 912/M5 M5x20 Innensechskantschraube DIN 912/M5<br />
* Die mitgelieferten Schrauben eigenen sich für 12 mm dicke Befestigungsplatten<br />
NTI AG / <strong>LinMot</strong> ® www.<strong>LinMot</strong>.com 25 / 41
<strong>Montageanleitung</strong><br />
6 Maintenance and test instructions<br />
6 Wartungs- und Prüfhinweise<br />
6.1 Stator connector assignment<br />
6.1 Steckerbelegung der Statoren<br />
Do not connect or disconnect motor when there is power on the servo drive.<br />
Use only double-shielded original <strong>LinMot</strong> cable. Cables from other sources must be checked<br />
precisely before commissioning.<br />
Incorrect connections can destroy the drive and stator.<br />
Motorstecker nur ein- oder ausstecken wenn keine Spannung am Servo Drive anliegt!<br />
Für die Motorverkabelung darf nur das doppelt geschirmte Originalkabel von <strong>LinMot</strong> verwendet<br />
werden! Selbst konfektionierte Kabel müssen vor der Inbetriebnahme genau geprüft werden!<br />
Eine falsche Motorverkabelung kann den Motor und / oder den Servo Drive beschädigen!<br />
Connector<br />
Type<br />
Series<br />
D-Sub 9 pol P-Connector M-Connector C-Connector R-Connector<br />
PS01-23x80<br />
PS01-23x160<br />
PS01-37x120<br />
PS01-37x240<br />
PS01-23x..-M<br />
PS01-37x..-M<br />
PS01-37x120..-C<br />
PS01-37x240..-C<br />
PS01-48x..-C<br />
P0S1-23x80..-R<br />
PS01-23x160..-R<br />
PIN Wire PIN Wire PIN Wire Pin Pin<br />
Phase1+ 1 red 1 red 1 red A 1<br />
Phase1- 6 pink 2 pink 2 pink B 2<br />
Phase2+ 2 blue 3 blue 3 blue C 3<br />
Phase2- 7 grey 4 grey 4 grey D 4 (-)<br />
+5V 3 white 5 white 5 white E A<br />
GROUND* 8 brown 6 brown 6 brown F B<br />
Sensor Sin 4 yellow 7 yellow 7 yellow G C<br />
Sensor Cos 9 green 8 green 8 green H D<br />
Temp sensor 5 black 9 black 9 black L E<br />
SHIELD* of<br />
stator and<br />
stator cable<br />
Connector<br />
on the stator<br />
(-cables)<br />
Case shield 10<br />
Inner &<br />
outer<br />
shield<br />
Case<br />
Inner &<br />
outer<br />
shield<br />
Casese<br />
Case<br />
Extension cables are double shielded. The two shields of the extension cables must not be<br />
connected together: the inner shield of the extension cables is used as GROUND and must be<br />
connected to GROUND*; only the outer shield must be connected to SHIELD* of the<br />
connector.<br />
Motor Verlängerungskabel sind doppelt geschirmt. Die zwei Schirme des Verlängerungskabels<br />
sind voneinander isoliert. Der innere Schirm des Verlängerungskabels darf lediglich mit<br />
Ground* verbunden werden (kein Kontakt zum äusseren Schirm). Nur der äussere Schirm<br />
muss mit dem Schirm* des Steckers verbunden werden.<br />
26 / 41 www.<strong>LinMot</strong>.com NTI AG / <strong>LinMot</strong> ®
<strong>Installation</strong> guide<br />
6.2 Stator checking<br />
6.2 Funktionsprüfung Statoren<br />
The following tables show the resistive value between the different connector pins for each<br />
stator type. If the value is not within a range of +/- 10% the stator may be damaged<br />
(temperature of the stator for all measurements: 20°C).<br />
Zur Überprüfung der Statoren können die ohmschen Widerstände zwischen den einzelnen<br />
Steckerpins ausgemessen werden. Liegen die gemessenen Werte ausserhalb der Toleranz<br />
von +/- 10% der aufgeführten Werte, könnte der Stator beschädigt sein (aufgeführte Werte<br />
gemessen bei 20°C).<br />
PS01–23x80 (0150-1201)<br />
Phase1+ / Phase1- Red / Pink Pin 1 / Pin 6 10 <br />
Phase2+ / Phase2- Blue / Gray Pin 2 / Pin 7 10 <br />
5V / GND White / Brown Pin 3 / Pin 8 505 / 275 *<br />
Sensor Sine / GND Yellow / Brown Pin 4 / Pin 8 37.5 k<br />
Sensor Cosine / GND Green / Brown Pin 9 / Pin 8 37.5 k<br />
Temp. Sensor / GND Black / Brown Pin 5 / Pin 8 10.5k / >20 M*<br />
Phase / GND - Pin 1, 2, 6, 7 / Pin 8 >20 M<br />
All Pin / Shield - Pin 1 – 9 / Housing >20 M<br />
PS01–23x80-M (0150-1208)<br />
Phase1+ / Phase1- Red / Pink Pin 1 / Pin 2 10 <br />
Phase2+ / Phase2- Blue / Gray Pin 3 / Pin 4 10 <br />
5V / GND White / Brown Pin 5 / Pin 6 505 / 275 *<br />
Sensor Sine / GND Yellow / Brown Pin 7 / Pin 6 37.5 k<br />
Sensor Cosine / GND Green / Brown Pin 8 / Pin 6 37.5 k<br />
Temp. Sensor / GND Black / Brown Pin 9 / Pin 6 10.5k / >20 M*<br />
Phase / GND - Pin 1, 2, 3, 4 / Pin 6 >20 M<br />
All Pin / Shield - Pin 1 – 9 / Housing >20 M<br />
PS01–23x80-R (0150-1233)<br />
Phase1+ / Phase1- Red / Orange Pin 1 / Pin 2 10 <br />
Phase2+ / Phase2- Blue / Gray Pin 3 / Pin 4(-) 10 <br />
5V / GND White / Brown Pin A / Pin B 505 / 275 *<br />
Sensor Sine / GND Yellow / Brown Pin C / Pin B 37.5 k<br />
Sensor Cosine / GND Green / Brown Pin D / Pin B 37.5 k<br />
Temp. Sensor / GND Black / Brown Pin E / Pin B 10.5k / >20 M*<br />
Phase / GND - Pin 1, 2, 3, 4(-) / Pin B >20 M<br />
All Pin / Shield - Pin 1 – E / Housing >20 M<br />
PS01–23x80F-HP-R (0150-1259)<br />
Phase1+ / Phase1- Red / Orange Pin 1 / Pin 2 4.1 <br />
Phase2+ / Phase2- Blue / Gray Pin 3 / Pin 4(-) 4.1 <br />
5V / GND White / Brown Pin A / Pin B 505 / 275 *<br />
Sensor Sine / GND Yellow / Brown Pin C / Pin B 37.5 k<br />
Sensor Cosine / GND Green / Brown Pin D / Pin B 37.5 k<br />
Temp. Sensor / GND Black / Brown Pin E / Pin B 10.5k / >20 M*<br />
Phase / GND - Pin 1, 2, 3, 4(-) / Pin B >20 M<br />
All Pin / Shield - Pin 1 – E / Housing >20 M<br />
* For stators with serial no. before xxxx.3IJ.xxx<br />
* Für Statoren vor Serie-Nr. xxxx.3IJ.xxx<br />
NTI AG / <strong>LinMot</strong> ® www.<strong>LinMot</strong>.com 27 / 41
<strong>Montageanleitung</strong><br />
PS01–23x160 (0150-1202)<br />
Phase1+ / Phase1- Red / Pink Pin 1 / Pin 6 20 <br />
Phase2+ / Phase2- Blue / Gray Pin 2 / Pin 7 20 <br />
5V / GND White / Brown Pin 3 / Pin 8 505 / 275 *<br />
Sensor Sine / GND Yellow / Brown Pin 4 / Pin 8 37.5 k<br />
Sensor Cosine / GND Green / Brown Pin 9 / Pin 8 37.5 k<br />
Temp. Sensor / GND Black / Brown Pin 5 / Pin 8 10.5k / >20 M**<br />
Phase / GND - Pin 1, 2, 6, 7 / Pin 8 >20 M<br />
All Pin / Shield - Pin 1 – 9 / Housing >20 M<br />
PS01–23x160-M (0150-1209)<br />
Phase1+ / Phase1- Red / Pink Pin 1 / Pin 2 20 <br />
Phase2+ / Phase2- Blue / Gray Pin 3 / Pin 4 20 <br />
5V / GND White / Brown Pin 5 / Pin 6 505 / 275 *<br />
Sensor Sine / GND Yellow / Brown Pin 7 / Pin 6 37.5 k<br />
Sensor Cosine / GND Green / Brown Pin 8 / Pin 6 37.5 k<br />
Temp. Sensor / GND Black / Brown Pin 9 / Pin 6 10.5k / >20 M**<br />
Phase / GND - Pin 1, 2, 3, 4 / Pin 6 >20 M<br />
All Pin / Shield - Pin 1 – 9 / Housing >20 M<br />
PS01–23x160-R (0150-1234)<br />
Phase1+ / Phase1- Red / Orange Pin 1 / Pin 2 20 <br />
Phase2+ / Phase2- Blue / Gray Pin 3 / Pin 4(-) 20 <br />
5V / GND White / Brown Pin A / Pin B 505 / 275 ***<br />
Sensor Sine / GND Yellow / Brown Pin C / Pin B 37.5 k<br />
Sensor Cosine / GND Green / Brown Pin D / Pin B 37.5 k<br />
Temp. Sensor / GND Black / Brown Pin E / Pin B 10.5k<br />
Phase / GND - Pin 1, 2, 3, 4(-) / Pin B >20 M<br />
All Pin / Shield - Pin 1 – E / Housing >20 M<br />
PS01–23x160F (0150-1206)<br />
Phase1+ / Phase1- Red / Pink Pin 1 / Pin 2 8.5 <br />
Phase2+ / Phase2- Blue / Gray Pin 3 / Pin 4 8.5 <br />
5V / GND White / Brown Pin 5 / Pin 6 505 <br />
Sensor Sine / GND Yellow / Brown Pin 7 / Pin 6 37.5 k<br />
Sensor Cosine / GND Green / Brown Pin 8 / Pin 6 37.5 k<br />
Temp. Sensor / GND Black / Brown Pin 9 / Pin 6 10.5k<br />
Phase / GND - Pin 1, 2, 3, 4 / Pin 6 >20 M<br />
All Pin / Shield - Pin 1 – 9 / Pin 10 >20 M<br />
PS01–23x160H-HP-R(0150-1254)<br />
Phase1+ / Phase1- Red / Pink Pin 1 / Pin 2 4.0 <br />
Phase2+ / Phase2- Blue / Gray Pin 3 / Pin 4 4.0 <br />
5V / GND White / Brown Pin 5 / Pin 6 505 <br />
Sensor Sine / GND Yellow / Brown Pin 7 / Pin 6 37.5 k<br />
Sensor Cosine / GND Green / Brown Pin 8 / Pin 6 37.5 k<br />
Temp. Sensor / GND Black / Brown Pin 9 / Pin 6 10.5k<br />
Phase / GND - Pin 1, 2, 3, 4 / Pin 6 >20 M<br />
All Pin / Shield - Pin 1 – 9 / Pin 10 >20 M<br />
* For stators with serial no. before xxxx.3IL.xxx<br />
** For stators with serial no. before xxxx.2VM.xxx<br />
*** For stators with serial no. before xxxx.3IH.xxx<br />
* Für Statoren vor Serie-Nr. xxxx.3IL.xxx<br />
** Für Statoren vor Serie-Nr. xxxx.2VM.xxx<br />
*** Für Statoren vor Serie-Nr. xxxx.3IH.xxx<br />
28 / 41 www.<strong>LinMot</strong>.com NTI AG / <strong>LinMot</strong> ®
<strong>Installation</strong> guide<br />
PS01–37x120 (0150-1204)<br />
Phase1+ / Phase1- Red / Pink Pin 1 / Pin 2 6 <br />
Phase2+ / Phase2- Blue / Gray Pin 3 / Pin 4 6 <br />
5V / GND White / Brown Pin 5 / Pin 6 155 /275 *<br />
Sensor Sine / GND Yellow / Brown Pin 7 / Pin 6 33 k / 40 k*<br />
Sensor Cosine / GND Green / Brown Pin 8 / Pin 6 33 k / 40 k*<br />
Temp. Sensor / GND Black / Brown Pin 9 / Pin 6 10k / >20M*<br />
Phase / GND - Pin 1, 2, 3, 4 / Pin 6 >20 M<br />
All Pin / Shield - Pin 1 – 9 / Pin 10 >20 M<br />
PS01–37x120-M (0150-1210)<br />
Phase1+ / Phase1- Red / Pink Pin 1 / Pin 2 6 <br />
Phase2+ / Phase2- Blue / Gray Pin 3 / Pin 4 6 <br />
5V / GND White / Brown Pin 5 / Pin 6 155 /275 *<br />
Sensor Sine / GND Yellow / Brown Pin 7 / Pin 6 33 k / 40 k*<br />
Sensor Cosine / GND Green / Brown Pin 8 / Pin 6 33 k / 40 k*<br />
Temp. Sensor / GND Black / Brown Pin 9 / Pin 6 10k / >20M*<br />
Phase / GND - Pin 1, 2, 3, 4 / Pin 6 >20 M<br />
All Pin / Shield - Pin 1 – 9 / Housing >20 M<br />
PS01–37x120-C (0150-1223)<br />
Phase1+ / Phase1- Red / Orange Pin A / Pin B 6 <br />
Phase2+ / Phase2- Blue / Gray Pin C / Pin D 6 <br />
5V / GND White / Brown Pin E / Pin F 155 /275 *<br />
Sensor Sine / GND Yellow / Brown Pin G / Pin F 33 k / 40 k*<br />
Sensor Cosine / GND Green / Brown Pin H / Pin F 33 k / 40 k*<br />
Temp. Sensor / GND Black / Brown Pin L / Pin F 10k / >20M*<br />
Phase / GND - Pin A,B,C,D / Pin F >20 M<br />
All Pin / Shield - Pin A-L / Housing >20 M<br />
PS01–37x120F-HP-C (0150-1251)<br />
Phase1+ / Phase1- Red / Orange Pin A / Pin B 2.6<br />
Phase2+ / Phase2- Blue / Gray Pin C / Pin D 2.6 <br />
5V / GND White / Brown Pin E / Pin F 155 <br />
Sensor Sine / GND Yellow / Brown Pin G / Pin F 33 k<br />
Sensor Cosine / GND Green / Brown Pin H / Pin F 33 k<br />
Temp. Sensor / GND Black / Brown Pin L / Pin F 10k<br />
Phase / GND - Pin A,B,C,D / Pin F >20 M<br />
All Pin / Shield - Pin A-L / Housing >20 M<br />
NTI AG / <strong>LinMot</strong> ® www.<strong>LinMot</strong>.com 29 / 41
<strong>Montageanleitung</strong><br />
PS01–37x240 (0150-1203)<br />
Phase1+ / Phase1- Red / Pink Pin 1 / Pin 2 11.5 <br />
Phase2+ / Phase2- Blue / Gray Pin 3 / Pin 4 11.5 <br />
5V / GND White / Brown Pin 5 / Pin 6 155 /275 *<br />
Sensor Sine / GND Yellow / Brown Pin 7 / Pin 6 33 k / 40 k*<br />
Sensor Cosine / GND Green / Brown Pin 8 / Pin 6 33 k / 40 k*<br />
Temp. Sensor / GND Black / Brown Pin 9 / Pin 6 10k / >20M*<br />
Phase / GND - Pin 1, 2, 3, 4 / Pin 6 >20 M<br />
All Pin / Shield - Pin 1 – 9 / Pin 10 >20 M<br />
PS01–37x240-M (0150-1211)<br />
Phase1+ / Phase1- Red / Pink Pin 1 / Pin 2 11.5 <br />
Phase2+ / Phase2- Blue / Gray Pin 3 / Pin 4 11.5 <br />
5V / GND White / Brown Pin 5 / Pin 6 155 /275 *<br />
Sensor Sine / GND Yellow / Brown Pin 7 / Pin 6 33 k / 40 k*<br />
Sensor Cosine / GND Green / Brown Pin 8 / Pin 6 33 k / 40 k*<br />
Temp. Sensor / GND Black / Brown Pin 9 / Pin 6 10k / >20M*<br />
Phase / GND - Pin 1, 2, 3, 4 / Pin 6 >20 M<br />
All Pin / Shield - Pin 1 – 9 / Housing >20 M<br />
* For stators with serial no. before xxxx.38A.xxx<br />
* Für Statoren vor Serie-Nr. xxxx.38A.xxx<br />
PS01–37x240-C (0150-1224)<br />
Phase1+ / Phase1- Red / Orange Pin A / Pin B 11.5 <br />
Phase2+ / Phase2- Blue / Gray Pin C / Pin D 11.5 <br />
5V / GND White / Brown Pin E / Pin F 155 /275 *<br />
Sensor Sine / GND Yellow / Brown Pin G / Pin F 33 k / 40 k*<br />
Sensor Cosine / GND Green / Brown Pin H / Pin F 33 k / 40 k*<br />
Temp. Sensor / GND Black / Brown Pin L / Pin F 10k / >20M*<br />
Phase / GND - Pin A,B,C,D / Pin F >20 M<br />
All Pin / Shield - Pin A-L / Housing >20 M<br />
PS01–37x240F-M (0150-1213)<br />
Phase1+ / Phase1- Red / Pink Pin 1 / Pin 2 4.8 <br />
Phase2+ / Phase2- Blue / Gray Pin 3 / Pin 4 4.8 <br />
5V / GND White / Brown Pin 5 / Pin 6 155 /275 *<br />
Sensor Sine / GND Yellow / Brown Pin 7 / Pin 6 33 k / 40 k*<br />
Sensor Cosine / GND Green / Brown Pin 8 / Pin 6 33 k / 40 k*<br />
Temp. Sensor / GND Black / Brown Pin 9 / Pin 6 10k / >20M*<br />
Phase / GND - Pin 1, 2, 3, 4 / Pin 6 >20 M<br />
All Pin / Shield - Pin 1 – 9 / Housing >20 M<br />
PS01–37x240F-C (0150-1225)<br />
Phase1+ / Phase1- Red / Orange Pin A / Pin B 4.8 <br />
Phase2+ / Phase2- Blue / Gray Pin C / Pin D 4.8 <br />
5V / GND White / Brown Pin E / Pin F 155 /275 *<br />
Sensor Sine / GND Yellow / Brown Pin G / Pin F 33 k / 40 k*<br />
Sensor Cosine / GND Green / Brown Pin H / Pin F 33 k / 40 k*<br />
Temp. Sensor / GND Black / Brown Pin L / Pin F 10k / >20M*<br />
Phase / GND - Pin A,B,C,D / Pin F >20 M<br />
All Pin / Shield - Pin A-L / Housing >20 M<br />
30 / 41 www.<strong>LinMot</strong>.com NTI AG / <strong>LinMot</strong> ®
<strong>Installation</strong> guide<br />
PS01–48x240-C (0150-1219)<br />
Phase1+ / Phase1- Red / Orange Pin A / Pin B 3.1 <br />
Phase2+ / Phase2- Blue / Gray Pin C / Pin D 3.1 <br />
5V / GND White / Brown Pin E / Pin F 155 <br />
Sensor Sine / GND Yellow / Brown Pin G / Pin F 33 k / >20 M**<br />
Sensor Cosine / GND Green / Brown Pin H / Pin F 33 k / >20 M**<br />
Temp. Sensor / GND Black / Brown Pin L / Pin F 10 k<br />
Phase / GND - Pin A,B,C,D / Pin F >20 M<br />
All Pin / Shield - Pin A-L / Housing >20 M<br />
PS01–48x240F-C (0150-1220)<br />
Phase1+ / Phase1- Red / Orange Pin A / Pin B 1.1 <br />
Phase2+ / Phase2- Blue / Gray Pin C / Pin D 1.1 <br />
5V / GND White / Brown Pin E / Pin F 155 <br />
Sensor Sine / GND Yellow / Brown Pin G / Pin F 33 k / >20 M**<br />
Sensor Cosine / GND Green / Brown Pin H / Pin F 33 k / >20 M**<br />
Temp. Sensor / GND Black / Brown Pin L / Pin F 10 k<br />
Phase / GND - Pin A,B,C,D / Pin F >20 M<br />
All Pin / Shield - Pin A-L / Housing >20 M<br />
PS01–48x360F-C (0150-1220)<br />
Phase1+ / Phase1- Red / Orange Pin A / Pin B 1.5 <br />
Phase2+ / Phase2- Blue / Gray Pin C / Pin D 1.5 <br />
5V / GND White / Brown Pin E / Pin F 155 <br />
Sensor Sine / GND Yellow / Brown Pin G / Pin F 33 k / >20 M**<br />
Sensor Cosine / GND Green / Brown Pin H / Pin F 33 k / >20 M**<br />
Temp. Sensor / GND Black / Brown Pin L / Pin F 10 k<br />
Phase / GND - Pin A,B,C,D / Pin F >20 M<br />
All Pin / Shield - Pin A-L / Housing >20 M<br />
* For stators with serial no. before xxxx.38A.xxx<br />
** For stators with serial no. before xxxx.3IK.xxx<br />
* Für Statoren vor Serie-Nr. xxxx.38A.xxx<br />
** Für Statoren vor Serie-Nr. xxxx.3IK.xxx<br />
NTI AG / <strong>LinMot</strong> ® www.<strong>LinMot</strong>.com 31 / 41
<strong>Montageanleitung</strong><br />
6.3 Maintenance of linear <strong>motors</strong><br />
6.3 Wartung <strong>Linear</strong> Motoren<br />
The maintenance schedule below is based on a 5-day week with 8 working hours daily. Central<br />
European industrial operating conditions are assumed. Where conditions differ, such as severe<br />
and permanent fouling, direct sunshine, outdoor operation, etc., the maintenance intervals<br />
must be shortened until empirical values are obtained for the particular application. Accordingly<br />
a distinction is drawn between the maintenance schedules for standard applications and novel<br />
applications or arduous conditions.<br />
Der nachfolgende Wartungsplan geht von einer 5 Tage-Woche mit 8 Stunden Betriebszeit pro<br />
Tag aus. Es werden mitteleuropäische industrielle Betriebsbedingungen vorausgesetzt. Bei<br />
abweichenden Anforderungen wie etwa starker und permanente Verschmutzung, direkte<br />
Sonneneinstrahlung, tiefe Luftfeuchtigkeit, Betrieb im Freien etc. muss der Wartungsplan<br />
verkürzt werden bis applikationsspezifische Erfahrungswerte vorliegen. Entsprechend wird<br />
zwischen ‘Standard-Anwendungen’ und ‘Erstanwendungen / erschwerte Bedingungen’<br />
unterschieden.<br />
Maintenance schedule for novel and heavy duty applications<br />
Wartungsplan für Erstanwendungen / erschwerte Bedingungen<br />
Less than 120 120 to 360 strokes/min Over 360 strokes/min<br />
strokes/min<br />
Comissioning Inspection and lubrication Inspection and lubrication Inspection and lubrication<br />
every 3 months -- Inspection Inspection and lubrication<br />
every 6 months Inspection Inspection and lubrication Inspection and lubrication<br />
unter 120 Hübe/Minuten 120 - 360 Hübe/Minute über 360 Hübe/Minute<br />
Inbetriebnahme Inspektion & Schmierung Inspektion & Schmierung Inspektion & Schmierung<br />
alle 3 Monate -- Inspektion Inspektion & Schmierung<br />
alle 6 Monate Inspektion Inspektion & Schmierung Inspektion & Schmierung<br />
Maintenance schedule for first and heavy duty applications<br />
Wartungsplan für Erstanwendungen / erschwerte Bedingungen<br />
Less than 120 120 to 360 strokes/min Over 360 strokes/min<br />
strokes/min<br />
Comissioning<br />
Inspection and<br />
lubrication<br />
Inspection and<br />
lubrication<br />
Inspection and<br />
lubrication<br />
after the first 8 hours Inspection Inspection Inspection<br />
after the first week of<br />
Inspection Inspection Inspection<br />
operation<br />
every 3 months Inspection Inspection Inspection and<br />
lubrication<br />
every 6 months<br />
Inspection and<br />
lubrication<br />
Inspection and<br />
lubrication<br />
Inspection and<br />
lubrication<br />
32 / 41 www.<strong>LinMot</strong>.com NTI AG / <strong>LinMot</strong> ®
<strong>Installation</strong> guide<br />
Inspection<br />
Inspektion<br />
Cleaning<br />
Reinigung<br />
Inbetriebnahme<br />
unter 120<br />
Hübe/Minuten<br />
Inspektion &<br />
Schmierung<br />
120 - 360<br />
Hübe/Minute<br />
Inspektion &<br />
Schmierung<br />
über 360 Hübe/Minute<br />
Inspektion &<br />
Schmierung<br />
nach den ersten 8 Stunden Inspektion Inspektion Inspektion<br />
nach der ersten Woche Inspektion Inspektion Inspektion<br />
alle 3 Monate Inspektion Inspektion Inspektion &<br />
Schmierung<br />
alle 6 Monate<br />
Inspektion &<br />
Schmierung<br />
Inspektion &<br />
Schmierung<br />
The following aspects must be checked when inspecting the drives:<br />
Is the slider lubricated completely?<br />
Is the lubricant not ‘decomposed’?<br />
Can the slider be moved easily?<br />
Bei der Inspektion der Antriebe sind folgende Punkte zu überprüfen:<br />
Ist der Läufer vollständig mit Schmiermittel versehen?<br />
Ist das Schmiermittel nicht zersetzt?<br />
Lässt sich der Läufer leichtgängig bewegen?<br />
Inspektion &<br />
Schmierung<br />
On no account may brushes or similar be used for cleaning purposes.<br />
No cleaning fluids containing solvents, kerosene, or the like are to be used.<br />
Carefully remove the slider from the stator.<br />
Clean the slider and stator with soft paper towel, using methylated spirit or alcohol if needed<br />
Lubricate the slider and carefully reinsert it<br />
Auf keinen Fall harte Bürsten oder dergleichen für Reinigungszwecke verwenden.<br />
Keinesfalls Reinigungsflüssigkeiten, die mit Lösungsmittelzusätzen wie Petroleum oder<br />
dergleichen versetzt sind, verwenden.<br />
Läufer vorsichtig aus dem Stator ziehen<br />
Läufer und Stator mit einem weichen Wegwerfpapier idealerweise unter Zuhilfenahme von<br />
LU06 Reinigungsspray (alternativ Brennsprit oder Alkohol) reinigen.<br />
Läufer mit Schmiermittel versehen und vorsichtig einführen<br />
Ordering information<br />
Bestell-Informationen<br />
Item<br />
Produkt<br />
LU06-250<br />
Description<br />
Beschreibung<br />
Klüberfood NH1 4-002 Spray (250 ml)<br />
Klüberfoof NH1 4-002 Spray (250 ml)<br />
Item-No.<br />
Artikel-Nr.<br />
0150-2394<br />
NTI AG / <strong>LinMot</strong> ® www.<strong>LinMot</strong>.com 33 / 41
<strong>Montageanleitung</strong><br />
6.4 Lubricating instructions<br />
6.4 Schmiervorschrift<br />
The lubricant reduces the friction between the chromium-nickel steel surface of the slider and<br />
the plastic plain bearing. In addition, it prevents corrosion due to fretting. The lubricant<br />
employed must not react with the material of the plain bearing and must be temperature<br />
resistant up to 150ºC. It must also retain low viscosity at low temperatures and not evaporate.<br />
The following lubricants are recommended:<br />
<strong>LinMot</strong> Lubricant LU02 Art. No. 0150-1953 (8g)<br />
<strong>LinMot</strong> Lubricant LU02 Art. No. 0150-1954 (50g)<br />
<strong>LinMot</strong> Lubricant LU02 Art. No. 0150-1955 (1000g)<br />
<strong>LinMot</strong> LU02 Lubricant corresponds to KLÜBERSYNTH UH1 14-31 which was developed for<br />
the food processing industry.<br />
Das Schmiermittel verbessert die Gleiteigenschaft zwischen der Chromnickelstahloberfläche<br />
des Läufers und dem Kunststoffgleitlager (Basis POM bzw. Delrin). Zusätzlich verhindert das<br />
Schmiermittel Korrosionsbildung (Passrost). Die verwendeten Schmiermittel dürfen das<br />
Gleitlagermaterial nicht angreifen und müssen Temperaturfest bis 100°C sein. Wichtig ist, dass<br />
das Schmiermittel auch bei tiefen Temperaturen eine geringe Viskosität beibehält und nicht<br />
ausdampft. Folgende Schmiermittel werden empfohlen:<br />
<strong>LinMot</strong> Fett LU02 Art. No. 0150-1953 (8g)<br />
<strong>LinMot</strong> Fett LU02 Art. No. 0150-1954 (50g)<br />
<strong>LinMot</strong> Fett LU02 Art. No. 0150-1955 (1000g)<br />
<strong>LinMot</strong> Fett ist identisch mit KLÜBERSYNTH UH1 14-31 (Lebensmitteltauglich UH1<br />
Zulassung).<br />
7 Storage, transport, installation altitude<br />
7 Lagerung, Transport, Aufstellhöhe<br />
Sliders are to be stored and transported only in the plastic containers (with cardboard inlay)<br />
provided for this purpose, or already installed and secured in <strong>LinMot</strong> P stators.<br />
The storage area must be dry, dust-free, frost-free and vibration-free.<br />
The relative air humidity should be less than 60 %.<br />
Prescribed storage temperature: -15 °C…70 °C<br />
The motor must be protected against extreme weather conditions.<br />
The air in the storage area must not contain any harmful gases.<br />
An installation altitude of more than 1000 m above sea level leads to power derating.<br />
<strong>LinMot</strong> Läufer dürfen ausschliesslich in der Orginalverpackung transportiert und gelagert<br />
werden.<br />
Der Lagerraum muss trocken, staubfrei, frostfrei und erschütterungsfrei sein.<br />
Die relative Luftfeuchte sollte weniger als 60 % betragen.<br />
Vorgeschriebene Lagertemperatur: -15 °C…70 °C<br />
Der Motor muss vor extremen Witterungen geschützt werden.<br />
Die Raumluft darf keine aggressiven Gase enthalten.<br />
Bei einer Aufstellhöhe von mehr als 1000 m über NN ist mit einer Leistungsreduzierung zu<br />
rechnen.<br />
34 / 41 www.<strong>LinMot</strong>.com NTI AG / <strong>LinMot</strong> ®
<strong>Installation</strong> guide<br />
8 Stator dimensions<br />
8 Stator Abmessungen<br />
8.1 Stator PS01-23x80<br />
8.1 Stator PS01-23x80<br />
(in mm)<br />
8.2 Stator PS01-23x80-R<br />
8.2 Stator PS01-23x80-R<br />
(in mm)<br />
NTI AG / <strong>LinMot</strong> ® www.<strong>LinMot</strong>.com 35 / 41
<strong>Montageanleitung</strong><br />
8.3 Stator PS01-23x160<br />
8.3 Stator PS01-23x160<br />
(in mm)<br />
8.4 Stator PS01-23x160-R<br />
8.4 Stator PS01-23x160-R<br />
(in mm)<br />
36 / 41 www.<strong>LinMot</strong>.com NTI AG / <strong>LinMot</strong> ®
<strong>Installation</strong> guide<br />
8.5 Stator PS01-37x120<br />
8.5 Stator PS01-37x120<br />
(in mm)<br />
8.6 Stator PS01-37x120-C<br />
8.6 Stator PS01-37x120-C<br />
(in mm)<br />
NTI AG / <strong>LinMot</strong> ® www.<strong>LinMot</strong>.com 37 / 41
<strong>Montageanleitung</strong><br />
8.7 Stator PS01-37x240<br />
8.7 Stator PS01-37x240<br />
(in mm)<br />
8.8 Stator PS01-37x240-C<br />
8.8 Stator PS01-37x240-C<br />
(in mm)<br />
38 / 41 www.<strong>LinMot</strong>.com NTI AG / <strong>LinMot</strong> ®
<strong>Installation</strong> guide<br />
8.9 Stator PS01-48x240-C<br />
8.9 Stator PS01-48x240-C<br />
(in mm)<br />
8.10 Stator PS01-48x360-C<br />
8.10 Stator PS01-48x360-C<br />
(in mm)<br />
NTI AG / <strong>LinMot</strong> ® www.<strong>LinMot</strong>.com 39 / 41
<strong>Montageanleitung</strong><br />
9 Declaration of Conformity and CE-marking<br />
9 CE-Konformitätserklärung<br />
Manufacturer:<br />
Products:<br />
NTI AG<br />
<strong>LinMot</strong> ®<br />
Haerdlistrasse 15<br />
CH-8957 Spreitenbach<br />
Tel.: +41 (0) 56 419 91 91<br />
Fax: +41 (0) 56 419 91 92<br />
<strong>LinMot</strong> ® <strong>Linear</strong> Servo Motors<br />
Type Item no. Type Item no.<br />
PS01-23x80-R 0150-1233 PS01-23x80F-HP-R20 0150-1260<br />
PS01-23x160-R 0150-1234 PS01-23x160H-HP-R20 0150-1255<br />
PS01-23x160F-R 0150-1235 PS01-37x120F-HP-C20 0150-1252<br />
PS01-37x120-C 0150-1223 PS01-23x80 0150-1201<br />
PS01-37x240-C 0150-1224 PS01-23x160 0150-1202<br />
PS01-37x240F-C 0150-1225 PS01-37x120 0150-1204<br />
PS01-48x240-C 0150-1219 PS01-37x240 0150-1203<br />
PS01-48x240F-C 0150-1220 PS01-37x240F 0150-1256<br />
PS01-48x360F-C 0150-1269 PS02-23Sx80-F * 0150-1272<br />
PS01-23x80F-HP-R 0150-1259 PS02-23Sx80F-HP-K 0150-1285<br />
PS01-23x160H-HP-R 0150-1254 PS01-37Sx60-HP-N 0150-1295<br />
PS01-37x120F-HP-C 0150-1251 PS01-37Sx120F-HP-N 0150-1296<br />
PS01-23x80-R20 0150-1241 PS01-37x120F-HP-SSC-R 0150-1282<br />
PS01-23x160-R20 0150-1242 PS01-37x120F-HP-SSC-R-FC 0150-1283<br />
PS01-23x160F-R20 0150-1243 PS01-48x240F-SSC-C 0150-1267<br />
PS01-37x120-C20 0150-1237 PS01-48x240F-SSC-C-FC 0150-1268<br />
PS01-37x240-C20 0150-1238 PS01-48x360F-SSC-C 0150-1270<br />
PS01-37x240F-C20 0150-1239 PS01-48x360F-SSC-C-FC 0150-1271<br />
PS01-23x80-M 0150-1208 PS01-48x240F-SSC-C-Cw 0150-1274<br />
PS01-23x160-M 0150-1209 PS01-48x240F-SSC-C-CW-FC 0150-1275<br />
PS01-37x120-M 0150-1210 PS01-48x360F-SSC-C-Cw 0150-1271<br />
PS01-37x240-M 0150-1211<br />
PL01-… Slider (all dimensions)<br />
*shielded flat cable needed<br />
PL02-….Slider (all dimensions)<br />
The product must be mounted and used in strict accordance with the installation instruction<br />
contained within the User’s Manual, a copy of which may be obtained from NTI AG.<br />
I declare that as the authorized representative, the above information in relation to the<br />
supply/manufacture of this product is in conformity with the stated standards and other related<br />
documents in compliance with the protection requirements of the Electromagnetic Compatibility<br />
(EMC) Directive 2004/108/EC and is marked in accordance with the CE Marking Directive<br />
(93/68/EEC).<br />
Standards Compl. with: Conducted EMI<br />
EN 61000-6-4: 2007+A1:2011<br />
Electromagnetic Susceptibility<br />
EMC EN 61000-6-2: 2005<br />
Company NTI AG, Spreitenbach, March 2013<br />
EN 55011: 2009+A1:2010<br />
EN 61000-4-2: 2009<br />
EN 61000-4-4: 2012<br />
EN 61000-4-3:<br />
2006+A1:2008+A2:2010<br />
EN 61000-4-6: 2009<br />
Class A<br />
4 kV / 8kV<br />
1 kV / 2kV<br />
10 V/m<br />
10 V<br />
Dr.-Ing. Ronald Rohner / CEO NTI AG<br />
40 / 41 www.<strong>LinMot</strong>.com NTI AG / <strong>LinMot</strong> ®
<strong>Installation</strong> guide<br />
Note<br />
Notizen<br />
NTI AG / <strong>LinMot</strong> ® www.<strong>LinMot</strong>.com 41 / 41
SWITZERLAND<br />
USA<br />
NTI AG<br />
Haerdlistr. 15<br />
CH-8957 Spreitenbach<br />
Sales / Administration: +41-(0)56-419 91 91<br />
office@linmot.com<br />
Tech. Support: +41-(0)56-544 71 00<br />
support@linmot.com<br />
Tech. Support (Skype): skype:support.linmot<br />
Fax: +41-(0)56-419 91 92<br />
Web:<br />
http://www.linmot.com/<br />
<strong>LinMot</strong>, Inc.<br />
204 E Morrissey Dr.<br />
Elkhorn, WI 53121<br />
Sales / Administration: 877-546-3270<br />
262-743-2555<br />
Tech. Support: 877-804-0718<br />
262-743-1284<br />
Fax: 800-463-8708<br />
262-723-6688<br />
E-Mail:<br />
Web:<br />
us-sales@linmot.com<br />
http://www.linmot-usa.com/<br />
Subject to change / Änderungen vorbehalten<br />
© 2014 NTI AG