Raptor 30 V2 - DMT
Raptor 30 V2 - DMT
Raptor 30 V2 - DMT

You also want an ePaper? Increase the reach of your titles
YUMPU automatically turns print PDFs into web optimized ePapers that Google loves.
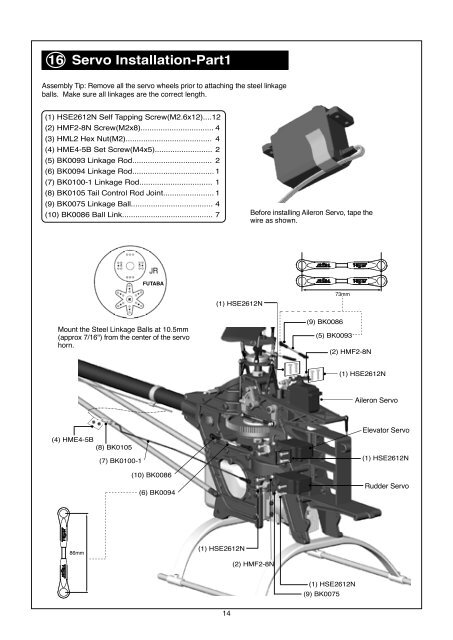
16 Servo Installation-Part1<br />
Assembly Tip: Remove all the servo wheels prior to attaching the steel linkage<br />
balls. Make sure all linkages are the correct length.<br />
(1) HSE2612N Self Tapping Screw(M2.6x12)....12<br />
(2) HMF2-8N Screw(M2x8)................................. 4<br />
(3) HML2 Hex Nut(M2)....................................... 4<br />
(4) HME4-5B Set Screw(M4x5).......................... 2<br />
(5) BK0093 Linkage Rod.................................... 2<br />
(6) BK0094 Linkage Rod..................................... 1<br />
(7) BK0100-1 Linkage Rod................................. 1<br />
(8) BK0105 Tail Control Rod Joint....................... 1<br />
(9) BK0075 Linkage Ball..................................... 4<br />
(10) BK0086 Ball Link......................................... 7<br />
Before installing Aileron Servo, tape the<br />
wire as shown.<br />
FUTABA<br />
(1) HSE2612N<br />
73mm<br />
Mount the Steel Linkage Balls at 10.5mm<br />
(approx 7/16") from the center of the servo<br />
horn.<br />
(9) BK0086<br />
(5) BK0093<br />
(2) HMF2-8N<br />
(1) HSE2612N<br />
Aileron Servo<br />
(4) HME4-5B<br />
(8) BK0105<br />
(7) BK0100-1<br />
(10) BK0086<br />
(6) BK0094<br />
Elevator Servo<br />
(1) HSE2612N<br />
Rudder Servo<br />
86mm<br />
(1) HSE2612N<br />
(2) HMF2-8N<br />
(1) HSE2612N<br />
(9) BK0075<br />
14