MDH-302/402 & Icepic / Selectable Ice Series - Manitowoc ...
MDH-302/402 & Icepic / Selectable Ice Series - Manitowoc ...
MDH-302/402 & Icepic / Selectable Ice Series - Manitowoc ...

Create successful ePaper yourself
Turn your PDF publications into a flip-book with our unique Google optimized e-Paper software.
Installation Instructions Section 2<br />
Step by Step Installation<br />
GENERAL<br />
<strong>MDH</strong> series dispensers have a stainless steel cabinet and<br />
lighted merchandiser standard.<br />
Beverage valves, coldplate connections, drain<br />
connections and electrical components are front<br />
serviceable.<br />
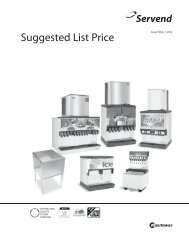
CAPACITIES<br />
Dispenser Valves <strong>Ice</strong> Storage<br />
<strong>MDH</strong>-<strong>302</strong> 10 or 12 300 lbs<br />
<strong>MDH</strong>-<strong>302</strong> w/EM 10 or 12 300 lbs<br />
<strong>MDH</strong>-<strong>402</strong> 16 or 20 400 lbs<br />
<strong>MDH</strong>-<strong>402</strong> w/24" EM 16 or 20 400 lbs<br />
<strong>MDH</strong>-<strong>402</strong> w/34" EM 16 or 20 400 lbs<br />
SPECIFICATIONS CHART<br />
Incoming Plain<br />
Water Pressure<br />
Plain Water Pressure<br />
to Carb Tank<br />
Ambient<br />
Temperature<br />
Co2 Pressure<br />
(Primary)<br />
MIN. MAX<br />
40 psi dynamic 70 psi static<br />
55 psi 65 psi<br />
40°F<br />
(4°C)<br />
105°F<br />
(41°C)<br />
90 psi 100 psi<br />
Electrical<br />
Pre-mix Pressure<br />
115V/60 Hz/1 230V/50-60 Hz/1<br />
Normal 60 psi*<br />
Diet 40 psi*<br />
B-I-B (Secondary) 75 psi or according to line run<br />
Flavor Shots 30 psi or according to line run<br />
* This is the optimal pressure. For high foam, decrease the pressure,<br />
for spitting/popping, increase the pressure.<br />
UNIT INSTALLATION<br />
1. Place the dispenser in the desired location.<br />
NOTE: The unit must be placed and operated in a<br />
horizontal, level position. This unit is not suitable for areas<br />
cleaned with a water jet, pressure washers or water hoses.<br />
2. Run the beverage lines and water lines; make sure<br />
to install the water connections to the proper inlets.<br />
Connection “A” comes from the brass carbonator<br />
pump and connection “B” is your plain water supply.<br />
3. Install plumbing drains and insulate.<br />
4. Fill bin with ice.<br />
5. Set flexible manifold for correct drink settings.<br />
6. Turn water supply on to the dispenser.<br />
7. Purge air from the carbonator tank. Lift the pressure<br />
relief valve tab on the carbonator tank until water<br />
comes out of the relief valve.<br />
8. Connect the pump deck control lead to the pump motor.<br />
9. Connect power supply cords. (There are (2) two cords<br />
that need to be connected to a 115V power supply.)<br />
10. Brix beverage valves.<br />
SYSTEM PRESSURES<br />
1. Incoming tap water - must be at a minimum<br />
dynamic pressure of 40 psi and maximum static<br />
pressure of 70 psi.<br />
Important<br />
If incoming water pressure is under 40 psi dynamic, a<br />
water booster is recommended. If incoming water pressure<br />
is over 55 psi, a water regulating valve is recommended.<br />
NOTE: For water booster setups, connect directly to the<br />
incoming water to the unit. A regulator may be needed to<br />
maintain 40 - 55 psi to the carbonator or water may be<br />
routed around the booster to the carbonator. If water<br />
pressure is too high to the carbonator poor drink<br />
carbonation can result.<br />
Important<br />
Water boosters are preset to turn on at 65 psi and off<br />
at 85 psi.<br />
2. BIB pressure gauge must be set for 75 psi or<br />
according to your line run.<br />
3. Carbonator Pressure gauge (Use Preset Regulator):<br />
- Cold Carbonation set for 75 psi.<br />
- Ambient systems must be set at 90 psi to 105 psi.<br />
NOTE: For models with flavor shots you want to achieve<br />
.5 oz (14.787 cc) a second dispense, adjust secondary<br />
regulator or flow controls accordingly.<br />
2-14 Part Number 020003999 4/12