MDH-302/402 & Icepic / Selectable Ice Series - Manitowoc ...
MDH-302/402 & Icepic / Selectable Ice Series - Manitowoc ...
MDH-302/402 & Icepic / Selectable Ice Series - Manitowoc ...

You also want an ePaper? Increase the reach of your titles
YUMPU automatically turns print PDFs into web optimized ePapers that Google loves.
Maintenance Section 4<br />
7. On <strong>MDH</strong> models without a top mounted ice<br />
machine, remove the plastic lid from the top of the<br />
dispenser.<br />
8. Remove all ice from the dispenser.<br />
9. Disconnect electrical power to the dispenser.<br />
10. Remove the strip lids off the top left and top right of<br />
the dispenser bin.<br />
11. There is a left bin and a right bin on both the <strong>302</strong> and<br />
<strong>402</strong> models. Clean and sanitize one bin, then follow<br />
the same procedures on the second bin.<br />
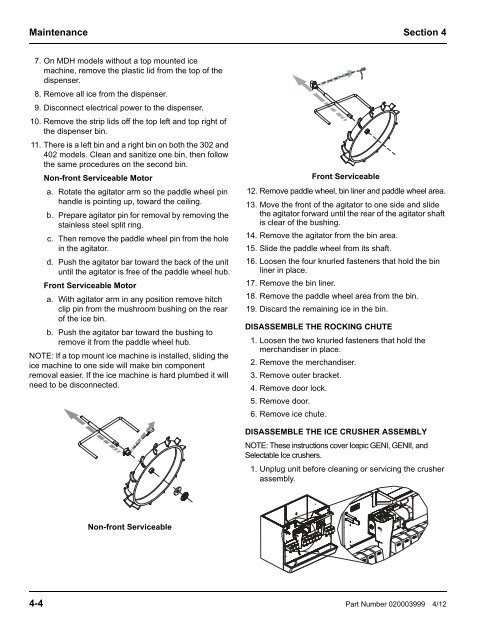
Non-front Serviceable Motor<br />
a. Rotate the agitator arm so the paddle wheel pin<br />
handle is pointing up, toward the ceiling.<br />
b. Prepare agitator pin for removal by removing the<br />
stainless steel split ring.<br />
c. Then remove the paddle wheel pin from the hole<br />
in the agitator.<br />
d. Push the agitator bar toward the back of the unit<br />
until the agitator is free of the paddle wheel hub.<br />
Front Serviceable Motor<br />
a. With agitator arm in any position remove hitch<br />
clip pin from the mushroom bushing on the rear<br />
of the ice bin.<br />
b. Push the agitator bar toward the bushing to<br />
remove it from the paddle wheel hub.<br />
NOTE: If a top mount ice machine is installed, sliding the<br />
ice machine to one side will make bin component<br />
removal easier. If the ice machine is hard plumbed it will<br />
need to be disconnected.<br />
Non-front Serviceable<br />
Front Serviceable<br />
12. Remove paddle wheel, bin liner and paddle wheel area.<br />
13. Move the front of the agitator to one side and slide<br />
the agitator forward until the rear of the agitator shaft<br />
is clear of the bushing.<br />
14. Remove the agitator from the bin area.<br />
15. Slide the paddle wheel from its shaft.<br />
16. Loosen the four knurled fasteners that hold the bin<br />
liner in place.<br />
17. Remove the bin liner.<br />
18. Remove the paddle wheel area from the bin.<br />
19. Discard the remaining ice in the bin.<br />
DISASSEMBLE THE ROCKING CHUTE<br />
1. Loosen the two knurled fasteners that hold the<br />
merchandiser in place.<br />
2. Remove the merchandiser.<br />
3. Remove outer bracket.<br />
4. Remove door lock.<br />
5. Remove door.<br />
6. Remove ice chute.<br />
DISASSEMBLE THE ICE CRUSHER ASSEMBLY<br />
NOTE: These instructions cover <strong><strong>Ice</strong>pic</strong> GENI, GENII, and<br />
<strong>Selectable</strong> <strong>Ice</strong> crushers.<br />
1. Unplug unit before cleaning or servicing the crusher<br />
assembly.<br />
4-4 Part Number 020003999 4/12