

KD-G333/KD-G332/KD-G331 - JVC Multilingual Service Information ...
KD-G333/KD-G332/KD-G331 - JVC Multilingual Service Information ...
KD-G333/KD-G332/KD-G331 - JVC Multilingual Service Information ...

You also want an ePaper? Increase the reach of your titles
YUMPU automatically turns print PDFs into web optimized ePapers that Google loves.
GET0404-002A<br />
[UI]<br />
<strong>KD</strong>-G334<br />
Installation/Connection Manual<br />
This unit is designed to operate on 12 V DC, NEGATIVE ground electrical systems. If your vehicle does<br />
not have this system, a voltage inverter is required, which can be purchased at <strong>JVC</strong> car audio dealers.<br />
WARNINGS<br />
To prevent short circuits, we recommend that you disconnect the battery’s negative terminal and make all<br />
electrical connections before installing the unit.<br />
• Be sure to ground this unit to the car’s chassis again after installation.<br />
Notes:<br />
• Replace the fuse with one of the specified rating. If the fuse blows frequently, consult your <strong>JVC</strong> car audio<br />
dealer.<br />
• It is recommended to connect to the speakers with maximum power of more than 50 W (both at<br />
the rear and at the front, with an impedance of 4 Ω to 8 Ω). If the maximum power is less than<br />
50 W, change “AMP GAIN” setting to prevent the speakers from being damaged (see page 12 of the<br />
INSTRUCTIONS).<br />
• To prevent short-circuit, cover the terminals of the UNUSED leads<br />
with insulating tape.<br />
• The heat sink becomes very hot after use. Be careful not to touch it<br />
when removing this unit.<br />
Heat sink<br />
PRECAUTIONS on power supply and speaker connections:<br />
• DO NOT connect the speaker leads of the power cord to the car battery; otherwise, the unit<br />
will be seriously damaged.<br />
• BEFORE connecting the speaker leads of the power cord to the speakers, check the speaker wiring in<br />
your car.<br />
Parts list for installation and connection<br />
The following parts are provided for this unit. If any item is missing, consult your <strong>JVC</strong> car audio dealer<br />
immediately.<br />
A / B<br />
Hard case/Control panel<br />
E<br />
Power cord<br />
I<br />
Rubber cushion<br />
J<br />
Handles<br />
TROUBLESHOOTING<br />
C<br />
Sleeve<br />
F<br />
Washer (ø5)<br />
G<br />
Lock nut (M5)<br />
K<br />
Remote controller<br />
D<br />
Trim plate<br />
H<br />
Mounting bolt (M5 × 20 mm)<br />
L<br />
Battery<br />
• The fuse blows.<br />
* Are the red and black leads connected correctly?<br />
• Power cannot be turned on.<br />
* Is the yellow lead connected?<br />
• No sound from the speakers.<br />
* Is the speaker output lead short-circuited?<br />
• Sound is distorted.<br />
* Is the speaker output lead grounded?<br />
* Are the “–” terminals of L and R speakers grounded in common?<br />
• Noise interfere with sounds.<br />
* Is the rear ground terminal connected to the car’s chassis using shorter and thicker cords?<br />
• This unit becomes hot.<br />
* Is the speaker output lead grounded?<br />
* Are the “–” terminals of L and R speakers grounded in common?<br />
• This unit does not work at all.<br />
* Have you reset your unit?<br />
1<br />
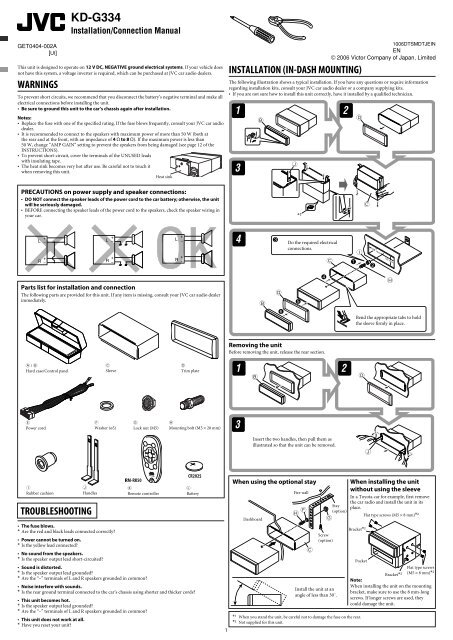
INSTALLATION (IN-DASH MOUNTING)<br />
1006DTSMDTJEIN<br />
EN<br />
© 2006 Victor Company of Japan, Limited<br />
The following illustration shows a typical installation. If you have any questions or require information<br />
regarding installation kits, consult your <strong>JVC</strong> car audio dealer or a company supplying kits.<br />
• If you are not sure how to install this unit correctly, have it installed by a qualified technician.<br />
Do the required electrical<br />
connections.<br />
Removing the unit<br />
Before removing the unit, release the rear section.<br />
Insert the two handles, then pull them as<br />
illustrated so that the unit can be removed.<br />
When using the optional stay<br />
Dashboard<br />
Fire wall<br />
Screw<br />
(option)<br />
Install the unit at an<br />
angle of less than 30˚.<br />
Stay<br />
(option)<br />
Bend the appropriate tabs to hold<br />
the sleeve firmly in place.<br />
When installing the unit<br />
without using the sleeve<br />
In a Toyota car for example, first remove<br />
the car radio and install the unit in its<br />
place.<br />
Bracket* 2<br />
* 1 When you stand the unit, be careful not to damage the fuse on the rear.<br />
* 2 Not supplied for this unit.<br />
Flat type screws (M5 × 8 mm)* 2<br />
Flat type screws<br />
(M5 × 8 mm)*<br />
Note:<br />
When installing the unit on the mounting<br />
bracket, make sure to use the 8 mm-long<br />
screws. If longer screws are used, they<br />
could damage the unit.<br />
2<br />
Pocket<br />
Bracket* 2