Digital Trunking â Desktop/Mobile Radio Scanner - Radio Shack
Digital Trunking â Desktop/Mobile Radio Scanner - Radio Shack
Digital Trunking â Desktop/Mobile Radio Scanner - Radio Shack

You also want an ePaper? Increase the reach of your titles
YUMPU automatically turns print PDFs into web optimized ePapers that Google loves.
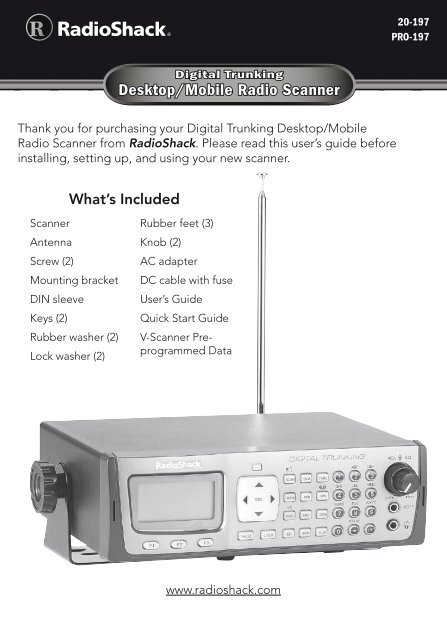
20-197<br />
PRO-197<br />
<strong>Digital</strong> <strong>Trunking</strong><br />
<strong>Desktop</strong>/<strong>Mobile</strong> <strong>Radio</strong> <strong>Scanner</strong><br />
Thank you for purchasing your <strong>Digital</strong> <strong>Trunking</strong> <strong>Desktop</strong>/<strong>Mobile</strong><br />
<strong>Radio</strong> <strong>Scanner</strong> from <strong>Radio</strong><strong>Shack</strong>. Please read this user’s guide before<br />
installing, setting up, and using your new scanner.<br />
What’s Included<br />
<strong>Scanner</strong><br />
Antenna<br />
Screw (2)<br />
Mounting bracket<br />
DIN sleeve<br />
Keys (2)<br />
Rubber washer (2)<br />
Lock washer (2)<br />
Rubber feet (3)<br />
Knob (2)<br />
AC adapter<br />
DC cable with fuse<br />
User’s Guide<br />
Quick Start Guide<br />
V-<strong>Scanner</strong> Preprogrammed<br />
Data<br />
www.radioshack.com
Contents<br />
Contents<br />
Understanding Your <strong>Scanner</strong>............................................................. 6<br />
Understanding the Function Keys....................................................................6<br />
Understanding the Display................................................................................9<br />
Understanding Object Oriented Scanning....................................................10<br />
<strong>Scanner</strong> Features..............................................................................................13<br />
<strong>Scanner</strong> Setup.................................................................................. 16<br />
Installing Your <strong>Scanner</strong>....................................................................................16<br />
Setting up a <strong>Mobile</strong> Base.............................................................................16<br />
Bracket Mounting..........................................................................................16<br />
Dashboard Installation..................................................................................17<br />
Connecting the Antenna..............................................................................18<br />
Powering Your <strong>Scanner</strong>....................................................................................19<br />
Wall Outlet.....................................................................................................19<br />
Vehicle (Power Socket)..................................................................................19<br />
Vehicle (Direct)...............................................................................................20<br />
Headphones and Speakers.............................................................................20<br />
Listening Safety.............................................................................................20<br />
Transferring Data To or From another <strong>Scanner</strong> or PC ..................................21<br />
Turning on the <strong>Scanner</strong> and Setting Squelch................................................21<br />
Squelch and Attenuator..................................................................................22<br />
Basic Settings...................................................................................................23<br />
Delay..............................................................................................................24<br />
Adjusting the LCD Contrast.........................................................................24<br />
Turning the Key Tone On or Off...................................................................25<br />
Turning Key and Backlight On or Off..........................................................25<br />
Creating Scannable Objects............................................................ 26<br />
Understanding Object Menus........................................................................26<br />
Conventional Channel Objects.......................................................................28<br />
Essential Parameters.....................................................................................28<br />
Creating a CONV Object.............................................................................29<br />
Changing Text Tags.......................................................................................29<br />
<strong>Trunking</strong> Talkgroup Objects (TGRP)...............................................................30<br />
Essential Parameters.....................................................................................30<br />
<strong>Trunking</strong> System (TSYS) Objects..................................................................31<br />
Duplicate (DUPE)..............................................................................................34<br />
Scanning.......................................................................................... 35<br />
Basic Scanning Operation...............................................................................35<br />
Wildcard Scanning...........................................................................................35<br />
Manual Mode...................................................................................................36<br />
Organizing Objects ........................................................................ 38<br />
Object Numbering...........................................................................................38<br />
Grouping Objects with Scan Lists...................................................................39<br />
Changing Scan List Membership.................................................................40<br />
New Objects.............................................................................................40<br />
Existing Objects........................................................................................40<br />
Naming Scan Lists.........................................................................................41<br />
Enabling or Disabling Scan Lists..................................................................41<br />
While Scanning.........................................................................................41<br />
From Global Settings Menu....................................................................42<br />
NS (Not Scanned) Scan List..........................................................................42<br />
Favorite List....................................................................................................43<br />
Setting the Default Scan List........................................................................44<br />
Deleting Objects..............................................................................................44<br />
Searching for Objects using FIND..................................................................45<br />
Filtering by Object Type..................................................................................47<br />
Object Lockout.................................................................................................47<br />
Temporary Lockout.......................................................................................48<br />
Permanent Lockout.......................................................................................48<br />
Change L/OUT Key Function.......................................................................49<br />
Search Lockout..............................................................................................49<br />
Talkgroup Lockout.........................................................................................50<br />
Object Searches............................................................................... 51<br />
Limit Search Object (LMIT)..............................................................................51<br />
Essential Parameters.....................................................................................51
Contents<br />
Contents<br />
Service Search Object (SRVC).........................................................................53<br />
Essential Parameters.....................................................................................53<br />
Signal Stalker II Object (STLK).........................................................................55<br />
Essential Parameters.....................................................................................55<br />
Dedicated Searches......................................................................... 57<br />
Dedicated LMIT Search...................................................................................57<br />
Dedicated SRVC Search..................................................................................58<br />
Dedicated Signal Stalker II .............................................................................60<br />
Dedicated TUNE Search..................................................................................61<br />
Tune LED........................................................................................................63<br />
Weather Scanning............................................................................ 64<br />
Weather <strong>Radio</strong> Mode......................................................................................64<br />
Weather Priority Mode....................................................................................64<br />
SAME Standby Mode......................................................................................65<br />
Activating SAME Standby Mode.................................................................68<br />
<strong>Scanner</strong> Memory.............................................................................. 69<br />
V-<strong>Scanner</strong> Storage............................................................................................69<br />
Using V-<strong>Scanner</strong>s...........................................................................................70<br />
Saving Main Memory to a V-<strong>Scanner</strong> Folder..............................................70<br />
Loading a V-<strong>Scanner</strong> Folder to Main Memory............................................71<br />
Erasing V-<strong>Scanner</strong> Folders............................................................................71<br />
Cloning .............................................................................................................71<br />
Memory Report................................................................................................72<br />
Advanced Settings.......................................................................... 73<br />
Priority Scan......................................................................................................73<br />
Turning Object Priority On or Off................................................................73<br />
Turning Priority Scan Mode On or Off.........................................................73<br />
CONV Priority Scan.......................................................................................74<br />
TGRP Priority Scan........................................................................................74<br />
Hit Counters.....................................................................................................74<br />
Audible Alarms and the Alert LED.................................................................75<br />
Multi-Site Mode on Networked Systems.......................................................77<br />
LTR Home Repeater AutoMove......................................................................79<br />
Additional Information.................................................................... 80<br />
Power-On Configuration Key Sequences.......................................................80<br />
Power-On Password.........................................................................................81<br />
Birdie Frequencies...........................................................................................82<br />
FCC Notice.......................................................................................................83<br />
Scanning Legally..............................................................................................83<br />
Care...................................................................................................................84<br />
Service and Repair...........................................................................................84<br />
Specifications ...................................................................................................85<br />
Troubleshooting...............................................................................................89<br />
Reset Global Parameters to Factory Defaults................................................90<br />
Initializing the <strong>Scanner</strong> to Factory Defaults...................................................92<br />
Appendix A: Search Bands.............................................................. 94<br />
All Sub Bands...................................................................................................94<br />
PubSafety Band................................................................................................94<br />
Aircraft Band.....................................................................................................95<br />
Ham Bands.......................................................................................................95<br />
Appendix B: Detailed Menu Reference........................................... 96<br />
GLOB Menu......................................................................................................96<br />
CONV Menu..................................................................................................101<br />
TGRP Menu....................................................................................................104<br />
TSYS Menu.....................................................................................................106<br />
LMIT Menu......................................................................................................108<br />
SRVC Menu....................................................................................................110<br />
STLK Menu.....................................................................................................113<br />
Appendix C: Text Entry and QuickText......................................... 115<br />
Text Entry........................................................................................................115<br />
QuickText........................................................................................................117<br />
Customizing QuickText...............................................................................118<br />
Index.............................................................................................. 119
Understanding Your <strong>Scanner</strong><br />
Understanding the Function Keys<br />
Five Way Pushbutton Pad<br />
t p q u Navigates while browsing objects and menus.<br />
t u Navigates through Scan Lists.<br />
SEL (Select)<br />
Activates data entry fields and toggles Scan List<br />
selection in object menus.<br />
FUNC + SEL to activate context sensitive help menus.<br />
Programmable LED<br />
Understanding your <strong>Scanner</strong><br />
1-0 / A-Z<br />
Inputs a number or character.<br />
Use while scanning to select Scan Lists 1-10 on/off.<br />
Press after FUNC to select Scan List 11-20 on/off.<br />
• / DELAY<br />
Inputs decimal point (frequency input), space (text input)<br />
or hyphen (<strong>Trunking</strong> ID input).<br />
Toggles delay functions on/off.<br />
ENT (Enter)<br />
Softkeys F1 / F2 / F3<br />
Activates the function<br />
shown in the LCD display<br />
above the softkey.<br />
Volume / ON/OFF / Squelch<br />
PAUSE<br />
Pauses scan or search.<br />
Connect computer, PRO-<br />
197 or PRO-106 scanner<br />
L/OUT<br />
Toggles temporary Lockout<br />
on active or selected object.<br />
FUNC + L/OUT for<br />
permanent lockout.<br />
SCAN /<br />
Enters Scan Mode for scanning enabled objects.<br />
FUNC + SCAN activates Signal Stalker II.<br />
MAN (Manual)<br />
Places scanner in Manual Mode for monitoring single objects.<br />
PROG (Program)<br />
Puts scanner in Program Mode for editing radio-wide options,<br />
adding new objects, or editing existing objects. FUNC + PROG<br />
accesses V-<strong>Scanner</strong> Mode.<br />
ATT (Attenuator)<br />
Toggles Attenuator on and off.<br />
FUNC + ATT toggles Global Attenuator mode.<br />
DIM<br />
Controls backlight brightness.<br />
PRI (Priority)<br />
Toggles Priority setting for selected<br />
or active object.<br />
FUNC + PRI toggles Priority Mode<br />
on/off.<br />
SRCH (Search)<br />
Enters Search Mode for dedicated<br />
service and frequency searches.<br />
FAV (Favorites)<br />
Activates Favorites Scan Mode.<br />
FUNC + FAV adds current object to<br />
the Favorite Scan List.<br />
Connect Headphones<br />
FUNC (Function)<br />
Activates alternative key<br />
functions.<br />
WX /<br />
Activates Weather Scan.<br />
FUNC + WX activates Skywarn<br />
mode.<br />
TUNE<br />
Direct tuning of any valid<br />
frequency.<br />
FUNC + TUNE loads current<br />
or most recently scanned<br />
frequency into Tune.<br />
CLR (Clear)<br />
Clears an incorrect entry.<br />
FUNC + CLR clears entire field.<br />
Moves back to previous menu.
Understanding your <strong>Scanner</strong><br />
Understanding your <strong>Scanner</strong><br />
DC 13.8V<br />
Connect power<br />
source.<br />
Understanding the Display<br />
The LCD provides important information about the status of the<br />
radio. The top row of icons provide status information. Beneath<br />
this row, there are 4 rows of 16 characters each that provide<br />
alphanumeric information such as frequencies and object names.<br />
The last row usually contains softkeys for F1, F2, and F3.<br />
EXT SP<br />
Connect an external<br />
speaker.<br />
ANT<br />
Connect the supplied antenna or an<br />
external antenna.<br />
SCREW HOLE<br />
May be used to mount<br />
the scanner in a car.<br />
AlphanumericInfo<br />
AlphanumericInfo<br />
AlphanumericInfo<br />
F1 F2 F3<br />
The Function Key (FUNC) has been pressed.<br />
The scanner is currently receiving trunking control channel data.<br />
The attenuator is set for Global mode.<br />
The attenuator is currently active.<br />
The radio’s squelch circuit is open.<br />
Signal meter indicating strength of the received signal.<br />
Menu position and search direction indicators.
Understanding your <strong>Scanner</strong><br />
Understanding Object Oriented Scanning<br />
Your PRO-197 scanner utilizes an entirely new method of<br />
programming called Object Oriented Scanning. In Object Oriented<br />
Scanning, all “Scannable Objects” are treated the same. Scannable<br />
Objects include talkgroups on trunked radio systems, conventional<br />
non-trunked frequencies, limit searches, service searches, and Signal<br />
Stalker II configurations. All these Scannable Objects are created,<br />
edited, grouped, scanned and deleted using the same methods.<br />
Scannable Objects can also be searched, filtered, and locked out.<br />
Scannable Objects are mapped to Scan Lists, which can be named,<br />
enabled, and disabled. There is even a Favorites Scan List. It is<br />
easy to search for new frequencies or talkgroups and add them to<br />
Scan List groups. It is also easy to delete or deactivate objects and<br />
Scan Lists that you do not want to listen to, including a powerful<br />
temporary lockout mode that allows you to zero in on activity<br />
associated with a specific incident, then restore your desired<br />
configuration when the incident is over.<br />
Object Oriented Scanning is completely different from any prior<br />
scanning receiver technology. Accordingly, some users may find it<br />
difficult to visualize and understand how Object Oriented Scanning<br />
works. This may be especially true for users who are familiar with<br />
more recent scanning receiver technologies.<br />
We suggest that you keep the following Object Oriented Scanning<br />
Tenets in mind as you proceed with your study of this manual.<br />
1. Memory organization is nothing more than a large list of<br />
Scannable Objects.<br />
2. A Scannable Object is simply “something that can be scanned,”<br />
including conventional channels, trunking talkgroups, limit<br />
searches, service searches, and Signal Stalker II setups.<br />
3. There are no “systems,” “banks,” “groups,” “sub-groups,” or<br />
“ID lists.” There is simply a very large collection of objects, each<br />
Understanding your <strong>Scanner</strong><br />
with their own attributes. Scannable Objects all exist at the same<br />
level or hierarchy within the scanner—no single type of Scannable<br />
Object is more important than another, and Scannable Objects<br />
do not have dependencies on or links to other Scannable Objects<br />
in order for them to function properly.<br />
4. The primary method of grouping the collection of objects is by<br />
mapping them to Scan Lists. Mapping a Scannable Object to<br />
one or more Scan Lists does not change the physical location<br />
of the object in the memory system. When an object is mapped<br />
to one or more Scan Lists, the object itself has not moved nor<br />
changed from what it is—a simple, standalone object that is part<br />
of a larger collection.<br />
Object abbreviations used in this manual<br />
Object names are abbreviated so that they can easily fit into the 16<br />
character LCD. You should take a moment and become familiar with<br />
these abbreviations now.<br />
CONV – Conventional Channel Object<br />
A CONV object is a regular, non-trunked frequency used for radio<br />
communications. CONV objects are used to store the parameters for<br />
any radio channel that is not a part of a trunked system. For example,<br />
if you want to monitor specific VHF marine channels, they should be<br />
programmed as CONV objects. If you want to monitor your favorite<br />
amateur radio channel, it should be stored as a CONV object. If<br />
your police or fire department uses a channel, or channels that are<br />
not trunked, but part of a “plain old radio system,” they should be<br />
stored as CONV objects.<br />
TGRP – <strong>Trunking</strong> Talkgroup Object<br />
<strong>Trunking</strong> Talkgroups are “virtual” channels that exist on a trunked<br />
radio system. A trunked radio system is a radio system where a<br />
small group of radio channels are automatically shared between a<br />
larger number of users and user groups. This sharing of channels is<br />
10 11
Understanding your <strong>Scanner</strong><br />
managed automatically by a special computer, called a controller, or<br />
by other specialized hardware. If you want to monitor a talkgroup on<br />
a trunked radio system, you must store that talkgroup’s parameters in<br />
a TGRP object.<br />
TSYS – <strong>Trunking</strong> System Object<br />
A TSYS is a special object type that is used when creating TGRP<br />
objects. A trunking talkgroup must be associated with a specific<br />
trunked radio system in order for it to operate. There are parameters<br />
that are associated with trunking systems, such as the type of trunked<br />
radio system technology used, the frequencies that the system uses<br />
to broadcast control data, etc. Instead of entering these parameters<br />
over and over again every time you create a new TGRP, you create<br />
a TSYS object with all of the system parameters, then specify that<br />
TSYS object for each TGRP you create on the same trunked radio<br />
system. A TSYS cannot be scanned by itself and is not considered<br />
a Scannable Object. It is a “configuration object” that can be used<br />
over and over again when adding talkgroups for a specified trunked<br />
radio system.<br />
LMIT – Limit Search or Search Range Object<br />
LMIT objects contain the parameters necessary for the radio to<br />
search a range of individual frequencies between a lower and upper<br />
limit frequency.<br />
SRVC – Service Search Object<br />
SRVC objects are further divided into Public Safety, Aircraft, Amateur,<br />
CB, Marine, and FRS/GMRS/MURS/DOT. SRVC objects are similar<br />
to LMIT objects, but are preprogrammed to search all frequencies<br />
associated with the selected service.<br />
STLK – Signal Stalker II Object<br />
STLK objects contain the parameters necessary for the radio to<br />
rapidly sweep a range of radio spectrum for strong signals from<br />
nearby transmitters.<br />
<strong>Scanner</strong> Features<br />
Understanding your <strong>Scanner</strong><br />
Object Oriented User Interface is designed for ease of use, yet is<br />
powerful enough to satisfy the most sophisticated experts. Common<br />
data entry, browsing and control methods are used for non-trunked<br />
conventional channels, trunking talkgroups, search configurations and<br />
Signal Stalker II setups. The radio grows with you—you can start out<br />
with a small, easy to manage configuration, then expand it whenever<br />
you need to.<br />
Menu Driven Programming with Context Sensitive Help – Each<br />
menu item provides a few lines of help text that provide assistance<br />
with programming and using the scanner.<br />
Scan List functionality allows you to arrange, group and scan objects<br />
according to your preference.<br />
Free-Form Memory Organization – Memory is assigned as objects<br />
are created using a sophisticated internal file management system.<br />
You are not constrained to traditional bank or channel scanner<br />
memory layouts. The scanner can store over 1,800 conventional<br />
channels, trunking talkgroups, search configurations, and Signal<br />
Stalker II objects in any combination.<br />
V-<strong>Scanner</strong> Technology – Allows you to save complete radio<br />
configurations within the radio, for recall into main memory as<br />
needed in the field. Twenty one V-<strong>Scanner</strong> Folders are provided,<br />
each capable of storing over 1,800 objects. Total memory capacity of<br />
main memory combined with V-<strong>Scanner</strong>s is over 37,800 objects.<br />
Skywarn Storm Spotter Functionality – Instant access to<br />
frequencies used by storm spotter networks. You can monitor<br />
storm conditions as they occur, and become aware of dangerous<br />
conditions before the media or emergency management officials<br />
announce them to the general public.<br />
SAME and All Hazards Weather Alerting – Your scanner can<br />
alert you to severe weather and other hazards in the specific areas<br />
12 13
Understanding your <strong>Scanner</strong><br />
that you select. Your scanner can check your local NOAA weather<br />
frequency periodically, even while scanning, and alert you when an<br />
All Hazards alert occurs.<br />
Multi-System <strong>Trunking</strong> – Scans most common trunked radio system<br />
signaling formats, including Motorola, EDACS, LTR and P25 trunked<br />
radio networks. Both talkgroup and individual call monitoring are<br />
supported.<br />
Automatic Adaptive <strong>Digital</strong> Tracking – When monitoring P25 digital<br />
systems, instantly adapts the digital decoder to the digital modulation<br />
format of the transmitted signal, then analyzes the signal over 50 times<br />
each second and adapts to any subtle changes caused by multipath or<br />
fading. No cumbersome manual adjustments are required.<br />
<strong>Digital</strong> AGC – Instantly compensates for low user audio levels that<br />
are common on digital systems.<br />
LTR Home Repeater AutoMove – Takes the guesswork out of<br />
programming LTR trunking systems when the home repeater order<br />
is not known. Enter the LTR system frequencies in any order, and the<br />
PRO-197 will automatically move the frequencies to the proper home<br />
repeater slots as transmissions are received on the system.<br />
Subaudible Squelch Decoder – CTCSS and DCS subaudible<br />
squelch coding is processed by the same powerful DSP chip that is<br />
used for P25 digital decoding. Provides fast and reliable decoding of<br />
subaudible squelch signaling with squelch tail elimination.<br />
Signal Stalker II – Quickly sweeps the scanner’s frequency ranges for<br />
transmissions from nearby sources.<br />
P25 NAC Functionality – P25 Network Access Code (NAC) is used<br />
to provide selective squelch operation on conventional digital<br />
channels. Your PRO-197 will detect the NAC that is being used on<br />
a P25 conventional digital channel, and allow you to program NAC<br />
codes to block transmissions that do not have a matching NAC,<br />
including analog traffic on the same frequency.<br />
Understanding your <strong>Scanner</strong><br />
Alert LED – Programmable tri-color LED can be configured to<br />
illuminate or flash when certain objects are active. Eight user-defined<br />
colors and brightness levels can be specified from thousands of<br />
possible combinations.<br />
Audible alarms – Programmable audible alarms can be configured<br />
to sound when certain Scannable Objects are active. Can be used in<br />
conjunction with, or separately from, the Alert LED described above.<br />
High Speed PC Interface – Use a USB <strong>Scanner</strong> programming<br />
cable for full duplex mode at 6 times the speed of previous scanner<br />
models for PC transfer and 8 times the speed of previous models for<br />
radio to radio cloning. High speed scanner programming cables are<br />
available at your local <strong>Radio</strong><strong>Shack</strong> store or <strong>Radio</strong><strong>Shack</strong>.com.<br />
Real-time Signal Strength Indicator – Shows relative strength of<br />
received signals.<br />
IMPORTANT NOTICE: The PRO-197 <strong>Digital</strong> <strong>Scanner</strong> will not receive<br />
encrypted radio communications, or radio transmissions that utilize<br />
ProVoice digital modulation.<br />
14 15
<strong>Scanner</strong> Setup<br />
<strong>Scanner</strong> Setup<br />
Installing Your <strong>Scanner</strong><br />
You can mount your scanner in your vehicle or use it as a base<br />
station.<br />
Setting up a <strong>Mobile</strong> Base<br />
You can place your scanner on a desk, shelf, or table to use it as a<br />
base station. Because the speaker is on the bottom of the scanner,<br />
use the mounting bracket to elevate your scanner off the surface for<br />
better sound.<br />
To use the scanner on a flat surface:<br />
1. Attach the three protective<br />
rubber feet to the<br />
mounting bracket.<br />
2. Slide the scanner into<br />
the bracket, aligning<br />
the scanner’s side holes<br />
with the holes in the<br />
bracket, and then screw the<br />
mounting knobs into the scanner.<br />
Bracket Mounting<br />
You can mount your scanner under or on top of the dashboard a<br />
desk, shelf, table or other flat surface, using the mount bracket.<br />
1. Use the supplied mounting bracket as a template to make<br />
positions for the two mounting screws.<br />
2. At the marked positions, drill holes slightly smaller than the<br />
screws. When drilling holes, avoid obstructions behind the<br />
mounting surface.<br />
<strong>Scanner</strong> Setup<br />
3. Attach the mounting bracket<br />
to your vehicle’s surface using<br />
the supplied screws and<br />
lockwashers.<br />
Note: Do not use the rubber feet if<br />
you are mounting the bracket with<br />
screws.<br />
Dashboard Installation<br />
If you are unsure how to install your scanner in your vehicle, consult<br />
your automobile manufacturer, dealer, or a qualified installer.<br />
To mount in your dashboard, you must connect an external antenna<br />
and speaker.<br />
1. Before installing, confirm your scanner fits in the desired<br />
mounting area and you have all the necessary materials. Your<br />
scanner requires a 2 x 7 1 /8 x 5 5 /16 inch (50 x 180 x 135 mm) space.<br />
2. Remove the four rear screws and pull off the black case before<br />
installing your scanner.<br />
3. Install the DIN sleeve into the opening in your dashboard, lip<br />
facing out.<br />
4. Push out the top and bottom tabs to hold the sleeve firmly in place.<br />
5. Slide the scanner into the sleeve until it locks in place.<br />
16<br />
17
<strong>Scanner</strong> Setup<br />
Connecting the Antenna<br />
You must install an antenna<br />
before you can operate<br />
the scanner. The supplied<br />
telescopic antenna helps<br />
your scanner receive strong<br />
local signals. To install the<br />
antenna, align the antenna<br />
slots with the tabs on the<br />
scanner, and slide the<br />
antenna into place. Turn<br />
and push down until the<br />
antenna locks into place.<br />
To remove your scanner from<br />
the DIN sleeve, insert the two<br />
keys straight into the scanner’s<br />
front panel and pull the<br />
scanner out.<br />
To connect an external antenna, follow the installation instructions<br />
supplied with the antenna. Use 50-ohm coaxial cable, such as RG-58<br />
or RG-8X, to connect an outdoor antenna. For lengths between 50<br />
and 100 feet, use RG-8X low-loss dielectric coaxial cable. For lengths<br />
over 100 feet, use RG8. You also may need a BNC adapter (not<br />
supplied).<br />
WARNING: Use extreme caution when you installing or removing<br />
an outdoor antenna. If the antenna starts to fall, let it go! It could<br />
contact overhead power lines. If the antenna touches a power<br />
line, contact with the antenna, mast, cable, or guy wires can cause<br />
electrocution and death. Call the power company to remove the<br />
antenna. DO NOT attempt to do so yourself.<br />
Powering Your <strong>Scanner</strong><br />
<strong>Scanner</strong> Setup<br />
You can power your scanner from a wall outlet, or from your vehicle’s<br />
battery.<br />
You must use a power source that supplies 12V DC and delivers at<br />
least 600 mA. Its center tip must be set to positive and its plug must<br />
fit the scanner’s DC 13.8V jack. The supplied AC adapter and DC<br />
power cord meet these specifications. Using a power source that<br />
does not meet these specifications could damage the scanner or the<br />
adapter.<br />
Wall Outlet<br />
1. Connect the tip of the supplied AC adapter to the DC 13.8V jack<br />
at the rear of your scanner.<br />
2. Plug the AC adapter into your wall outlet.<br />
To prevent electric shock, do not use the AC adapter’s polarized<br />
plug with an extension cord, receptacle, or outlet unless you can fully<br />
insert the blades to prevent blade exposure.<br />
Note: To avoid injury, do not connect the provided power adapter to<br />
a ceiling outlet.<br />
Vehicle (Power Socket)<br />
To power your scanner from a 12V power source in your vehicle, such<br />
as a cigarette-lighter socket, you need a 12V, 600 mA DC cigarettelighter<br />
adapter (not supplied), available at your local <strong>Radio</strong><strong>Shack</strong><br />
store.<br />
1. Insert the adapter’s barrel plug into the scanner’s DC 13.8V jack.<br />
2. Plug the adapter’s other end into your vehicle’s cigarette lighter<br />
or power socket.<br />
Note: When you use a cigarette-lighter adapter, you might hear<br />
electrical noise from your engine while scanning. This is normal. This<br />
is less of a problem if you connect directly to the vehicle fuse box.<br />
18<br />
19
<strong>Scanner</strong> Setup<br />
<strong>Scanner</strong> Setup<br />
Vehicle (Direct)<br />
1. Disconnect the cable from your vehicle battery’s negative (–)<br />
terminal.<br />
2. Ground the black wire of the supplied DC power cord to your<br />
vehicle’s chassis. The grounding screw must make complete<br />
contact with your vehicle’s metal frame.<br />
3. Connect the red wire of the supplied DC power cord to a<br />
voltage source that turns on and off with the ignition switch, such<br />
as a spare accessory terminal in your vehicle’s fuse box.<br />
4. Insert the power cord’s barrel plug into the scanner’s DC 13.8V jack.<br />
5. Reconnect the cable to your vehicle battery’s negative (–) terminal.<br />
Headphones and Speakers<br />
You can plug headphones or an external speaker (neither included)<br />
into your scanner.<br />
To use headphones, connect the plug into the headphone jack<br />
on the front panel. Headphones automatically mute the scanner’s<br />
speaker.<br />
To use an external speaker, connect the plug into the EXT SP jack on<br />
the rear panel.<br />
Listening Safety<br />
To protect your hearing, follow these earphone or headphones<br />
guidelines:<br />
• Do not listen at extremely high volume levels. Extended highvolume<br />
listening can lead to permanent hearing loss.<br />
• Set the volume to the lowest setting before listening. Turn on the<br />
scanner, then adjust the volume to a comfortable level.<br />
• After you set the volume, do not increase it. Over time, your ears<br />
adapt to the volume level, so a volume level that does not cause<br />
discomfort might still damage your hearing.<br />
20<br />
• Do not wear an earphone or headphones with your scanner<br />
when operating a motor vehicle or riding a bicycle in or near<br />
traffic. Doing so can create a traffic hazard and could be illegal in<br />
some areas.<br />
• Even though some earphones/headphones let you hear some<br />
outside sounds when listening at normal volume, they can still be<br />
a traffic hazard.<br />
Transferring Data To or From another <strong>Scanner</strong> or PC<br />
You can transfer the programmed data to and from another PRO-197<br />
or PRO-106 scanner using a connecting cable which has 1/8-inch<br />
(3.5mm) stereo (TRS) phone plugs on both ends (not supplied). See<br />
“Cloning” on page 71.<br />
You can also upload or download programmed data to or from a PC<br />
using a USB cable available through your local <strong>Radio</strong><strong>Shack</strong> store or<br />
at <strong>Radio</strong><strong>Shack</strong>.com. To find the application software, we recommend<br />
using an internet search engine to search for “scanner programming<br />
software.”<br />
Turning on the <strong>Scanner</strong> and Setting Squelch<br />
1. Turn the VOLUME and SQUELCH knobs clockwise to about<br />
their mid-point (12:00 o’clock) position.<br />
Note: Make sure the scanner’s antenna is connected before you turn it on.<br />
2. Press TUNE.<br />
3. Turn SQUELCH down (counterclockwise) until you hear noise.<br />
4. Turn SQUELCH up (clockwise) a little past where the noise stops.<br />
The higher the squelch is set, the stronger the signal required to<br />
break the squelch.<br />
5. If noise starts breaking the squelch, turn SQUELCH up to<br />
decrease the scanner’s sensitivity. To hear weaker signals, turn<br />
SQUELCH down to increase its sensitivity.<br />
21
<strong>Scanner</strong> Setup<br />
Squelch and Attenuator<br />
The squelch and attenuator control the scanner sensitivity. If squelch<br />
is set too high, the scanner may scan slowly or stop on noise or<br />
silence. If this happens, adjust squelch using the steps above, or for<br />
conventional channels, set the correct subaudible squelch mode.<br />
See “Appendix B: Detailed Menu Reference: Conv Menu” on page 101.<br />
With the attenuator on, the scanner might not receive weak signals,<br />
but immunity to adjacent strong signals is improved.<br />
You can reduce interference using two attenuator modes:<br />
• Global – The attenuator setting is applied to all channels, bands, or<br />
groups.<br />
• Normal – Lets you set the attenuator in each channel, band, or group.<br />
Note: You cannot set the attenuator while scanning.<br />
To set the attenuator mode in the Global Menu:<br />
1. Press PROG for Program Mode.<br />
2. Press GLOB softkey to access GLOB menu.<br />
3. Press p or q to scroll to Atten Mode.<br />
4. Press or to select Global or Normal.<br />
5. When attenuator is set to Global, you can set Global attenuator<br />
on or off. Press p or q to scroll to Global Atten.<br />
6. Press or to select on or off.<br />
7. Press SAVE softkey to save the new setting.<br />
To set the attenuator mode using the ATT key:<br />
When the scanner is in Manual Mode, Program Mode, Search Mode,<br />
Signal Stalker Mode, or when the scan stops:<br />
• Press ATT to toggle on and off the attenuator setting.<br />
• Press FUNC ATT to toggle on and off the global attenuator setting.<br />
22<br />
Basic Settings<br />
23<br />
<strong>Scanner</strong> Setup<br />
The Global menu stores all of the radio-wide settings used by the<br />
scanner. The Global menu allows you to “tweak” these settings to<br />
your liking. The default settings will work fine for most users, but you<br />
may want to use the Global menu to personalize the radio to suit<br />
your individual tastes. The most common settings are described in<br />
the following sections. Refer to “Appendix B: Detailed Menu Reference:<br />
GLOB Menu” on page 96 for a description of all the settings.<br />
• The active parameter is always the middle parameter and is<br />
indicated by a flashing colon (:).<br />
• Some Global parameter changes do not take effect until the<br />
Global menu is saved.<br />
• Help is available for every menu parameter. Press FUNC SEL to<br />
view help for the selected parameter. Press SEL to exit help.<br />
• The Undo softkey appears in fields where numerical values can<br />
be set, allowing you to exit a parameter field without saving<br />
changes. A note will appear: “Unsaved Changes! Go Back?”<br />
Press YES to go back to the field and continue editing. Press NO<br />
to discard changes and return to the previous menu.<br />
• Each menu parameter features a Dflt softkey that can be used<br />
to restore the value to the factory defaults. This can be very<br />
useful if you make a change to a parameter but do not like the<br />
result.<br />
• You can restore all Global settings to their defaults without<br />
affecting your programmed objects or V-<strong>Scanner</strong>s. Power cycle<br />
the radio, then press 0, then 2 during the welcome message<br />
display. Press ENT to confirm the Global parameter reset.<br />
To access GLOB menu:<br />
1. Press PROG for Program Mode.<br />
2. Press GLOB softkey to access Global menu.
<strong>Scanner</strong> Setup<br />
3. Press p or q to scroll to the desired parameter.<br />
Note: Press FUNC p or FUNC q to jump to the top or bottom of<br />
the menu.<br />
4. Press or to select options for selected field.<br />
5. Press SAVE softkey to save new settings to radio configuration<br />
memory.<br />
Delay<br />
Sometimes, several seconds can pass between transmissions. To<br />
avoid missing a reply, a delay is automatically set for each channel.<br />
The scanner stops for 2 seconds after a transmission stops before it<br />
resumes scanning or searching.<br />
To turn the delay on or off:<br />
Press FUNC •/Delay when the scanner stops on a transmission.<br />
Lowercase d in the display indicates delay is off. Uppercase D<br />
indicates delay is on.<br />
Note: Delay and delay time can also be set in each Scannable<br />
Object Menu. Search Delay time can be set in the Global menu.<br />
Refer to “Appendix B: Detailed Menu Reference” on page 96 for a<br />
description of delay settings.<br />
Adjusting the LCD Contrast<br />
You can set the LCD contrast from level 1 to 7.<br />
1. Press PROG for Program Mode.<br />
2. Press GLOB softkey to access Global menu.<br />
3. Press p or q to scroll CONTRAST.<br />
4. Press or to select contrast level 1 to 7.<br />
5. Press SAVE softkey to save new setting.<br />
<strong>Scanner</strong> Setup<br />
Turning the Key Tone On or Off<br />
Each time you press any of the scanner’s keys, the scanner beeps.<br />
To turn the scanner’s key tone on or off:<br />
1. Press PROG for Program Mode.<br />
2. Press GLOB softkey to access Global menu.<br />
3. Press p or q to scroll to Key Beeps.<br />
4. Press to select On or Off.<br />
5. Press SAVE softkey to save new setting.<br />
Turning Key and Backlight On or Off<br />
1. Press PROG for Program Mode.<br />
2. Press GLOB softkey to access Global menu.<br />
3. Press p or q to scroll to Light Mode.<br />
4. Press to select backlight operation.<br />
Norml (Normal): Uses the backlight on.<br />
Stlth (Stealth): Disables backlight<br />
5. Press SAVE softkey to save new setting.<br />
To change the backlight mode:<br />
Repeatedly press DIM to adjust backlight from Dark, Light Off, or<br />
Light.<br />
24<br />
25
Creating Scannable Objects<br />
Creating Scannable Objects<br />
Understanding Object Menus<br />
When you turn on your scanner for the first time, the scanner is in<br />
Program Mode for you to create your first object into memory. If you<br />
do not see this screen, press PROG.<br />
Press NEW to<br />
Create objects<br />
NEW EDIT GLOB<br />
Creating Scannable Objects<br />
2. For the purpose of this explanation, press F2, the CONV softkey.<br />
3. The Conventional Channel menu opens.<br />
<br />
CONV Channel <br />
Scan Lists: *01<br />
Freq: 25.000000<br />
Save Exit Dflt<br />
Menu softkeys. Press F1,<br />
F2, and F3 to access.<br />
Indicates cursor<br />
location in menu<br />
Menu name<br />
Active menu item<br />
Next menu item<br />
(Scroll down for more<br />
menu items)<br />
Press F1 to<br />
create a new<br />
scannable<br />
object.<br />
Press F2 to<br />
edit existing<br />
object.<br />
Press F3 to<br />
change the<br />
scanner’s global<br />
configuration<br />
settings.<br />
1. Press F1, the NEW softkey, to begin entering a new object.<br />
Press F1 to<br />
create a new<br />
Talkgroup<br />
Object.<br />
Select object<br />
type to create<br />
TGRP CONV SRCH<br />
Press F2 to<br />
create a new<br />
Conventional<br />
Object.<br />
Press F3<br />
to create a<br />
new Search<br />
Object.<br />
Object menu notes:<br />
• The first line of the display shows either:<br />
to indicate the cursor is at the top position of the menu,<br />
to indicate the cursor is at the bottom, or to indicate<br />
there are menu items above and below the cursor.<br />
• The center (third) line of the display contains the blinking cursor<br />
indicating the active menu item.<br />
• To see the help text for the active menu item, press FUNC, then<br />
press SEL on the 5-way pushbutton pad. To exit help, press SEL<br />
again.<br />
• The last line of the display shows the softkeys, which will change<br />
with each menu. In this menu, the Save softkey will save your<br />
new object to the file system, the Exit softkey aborts the<br />
creation of the new object, and the Dflt softkey restores the<br />
parameter of the active menu item to its default setting.<br />
26<br />
27
Creating Scannable Objects<br />
Creating Scannable Objects<br />
• If you press the key on the bottom of the 5-way pushbutton<br />
pad, you can scroll down and see all of the parameters that can<br />
be specified for the object.<br />
• Pressing FUNC or FUNC will jump to the top or bottom of<br />
a menu, respectively.<br />
• As you scroll the object menu, you will see a line that states: <br />
EXPERT BELOW . This line is found in the object menus and the<br />
Global Configuration menu. It delineates between basic settings<br />
and expert settings for advanced users. For more information<br />
about the Basic and Expert settings, refer to “Appendix B: Detailed<br />
Menu Reference” on page 96.<br />
• When entering data into a numerical field, you can start typing as<br />
soon as you have scrolled to the desired field, which will replace<br />
any previous contents with your new entry. Alternatively, you can<br />
press the key, which will preserve the original contents of the<br />
field so you can make small changes without retyping all of the<br />
data.<br />
Conventional Channel Objects<br />
A Conventional Channel Object (CONV) is a record that stores<br />
the parameters for a regular, non-trunked conventional AM or FM<br />
channel. When you create a CONV object, you are creating an object<br />
that will allow you to scan and monitor a “plain old radio channel,”<br />
that is, a single frequency and the associated parameters that are<br />
necessary for you to receive traffic on that frequency.<br />
Essential Parameters<br />
CONV objects are the simplest objects supported by the radio.<br />
However, there are a few essential parameters in the CONV object<br />
fields that must be set correctly. The frequency must be set to match<br />
the frequency of the transmitter you want to scan or monitor, and the<br />
Modulation (MODE) should be set to Auto (au), AM, FM, or NFM.<br />
28<br />
Note: When MODE is set for Auto, the scanner will automatically<br />
select the default mode based on the frequency you enter. In most<br />
cases it will not be necessary to change MODE.<br />
We also recommend labeling your CONV object by giving it a name<br />
in the TAG field. This makes it easier to find the CONV object later<br />
and identifies it when the scanner stops to monitor activity.<br />
Creating a CONV Object<br />
1. Press PROG to put scanner in Program Mode.<br />
2. Press NEW softkey to create new object.<br />
3. Press CONV softkey to enter a conventional channel object.<br />
4. Press to scroll through the conventional channel object<br />
parameters until the flashing cursor appears next to the Freq:<br />
label.<br />
5. Use the number keys and • to enter the frequency, including the<br />
decimal point.<br />
6. Press ENT or the DONE softkey to store the frequency parameter<br />
in your conventional object.<br />
Note: Go to www.radioreference.com for up-to-date frequency<br />
information.<br />
Changing Text Tags<br />
By default, your new conventional object will be tagged “Channel.”<br />
We recommend that you rename your CONV object, making it easier<br />
to find it later, and identifying it when the scanner stops to monitor<br />
activity.<br />
To change the tag:<br />
1. Press until the cursor highlights Tag:.<br />
2. Press SEL to edit the tag.<br />
3. Enter the text using the text keys (up to 16 characters).<br />
29
Creating Scannable Objects<br />
Creating Scannable Objects<br />
• When you press a key, the associated letters appear on the<br />
screen. Press the corresponding number. For example, when you<br />
press ABC, A, B, and C appear on the display. To select A, press<br />
1. To select B, press 2. To select C, press 3.<br />
• For example, to enter the tag “FIRE”:<br />
Press 3 (DEF), then 3 to choose F<br />
Press 4 (GHI), then 3 to choose I<br />
Press 7 (PQRS), then 3 to choose R<br />
Press 3 (DEF), then 2 to choose E<br />
• To enter a number, press 1, then press the number key.<br />
• To enter lowercase character or second-set character for the 0<br />
key, press the text key and then press FUNC.<br />
• Press or to move the cursor to another digit to make<br />
adjustments.<br />
• Press CLR to clear text. Press FUNC CLR to clear the entire field.<br />
4. Press ENT or the DONE softkey to store new tag information.<br />
See “Appendix C: Text Entry and QuickText” on page 115 for more<br />
information on entering text.<br />
<strong>Trunking</strong> Talkgroup Objects (TGRP)<br />
A <strong>Trunking</strong> Talkgroup Object (TGRP) is a record that stores the<br />
parameters for a trunked talkgroup on a trunked radio system.<br />
A TGRP object allows you to scan and monitor a talkgroup on a<br />
particular trunked radio system.<br />
Essential Parameters<br />
As a standalone object, a TGRP object is similar to a CONV object.<br />
However, for trunking to work, the trunking system (TSYS) and the<br />
talkgroup ID must be specified. We also recommend that you label<br />
your TGRP object by giving it a name in the TAG field, making it<br />
easier to find the TGRP object later, and identifying it when the<br />
scanner stops to monitor activity.<br />
<strong>Trunking</strong> System (TSYS) Objects<br />
The first time you make a TGRP for a particular trunked radio<br />
system, you must also create a TSYS object that contains the system<br />
parameters associated with that trunked radio system. Once you<br />
create a TSYS, you can use it over and over again without having to<br />
re-enter all of the system data.<br />
A TSYS object has its own set of essential parameters, and these<br />
parameters vary depending on the type of trunked radio system<br />
you plan to monitor. If you are a reasonably experienced user, you<br />
probably already know what the essential parameters are for the<br />
system you wish to monitor. For example, each TSYS must correctly<br />
specify the type of system being monitored, the control channel<br />
or LCN frequencies used by the system, and so on. A detailed<br />
description of each type of system supported by this radio and<br />
the essential parameters required to make them work properly is<br />
provided in “Appendix B: Detailed Menu Reference: TSYS Menu” on page<br />
106.<br />
Note: By default all new objects are mapped to Scan List 01. Refer to<br />
“Grouping Objects with Scan Lists” on page 39 for more information on Scan<br />
Lists.<br />
To create a new TSYS object.<br />
1. Press PROG to put scanner in Program Mode.<br />
2. Press NEW softkey to create new object.<br />
3. Press TGRP softkey to create a trunking system object.<br />
<br />
> Talkgroup <<br />
Scan Lists: *01<br />
TSYS:<br />
NEW<br />
Save Exit Dflt<br />
30<br />
31
Creating Scannable Objects<br />
Creating Scannable Objects<br />
4. Press or to scroll through the talkgroup object parameters<br />
until the cursor is at TSYS:.<br />
5. Press SEL.<br />
<br />
> Trunked System <<br />
Type: MOT 800/900<br />
Tag: System<br />
Save Exit Dflt<br />
6. The cursor should be on TYPE:.<br />
7. Press or to select the desired trunking system.<br />
8. Press to scroll to Tag: and enter a new name for the system.<br />
See “Appendix C: Text Entry and QuickText” on page 115 for<br />
information on entering text.<br />
9. Press to scroll to Frequencies: to enter the control<br />
frequencies for the system.<br />
10. Press SEL.<br />
11. At Ch01:, use the number keys and • to enter the first control<br />
channel frequency for the system.<br />
12. Press and repeat Step 11 to add any other control channels<br />
used by the system.<br />
13. Press the SAVE softkey to save.<br />
14. Press SAVE softkey again to store the new TSYS into memory and<br />
return to the TGRP menu.<br />
<br />
Scan Lists: *01<br />
TSYS: System<br />
ID:<br />
Wildcard<br />
Save Exit Dflt<br />
15. Press to scroll to ID:.<br />
By default, the trunking talkgroup ID is set to Wildcard.<br />
To change the ID, press the number keys to enter the specific<br />
talkgroup ID. Press ENT or DONE softkey to store the ID.<br />
See “Talkgroup Notes” below for more information about wildcard<br />
and other talkgroup configurations.<br />
16. Press to scroll down to Tag: and enter a name for your<br />
talkgroup that corresponds with its purpose on the trunked radio<br />
system. See “Appendix C: Text Entry and QuickText” on page 115 for<br />
information on entering text.<br />
17. Press ENT or the DONE softkey to store the name, then press<br />
SAVE softkey to store the TGRP as a new object.<br />
Refer to “Appendix B: Detailed Menu Reference: TSYS Menu” on page 106<br />
for more parameters that can be customized for your system.<br />
Talkgroup Notes:<br />
• A talkgroup object may be configured in one of four different<br />
ways to monitor traffic on a trunked radio system.<br />
Wildcard Talkgroup: will monitor all talkgroup call radio traffic<br />
on the desired trunked radio system. (Press Dflt in the ID: field<br />
to use Wildcard for TGRP object.)<br />
Talkgroup with TGID: will only monitor talkgroup call radio traffic<br />
on the specified TGID. (Enter the desired talkgroup in the ID: field<br />
of the TGRP object to scan a specified ID.)<br />
Wildcard Private Call: will monitor all private call radio traffic on<br />
the desired trunked radio system. (Press Dflt in the TGID field to<br />
get Wildcard, and set the Type field to Private.)<br />
Private Call with ID: will only monitor private call radio traffic on<br />
the specified TGID. (Enter the desired <strong>Radio</strong> ID in the TGID field,<br />
and set the Type field to Private.)<br />
32<br />
33
Creating Scannable Objects<br />
Wildcard Talkgroup Notes:<br />
• Wildcard is a special type of TGRP object that allows you to<br />
monitor all talkgroup call traffic on the associated trunked radio<br />
system.<br />
• Wildcard TGRP objects allow you to quickly find and store new<br />
or unknown talkgroups on a trunked radio system.<br />
• When a Wildcard TGRP object is mapped to an active Scan List<br />
and scanned, all talkgroup traffic on the system is monitored,<br />
and you have the option to save or lock out new talkgroups as<br />
they appear.<br />
• Wildcard objects are easier to find and change later if you<br />
include an abbreviated name for the system in the tag field.<br />
• TGRP objects are also used to receive Private/Individual Calls on<br />
trunking systems that support these call types.<br />
Duplicate (DUPE)<br />
Duplicate (DUPE) is useful when entering multiple TGRP objects that<br />
are hosted on the same trunked radio system, or multiple CONV<br />
objects that have similar parameters or tag names.<br />
1. Press PROG.<br />
2. Press or to scroll to the object that you wish to duplicate.<br />
3. Press the EDIT softkey, then press the DUPE softkey.<br />
An exact copy of the object you selected is created, and the<br />
scanner displays the newly created object menu so you can<br />
change the parameters that need to be changed. Be sure to<br />
change the tag name before saving your new object.<br />
4. Press the SAVE softkey to save the new object.<br />
Note: As soon as you press DUPE, a duplicate of the selected object is<br />
created and saved in memory. Be sure to delete any objects that you<br />
create accidentally. See “Deleting Objects” on page 44.<br />
Basic Scanning Operation<br />
Scanning<br />
Before the scanner can begin to scan, you must have created<br />
scannable objects. Your scanner will scan any scannable objects that<br />
are members of enabled Scan Lists and are not locked out.<br />
1. Press SCAN to start scanning.<br />
Flashing T indicates scanner is<br />
receiving control channel data<br />
from a trunked radio system<br />
Scan lists 1 to 10<br />
Scan lists 11 to 20<br />
<br />
>> Scanning
Scanning<br />
Manual Mode<br />
In Manual Mode, you can browse through the stored objects in your<br />
scanner and select an object to monitor.<br />
1. Press MAN during scanning to enter Manual Mode.<br />
2. Press or to scroll through the objects assigned to the<br />
current Scan List.<br />
3. Press or to browse up and down through the Scan Lists.<br />
Only Scan Lists that contain objects are shown when browsing. A<br />
quick low-high wrap beep sounds when the scanner reaches the last<br />
occupied Scan List and wraps back to the beginning.<br />
The following screen appears when the scanner is stopped on a<br />
conventional channel while scanning.<br />
The following screen appears when the scanner is stopped on a<br />
talkgroup channel while scanning.<br />
Scanning<br />
36<br />
37
Organizing Objects<br />
Organizing Objects<br />
Object Numbering<br />
Your PRO-197 is different from other types of scanners in how<br />
it stores your Scannable Objects in memory. Instead of fixed<br />
channels and banks, objects are stored in the first available block<br />
of free memory and an Object ID is assigned. The Object ID is the<br />
“address” where the object is stored in memory.<br />
The Object ID and the current Scan List number are displayed<br />
whenever an object is selected in Manual Mode and Program Mode.<br />
The Object ID is also displayed when the scanner stops on an active<br />
object while scanning.<br />
Scan List<br />
Object ID<br />
10-0348 CONV pID<br />
FM 155.95000<br />
FIRE<br />
CT:127.3<br />
For example: 10-0348 means Object ID 0348 is mapped to Scan<br />
List 10.<br />
To directly access an object using Object ID:<br />
1. Press MAN or PROG to enter Manual Mode or Program Mode.<br />
2. Use the number keys to enter the Object ID, then press ENT.<br />
Note: Objects are not really “in” a Scan List. Objects are “mapped”<br />
to Scan Lists, meaning that an object can be a member of one or<br />
more Scan Lists. Using the p or q keys to scroll up or down while<br />
viewing a Scan List, will show all the other objects mapped to that<br />
list.<br />
Grouping Objects with Scan Lists<br />
Organizing Objects<br />
By default, new objects are automatically assigned to Scan List 01.<br />
You can divide these objects into separate Scan Lists so that you can<br />
easily enable or disable groups of objects depending on what you<br />
want to scan.<br />
The number of objects that can be grouped in a Scan List is limited<br />
only by the scanner’s memory, and single objects can be members of<br />
multiple Scan Lists.<br />
There are 20 regular Scan Lists available, a special “FAV” Scan List<br />
for one-button access to your favorite Scannable Objects, and a<br />
Skywarn Scan List.<br />
You can also mix and match different object types in Scan Lists as<br />
you see fit. There are no limitations as to the type of objects that can<br />
exist together in the same Scan List.<br />
How you group objects in Scan Lists is entirely up to you. Here are<br />
some examples of how objects can be grouped:<br />
Geographically: You may wish to group your Scannable Objects<br />
according to the areas where they are used. This may be useful if you<br />
use your scanner while traveling.<br />
By trunking system: It is possible to assign any combination of<br />
object types to any Scan List. However, you may wish to assign TGRP<br />
objects associated with specific trunked radio systems to specific<br />
Scan Lists, so you can easily enable or disable monitoring of each<br />
system by enabling or disabling the associated Scan List.<br />
By object type: It may be desirable to segregate object types by<br />
assigning them to specific Scan Lists. For example, if you assign a<br />
group of LMIT or SRVC searches to a single Scan List, you can easily<br />
activate or deactivate searching on those objects by enabling or<br />
disabling the associated Scan List.<br />
38<br />
39
Organizing Objects<br />
Organizing Objects<br />
By application: You can group objects by their application. For<br />
example, you may wish to place law enforcement related objects for<br />
your area in one Scan List, fire and rescue objects in another, and<br />
business related objects in yet another Scan List.<br />
By Favorites: The Favorites (FAV) Scan List is a powerful tool that<br />
can be used to quickly narrow (or expand) your scanning profile.<br />
When you press the FAV key, the radio suspends scanning of all<br />
objects in the radio except for those that are mapped to the FAV<br />
Scan List.<br />
Changing Scan List Membership<br />
New Objects<br />
1. Press PROG to put scanner in Program Mode.<br />
2. Press NEW softkey to create new object.<br />
3. Press the softkey for the object you want to create.<br />
4. Press or to scroll to Scan Lists:.<br />
5. Press or to scroll the Scan Lists until you find the one you<br />
want to enable or disable.<br />
6. Press SEL to select between On or Off. The asterisk (*) next to<br />
the Scan List number indicates that the object is a member of<br />
that Scan List.<br />
7. Press Save softkey to save the new object.<br />
Existing Objects.<br />
1. Press PROG to put scanner in Program Mode.<br />
2. Press , , or to scroll to the object you want to change.<br />
3. Press EDIT softkey.<br />
4. Press CURR softkey to edit the current object.<br />
6. Press to scroll through the Scan Lists.<br />
7. Press SEL to select On or Off for the desired scan list item. The<br />
asterisk (*) next to the Scan List number indicates that the object<br />
is a member of that Scan List.<br />
8. Press Save softkey to save your changes.<br />
Naming Scan Lists<br />
1. Press PROG to put scanner in Program Mode.<br />
2. Press GLOB softkey.<br />
3. Press or to scroll to Scan Lists:.<br />
4. Press SEL.<br />
5. Press to edit the settings for the selected Scan List.<br />
6. Press or to scroll to Tag:, then press .<br />
7. Use the number keys to enter a name. See “Appendix C: Text Entry<br />
and QuickText” on page 115 for information on entering text.<br />
8. Press Done softkey when finished.<br />
9. Press Save softkey to save changes to the Global menu.<br />
Enabling or Disabling Scan Lists<br />
While Scanning<br />
Scan List 1-10<br />
Press the number keys that corresponds with the Scan List you want<br />
to select.<br />
For example, pressing 4 while scanning will toggle the state of Scan<br />
List 04 from enabled to disabled, or vice versa if the Scan List is<br />
already disabled.<br />
5. Scroll down to Scan Lists:<br />
40<br />
41
Organizing Objects<br />
Organizing Objects<br />
Scan List 11-20<br />
Press FUNC, then press a number key, i.e., press FUNC 3 to toggle<br />
the status of Scan List 13.<br />
Note: If you enable a Scan List that has no assigned objects, the<br />
number for that Scan List will flash in the display while the scanner is<br />
scanning.<br />
From Global Settings Menu<br />
1. Press PROG to enter Program Mode.<br />
2. Press GLOB softkey.<br />
3. Press or to scroll to Scan Lists: and press SEL.<br />
4. Press or to scroll to the Scan List you wish to change then<br />
press SEL.<br />
5. Press to scroll to Enabled: and press or to select On or<br />
Off.<br />
The asterisk (*) indicates Scan List enabled.<br />
6. Press the Save softkey to save settings.<br />
7. Press Save softkey again to confirm global changes and exit<br />
GLOB menu.<br />
NS (Not Scanned) Scan List<br />
If you accidently store an object with no Scan List mappings, the<br />
object will be placed in a special “NS” Scan List.<br />
To access NS scan List:<br />
1. Press PROG to enter Program Mode or press MAN to enter<br />
Manual Mode.<br />
2. Press or to scroll to the NS Scan List.<br />
3. Press or to scroll through the NS objects.<br />
4. Press PROG.<br />
5. Press EDIT softkey.<br />
6. Press CURR softkey to view object menu.<br />
7. Scroll down to Scan Lists:<br />
8. Press to scroll through the Scan Lists.<br />
9. Press SEL to select On or Off the desired scan list item. The<br />
asterisk (*) next to the Scan List number indicates that the object<br />
is a member of that Scan List.<br />
Favorite List<br />
To add an object to Favorites:<br />
In scan mode, Manual mode or Program mode, press FUNC, then<br />
FAV.<br />
Each scannable object menu also has a FAV option. Select YES to<br />
add to Favorites.<br />
When FAV is set to YES, the object is a member of the Favorites Scan<br />
List in addition to any other Scan Lists that it is mapped to.<br />
To activate FAV scan:<br />
Press FAV and the radio suspends scanning of all objects in the radio<br />
except for those that are in your Favorites list.<br />
To clear FAV scan list:<br />
1. Press PROG to enter Program Mode.<br />
2. Press the GLOB softkey.<br />
3. Press or to scroll to Clear FAV:.<br />
4. Press SEL to set FAV = NO for all objects.<br />
5. Press YES softkey to confirm.<br />
6. Press Save softkey.<br />
42<br />
43
Organizing Objects<br />
Setting the Default Scan List<br />
By default, your scanner will store all new objects, and objects found<br />
during Search, Tune, and Stalker as mapped to Scan List 01.<br />
You can easily change the default Scan List to any Scan List you<br />
specify, including the special FAV and Skywarn Scan Lists.<br />
1. Press PROG.<br />
2. Press GLOB softkey.<br />
3. Press q to scroll down to Dflt ScanList.<br />
4. Enter new Scan List number to use as default scan list.<br />
0: The “not scanned” (ns) Scan List. Objects with no Scan List<br />
mapping.<br />
1 - 20: Normal Scan Lists<br />
21: FAV Scan List<br />
22: Skywarn Scan List.<br />
5. Press ENT or the Done softkey to store your new default Scan<br />
List value.<br />
6. Press SAVE softkey to save your changes.<br />
Deleting Objects<br />
To delete an object:<br />
1. Press PROG to enter Program Mode.<br />
2. Press , , or to navigate to the object you wish to delete.<br />
3. Press FUNC CLR to delete the object.<br />
The scanner will ask you to confirm the delete command before<br />
removing the object from the scanner’s memory. Deletions<br />
cannot be un-done.<br />
Organizing Objects<br />
To delete a TSYS using the FIND feature:<br />
1. See “Searching for Objects using FIND” below.<br />
2. Once the TSYS has been located, press the PROG key, then<br />
press FUNC CLR.<br />
3. Press the YES softkey at both warnings to delete the TSYS.<br />
WARNING: All TGRPs associated with the deleted TSYS will be lost.<br />
To delete a TSYS using the TSYS filter.<br />
1. Press PROG to enter Program Mode.<br />
2. Press the EDIT softkey.<br />
3. Press , and press the TSYS softkey.<br />
4. Press or to scroll to the desired TSYS, then press FUNC<br />
CLR.<br />
5. Press the YES softkey at both delete warnings to delete the<br />
TSYS.<br />
WARNING: All TGRPs associated with the deleted TSYS will be lost.<br />
Searching for Objects using FIND<br />
The FIND feature allows you to search for locked out objects, or for<br />
objects containing a text string that you specify. FIND searches for<br />
your specified text in the following places:<br />
• TGRP objects: ID and Tag fields.<br />
• CONV objects: Frequency and Tag fields.<br />
• TSYS, LMIT, SRVC and STLK objects: Tag field<br />
To find locked out objects:<br />
1. Press PROG to enter Program Mode.<br />
2. Press EDIT softkey.<br />
44<br />
45
Organizing Objects<br />
3. Press FIND softkey.<br />
4. Press L/Out softkey. The scanner finds the first locked out<br />
object.<br />
5. Press L/Out to toggle lockout status.<br />
6. Press EXIT softkey when finished.<br />
or Press EDIT softkey to edit object menu for the selected object.<br />
or Press NEXT softkey to find the next locked out object.<br />
or Press MAN to begin monitoring the object in Manual Mode.<br />
or Press PROG to exit FIND and execute programming tasks at the<br />
selected object position.<br />
To find objects with a specified text string:<br />
1. Press PROG to enter Program Mode.<br />
2. Press EDIT softkey.<br />
3. Press FIND softkey.<br />
4. Press Text softkey<br />
5. Use the number keys to enter the text string you wish to search<br />
for. Or press the Qtxt softkey to use QuickText in your find text<br />
screen. See “Appendix C: Text Entry and QuickText” on page 115 for<br />
information on entering text.<br />
6. Press OK softkey to begin searching.<br />
The radio will stop on any object where your text string is found<br />
in the frequency, tag, or ID fields as described above.<br />
7. Press the Exit softkey to cancel the FIND operation.<br />
or Press EDIT softkey to edit object menu for the selected object.<br />
or Press NEXT softkey to find the next object.<br />
Organizing Objects<br />
or Press MAN to begin monitoring the object in Manual Mode.<br />
or Press PROG to exit FIND and execute programming tasks at the<br />
selected object position.<br />
Note: FIND keeps the last search text you specified stored for<br />
subsequent FIND operations.<br />
Filtering by Object Type<br />
When browsing objects in Program Mode, you can filter the objects<br />
that are displayed by their type.<br />
1. Press the PROG to enter Program Mode.<br />
2. Press EDIT softkey.<br />
3. Press or to scroll to display the filter softkeys. The filter<br />
softkeys are as follows:<br />
CONV<br />
TGRP<br />
TSYS<br />
SRCH<br />
STLK<br />
4. Press the softkey that corresponds with that object type to filter.<br />
5. Press , , or to browse filtered objects.<br />
Object Lockout<br />
When an object is locked out, traffic is not received on that object<br />
until it is unlocked, even if the object is mapped to more than one<br />
Scan List. Locking out an object locks it out “radio-wide” until it is<br />
enabled by toggling the lockout setting.<br />
Four types of lockout functions are available: temporary lockout,<br />
permanent lockout, search lockout, and talkgroup lockout.<br />
46<br />
47
Organizing Objects<br />
Organizing Objects<br />
Temporary Lockout<br />
Temporary lockout locks out an object until the scanner is turned off.<br />
When the scanner is powered on again, all objects that have been<br />
temporarily locked out are restored.<br />
To temporarily lockout an object:<br />
1. When the scanner stops on an object, press L/OUT.<br />
or<br />
1. In Manual Mode or Program Mode, press , , or to<br />
select an object.<br />
2. Press L/OUT.<br />
The lowercase “l” in the display flashes to indicate the object is<br />
temporary lockout.<br />
To unlock a temporary lockout object:<br />
1. In Manual Mode or Program Mode, press , , or to<br />
select an object.<br />
2. Press L/OUT.<br />
HINT: You can also toggle lockout anytime you are viewing an object<br />
menu in Program Mode by pressing L/OUT.<br />
Permanent Lockout<br />
Permanent lockout locks out an object until you explicitly unlock it.<br />
No traffic will be received on the locked out object while permanent<br />
lockout is active.<br />
1. When the scanner stops on an object, press FUNC, then L/OUT.<br />
or<br />
1. In Manual Mode or Program Mode, press , , or to<br />
select an object.<br />
2. Press FUNC, then L/OUT.<br />
48<br />
To unlock a permanent lockout:<br />
1. In Manual Mode or Program Mode, press , , or to<br />
select an object.<br />
2. Press FUNC, then L/OUT.<br />
Change L/OUT Key Function<br />
By default, the L/OUT key activates temporary lockout when<br />
pressed. To change the L/OUT key to activate a permanent lockout<br />
when pressed:<br />
1. Press PROG to enter Program Mode.<br />
2. Press GLOB softkey.<br />
3. Press or to scroll to TLO=FUNC L/O:.<br />
4. Press and select YES to change the L/OUT button to be a<br />
permanent lockout instead of a temporary lockout.<br />
Search Lockout<br />
Search lockout works with certain search objects, including LMIT<br />
searches, some SRVC searches, and STLK objects. Frequency lockout<br />
is used to lock out undesired frequencies that are found during<br />
searches.<br />
To apply search lockout during a search:<br />
When scanner stops on the undesired frequency, press the FrL/O<br />
softkey.<br />
To edit or clear the search lockout list:<br />
1. Press PROG.<br />
2. Press GLOB softkey.<br />
3. Scroll down to SRCH L/Outs: and press SEL.<br />
4. Scroll to the frequencies you wish to remove from the lockout list<br />
and press Del softkey to remove them from the list.<br />
49
Organizing Objects<br />
5. Scroll to an empty spot and enter any frequency you wish to<br />
manually add to the list.<br />
6. To clear the entire list, press FUNC, then the Del softkey.<br />
Talkgroup Lockout<br />
Talkgroup lockout is similar to search lockout, as it allows you to<br />
lockout undesired talkgroups while searching for new talkgroup<br />
activity with wildcard TGRP objects.<br />
When you lock out an undesired talkgroup that is found by a<br />
Wildcard TGRP object, the radio creates a new TGRP object in the<br />
radio’s memory, then locks that TGRP object out, so that the next<br />
time it appears on the system, the radio will ignore any traffic on that<br />
TGRP.<br />
To lockout an undesired wildcard hit:<br />
When the scanner stops on an undesired talkgroup, press the TGL/O<br />
softkey.<br />
To unlock or edit talkgroups locked out using the wildcard<br />
lockout feature:<br />
1. Press PROG to enter Program Mode.<br />
2. Press , , or to select a locked out talkgroup.<br />
3. Press FUNC, then L/OUT to remove permanent lockout from the<br />
talkgroup.<br />
or Press FUNC, then CLR to delete the TGRP object from the<br />
scanner.<br />
or Press the EDIT, then the CURR softkey to edit and save the TGRP<br />
object.<br />
Object Searches<br />
Object Searches<br />
A powerful feature of your PRO-197 is the ability to define different types<br />
of frequency searches and process them while scanning. Frequency<br />
searches are just another type of Scannable Object in the hierarchy<br />
of the radio’s memory organization, so they can be manipulated and<br />
scanned in the same manner as conventional channels and trunking<br />
talkgroups.<br />
Limit Search Object (LMIT)<br />
A Limit Search Object (LMIT) is a search object that stores the<br />
parameters necessary for the radio to search each frequency within<br />
a lower and an upper limit for activity. A LMIT object can be used for<br />
standalone searching—the radio just searches and stops when activity<br />
is detected on a frequency, or for searching that is performed while<br />
the radio is scanning. The radio treats LMIT objects just like any other<br />
Scannable Object when in Scan Mode.<br />
When used in Scan Mode, this capability is best suited for small<br />
ranges of frequencies that contain more frequencies than practical<br />
to program as individual channels. Any size range can be used, but<br />
larger ranges that take more time to search will increase the chances<br />
of missed activity on other object types.<br />
Essential Parameters<br />
FrLo: Lower frequency limits to begin search<br />
FrHi: Upper frequency limits to end search<br />
Mode: By default the scanner will automatically choose the receive<br />
mode that most likely applies to the active frequency as the search<br />
proceeds.<br />
Tag: (Recommended) Name your LMIT so you can easily find or<br />
identify it later.<br />
50<br />
51
Object Searches<br />
Object Searches<br />
See “Appendix B: Detailed Menu Reference: LMIT Menu” on page 108 for<br />
detailed menu information.<br />
To create a new LMIT object:<br />
1. Press PROG for Program Mode.<br />
2. Press NEW softkey.<br />
3. Press SRCH softkey to view available Search types.<br />
4. Press LMIT softkey.<br />
5. Press or to select FrLo : and FrHi: then press SEL to<br />
select the field.<br />
6. Use the number keys and • to enter lower and upper search<br />
units and press ENT or the DONE softkey to save.<br />
7. Press or to select Tag:.<br />
8. Use the number keys to enter a name for the LMIT object. See<br />
“Appendix C: Text Entry and QuickText” on page 115 for information<br />
on entering text.<br />
9. Press ENT or the DONE softkey to save.<br />
10. Press Save softkey to store your LMIT search as an object.<br />
To activate LMIT search:<br />
1. Press MAN during scanning to enter Manual Mode.<br />
2. Press or to scroll through the LMIT objects.<br />
3. Press the SRCH softkey. LMIT search will stop on an active<br />
frequency.<br />
Note: Be sure to press the SRCH softkey, and not the SRCH key on<br />
the keypad.<br />
3. Press PAUSE to hold on the active frequency. Press PAUSE again<br />
to resume.<br />
Note: It can take some time to process all of the frequencies in a<br />
LMIT search. You can experiment with different size frequency ranges<br />
to find a LMIT search setup that does not interfere excessively with<br />
scanning of other object types.<br />
Service Search Object (SRVC)<br />
A Service Search Object (SRVC) is similar to a LMIT search but is<br />
optimized for a specific radio service, and can search for activity<br />
associated with a type of service across multiple frequency bands.<br />
See “Dedicated SRVC Search” on page 58 or “Appendix A: Search Bands”<br />
on page 94 for Service Band frequency information.<br />
Essential Parameters<br />
Service type is the critical parameter needed for a Service Search to<br />
function. See “Appendix B: Detailed Menu Reference: SRVC Menu” on page<br />
110 for detailed menu information.<br />
52<br />
53
Object Searches<br />
Object Searches<br />
To create a new SRVC object<br />
1. Press PROG for Program Mode.<br />
2. Press NEW softkey, then press SRCH softkey to view the available<br />
Search types.<br />
3. Press the SRVC softkey.<br />
4. Press to scroll to the Srvc: field.<br />
5. Press or to select the type of search you want to define.<br />
Service types include Public Safety, Aircraft, Amateur, CB,<br />
Marine, FRS/GMRS/MURS/DOT and Railroad.<br />
6. Press Save softkey to store your SRVC search as an object.<br />
To activate SRVC search:<br />
1. Press MAN during scanning to enter Manual Mode.<br />
2. Press or to scroll through the objects to SRVC.<br />
3. Press the SRCH softkey to activate the SRVC search. SRVC search<br />
stops when an active frequency is found.<br />
frequency lockout list<br />
4. To resume searching, press .<br />
Signal Stalker II Object (STLK)<br />
A Signal Stalker Object (STLK) stores the parameters necessary for<br />
the radio to rapidly sweep a range of frequencies for strong signals<br />
from nearby transmitters. A STLK object can be used for standalone<br />
operation—the radio just sweeps and stops when activity is detected,<br />
or for stalking that is performed while the radio is scanning. During<br />
scanning, the radio will check for activity on all the enabled Scannable<br />
Objects: TGRP objects, CONV objects, LMIT objects and STLK objects.<br />
Essential Parameters<br />
By default, a newly created STLK object is ready to go without any<br />
changes. In its default configuration, the STLK object will sweep<br />
through all of the important land mobile radio bands and look for<br />
strong signal activity from nearby transmitters. You may wish to<br />
include or exclude some bands in your sweeps in order to check other<br />
frequency ranges or to limit the amount of time the scanner spends<br />
sweeping frequency ranges where local transmitter activity is less<br />
likely. See “Appendix B: Detailed Menu Reference: STLK Menu” on page 113<br />
for detailed menu information.<br />
To create a new STLK object:<br />
1. Press PROG to place your scanner into Program Mode.<br />
2. Press NEW softkey, then press SRCH softkey to view the available<br />
Search types.<br />
3. Press STLK softkey.<br />
4. Scroll down to Type: and press if you want to change<br />
between All Bands and Public Safety.<br />
Refer to “Appendix A: Search Bands” on page 94 for sub-band<br />
frequencies.<br />
If you want to include or exclude sub bands:<br />
1. Scroll down to Sub-bands: and press or to scroll through<br />
the sub-bands.<br />
54<br />
55
Object Searches<br />
2. Press SEL to select On or Off. An asterisk (*) indicates the sub<br />
band is enabled.<br />
3. Press or to select Tag: to name your STLK object.<br />
4. Use the number keys to enter a name. See “Appendix C: Text Entry<br />
and QuickText” on page 115 for information on entering text.<br />
5. Press Save softkey to store your STLK search as an object.<br />
To activate STLK search:<br />
1. Press MAN during scanning to enter Manual Mode.<br />
2. Press or to scroll through the objects to STLK.<br />
3. Press the STLK softkey.<br />
Dedicated Searches<br />
Dedicated Searches<br />
Your scanner provides fast access to dedicated frequency search<br />
modes that allow you to execute searches or run Signal Stalker II<br />
without having to go through the process of setting up and saving a<br />
search object. T his is handy for those times where you need to run<br />
a search quickly. Dedicated search modes do not create new search<br />
objects or use previously created search objects.<br />
The SRCH key provides immediate access to the dedicated search<br />
modes. Pressing the SRCH key cycles through each search mode in<br />
this order: Limit, Railroad, Public Safety, Aircraft, Ham, CB, Marine,<br />
and FRS/GMRS/MURS/DOT.<br />
Dedicated LMIT Search<br />
Your scanner’s dedicated LMIT search mode provides you with the<br />
ability to create a limit search with a search frequency range between<br />
upper and lower limit frequencies that you specify and perform the<br />
limit search directly without creating a new LMIT object. You can then<br />
monitor that frequency range for transmissions.<br />
To enter LMIT mode:<br />
1. Press SRCH repeatedly until the display indicates LMIT search.<br />
2. Press the Lmts softkey to set the lower and upper frequency<br />
limits for your limit search.<br />
Note: When a signal is being received, the Lmts softkey (F1)<br />
changes to FrL/O. You can access the Lmts softkey by pressing<br />
FUNC F1 when the F1 key function is FrL/O.<br />
3. Press or to change the search direction.<br />
4. Press the MODE softkey to change the receive mode (AM, FM,<br />
NFM) from the default for the current frequency range (auto).<br />
56<br />
57
Dedicated Searches<br />
Dedicated Searches<br />
5. Press the FrL/O softkey to add a found frequency to the lockout<br />
list.<br />
6. Press the STOR softkey to create a new CONV object using the<br />
found frequency.<br />
Dedicated SRVC Search<br />
Your scanner’s dedicated SRVC search modes provide you with the<br />
ability to instantly access each of the scanner’s service search ranges<br />
without creating a new SRVC object.<br />
To activate dedicated SRVC search mode:<br />
1. Press SRCH repeatedly until the desired service search is<br />
indicated on the display. The following service searches are<br />
available:<br />
• Railroad: Searches the Association of American Railroads (AAR)<br />
VHF railroad frequencies used in the US and Canada<br />
• Public Safety (PubSafety): Searches commonly used public<br />
safety frequencies.<br />
Freq. (MHz) Band<br />
0 33.4-46.5 VHF Low Band<br />
1 151-170 VHF High Band<br />
2 453-467 UHF Band<br />
3 764-806 700 MHz Band<br />
4 851-869 800 MHz Band<br />
• Aircraft - Searches civilian and military air frequencies.<br />
Freq. (MHz) Band<br />
0 108-118 Navigation<br />
1 118-137 Civilian Voice<br />
2 138-150 Military Voice<br />
(excludes 2m<br />
Amateur)<br />
3 225-400 Military Voice<br />
• Ham - Searches amateur radio frequencies.<br />
Freq. (MHz) Band<br />
0 28.0-29.7 10m Band<br />
1 50-54 6m Band<br />
2 144-148 2m Band<br />
3 222-225 1.25cm Band<br />
4 420-450 70cm Band<br />
5 902-928 33cm Band<br />
6 1240-1300 23cm Band<br />
• CB - Searches the citizen’s band radio frequencies.<br />
• Marine - Searches the VHF-FM marine radio band.<br />
• FRS/GMRS/MURS/DOT/STAR (F/G/MURS) Searches the FRS,<br />
GMRS, MURS, DOT and STAR radio frequencies.<br />
2. Use the numeric keypad to toggle the sub bands on and off<br />
while searching.<br />
3. Press or to change the search direction.<br />
4. Press the FrL/O softkey to add a found frequency to the lockout<br />
list.<br />
5. Press the STOR softkey to create a new CONV object using the<br />
found frequency.<br />
58<br />
59
Dedicated Searches<br />
Dedicated Signal Stalker II<br />
Dedicated STLK mode lets you access and run Signal Stalker II easily<br />
and quickly.<br />
In Manual, Program or Scan mode, press FUNC SCAN to access the<br />
Signal Stalker II dedicated mode.<br />
Note: When a signal is being received, the Band softkey (F1)<br />
changes to FrL/O. You can access the Band softkey by pressing<br />
FUNC F1 when the F1 key function is FrL/O.<br />
Operation of the dedicated Signal Stalker II mode is almost identical<br />
to that of the object mode, with one exception. When dedicated<br />
Signal Stalker II mode is used, you may press the numeric key on<br />
the keypad that corresponds with the sub-band you wish to enable<br />
or disable. Disabling a sub-band will cause the Signal Stalker II<br />
system to skip the frequencies within that sub-band as it performs its<br />
sweeps.<br />
Signal Stalker II sub-bands:<br />
Public Safety sub bands:<br />
Freq. (MHz)<br />
Dedicated TUNE Search<br />
Band<br />
0 33.4-46.5 VHF Low Band<br />
1 151-170 VHF High Band<br />
2 453-467 UHF Band<br />
3 764-806 700 MHz Band<br />
4 851-869 800 MHz Band<br />
Dedicated Searches<br />
Your scanner’s dedicated TUNE mode provides you with the ability<br />
to quickly enter any frequency and monitor that frequency for<br />
transmissions, or search up or down from that frequency for activity.<br />
1. To enter TUNE mode, press TUNE. The scanner displays the<br />
TUNE screen.<br />
Freq. (MHz)<br />
Band<br />
0 25-54 MHz VHF Low Band<br />
1 108-137 VHF Aircraft Band<br />
2 137-174 MHz VHF High Band<br />
3 216-300 220 MHz Commercial/<br />
Amateur Band<br />
4 300-406 UHF Military Air Band<br />
5 406-470 UHF Band<br />
6 470-512 UHF-T Band<br />
7 764-806 700 MHz Band<br />
8 806-869 800 MHz Band<br />
9 896-1300 MHz 900 MHz Band, 23 cm<br />
Amateur Band<br />
60<br />
61
Dedicated Searches<br />
By default, TUNE mode is paused when first activated.<br />
2. Press PAUSE to begin searching from the current frequency.<br />
3. Press or to change the search direction.<br />
or Press FrL/O softkey to add a found frequency to the lockout list.<br />
or Press the MODE softkey to change the receive mode (AM, FM,<br />
NFM) from the default for the current frequency range (au).<br />
or Press STOR to create a new CONV object using the found<br />
frequency.<br />
or Use the keypad to enter a new frequency, and press ENT to<br />
make that the TUNE frequency.<br />
Notes:<br />
• Using FUNC TUNE from any other mode will load the last<br />
active frequency from the other mode into TUNE. For example,<br />
pressing FUNC TUNE while parked on a trunked radio TGRP will<br />
load the control channel frequency into the TUNE mode if the<br />
control channel frequency is the last frequency that the scanner<br />
checked while scanning.<br />
• Dedicated TUNE mode will always check for the presence of<br />
encoded squelch and digital modulation each time it finds an<br />
active frequency. If a valid encoded squelch code is found, it<br />
will be shown on the display, and stored automatically when you<br />
press STOR to create a new CONV object.<br />
• Dedicated TUNE mode also displays information about trunking<br />
control channels and trunked voice channels it finds while tuning<br />
through the RF spectrum.<br />
Dedicated Searches<br />
The following information is displayed for each trunking mode:<br />
Trunked Mode<br />
Motorola 3600<br />
baud control<br />
channel<br />
P25 9600 BPS<br />
control channel<br />
EDACS control<br />
channel<br />
LTR home<br />
repeater<br />
Motorola<br />
analog voice<br />
channel<br />
Analysis Display<br />
qq% SID:ssss Stt<br />
qq = decoding quality of the control channel data, SID = System<br />
ID, and<br />
S = Site Number<br />
qq% Nnnn W:wwwww<br />
Sys:sss Rrr Stt<br />
qq = decoding quality of the control channel data, N = NAC, W =<br />
WACN, SYS = System ID, R = RFSS, and S = Site Number<br />
qq% S:ss h/H s/S a/A<br />
qq = decoding quality of the control channel data, S = Site ID,<br />
h/H = not home site/is home site, s/S = not SCAT site/is SCAT<br />
site, a/A = not Aux CC/is Aux CC<br />
HR:hh A–HH–GGG<br />
HR = the home repeater number of the tuned frequency, A-<br />
HH-GGG = the Area, Home Repeater and Group ID of the LTR<br />
talkgroup<br />
VC: lsTGID–nnnnn<br />
lsTGID = the decoded talkgroup ID data from the lowspeed data<br />
stream<br />
Note that the analog lowspeed data protocol does not provide<br />
error correction, and some false “VC: lsTGID” readings should be<br />
expected.<br />
Tune LED<br />
Tune LED can provide visual indication of signal strength using the<br />
tri-color LED.<br />
To activate the Tune LED:<br />
1. Press PROG for Program Mode.<br />
2. Press GLOB softkey.<br />
3. Press q to select Tune LED:.<br />
4. Press or to select Tune LED on or off.<br />
5. Press the SAVE softkey to save your changes to the radio’s<br />
configuration memory.<br />
62<br />
63
Weather Scanning<br />
Weather Scanning<br />
Note: The weather alert feature is an extremely sensitive, high<br />
quality receiver of weather frequencies. However, the included<br />
antenna is optimized for general purpose scanning. If you use this<br />
scanner as your only means for receiving weather alerts, please check<br />
to be sure you are receiving a clear signal on the included antenna or<br />
switch to an external antenna that gives you clear reception of a local<br />
NOAA weather broadcast.<br />
Weather <strong>Radio</strong> Mode<br />
Weather radio mode allows you to receive weather broadcasts from<br />
your local weather service.<br />
To use weather radio mode:<br />
1. Press WX. The scanner will quickly scan and lock on to the first<br />
active weather radio frequency it receives.<br />
2. Press p or q to look for other weather radio transmitters.<br />
It is generally best to select the weather radio transmitter that<br />
provides you with the strongest signal. You can use the signal<br />
meter to help you chose the best weather radio transmitter for<br />
your area.<br />
While operating in Weather <strong>Radio</strong> Mode, your scanner will alert<br />
on SAME messages that match the SAME location codes you<br />
have entered, or all SAME messages if you do not enter any<br />
SAME location codes.<br />
Weather Priority Mode<br />
Weather Priority mode samples the specified weather frequency<br />
periodically while scanning to see if the All Hazards 1050 Hz Warning<br />
Alert Tone (WAT) is present. If the WAT is present, the scanner will<br />
sound an alarm and tune to the specified weather frequency to<br />
monitor the nature of the alert.<br />
Weather Scanning<br />
To activate Weather Priority Mode:<br />
1. Press WX.<br />
2. Press p or q to look for other weather radio transmitters and<br />
find the strongest weather radio transmitter for your location.<br />
3. Press PRI.<br />
SAME Standby Mode<br />
SAME Standby Mode monitors the specified weather frequency<br />
silently, waiting to receive a Specific Area Message Encoding (SAME)<br />
alert that corresponds with a SAME location code that you have<br />
previously entered. If there is a match, the scanner will sound an<br />
alarm, display the alert type, and monitor the nature of the alert.<br />
To activate SAME Standby Mode, first you should provide at least<br />
one SAME location code for your city, county or state. By default,<br />
SAME mode will alert on any SAME message received if no SAME<br />
location codes are entered.<br />
SAME alerts include FIPS codes to identify areas, established by the<br />
US Census bureau. You can set your scanner to alert for all areas or<br />
limit weather alerts to up to 10 specific areas by FIPS code. A list of<br />
SAME location codes can be found online at: www.weather.gov.<br />
FIPS codes are formatted as follows:<br />
Subdivisions State Code County Code<br />
0-9<br />
(0=entire area)<br />
01-50<br />
(00=all states)<br />
Example: 048439<br />
(0=All; 48=Texas; 439=Tarrant County)<br />
XXX<br />
(000=all counties)<br />
In addition to the code for your location, you may wish to enter<br />
additional codes for surrounding areas and any other areas of<br />
interest so that you can receive advance warning of adverse or<br />
dangerous weather that may be headed in your direction.<br />
64<br />
65
Weather Scanning<br />
Your scanner also has a SAME wildcard feature, which allows you to<br />
set the radio to alarm on partial matches of the location code.<br />
To enter SAME Location and Event Codes<br />
1. Press WX to enter Weather mode.<br />
2. Press the SAME softkey to add or edit SAME entries.<br />
3. Press p or q to scroll to the desired SAME code entry.<br />
4. Press SEL to edit the selected SAME entry.<br />
5. With the Entry: field selected, press to turn the entry on.<br />
Note: When a SAME location/event code storage location is set<br />
for Entry ON, the radio will process the SAME location and event<br />
code that is stored there. When a storage location is set for Entry<br />
OFF, that SAME location and event code will be ignored.<br />
6. Scroll to Code: and press to enter a SAME location code.<br />
7. Press the number keys to enter a SAME code.<br />
Note: The PRO-197 supports entry of Extended SAME codes,<br />
which can include numbers and letters. The text entry mode is used<br />
to enter both numerical SAME codes and extended SAME codes.<br />
To enter a numerical SAME code, simply precede each number<br />
in the SAME code with “1”. For example, to enter SAME code<br />
048113, press 10 14 18 11 11 13.<br />
8. Scroll to the Event: field. Note the current default of ***,<br />
which will allow all messages for the specified SAME location<br />
code. We recommend that you leave the event code with<br />
*** to receive all alerts. A list of event codes can be found at<br />
www.weather.gov.<br />
9. Scroll to Tag: and press .<br />
10. Input a tag name that corresponds with the SAME location<br />
code that you have entered. See “Appendix C: Text Entry and<br />
QuickText” on page 115 for information on entering text.<br />
Weather Scanning<br />
11. Scroll to Alarm:. You can specify different alarm sounds for this<br />
SAME entry. We recommend that you use the default setting<br />
here for general purpose weather alerting.<br />
12. Scroll to Lockout:. Default is off. Lockout is a special purpose<br />
parameter that can be used to lock out individual event or area<br />
codes. We recommend that you leave Lockout set to off for<br />
general purpose weather alerting.<br />
13. When you have finished editing your SAME entry, press the Save<br />
softkey to store the data.<br />
14. Press the Save softkey again to save all SAME changes and<br />
return to the Weather mode.<br />
Note: When a SAME location/event code storage location is set<br />
for Entry ON and Lockout ON, the radio will process the SAME<br />
location/event code that is stored there, and will lock out the<br />
specified event code. A SAME location/event code storage location<br />
set for Entry: OFF and Lockout: ON will not be processed,<br />
because Entry is set to OFF. In case of a conflict (i.e., two identical<br />
codes and events are entered, and one is locked out), the locked out<br />
entry will take precedence.<br />
To reset SAME code to the default setting:<br />
1. Press WX.<br />
2. Press SAME softkey.<br />
3. Press p or q to select SAME code location.<br />
4. Press SEL.<br />
5. Press q to select code, then press Dflt softkey.<br />
6. Press Save softkey to save the code.<br />
7. Press Save softkey again to save changes.<br />
66<br />
67
Weather Scanning<br />
Activating SAME Standby Mode<br />
After you have entered your desired SAME codes, you can activate<br />
the SAME Standby Mode to begin standby operation. The radio will<br />
remain silent until a SAME transmission is received with a code that<br />
matches one that you have stored. When a matching SAME message<br />
is received, your radio will sound a siren alarm, then will play the<br />
audio message that follows the Warning Alert Tone (WAT).<br />
To activate SAME standby mode:<br />
1. Press WX.<br />
2. Press p or q to find the best weather radio transmitter for your<br />
location, then press the stby softkey.<br />
The softkey will change to STBY to indicate that SAME Standby<br />
Mode is active, and the scanner will alert when a matching SAME<br />
message is received.<br />
3. Press the STBY softkey again to exit SAME Standby Mode, or<br />
press MAN, SCAN, or PROG.<br />
When your local NWS office activates a SAME warning that matches<br />
a FIPS code stored in your scanner, you will first hear a siren alarm<br />
and see the LED flash to alert you to the incoming alarm. The LED<br />
flashes RED for warnings, YELLOW for watches, and BLUE for tests<br />
and administrative messages.<br />
The scanner sounds the siren until the NWS transmission of the 1050<br />
Hz Warning Alert Tone (WAT) begins. Once the WAT begins, the<br />
scanner’s speaker will unmute, and you will hear the WAT play as an<br />
alert that the voice portion of the SAME warning is about to begin.<br />
You will then hear the voice portion of the SAME warning.<br />
Your scanner will resume SAME Standby operation 90 seconds after<br />
the SAME warning starts. You may reset standby mode by pressing<br />
the STBY softkey twice at any time.<br />
V-<strong>Scanner</strong> Storage<br />
Your PRO-197 features two types of memory storage:<br />
<strong>Scanner</strong> Memory<br />
• Main memory is used to store programming that is used for<br />
everyday monitoring and scanning.<br />
• Virtual <strong>Scanner</strong> (V-<strong>Scanner</strong>) memory is used to store complete<br />
copies of your scanner’s main memory for later recall. V-<br />
<strong>Scanner</strong> includes objects, global settings, and dedicated search<br />
configurations. Your scanner has 21 V-<strong>Scanner</strong> storage locations,<br />
each capable of storing a copy of your scanner’s main memory,<br />
including all of your object and global settings.<br />
You can custom-tailor a main memory configuration to suit your needs<br />
for the type of scanning you do in different situations, then store that<br />
configuration for later use. If you travel frequently, you may want to<br />
create V-<strong>Scanner</strong>s for the areas where you travel.<br />
V-<strong>Scanner</strong>s are also useful for backing up your configurations. Once<br />
you have main memory configured the way you like it, you can save<br />
it to a V-<strong>Scanner</strong> where it will remain untouched until you delete,<br />
overwrite or recall it. Then, if you happen to make a mistake while<br />
using your main memory that you cannot fix, you can recall the<br />
backup data and start again.<br />
Your PRO-197 <strong>Scanner</strong> comes preprogrammed with the frequencies,<br />
talkgroups, and configuration data for approximately 350 trunked<br />
radio systems in the United States. The preprogrammed data is stored<br />
in V-<strong>Scanner</strong> folder storage locations (01-20). The scanner’s working<br />
memory and V-<strong>Scanner</strong> folder “00” are not preprogrammed with any<br />
data. See the included “V-<strong>Scanner</strong> Preprogrammed Data” booklet for more<br />
information.<br />
68<br />
69
<strong>Scanner</strong> Memory<br />
Using V-<strong>Scanner</strong>s<br />
You can save active scanner configurations (called “working” or<br />
“main” memory) to a V-<strong>Scanner</strong> storage folder for later use. Then<br />
recall the stored scanner configurations from a V-<strong>Scanner</strong> storage<br />
folder to main memory when you want to use them.<br />
When you recall a configuration from a V-<strong>Scanner</strong> storage folder<br />
and use it in main memory, any changes you make while using<br />
the configuration will not automatically be transferred to the<br />
configuration data stored in the V-<strong>Scanner</strong> storage folder. You<br />
must save your changes back to that folder location if you want to<br />
preserve them for later use.<br />
When you load a new configuration into main memory, the<br />
contents of main memory are overwritten and lost, unless you save<br />
your main memory to a V-<strong>Scanner</strong> storage folder first. Once the<br />
configuration data in main memory has been overwritten, it cannot<br />
be recovered—there is no “Undo” function.<br />
Saving Main Memory to a V-<strong>Scanner</strong> Folder<br />
1. Press FUNC, then PROG to enter V-<strong>Scanner</strong> mode.<br />
2. Press the Stor softkey.<br />
3. Press p or q to scroll to the desired V-<strong>Scanner</strong> folder, then<br />
press the Stor softkey.<br />
4. If the selected V-<strong>Scanner</strong> folder already contains data, you will<br />
be asked if you wish to overwrite the existing data with new<br />
data from your current version of main memory. Press the YES<br />
softkey to proceed, or the NO softkey to cancel.<br />
5. The scanner will prompt you to enter a name for the stored V-<br />
<strong>Scanner</strong>. Use the standard text entry method to type the name<br />
you wish to use, then press the OK softkey.<br />
6. The scanner will write the contents of main memory to the<br />
V-<strong>Scanner</strong> folder. This will take approximately four seconds to<br />
complete.<br />
Loading a V-<strong>Scanner</strong> Folder to Main Memory<br />
1. Press FUNC, then PROG to enter V-<strong>Scanner</strong> mode.<br />
2. Press the Load softkey.<br />
<strong>Scanner</strong> Memory<br />
3. Press p or q to scroll to the desired V-<strong>Scanner</strong> folder, then press<br />
the Load softkey.<br />
4. The scanner will ask you to confirm that you wish to overwrite<br />
the current contents of main memory. Press the YES softkey to<br />
proceed, or the NO softkey to abort.<br />
The data transfer takes approximately 4 seconds to complete.<br />
Erasing V-<strong>Scanner</strong> Folders<br />
1. Press FUNC, then PROG to enter V-<strong>Scanner</strong> mode.<br />
2. Press the Eras softkey.<br />
3. Press p or q to scroll to the desired V-<strong>Scanner</strong> folder, then press<br />
the Eras softkey.<br />
4. Press the YES softkey to delete current contents, or press the NO<br />
softkey to abort.<br />
Cloning<br />
You can transfer the programmed data to and from another PRO-197<br />
(or PRO-106) scanner using a connecting cable which has 1 /8 -inch<br />
stereo phone plugs on both ends (not supplied).<br />
To clone the scanner data:<br />
1. Turn on both scanners.<br />
2. Connect the connecting cable to each scanner’s PC/IF jack.<br />
3. Press PROG, then the GLOB softkey to enter the Global Settings<br />
menu.<br />
70<br />
71
<strong>Scanner</strong> Memory<br />
4. On the SOURCE radio, scroll to Clone Send: then press SEL<br />
when you are ready to send data from your SOURCE radio to the<br />
TARGET radio.<br />
Both working memory and global settings are transferred.<br />
Note: The contents of working memory on the TARGET radio will be<br />
overwritten immediately when SEL is pressed on the SOURCE radio.<br />
Memory Report<br />
To display the memory usage report:<br />
1. Press PROG.<br />
2. Press GLOB softkey to access the Global menu.<br />
3. Press p or q to scroll to Memory Info:.<br />
4. Press SEL to view the memory usage report.<br />
5. Press p or q to scroll the display.<br />
Advanced Settings<br />
Priority Scan<br />
Advanced Settings<br />
Priority Scan operation is available for CONV and TGRP objects.<br />
When Priority Scan is active, increased priority is given to objects that<br />
have their Priority mode set to ON.<br />
Turning Object Priority On or Off<br />
When the scanner stops on the object while active, press PRI to select<br />
Object Priority on or off.<br />
or<br />
Browse to an object in Manual Mode or Program Mode. Press PRI to<br />
select Object Priority on or off.<br />
or<br />
1. Browse to an object in Program Mode.<br />
2. Press EDIT, then CURR softkeys.<br />
3. Press to scroll to Priority.<br />
4. Press or to select Priority On or Off.<br />
The plD indicator in the object display will show lower case “p” for<br />
Object Priority Off, and upper case “P” for Object Priority On.<br />
Turning Priority Scan Mode On or Off<br />
1. While the radio is scanning, press FUNC.<br />
2. Press PRI to toggle Priority Scan On or Off.<br />
Priority Scan status is shown in the main Scanning status display.<br />
PRI indicates that Priority Scan mode is on, and pri indicates that<br />
Priority Scan mode is off.<br />
72<br />
73
Advanced Settings<br />
CONV Priority Scan<br />
When Object Priority is set to Yes for one or more CONV objects,<br />
the scanner will sample the CONV objects for activity periodically<br />
while scanning and monitoring other objects. This sampling will<br />
cause a brief muting of received audio when it occurs while another<br />
object is active. The more CONV objects that are set for Priority, the<br />
longer this audio muting will be, since it takes a certain amount of<br />
time to sample each Priority CONV object for activity.<br />
TGRP Priority Scan<br />
When Object Priority is set to Yes for one or more TGRP objects,<br />
the scanner will give those TGRPs priority over other TGRPs while<br />
checking a particular trunking system for activity. TGRPs configured<br />
for Priority are checked for activity before any other TGRPs are<br />
checked, and during the reply delay time after non-priority TGRP<br />
calls.<br />
Additionally, your PRO-197 decodes the subaudible priority data that<br />
is present on analog Motorola talkgroup calls (3600 baud control<br />
channel systems only), and will switch to a priority talkgroup when<br />
the data for that talkgroup is found in the subaudible priority data.<br />
Hit Counters<br />
The Hit Counter feature that keeps track of how many transmissions<br />
are received for each object type. The Hit Counter for an object<br />
is incremented each time a transmission is received on an object,<br />
making it possible for you to determine the objects that are the least<br />
and most active. By default, the Hit Counter feature is turned off.<br />
To turn the Hit Counter on:<br />
1. Press PROG.<br />
2. Press GLOB softkey.<br />
4. Press or to select Yes or No.<br />
Advanced Settings<br />
5. When finished, press the SAVE softkey to save your changes to<br />
the radio’s configuration memory.<br />
To view Hit Counts:<br />
1. Press PROG.<br />
2. Press , , or to navigate to the desired object, if<br />
necessary.<br />
3. Press EDIT softkey, then CURR softkey.<br />
4. Scroll to Hit Count in the object menu to view the hit counter.<br />
To reset for a single object:<br />
1. Press the Dflt softkey while the Hit Count item is selected in the<br />
object’s menu.<br />
To clear all hit counters:<br />
1. Press the PROG to enter Program Mode.<br />
2. Press GLOB softkey.<br />
3. Press to scroll to Clear Hits.<br />
4. Press SEL.<br />
5. Press the SAVE softkey to save your changes and exit the Global<br />
settings menu.<br />
Audible Alarms and the Alert LED<br />
Your PRO-197 features an Alert LED with audible alarm capability<br />
that allows you to set different visual and audible notifications for the<br />
different types of objects you create.<br />
3. Press to scroll to Hit Counts.<br />
74<br />
75
Advanced Settings<br />
Advanced Settings<br />
The menus for each type of object include various settings for LED,<br />
Backlight and Alarm. You can use these settings to design custom<br />
visual and/or audible alarms that are triggered when activity is<br />
detected on the specified Scannable Object.<br />
Notes:<br />
• The Alert LED utilizes a special tri-color Light Emitting Diode<br />
module that mixes light from red, green and blue LED elements<br />
to produce thousands of different colors. Eight pre-defined color<br />
settings are available for use in object menus. LED COLOR: 0 is<br />
normally used for “all colors off” or no Alert LED display.<br />
• Slight variations to LED colors are a normal part of the<br />
manufacturing process. You may notice these variations when<br />
using the White LED color setting (LED COLOR: 7), or when<br />
comparing one PRO-197 to another. You can compensate for these<br />
slight variations by fine-tuning the Red/Green/Blue (RGB) LED<br />
settings for each color. See the COLOR settings in the GLOB menu<br />
in “Appendix B: Detailed Menu Reference: GLOB Menu” on page 96.<br />
To set the Audible Alarm and Alert LED:<br />
In any object menu:<br />
1. Press to scroll to any of the following settings.<br />
• LED Mode: Solid or Flash controls whether the LED remains on<br />
solid or flashes when the object is active.<br />
• LED Color: 0-7 sets the color of the LED. By default, color 0<br />
is used for LED off. You can change the preprogrammed LED<br />
colors in the Global Settings menu.<br />
• Latch LED Keeps the LED on after activity on the object is<br />
finished. This is useful when you need to know if an object was<br />
active while you were away from the scanner.<br />
• Backlight: Off, On, Flash controls whether the backlight<br />
remains off, comes on solid or flashes when the object is active.<br />
• Alarm: None, Chirp, Hi-Lo, Alert, Ring, 2-Chirp, Fast Hi-Lo,<br />
DTMF # are used to set audible alarms that play each time<br />
activity is found on the object.<br />
2. Press or to select the desired option.<br />
3. When finished, press SAVE softkey to save your changes to the<br />
radio’s configuration memory.<br />
Multi-Site Mode on Networked Systems<br />
Some Motorola and P25 systems include a large number of sites<br />
that are networked together to provide radio coverage to a large<br />
geographical area. These types of trunked radio systems are more<br />
commonly used for large statewide systems, and for some systems<br />
that are used in large, rural counties.<br />
As a system user moves around, or “roams,” in the coverage area of<br />
the network, their radio will automatically find and use the nearest<br />
tower site. Each tower site includes a number of channels. One of<br />
these channels is used for control channel data, and the remaining<br />
channels are used for voice traffic. As a user moves away from the<br />
coverage of one site, the radio will search other control channel<br />
frequencies for a better site to use.<br />
Multi-site can be enabled by editing the trunking system (TSYS)<br />
parameters for a Motorola or P25 system. Multi-site can be set to Off,<br />
Stat (Stationary) or Roam. By default, Multi-site is set to Off.<br />
The ROAM setting is ideal for those times when you are driving<br />
around in the service area of a networked trunked radio system, as it<br />
allows the radio to find and use the best tower sites as you move in<br />
and out of the coverage footprints of different sites.<br />
The STAT (stationary) setting is ideal for those times when you are<br />
not moving and are within range of more than one tower site, as it<br />
will allow you to monitor traffic from any tower that you are within<br />
range of.<br />
76<br />
77
Advanced Settings<br />
Advanced Settings<br />
To activate Multi-site mode on a Motorola or P25 networked<br />
system:<br />
1. Press PROG to enter Program Mode.<br />
2. Press , , or to navigate to a talkgroup on the networked<br />
multi-site system.<br />
3. Press EDIT softkey, then CURR softkey.<br />
4. Press , to scroll to the TSYS item and press the SEL key to<br />
edit the TSYS parameters.<br />
5. Press or to scroll to Multi-Site.<br />
6. Press or to select Off, Stat or Roam.<br />
Off: the scanner will find the first usable control channel in the<br />
control channel list and use it until it is no longer usable.<br />
Stat (Stationary): the scanner will track the system using any<br />
control channel in the list that is usable.<br />
Roam: the scanner will attempt to locate and use the best<br />
possible control channel and ignore others, until the control<br />
channel is no longer usable, then it will locate a new “best<br />
control channel” to use. The scanner will always attempt to lock<br />
on to control channels where the decoding quality is greater<br />
than the Threshold Hi setting, and will search for new control<br />
channels when the decoding quality of a control channel drops<br />
below Threshold Lo setting. If no new control channels are<br />
available that meet the Threshold Hi criteria, the scanner will<br />
seek the best control channel to use, and continue checking<br />
periodically for a new control channel that meets the Threshold<br />
Hi criteria.<br />
7. Press SAVE softkey to save your changes to the TSYS parameters.<br />
8. Press SAVE softkey again to use the scanner.<br />
You should experiment with the different Multi-site modes and the<br />
threshold settings to find a combination that works best for your<br />
location.<br />
Notes:<br />
• Multi-site functionality is not available in EDACS or LTR trunking.<br />
• Threshold settings are only available when Multi-Site Roam is<br />
selected.<br />
• It may be necessary to change the values used for Threshold<br />
Hi and Threshold Low in the TSYS object to optimize Multi-site<br />
Roam performance.<br />
LTR Home Repeater AutoMove<br />
LTR Home Repeater AutoMove (AutoMove HRs) takes the guesswork<br />
out of programming LTR trunking systems when the home repeater<br />
order is not known.<br />
By default, AutoMove HRs is turned off and is controlled in the<br />
individual LTR TSYS objects. When AutoMove HRs is turned on, you<br />
may enter the LTR system frequencies in any order. Your scanner will<br />
automatically move the frequencies to the proper home repeater<br />
slots as transmissions are received on the system.<br />
To enable LTR Home Repeater AutoMove:<br />
1. Access the menu for the desired TSYS.<br />
2. Press to scroll to AutoMove HRs.<br />
3. Press or to toggle on or off for the selected TSYS.<br />
4. Press Save softkey to save your changes.<br />
78<br />
79
Additional Information<br />
Additional Information<br />
Power-On Configuration Key Sequences<br />
Power-on keypress sequences are used as shortcuts to configuration<br />
items, like attenuator settings, backlight settings and memory<br />
information. Power-on key sequences are also used to place your<br />
scanner into firmware upgrade mode for CPU and DSP firmware<br />
upgrades.<br />
The following table lists the power-on key sequences available in<br />
the PRO-197. Unless otherwise specified, each sequence is invoked<br />
by pressing and releasing each key in sequence, one at a time. The<br />
first key must be pressed while the Welcome/Owner screen is being<br />
displayed:<br />
Key Sequence<br />
Function<br />
1 Shortcut to PROG>GLOB>Sound Mode<br />
2 Shortcut to PROG>GLOB>Key Beeps<br />
3 Displays Boot, CPU and DSP versions<br />
DIM<br />
ATT<br />
Shortcut to PROG>GLOB>Light Mode<br />
Shortcut to PROG>GLOB>Atten Mode<br />
0, 0 Shortcut to PROG>GLOB>Memory Info<br />
0, 1 Destructive, clears working memory and resets all Global<br />
settings to factory defaults. Does not affect V-<strong>Scanner</strong>s.<br />
0, 2 Destructive, resets all Global settings to factory defaults.<br />
Does not affect working memory or V-<strong>Scanner</strong>s.<br />
0, 5 Destructive, executes EEPROM memory test, then clears<br />
working memory and resets all Global settings to factory<br />
defaults. Does not affect V-<strong>Scanner</strong>s.<br />
0, CLR Erases DSP APP Upgrade code, restores factory DSP version<br />
0, PROG Places radio in DSP APP firmware upgrade mode<br />
Hold PROG while<br />
powering on radio<br />
Places radio in CPU firmware upgrade mode<br />
Power-On Password<br />
Additional Information<br />
Setting a power-on password can prevent anyone other than you<br />
from using this scanner.<br />
To set the power-on password<br />
1. Press PROG to enter Program Mode.<br />
2. Press GLOB softkey.<br />
3. Scroll to Set password, then press SEL key.<br />
4. The confirmation menu for the power-on password setting<br />
appears. Press YES softkey.<br />
5. Enter the four-character (four-digit) password. You can enter the<br />
characters using alphanumeric text entry method. When you<br />
have finished entering characters, press OK softkey to save the<br />
entry.<br />
Note: You can cancel the entry by pressing Cancl softkey.<br />
To operate your scanner with power-on password:<br />
1. Turn VOLUME clockwise to turn power on.<br />
2. After the Welcome message is displayed, the scanner prompts<br />
you to enter the password.<br />
3. Enter your password.<br />
4. If you entered the correct password, you will be able to operate<br />
your scanner. If you have entered the wrong password, the<br />
scanner will generate error beep. Try entering your password<br />
again.<br />
To disable the power-on password<br />
1. Press PROG to enter Program Mode.<br />
2. Press GLOB softkey.<br />
3. Scroll to Set password, then press SEL key.<br />
80<br />
81
Additional Information<br />
4. The confirmation menu for the power-on password setting<br />
appears. Press NO softkey.<br />
5. Enter 0000 in the password setting menu and press OK softkey.<br />
Note: In the initial password setting menu characters “0000” are<br />
always displayed. Enter 0000 while these characters “0000” are<br />
displayed<br />
If you forget the password<br />
If you forget your password, you must initialize the scanner to be<br />
able to operate it. This operation will result in the clearing of your<br />
programmed data and the loss of any custom changes you have<br />
made to the radio’s global parameters. See “Initializing the <strong>Scanner</strong> to<br />
Factory Defaults” on page 92.<br />
Birdie Frequencies<br />
Every scanner has birdie frequencies. Birdies are signals created inside<br />
the scanner’s receiver, which may interfere with transmissions on the<br />
same frequencies. If you program one of these frequencies, you hear<br />
only noise on that frequency. If the interference is not severe, you<br />
might be able to turn Sqelch clockwise to omit the birdie.<br />
To find the birdies in your scanner, disconnect the antenna and<br />
moving it away from the scanner. Make sure that no other nearby<br />
radio or TV sets are turned on near the scanner. Use the Tune<br />
function and scan every frequency range from its lowest frequency to<br />
the highest. Occasionally, the searching will stop as if it had found a<br />
signal, often without any sound. This is a birdie. Make a list of all the<br />
birdies in your scanner for future reference.<br />
FCC Notice<br />
Additional Information<br />
This equipment has been tested and found to comply with the limits<br />
for a scanning receiver, pursuant to Part 15 of the FCC Rules. These<br />
limits are designed to provide reasonable protection against harmful<br />
interference in a residential installation. This equipment generates,<br />
uses and can radiate radio frequency energy and, if not installed<br />
and used in accordance with the instructions, may cause harmful<br />
interference to radio communications.<br />
However, there is no guarantee that interference will not occur in a<br />
particular installation. If this equipment does cause harmful interference<br />
to radio or television reception, which can be determined by turning<br />
the equipment off and on, the user is encouraged to try to correct the<br />
interference by one or more of the following measures:<br />
• Reorient or relocate the receiving antenna.<br />
• Increase the separation between the equipment and receiver.<br />
• Connect the equipment into an outlet on a circuit different from<br />
that to which the receiver is connected.<br />
This device complies with part 15 of the FCC Rules. Operation is<br />
subject to the following two conditions: (1) This device may not cause<br />
harmful interference, and (2) this device must accept any interference<br />
received, including interference that may cause undesired operation.<br />
Scanning Legally<br />
Your scanner covers frequencies used by many different groups<br />
including police and fire departments, ambulance services,<br />
government agencies, private companies, amateur radio services,<br />
military operations, pager services, and wireline (telephone and<br />
telegraph) service providers. It is legal to listen to almost every<br />
transmission your scanner can receive. However, there are some<br />
transmissions you should never intentionally listen to. These include:<br />
• Telephone conversations (cellular, cordless, or other private<br />
means of telephone signal transmission)<br />
82<br />
83
Additional Information<br />
• Pager transmissions<br />
• Any scrambled or encrypted transmissions<br />
According to the Electronic Communications Privacy Act (ECPA),<br />
as amended, you are subject to fines and possible imprisonment<br />
for intentionally listening to, using, or divulging the contents of<br />
such a transmission unless you have the consent of a party to the<br />
communication (unless such activity is otherwise illegal).<br />
This scanner is designed to prevent reception of illegal transmissions,<br />
in compliance with the law which requires that scanners be<br />
manufactured in such a way as to not be easily modifiable to pick up<br />
those transmissions. Do not open your scanner’s case to make any<br />
modifications that could allow it to pick up transmissions that are not<br />
legal to listen to. Doing so could subject you to legal penalties.<br />
In some areas, mobile use of this scanner is unlawful or requires a<br />
permit. Check the laws in your area. We encourage responsible, legal<br />
scanner use.<br />
Care<br />
Your scanner is not waterproof. Do not expose it to rain, moisture,<br />
or extreme high humidity. If the scanner gets wet, wipe it dry<br />
immediately. Use and store the scanner only in normal temperature<br />
environments. Handle the scanner carefully; do not drop it. Keep<br />
the scanner away from dust and dirt, and wipe it with a damp cloth<br />
occasionally to keep it looking new.<br />
Service and Repair<br />
If your scanner is not performing as it should, take it to your<br />
local <strong>Radio</strong><strong>Shack</strong> store for assistance. To locate your nearest<br />
<strong>Radio</strong><strong>Shack</strong>, use the store locator feature on <strong>Radio</strong><strong>Shack</strong>’s website<br />
(www.radioshack.com), or call 1-800-The <strong>Shack</strong> (800-843-7422) and<br />
follow the menu options. Modifying or tampering with the scanner’s<br />
internal components can cause a malfunction and might invalidate<br />
its warranty and void your FCC authorization to operate it.<br />
84<br />
85<br />
Additional Information<br />
Specifications<br />
Frequency Coverage<br />
25.000-26.960 MHz............................................................ (in 10 kHz steps/AM)<br />
26.965-27.405 MHz............................................................ (in 10 kHz steps/AM)<br />
27.410-29.505 MHz.............................................................. (in 5 kHz steps/AM)<br />
29.510-29.700 MHz...............................................................(in 5 kHz steps/FM)<br />
29.710-49.830 MHz.............................................................(in 10 kHz steps/FM)<br />
49.835-54.000 MHz...............................................................(in 5 kHz steps/FM)<br />
108.000-136.9916 MHz................................................... (in 8.33 kHz steps/AM)<br />
137.000-137.995 MHz...........................................................(in 5 kHz steps/FM)<br />
138.000-143.9875 MHz....................................................(in 12.5 kHz steps/FM)<br />
144.000-147.995 MHz...........................................................(in 5 kHz steps/FM)<br />
148.000-150.7875 MHz....................................................(in 12.5 kHz steps/FM)<br />
150.800-150.845 MHz...........................................................(in 5 kHz steps/FM)<br />
150.8525-154.4975 MHz....................................................(in 7.5 kHz steps/FM)<br />
154.515-154.640 MHz...........................................................(in 5 kHz steps/FM)<br />
154.650-156.255 MHz........................................................(in 7.5 kHz steps/FM)<br />
156.275-157.450 MHz.........................................................(in 25 kHz steps/FM)<br />
157.470-161.5725 MHz......................................................(in 7.5 kHz steps/FM)<br />
161.600-161.975 MHz...........................................................(in 5 kHz steps/FM)<br />
162.000-174.000 MHz......................................................(in 12.5 kHz steps/FM)<br />
216.0025-219.9975 MHz.......................................................(in 5 kHz steps/FM)<br />
220.000-224.995 MHz...........................................................(in 5 kHz steps/FM)<br />
225.000-379.99375 MHz................................................. (in 6.25 kHz steps/AM)<br />
380.000-419.9875 MHz....................................................(in 12.5 kHz steps/FM)<br />
420.000-450.000 MHz...........................................................(in 5 kHz steps/FM)<br />
450.00625-469.99375 MHz..............................................(in 6.25 kHz steps/FM)<br />
470.000-512.000 MHz......................................................(in 12.5 kHz steps/FM)<br />
764.000-805.996875 MHz..............................................(in 3.125 kHz steps/FM)<br />
806.000-823.9875 MHz....................................................(in 12.5 kHz steps/FM)<br />
849.000-868.9875 MHz....................................................(in 12.5 kHz steps/FM)<br />
894.000-939.9875 MHz....................................................(in 12.5 kHz steps/FM)
Additional Information<br />
Additional Information<br />
940.000-960.000 MHz......................................................(in 6.25 kHz steps/FM)<br />
1240.000-1300.000 MHz..................................................(in 6.25 kHz steps/FM)<br />
*Excludes frequencies utilized by the Cellular <strong>Mobile</strong> <strong>Radio</strong>telephone<br />
Service: 824-848.9875 MHz and 869-893.9875 MHz<br />
Working Memory<br />
1800 programmed objects using flexible “Scannable Object” system.<br />
Program and scan conventional channels, trunking talkgroups, limit<br />
searches, service searches, and Signal Stalker II configurations as<br />
“Scannable Objects” that are created, edited, grouped and scanned<br />
using common user interface conventions.<br />
Virtual <strong>Scanner</strong>s<br />
21 Virtual <strong>Scanner</strong> (V-<strong>Scanner</strong>) folders, each capable of holding the entire<br />
contents of working memory, for a total storage capacity of over 37,800<br />
objects.<br />
Searches<br />
Seven preprogrammed dedicated service searches, one dedicated limit<br />
search. Any service or limit search can be programmed and scanned as an<br />
object alongside conventional channels and trunking talkgroups.<br />
Priority<br />
Talkgroup and conventional channel priority, selectable priority sample<br />
rate and priority sample during trunking talkgroup call.<br />
Conventional Receiver Modes<br />
AM, FM, NFM, CTCSS, DCS, P25 NAC<br />
<strong>Trunking</strong> Receiver Modes<br />
Motorola Type I/II/III Analog and <strong>Digital</strong>, GE/Ericsson/MA-COM EDACS<br />
Narrowband and Wideband, EF Johnson LTR<br />
Receiver System<br />
Triple conversion PLL super-heterodyne<br />
1st IF...................................................................................................... 380.8 MHz<br />
(The 1st LO uses high side of receive frequency range for VHF and UHF<br />
Low/T, and low side of receive frequency range for >512 MHz)<br />
2nd IF....................................................................................................... 21.4 MHz<br />
(The second LO uses low side of 1st IF)<br />
3rd IF........................................................................................................... 455 kHz<br />
(The 3rd LO uses the low side of the 2nd IF)<br />
Frequency Range<br />
VHF Low...................................................................... 25.00000 - 54.00000 MHz<br />
VHF Aircraft............................................................. 108.00000 - 136.99166 MHz<br />
VHF High................................................................. 137.00000 - 174.00000 MHz<br />
.................................................................................... 216.00250 - 224.9950 MHz<br />
.................................................................................. 225.00000 - 299.93750 MHz<br />
UHF Low/T............................................................. 300.00000 - 512.00000 MHz<br />
UHF High............................................................... 764.00000 - 960.00000 MHz*<br />
............................................................................... 1240 .00000 - 1300.0000 MHz<br />
*Excludes frequencies utilized by the Cellular <strong>Mobile</strong> <strong>Radio</strong>telephone Service<br />
Preprogrammed Service Searches<br />
Marine, Aircraft, CB, FRS/GMRS/MURS/DOT-STAR, Public Safety, Amateur<br />
<strong>Radio</strong>, Railroad<br />
Weather frequencies<br />
162.400, 162.425, 162.450, 162.475, 162.500, 162.525, 162.550 MHz<br />
Scanning Rate...................................................Approx. 55 channels per second<br />
Search Rate............................................................ Approx. 90 steps per second<br />
Display<br />
LCD with amber LED backlight, 4 lines of 16 characters each, plus 13<br />
display icons<br />
Zeromatic<br />
Automatically zeroes receiver on correct frequency during searches<br />
Audio Output................................................................................................1.8 W<br />
Internal Speaker............................................................ 77 mm 8 ohms dynamic<br />
Operating Voltage........... 12-14.4 VDC, 13.8 VDC nominal, 16 VDC maximum<br />
Dimensions (WxDxH)................................Approximately 7.3 x 5.3 x 2.2 inches<br />
................................................................................................... 185 x 135 x 55 mm<br />
Weight (not including mounting hardware and antenna)<br />
Approximately 42.3 ounces, 1200 grams<br />
86<br />
87
Additional Information<br />
Additional Information<br />
Memory backup<br />
No backup battery required, utilizes non-volatile EEPROM memory.<br />
Power<br />
AC Adapter (Class 2; 12V DC; 600 mA; center tip set to positive).<br />
Specifications are typical; individual units might vary. Specifications and<br />
depictions are subject to change and improvement without notice.<br />
Troubleshooting<br />
Problem Cause Solution<br />
<strong>Scanner</strong> won’t<br />
power on.<br />
The keypad does<br />
not work.<br />
<strong>Scanner</strong> will not<br />
scan when SCAN<br />
is pressed<br />
The scanner does<br />
not receive digital<br />
transmission on<br />
digital frequencies<br />
or trunking<br />
systems.<br />
<strong>Scanner</strong> scans<br />
slowly.<br />
<strong>Scanner</strong> stops on<br />
noise or silence.<br />
The AC adapter or DC<br />
adapter/cable is not<br />
connected.<br />
The scanner may need<br />
to be initialized.<br />
Possible “birdie”<br />
frequency<br />
programmed<br />
The scanner may<br />
need to be reset or<br />
initialized<br />
No channels<br />
programmed, or<br />
only one channel<br />
programmed, or all<br />
channels locked out<br />
SQUELCH control is<br />
not adjusted properly<br />
The digital channel<br />
or talkgroup is not<br />
using APCO-25 digital<br />
modulation.<br />
The digital channel or<br />
talkgroup is encrypted.<br />
The digital channel<br />
or talkgroup is being<br />
transmitted from a<br />
distant location.<br />
SQUELCH control is<br />
set too high.<br />
Subaudible squelch<br />
mode not set.<br />
Be sure the adapter’s barrel plug is<br />
fully plugged into the DC 13.8V jack.<br />
Follow steps in “Initializing the<br />
<strong>Scanner</strong> to Factory Defaults” below.<br />
Tighten squelch, apply attenuator or<br />
lock out the “birdie” frequency<br />
Follow steps in “Initializing the<br />
<strong>Scanner</strong> to Factory Defaults” below.<br />
Ensure that the scanner has more<br />
than one channel programmed and<br />
enabled for scanning<br />
Turn SQUELCH control clockwise<br />
until scanning resumes<br />
The scanner can only receive<br />
APCO-25 C4FM/CQPSK IMBE digital<br />
signals.<br />
The scanner will not receive<br />
encrypted traffic.<br />
Reposition the scanner or use<br />
an outdoor antenna to improve<br />
reception.<br />
Turn SQUELCH control counter<br />
clockwise.<br />
Set the correct subaudible squelch<br />
mode. See “Appendix B: Detailed Menu<br />
Reference: Conv Menu” on page 101.<br />
88<br />
89
Additional Information<br />
Additional Information<br />
Poor or no<br />
reception.<br />
Problem Cause Solution<br />
Error message<br />
appears when<br />
trying to upload or<br />
download from a<br />
computer.<br />
Weak signals from<br />
distant stations.<br />
Attenuator in use on<br />
weak signals.<br />
Strong signal overload<br />
from nearby<br />
transmitter.<br />
Loose or defective<br />
antenna.<br />
Incorrect<br />
modulation mode<br />
selected.<br />
Your computer is using<br />
Windows XP and does<br />
not have the necessary<br />
USB cable driver.<br />
Reposition radio for best reception.<br />
Check performance with and<br />
without attenuator activated, use<br />
setting with best reception.<br />
Check performance with and<br />
without attenuator activated, use<br />
setting with best reception.<br />
Inspect antenna and connectors<br />
and correct any problems found.<br />
Ensure that proper modulation<br />
mode is selected for the type of<br />
system being monitored.<br />
Download and install the file:<br />
“Windows XP Driver to resolve PC<br />
connection error” from your scanner’s<br />
Product Support page or the Software<br />
Download page on<br />
www.<strong>Radio</strong><strong>Shack</strong>.com.<br />
Then make your connection and try<br />
again. Be sure the correct COM port<br />
is selected in device manager.<br />
Reset Global Parameters to Factory Defaults<br />
If your scanner does not appear to be functioning properly, you can<br />
reset the global radio parameters to their factory state without losing<br />
any of your programmed data. Any custom changes you have made<br />
to the radio’s global parameters will be lost.<br />
Note: This procedure preserves the information you stored in<br />
the scanner’s working memory, while resetting all global radio<br />
parameters to factory defaults. V-<strong>Scanner</strong> memory is not affected by<br />
this operation.<br />
1. Turn off the scanner, then turn it on again.<br />
The scanner briefly displays the DSP boot version, and then the<br />
Welcome/Owner screen is displayed.<br />
2. Press 0 while the scanner is displaying the Welcome/Owner<br />
screen. The scanner displays:<br />
System Tests:<br />
Select a Test...<br />
Exits if no key<br />
is pressed<br />
3. Press 2. The scanner displays:<br />
Init GLOB data<br />
To factory state<br />
ENTER if APPROVE<br />
CLEAR to EXIT<br />
4. Press ENT. The scanner displays:<br />
GLOB EEPROM area<br />
Initialized to<br />
defaults.<br />
Press any key.<br />
5. Press any key on the keypad to proceed. The scanner will reboot<br />
with file system and global parameters reset to factory defaults.<br />
90<br />
91
Additional Information<br />
Initializing the <strong>Scanner</strong> to Factory Defaults<br />
If initializing the global parameters to factory defaults does not<br />
resolve your problem, you may wish to initialize the entire scanner<br />
to factory defaults. This operation will result in the clearing of your<br />
programmed data and the loss of any custom changes you have<br />
made to the radio’s global parameters. Use this option as a last<br />
resort, and, if possible, save your working memory to a V-<strong>Scanner</strong><br />
folder prior to performing this operation.<br />
Note: This procedure clears all information you stored in the<br />
scanner’s working memory, AND resets the global parameters to<br />
factory defaults. Initialize the scanner only when you are sure the<br />
scanner is not working properly. V-<strong>Scanner</strong> memory is not affected<br />
when the scanner is initialized.<br />
1. Turn off the scanner, then turn it on again.<br />
The scanner briefly displays the DSP boot version, and then the<br />
Welcome/Owner screen is displayed.<br />
2. Press 0 while the scanner is displaying the Welcome/Owner<br />
screen. The scanner displays:<br />
4. Press ENT. The scanner displays:<br />
Initializing the<br />
File System<br />
Please Wait.....<br />
Additional Information<br />
File System<br />
Initialized to<br />
Defaults.<br />
Press any key.<br />
5. Press any key on the keypad to proceed. The scanner displays:<br />
GLOB EEPROM area<br />
Initialized to<br />
defaults.<br />
Press any key.<br />
6. Press any key on the keypad to proceed. The scanner will reboot<br />
with file system and global parameters reset to factory defaults.<br />
System Tests:<br />
Select a Test...<br />
Exits if no key<br />
is pressed<br />
3. Press 1. The scanner displays:<br />
Factory Init<br />
Erase Memory<br />
ENTER if APPROVE<br />
CLEAR to EXIT<br />
92<br />
93
Search Bands<br />
Search Bands<br />
Appendix A: Search Bands<br />
All Sub Bands<br />
Group. Freq. (MHz) Band<br />
0 25-54 VHF Low<br />
1 108-137 VHF Aircraft<br />
2 137-174 VHF High<br />
3 216-300 220 MHz Commercial/<br />
Amateur<br />
4 300-406 UHF Military Air<br />
5 406-470 UHF<br />
6 470-512 UHF-T<br />
7 764-806 700 MHz<br />
8 806-869 800 MHz<br />
9 896-1300 900 MHz Band, 23 cm<br />
Amateur<br />
PubSafety Band<br />
Searches commonly used public safety frequencies. Groups are as<br />
follows:<br />
Group Freq. (MHz) Band<br />
0 33.4-46.5 VHF Low<br />
1 151-170 VHF High<br />
2 453-467 UHF<br />
3 764-806 700 MHz<br />
4 851-869 800 MHz<br />
Aircraft Band<br />
Searches civilian and military air frequencies.<br />
Group. Freq. (MHz) Band<br />
0 108-118 Navigation<br />
1 118-137 Civilian Voice<br />
2 138-150 Military Voice<br />
(excludes 2m Amateur)<br />
3 225-400 Military Voice<br />
Ham Bands<br />
Searches amateur radio frequencies.<br />
Group. Freq. (MHz) Band<br />
0 28.0-29.7 10m<br />
1 50-54 6m<br />
2 144-148 2m<br />
3 222-225 1.25cm<br />
4 420-450 70cm<br />
5 902-928 33cm<br />
6 1240-1300 23cm<br />
94<br />
95
Detailed Menu Reference<br />
Appendix B: Detailed Menu Reference<br />
• Context sensitive help is available for every menu parameter. Press<br />
FUNC SEL to view help for the selected parameter. Press SEL to exit<br />
help.<br />
• Each menu parameter includes a Dflt softkey, which restores<br />
the factory default setting for that parameter.<br />
GLOB Menu<br />
The GLOB menu stores all of the radio-wide settings used by the<br />
scanner. The active parameter is always the middle parameter and is<br />
indicated by a flashing colon (:).<br />
Notes:<br />
• Some GLOB parameter changes do not take effect until the<br />
GLOB menu is saved.<br />
• You can restore all GLOB settings to their defaults without affecting<br />
your programmed objects or V-<strong>Scanner</strong>s. Power cycle the radio,<br />
then press 0, then 2 during the welcome message display. Press<br />
ENT to confirm the GLOB parameter reset.<br />
• The Special Global menu (FUNC GLOB) includes parameter<br />
settings that may adversely affect the performance of your radio if<br />
not set properly. We recommend that users not change the settings<br />
found in the FUNC GLOB menu without specific instructions.<br />
Should you experience difficulties after changing any of these<br />
settings, you can restore them to factory defaults by pressing the<br />
Dflt softkey associated with each menu line, or follow the global<br />
reset procedure described above. See the product support page for<br />
this scanner on www.<strong>Radio</strong><strong>Shack</strong>.com for detailed information on<br />
the FUNC GLOB menu.<br />
GLOB<br />
Parameter<br />
Options<br />
Detailed Menu Reference<br />
Description<br />
Contrast 1-7 Sets LCD contrast. Use keys on 5-way<br />
pushbutton pad.<br />
Owner SEL Enters sub menu to set Welcome Message<br />
text display.<br />
Clone Send SEL Press SEL to send data using clone mode.<br />
Alert Mode<br />
Both, Tone,<br />
Light, Off<br />
Controls the Alert LED and Audible Alarm<br />
behavior. Both allows the LED and Tone.<br />
Tone allows the audible alarm only. Light<br />
allows the LED only. Off deactivates the<br />
Alert LED and Audible Alarm feature.<br />
Sound Mode On or Stlth Controls all radio beeps.<br />
Key Beeps On or Off Controls key beeps.<br />
Light Mode Norml, Stlth Controls the backlight operation. Norml<br />
(Normal) causes the backlight to remain<br />
on all the time. Stlth (Stealth) disables the<br />
backlight.<br />
Light Level Brit, Dim, Off Controls backlight intensity. When Dim LED<br />
is set to Yes, it also controls the Alert LED<br />
intensity. Accessed from front panel using<br />
DIM key.<br />
Dim LED Global or Normal When on, DIM key and Light Level GLOB<br />
menu parameter also control intensity of<br />
Alert LED.<br />
Atten Mode Global or Normal The attenuator reduces the amount of<br />
signal at the receiver input. This helps<br />
reduce interference from strong nearby<br />
transmitters. Global attenuator mode<br />
applies attenuation radio-wide, regardless<br />
of individual object settings. In Normal attenuator<br />
mode, the attenuator follows the<br />
individual object attenuator setting.<br />
Global Atten On or Off When the Atten mode is set to Global, this<br />
controls whether the Global attenuator is<br />
on or off.<br />
96<br />
97
Detailed Menu Reference<br />
Detailed Menu Reference<br />
GLOB<br />
Parameter<br />
Options<br />
Description<br />
Clear Hits SEL Press SEL to clear all hit counters.<br />
Hit Counts Yes or No Turns the hit counter feature on or off.<br />
Dflt ScanList 0-22 Sets default destination Scan Lists for new<br />
objects and CONV Stor from Searches,<br />
Signal Stalker II, and Tune. Use 1-20 for<br />
“normal” Scan Lists 1-20. Use 0 for the<br />
“ns” (not scanned) Scan List (no Scan List<br />
mappings are specified). Use 21 for the FAV<br />
Scan List. Use 22 for the Skywarn Scan List.<br />
Priority On or Off Turns Priority Scan On or Off. Priority Scan<br />
can also be toggled by pressing FUNC PRI<br />
while scanning.<br />
WxPri On or Off Toggles Weather Priority Mode on or off.<br />
Also accessed by pressing WX, then PRI.<br />
Scan Lists SEL Enters sub menu for Scan List settings and<br />
status.<br />
SRCH L/Outs SEL Enters sub menu for review, editing or deletion<br />
of search lockout frequencies.<br />
Clear FAV SEL Press SEL to clear the Favorites Scan List.<br />
Memory Info SEL Press SEL to see the current memory<br />
usage.<br />
EXPERT BELOW<br />
Tune LED On or Off Activates Signal Strength driven LED when<br />
in Tune mode.<br />
Color 0-7<br />
Red, Green, Blue<br />
(RGB) value<br />
Sets intensity of red, green and blue LEDs.<br />
Press SEL to edit colors. Press to scroll<br />
to R, G or B LED settings. Use numeric keys<br />
to activate preset intensity levels for each<br />
LED, or use keys to fine scroll intensity.<br />
Qtxt 1-0 Text value Sets QTXT (QuickText) 0-9 text. Use “$” to<br />
indicate end of text.<br />
Key Repeat On or Off Toggles key repeat mode when a key is<br />
held down.<br />
GLOB<br />
Parameter<br />
Options<br />
Description<br />
LCD BlinkOff 1-250 x 10 mS For alternating text displays, sets the<br />
display time for the secondary display<br />
element.<br />
LCD BlinkOn 1-250 x 10 mS For alternating text displays, sets the display<br />
time for the primary display element.<br />
LED BlinkOff 1-250 x 10 mS When the Alert LED setting for an object is<br />
set to Flash, this is the amount of time the<br />
LED stays turned off.<br />
LED BlinkOn 1-250 x 10 mS When the Alert LED setting for an object is<br />
set to Flash, this is the amount of time the<br />
LED stays turned on.<br />
Pri Channels 0-250 Number of priority CONV channels to<br />
check during a priority scan sampling. “0”<br />
samples all CONV priority channels.<br />
Pri Interval 2-100 x 100 mS Conventional frequency priority sample<br />
interval.<br />
TGRP Pri Int On or Off Toggles priority interrupt scanning during<br />
trunked calls.<br />
QuickPriRtn On or Off When on, does not wait for verification of<br />
correct CTCSS, DCS or NAC when returning<br />
to an active CONV channel after priority<br />
sampling<br />
Search Delay 1-250 x 100 ms Sets wait for reply delay for all search<br />
modes.<br />
SRCH Dig AGC On or Off Sets digital AGC mode on or off for all<br />
search types. Useful to compensate for low<br />
or high digital audio levels caused at the<br />
system.<br />
SRCH SuprTrk On or Off Alternative DSP decoding algorithm is<br />
applied to all search types. May help<br />
reception on some systems.<br />
98<br />
99
Detailed Menu Reference<br />
Detailed Menu Reference<br />
GLOB<br />
Parameter<br />
Options<br />
Description<br />
TLO=FUNC L/O On or Off Controls the operation of the L/OUT key.<br />
When Off, pressing L/OUT performs a<br />
Temporary Lockout of the selected object.<br />
When On, pressing L/OUT performs a<br />
Permanent Lockout of the selected object.<br />
DupeChecksSQ Yes or No If set to Yes, dupe checking will check both<br />
the stored frequency and any encoded<br />
squelch settings when checking for duplicate<br />
CONV objects.<br />
TGID Format<br />
Norm, DEC,<br />
or HEX<br />
Selects TGID display format.<br />
TGRP Ignore Yes or No If set to Yes, TGRP wildcards will ignore<br />
calls on previously stored TGRPS that are<br />
mapped to disabled Scan Lists.<br />
ShowCCInfo Yes or No For Motorola and P25 systems, shows<br />
current control channel index (from TSYS<br />
frequency list) and frequency alternating<br />
with the voice frequency.<br />
Set Password SEL Set Power-on password.<br />
0000=none.<br />
CONV Menu<br />
The CONV menu is used when creating new Conventional Channel<br />
objects, or editing existing Conventional Channel objects.<br />
CONV<br />
Parameter<br />
Scan Lists<br />
Freq<br />
Tag<br />
Sq Mode<br />
Squelch Code<br />
Options<br />
On or Off for<br />
Scan Lists 1-22<br />
Any supported<br />
frequency in MHz<br />
Alpha-numeric<br />
text<br />
Search, None,<br />
CTCSS, DCS,<br />
P25<br />
CTCSS Hz, DCS<br />
Code, P25 NAC<br />
Description<br />
Sets membership in Scan Lists. Use keys<br />
to scroll through Scan Lists. Use SEL key to<br />
toggle Scan List membership. A “*” next<br />
to the Scan List number indicates that the<br />
object is mapped to that Scan List.<br />
The frequency that the CONV object will<br />
use.<br />
The alphanumeric display name for the<br />
CONV channel. Use the standard text entry<br />
method or QTXT to name the object.<br />
Sets subaudible squelch mode or Project<br />
25 conventional digital modulation. Use<br />
Search to automatically analyze signals to<br />
determine squelch mode and code. Use<br />
None to ignore subaudible squelch. Use<br />
CTCSS for tone coded squelch, DCS for<br />
digital coded squelch, or P25 for Project<br />
25 conventional digital operation. Used in<br />
conjunction with Squelch Code parameter<br />
below.<br />
Sets CTCSS tone, DCS code, or P25 NAC<br />
depending on Sq Mode setting. Use Search<br />
to detect tone or code value for selected<br />
squelch type.<br />
L/Out On or Off Permanent lockout for the CONV channel.<br />
Also accessed by pressing FUNC L/OUT<br />
while the scanner is stopped on the CONV<br />
object.<br />
Priority On or Off Turns Priority Mode on or off for the CONV<br />
object.<br />
100<br />
101
Detailed Menu Reference<br />
Detailed Menu Reference<br />
CONV<br />
Parameter<br />
Options<br />
Description<br />
LED Mode Solid or Flash Controls whether the Alert LED flashes<br />
or remains on solid when the Alert LED is<br />
used.<br />
LED Color 0-7 Sets LED color to 0-7 as defined in the<br />
GLOB menu. By default, 0=LED Off,<br />
1=Red, 2=Yellow, 3=Green, 4=Cyan,<br />
5=Blue, 6=Magenta, 7=White.<br />
Latch LED On or Off Normally the Alert LED is active only while<br />
the object is receiving a transmission. When<br />
Latch is on, the Alert LED will remain lit<br />
after the transmission is complete, unless<br />
overridden by a subsequent object that is<br />
also using the Alert LED.<br />
Backlight On, Off or Flash Controls whether the backlight should be<br />
on or flashing while the object is active.<br />
“Off” setting is ignored by the PRO-197.<br />
Alarm<br />
None,<br />
Chirp,<br />
Hi-Lo,<br />
Alert,<br />
Ring, 2-Chirp,<br />
Fast Hi-Lo,<br />
DTMF#<br />
Sets the Audible Alarm for the CONV<br />
object. When an Audible Alarm is selected,<br />
the selected alarm will play at the beginning<br />
of each transmission on the CONV<br />
object, or anytime the scanner stops for<br />
activity on the CONV object while scanning.<br />
Fav Yes or No When On, the CONV object is a member of<br />
the Favorites Scan List.<br />
Skywarn Yes or No When On, the CONV object is a member of<br />
the Skywarn Scan List.<br />
EXPERT BELOW<br />
Modulation<br />
Auto, AM,<br />
FM,<br />
NFM<br />
Modulation setting for the CONV channel.<br />
In most cases Auto will work fine. Use AM<br />
to override and force AM modulation, FM<br />
to force FM modulation, NFM to force<br />
narrow FM modulation.<br />
CONV<br />
Parameter<br />
Options<br />
Description<br />
Atten On or Off When on, applies 20 dB of attenuation to<br />
all transmissions on the CONV channel.<br />
Useful in areas where interference from<br />
nearby strong signals is present.<br />
Delay On or Off Controls whether a Delay is used to wait<br />
for reply traffic after a transmission on the<br />
CONV channel.<br />
Delay Time 1-250 x 100ms Sets the amount of time (in 100 millisecond<br />
intervals) for the wait for reply delay if Delay<br />
is On, e.g., 20=2 seconds.<br />
<strong>Digital</strong> AGC On or Off Controls <strong>Digital</strong> AGC function for the<br />
CONV channel.<br />
Supertrack On or Off Alternative DSP decoding algorithm. May<br />
help reception on some systems.<br />
AudioBoost On or Off Applies a 6 dB boost to audio levels when<br />
the object is active.<br />
Hit Count Numeric value Increments each time a transmission is<br />
received on the CONV object. Global “Hit<br />
Counts” must be set to ON. Press the<br />
Dflt softkey to reset to 0.<br />
102<br />
103
Detailed Menu Reference<br />
TGRP Menu<br />
The TGRP menu is used when creating new <strong>Trunking</strong> Talkgroup<br />
objects, or editing existing <strong>Trunking</strong> Talkgroup objects.<br />
TGRP<br />
Parameter<br />
Scan Lists<br />
TSYS<br />
ID<br />
Options<br />
On or Off for<br />
Scan Lists 1-22<br />
New or previously<br />
stored trunking<br />
system object<br />
(TSYS)<br />
Decimal, hex or<br />
AFS, depending<br />
on TSYS type<br />
Description<br />
Sets membership in Scan Lists. Use keys<br />
to scroll through Scan Lists. Use SEL key to<br />
toggle Scan List membership. A “*” next<br />
to the Scan List number indicates that the<br />
object is mapped to that Scan List.<br />
To enter a new trunking system, use the <br />
keys to scroll through the stored systems<br />
until NEW appears, then press SEL to enter<br />
the parameters for the new TSYS. To use a<br />
trunking system that you have previously<br />
entered, use the keys to scroll to the<br />
desired system.<br />
The digital address of the talkgroup or individual<br />
radio ID on the trunked radio system.<br />
Type Group or Private Use Group for talkgroup ID, Private for<br />
individual radio ID.<br />
Tag<br />
Alpha-numeric<br />
text<br />
The alphanumeric display name for the<br />
TGRP. Use the standard text entry method<br />
or QTXT to name the object.<br />
L/Out On or Off Permanent lockout for the TGRP. Also accessed<br />
by pressing FUNC L/OUT while the<br />
scanner is stopped on the TGRP object.<br />
Priority On or Off Turns Priority Mode on or off for the TGRP<br />
object.<br />
LED Mode Solid or Flash Controls whether the Alert LED flashes<br />
or remains on solid when the Alert LED is<br />
used.<br />
LED Color 0-7 Sets LED color to 0-7 as defined in the<br />
GLOB menu. By default, 0=LED Off,<br />
1=Red, 2=Yellow, 3=Green, 4=Cyan,<br />
5=Blue, 6=Magenta, 7=White.<br />
TGRP<br />
Parameter<br />
Options<br />
Detailed Menu Reference<br />
Description<br />
Latch LED On or Off Normally the Alert LED is active only while<br />
the object is receiving a transmission. When<br />
Latch is on, the Alert LED will remain lit<br />
after the transmission is complete, unless<br />
overridden by a subsequent object that is<br />
also using the Alert LED.<br />
Backlight On, Off or Flash Controls whether the backlight should be<br />
on, off or flashing while the object is active.<br />
Alarm<br />
None, Chirp,<br />
Hi-Lo, Alert, Ring,<br />
2-Chirp, Fast Hi-<br />
Lo, DTMF#<br />
Sets the Audible Alarm for the TGRP<br />
object. When an Audible Alarm is selected,<br />
the selected alarm will play at the beginning<br />
of each transmission on the TGRP<br />
object, or anytime the scanner stops for<br />
activity on the TGRP object while scanning.<br />
Fav Yes or No When On, the TGRP object is a member of<br />
the Favorites Scan List.<br />
Skywarn Yes or No When On, the CONV object is a member of<br />
the Skywarn Scan List.<br />
EXPERT BELOW<br />
Delay On or Off Controls whether a Delay is used to wait<br />
for reply traffic after a transmission on the<br />
TGRP.<br />
Delay Time 1-250 x 100 ms Sets the amount of time (in 100 millisecond<br />
intervals) for the wait for reply delay if Delay<br />
is On, e.g., 20=2 seconds.<br />
AudioBoost On or Off Applies a 6 dB boost to audio levels when<br />
the object is active.<br />
Hit Count Numeric value Increments each time a transmission is<br />
received on the TGRP object. Global “Hit<br />
Counts” must be set to ON. Press the<br />
Dflt softkey to reset to 0.<br />
104<br />
105
Detailed Menu Reference<br />
TSYS Menu<br />
The TSYS menu is used when creating new <strong>Trunking</strong> System objects,<br />
or editing existing <strong>Trunking</strong> System objects.<br />
Type<br />
Tag<br />
TSYS<br />
Parameter<br />
Options<br />
MOT<br />
800/900,<br />
MOT<br />
VHF/UHF,<br />
P25<br />
MANUAL,<br />
P25<br />
AUTO,<br />
EDACS<br />
STD,<br />
EDACS<br />
NAROW,<br />
LTR<br />
Alphanumeric<br />
text<br />
Description<br />
Sets the trunking system type. Choose MOT<br />
800/900 if the system is a Motorola 800 or 900<br />
MHz analog or digital trunked radio system that<br />
uses the 3600 baud control channel. Use P25<br />
AUTO for most Project 25 systems that send<br />
channel table information over the system control<br />
channel. Use P25 MANUAL if it is necessary to<br />
manually set the channel table information or if you<br />
wish to use the default 800 MHz table data. Use<br />
EDACS STD for most 800 MHz EDACS systems<br />
using the 9600 BPS EDACS control channel. Use<br />
EDACS NAROW for most 900 MHz and some<br />
VHF/UHF EDACS systems using the 4800 BPS<br />
EDACS control channel. Use LTR for Logic Trunked<br />
<strong>Radio</strong> (LTR) systems.<br />
The alphanumeric display name for the TSYS. Use<br />
the standard text entry method or QTXT to name<br />
the object.<br />
Frequencies SEL Press SEL to enter trunked radio system frequencies.<br />
Enter control channel frequencies in any order<br />
for all Motorola and Project 25 trunking systems.<br />
Enter system frequencies in LCN order for all<br />
EDACS trunking systems. Enter system frequencies<br />
in Home Repeater order for LTR systems.<br />
L/Out On or Off Permanent lockout for the TSYS. When On, no<br />
traffic will be received on any programmed TGRPs<br />
for this TSYS.<br />
EXPERT BELOW<br />
Atten On or Off When on, applies 20 dB of attenuation to all<br />
transmissions on this TSYS. Useful in areas where<br />
interference from nearby strong signals is present.<br />
TSYS<br />
Parameter<br />
Options<br />
Detailed Menu Reference<br />
Description<br />
Narrow FM Yes or No Use Yes when the system is known to use Narrow<br />
FM modulation. Most 900 MHz analog trunked<br />
radio systems utilize NFM modulation. This setting<br />
has no effect on digital trunked radio system<br />
performance.<br />
AudioBoost On or Off Activates 6 dB audio level boost for all activity on<br />
this TSYS.<br />
Dwell<br />
0-200 x<br />
100 mS<br />
Sets the amount of time the scanner dwells on a<br />
Motorola, P25 or EDACS system control channel<br />
for activity on programmed talkgroups. Use 0 for<br />
automatic mode, which uses control channel information<br />
to determine when all current talkgroup<br />
information has been broadcast by the system.<br />
<strong>Digital</strong> AGC On or Off Controls <strong>Digital</strong> AGC function for the TSYS.<br />
Supertrack On or Off Alternative DSP decoding algorithm. May help<br />
reception on some systems.<br />
Multi-Site<br />
Off,<br />
Roam or<br />
Stat<br />
(Stationary)<br />
Used with networked Motorola and P25 trunked radio<br />
systems. When Multi-Site=Off, the scanner will<br />
find the first usable control channel in the control<br />
channel list and use it to track the system. When<br />
Multi-Site=Roam, the scanner will always attempt<br />
to lock on to control channels where the decoding<br />
quality is greater than Threshold Hi, and will search<br />
for new control channels when the decoding quality<br />
of a control channel drops below Threshold<br />
Lo. If no control channels are available that meet<br />
the Threshold Hi criteria, the scanner will seek the<br />
best control channel to use, and continue checking<br />
periodically for a new control channel that meets<br />
the Threshold Hi criteria. When Multi-Site=STAT,<br />
the scanner will track the system using every usable<br />
control channel in the control channel list.<br />
Threshold Hi 1-99 Available When Multi-Site is set to ROAM. Sets the<br />
control channel decode % threshold for a site to be<br />
considered good when looking for a new site.<br />
106<br />
107
Detailed Menu Reference<br />
Detailed Menu Reference<br />
TSYS<br />
Parameter<br />
Options<br />
Description<br />
Threshold Lo 1-99 Available When Multi-Site is set to ROAM. Sets the<br />
control channel decode % threshold for a site to<br />
be considered out of range, which will begin the<br />
process of looking for a new site.<br />
T Tables<br />
Default,<br />
Splinter,<br />
Custom<br />
For Motorola and P25 systems only - sets custom<br />
channel tables. Use , to select option, press SEL<br />
on Custom to enter custom table information.<br />
Fleet Map Type I For Motorola Type I systems only—sets fleet map.<br />
LMIT Menu<br />
The LMIT menu is used when creating new Limit Search objects, or<br />
editing existing Limit Search objects.<br />
LMIT<br />
Parameter<br />
Scan Lists<br />
FrLo<br />
FrHi<br />
Tag<br />
Options<br />
On or Off for Scan<br />
Lists 1-22<br />
Any supported<br />
frequency in MHz<br />
Any supported<br />
frequency in MHz<br />
Alphanumeric<br />
text<br />
Description<br />
Sets membership in Scan Lists. Use <br />
keys to scroll through Scan Lists. Use SEL<br />
key to toggle Scan List membership. A “*”<br />
next to the Scan List number indicates that<br />
the object is mapped to that Scan List.<br />
A frequency that will be used as the lower<br />
limit for the limit search range.<br />
A frequency that will be used as the upper<br />
limit for the limit search range.<br />
The alphanumeric display name for the<br />
LMIT search. Use the standard text entry<br />
method or QTXT to name the object.<br />
L/Out On or Off Permanent lockout for the LMIT channel.<br />
Also accessed by pressing FUNC L/OUT<br />
while the scanner is stopped on the LMIT<br />
object.<br />
LED Mode Solid or Flash Controls whether the Alert LED flashes<br />
or remains on solid when the Alert LED is<br />
used.<br />
LMIT<br />
Parameter<br />
Options<br />
Description<br />
LED Color 0-7 Sets LED color to 0-7 as defined in the<br />
GLOB menu. By default, 0=LED Off,<br />
1=Red, 2=Yellow, 3=Green, 4=Cyan,<br />
5=Blue, 6=Magenta, 7=White.<br />
Latch LED On or Off Normally the Alert LED is active only while<br />
the object is receiving a transmission.<br />
When Latch is on, the Alert LED will remain<br />
lit after the transmission is complete, unless<br />
overridden by a subsequent object<br />
that is also using the Alert LED.<br />
Backlight On, Off or Flash Controls whether the backlight should be<br />
on, off or flashing while the object is active.<br />
Alarm<br />
None, Chirp,<br />
Hi-Lo, Alert, Ring,<br />
2-Chirp, Fast Hi-<br />
Lo, DTMF#<br />
Sets the Audible Alarm for the LMIT object.<br />
When an Audible Alarm is selected,<br />
the selected alarm will play anytime the<br />
scanner stops for activity on the LMIT<br />
object while scanning.<br />
Fav Yes or No When On, the LMIT object is a member of<br />
the Favorites Scan List.<br />
EXPERT BELOW<br />
Modulation<br />
Auto, AM,<br />
FM,<br />
NFM<br />
Modulation setting for the LMIT search. In<br />
most cases Auto will work fine. Use AM to<br />
override and force AM modulation, FM to<br />
force FM modulation, NFM to force narrow<br />
FM modulation.<br />
Atten On or Off When on, applies 20 dB of attenuation to<br />
all hits received on the LMIT search. Useful<br />
in areas where interference from nearby<br />
strong signals is present.<br />
Delay On or Off Controls whether a Delay is used to wait<br />
for reply traffic after a transmission is<br />
received during the LMIT search.<br />
Delay Time 1-250 x 100 ms Sets the amount of time (in 100 millisecond<br />
intervals) for the wait for reply delay if<br />
Delay is On, e.g., 20=2 seconds.<br />
108<br />
109
Detailed Menu Reference<br />
Detailed Menu Reference<br />
LMIT<br />
Parameter<br />
Options<br />
Description<br />
Zeromatic On or Of When on, enhances the scanner’s ability to<br />
lock on to the actual center frequency of a<br />
search hit instead of an adjacent frequency.<br />
Search Dir Up or Down Sets search direction used when LMIT<br />
object is active.<br />
Hit Count Numeric value Increments each time a transmission is<br />
received on the LMIT object. Global “Hit<br />
Counts” must be set to ON. Press the<br />
Dflt softkey to reset to 0.<br />
SRVC Menu<br />
The SRVC menu is used when creating new Service Search objects,<br />
or editing existing Service Search objects.<br />
SRVC<br />
Parameter<br />
Scan Lists<br />
Srvc<br />
Options<br />
On or Off for<br />
Scan Lists 1-22<br />
Pub Safety,<br />
Aircraft,<br />
Amateur,<br />
CB,<br />
Marine,<br />
FRS/GM/MURS,<br />
Railroad<br />
Description<br />
Sets membership in Scan Lists. Use keys<br />
to scroll through Scan Lists. Use SEL key to<br />
toggle Scan List membership. A “*” next<br />
to the Scan List number indicates that the<br />
object is mapped to that Scan List.<br />
Pub Safety (Public Safety) searches commonly<br />
used public safety frequencies.<br />
Aircraft searches civilian and military air<br />
frequencies. Amateur searches amateur<br />
radio frequencies. CB searches the<br />
citizen’s band radio frequencies. Marine<br />
searches the VHF-FM marine radio band.<br />
FRS/GMRS/MURS/DOT/STAR (F/G/MURS)<br />
searches the FRS, GMRS, MURS, DOT and<br />
STAR radio frequencies. Railroad searches<br />
the Association of American Railroads<br />
(AAR) VHF railroad frequencies used in the<br />
US and Canada.<br />
See Appendix A on page 94 for Search Band<br />
Group frequencies.<br />
SRVC<br />
Parameter<br />
Groups<br />
Tag<br />
Options<br />
Use to scroll,<br />
SEL to toggle<br />
on/off<br />
Alpha-numeric<br />
text<br />
Description<br />
Toggle search groups when Pub Safety,<br />
Aircraft and Amateur service searches are<br />
used.<br />
See Appendix A on page 94 for Search Band<br />
Group frequencies.<br />
The alphanumeric display name for the<br />
SRVC search. Use the standard text entry<br />
method or QTXT to name the object.<br />
L/Out On or Off Permanent lockout for the SRVC object.<br />
Also accessed by pressing FUNC L/OUT<br />
while the scanner is stopped on the SRVC<br />
object.<br />
LED Mode Solid or Flash Controls whether the Alert LED flashes<br />
or remains on solid when the Alert LED is<br />
used.<br />
LED Color 0-7 Sets LED color to 0-7 as defined in the<br />
GLOB menu. By default, 0=LED Off,<br />
1=Red, 2=Yellow, 3=Green, 4=Cyan,<br />
5=Blue, 6=Magenta, 7=White.<br />
Latch LED On or Off Normally the Alert LED is active only while<br />
the object is receiving a transmission.<br />
When Latch is on, the Alert LED will remain<br />
lit after the transmission is complete, unless<br />
overridden by a subsequent object that is<br />
also using the Alert LED.<br />
Backlight On, Off or Flash Controls whether the backlight should be<br />
on, off or flashing while the object is active.<br />
Alarm<br />
None, Chirp,<br />
Hi-Lo, Alert, Ring,<br />
2-Chirp, Fast Hi-<br />
Lo, DTMF#<br />
Sets the Audible Alarm for the SRVC<br />
object. When an Audible Alarm is selected,<br />
the selected alarm will play anytime the<br />
scanner stops for activity on the SRVC<br />
object while scanning.<br />
Fav Yes or No When On, the SRVC object is a member of<br />
the Favorites Scan List.<br />
110<br />
111
Detailed Menu Reference<br />
Detailed Menu Reference<br />
SRVC<br />
Parameter<br />
EXPERT BELOW<br />
Modulation<br />
Options<br />
Auto, AM, FM,<br />
NFM<br />
Description<br />
Modulation setting for the SRVC search. In<br />
most cases Auto will work fine. Use AM to<br />
override and force AM modulation, FM to<br />
force FM modulation, NFM to force narrow<br />
FM modulation.<br />
Atten On or Off When on, applies 20 dB of attenuation to<br />
all hits received on the SRVC search. Useful<br />
in areas where interference from nearby<br />
strong signals is present.<br />
Delay On or Off Controls whether a Delay is used to wait<br />
for reply traffic after a transmission on the<br />
SRVC search.<br />
Delay Time 1-250 x 100ms Sets the amount of time (in 100 millisecond<br />
intervals) for the wait for reply delay if Delay<br />
is On, e.g., 20=2 seconds.<br />
Zeromatic On or Off When on, enhances the scanner’s ability to<br />
lock on to the actual center frequency of a<br />
search hit instead of an adjacent frequency.<br />
Search Dir Up or Down Sets search direction used when SRVC<br />
object is active.<br />
Hit Count Numeric value Increments each time a transmission is<br />
received on the SRVC object. Global “Hit<br />
Counts” must be set to ON. Press the<br />
Dflt softkey to reset to 0.<br />
STLK Menu<br />
The STLK menu is used when creating new Signal Stalker II objects,<br />
or editing existing Signal Stalker II objects.<br />
STLK<br />
Parameters<br />
Scan Lists<br />
Type<br />
Options<br />
On or Off for<br />
Scan Lists 1-22<br />
All Bands or<br />
Pub Safety<br />
Description<br />
Sets membership in Scan Lists. Use keys<br />
to scroll through Scan Lists. Use SEL key to<br />
toggle Scan List membership. A “*” next to<br />
the Scan List number indicates that the object<br />
is mapped to that Scan List.<br />
Use to select All Bands or Public Safety.<br />
All Bands covers the entire frequency range<br />
of the scanner. Pub Safety covers frequency<br />
ranges commonly used for public safety<br />
communications.<br />
Sub-bands , SEL Sub bands are available when using STLK in All<br />
Bands or Public Safety mode.<br />
Tag<br />
Alpha-numeric<br />
text<br />
See Appendix A on page 94 for Search Band<br />
Group frequencies.<br />
The alphanumeric display name for the STLK<br />
object. Use the standard text entry method or<br />
QTXT to name the object.<br />
L/Out On or Off Permanent lockout for the STLK search. Also<br />
accessed by pressing FUNC L/OUT while the<br />
scanner is stopped on the STLK object.<br />
LED Mode Solid or Flash Controls whether the Alert LED flashes or<br />
remains on solid when the Alert LED is used.<br />
LED Color 0-7 Sets LED color to 0-7 as defined in the<br />
GLOB menu. By default, 0=LED Off, 1=Red,<br />
2=Yellow, 3=Green, 4=Cyan, 5=Blue,<br />
6=Magenta, 7=White.<br />
Latch LED On or Off Normally the Alert LED is active only while the<br />
object is receiving a transmission. When Latch<br />
is on, the Alert LED will remain lit after the<br />
transmission is complete, unless overridden<br />
by a subsequent object that is also using the<br />
Alert LED.<br />
112<br />
113
Detailed Menu Reference<br />
Text Entry<br />
STLK<br />
Parameters<br />
Options<br />
Description<br />
Backlight On, Off or Flash Controls whether the backlight should be on,<br />
off or flashing while the object is active.<br />
Alarm<br />
None, Chirp,<br />
Hi-Lo, Alert,<br />
Ring, 2-Chirp,<br />
Fast Hi-Lo,<br />
DTMF#<br />
Sets the Audible Alarm for the STLK object.<br />
When an Audible Alarm is selected, the selected<br />
alarm will play anytime the scanner stops<br />
for activity on the STLK object while scanning.<br />
Fav Yes or No When On, the STLK object is a member of the<br />
Favorites Scan List.<br />
EXPERT BELOW<br />
Atten On or Off When on, applies 20 dB of attenuation to all<br />
hits received on the STLK search. Useful in<br />
areas where interference from nearby strong<br />
signals is present.<br />
Delay On or Off Controls whether a Delay is used to wait for<br />
reply traffic after a transmission on the STLK<br />
search.<br />
Delay Time 1-250 x 100ms Sets the amount of time (in 100 millisecond<br />
intervals) for the wait for reply delay if Delay is<br />
On, e.g., 20=2 seconds.<br />
Zeromatic On or Off When on, enhances the scanner’s ability to lock<br />
on to the actual center frequency of a search<br />
hit instead of an adjacent frequency.<br />
Special On or Off STLK works by quickly sweeping the RF spectrum<br />
in 1 MHz increments to find nearby strong<br />
signals. If the 1 MHz sweep indicates that activity<br />
is present in the 1 MHz range, STLK sweeps<br />
that range to find the source.<br />
Search Dir Up or Down Sets search direction used when STLK object<br />
is active.<br />
Hit Count Numeric value Increments each time a transmission is<br />
received on the STLK object. Global “Hit<br />
Counts” must be set to ON. Press the Dflt<br />
softkey to reset to 0.<br />
Appendix C: Text Entry and QuickText<br />
Your scanner uses a simple text entry method that allows entry of<br />
all uppercase and lowercase letters of the alphabet, numbers, and<br />
punctuation symbols. Your scanner also features QuickText, which<br />
allows you to store up to 10 commonly used text items for instant<br />
recall while editing alphanumeric fields.<br />
Text Entry<br />
To enter a letter in an alphanumeric text field, press the number key<br />
below the letter you wish to type first, then press the number key<br />
that corresponds with the position of the letter in the silk screen<br />
group.<br />
For example, the number 2 is used to access the letters A, B and<br />
C. To type the letter A, press 2 to select the ABC group, then 1 to<br />
select the first letter in the group. Likewise, to type the letter B, press<br />
2 to select the ABC group, then press 2 again to select the second<br />
letter in the group. And, to type the letter C, press 2, then 3 to select<br />
the third letter in the group.<br />
• To enter numbers in alphanumeric text fields, press 1 first, then<br />
the number you wish to type.<br />
• To enter punctuation, press 0 first to see the first set of<br />
punctuation, then press the number key that corresponds with<br />
the position of the desired punctuation mark in the set.<br />
• To enter a space, press the . (period) key to enter a SPACE.<br />
• While using Standard Text Entry, the FUNC key serves as a shift<br />
key.<br />
• For letters, uppercase text is typed by default, and you can shift<br />
to lowercase by pressing FUNC before entering a character.<br />
114<br />
115
Text Entry<br />
• For punctuation, FUNC accesses a second set of punctuation<br />
marks. The shift action of FUNC remains active until it is pressed<br />
again.<br />
• Press or to move the cursor to the desired location in edit<br />
fields. Press FUNC or FUNC to move the cursor to the<br />
beginning or end of an edit field.<br />
• Use CLR as a backspace key to erase characters before the<br />
cursor, and press FUNC CLR to clear the entire field.<br />
Char Press Char Press Char Press Char Press<br />
A 21 O 63 3 13 ? 07<br />
B 22 P 71 4 14 -> 08<br />
C 23 Q 72 5 15 ‘ 09<br />
D 31 R 73 6 16
Text Entry<br />
Customizing QuickText<br />
To edit the QuickText words:<br />
1. Press PROG, then the GLOB softkey.<br />
2. Press p or q to scroll to QTXT and find the QuickText storage<br />
location that you wish to change.<br />
3. Press to edit the QuickText entry.<br />
4. Use the standard text entry method to enter your desired text.<br />
Note: When you use your QTXT entry in a text field, any unused<br />
spaces will be filled with space characters. If you want to leave room<br />
for adding text, enter a space after your QTXT, then a dollar sign ($).<br />
When you use your QTXT in a text field, and the edit cursor will be<br />
positioned just after the space so you can continue adding text to<br />
the text field.<br />
5. Once you are finished editing your QTXT storage location, press<br />
the SAVE softkey to save the QTXT.<br />
6. Press the SAVE softkey again to save the changes you made to<br />
the GLOB menu.<br />
Index<br />
A<br />
Alarms<br />
Global Setting.................................................................................................................97<br />
Object Setting...................................................................75, 99, 102, 105, 109, 111, 114<br />
Weather Alarm................................................................................................................65<br />
Alert LED<br />
Global Setting.................................................................................................................97<br />
Object Setting...................................................................75, 99, 102, 104, 108, 111, 113<br />
Antenna.................................................................................................................. 8, 18<br />
Troubleshooting..............................................................................................................90<br />
Weather Scanning...........................................................................................................64<br />
Attenuator<br />
Global Settings...............................................................................................................97<br />
Key......................................................................................................................................6<br />
Setting..............................................................................................................................22<br />
Troubleshooting..............................................................................................................90<br />
B<br />
Backlight<br />
Alerts................................................................................................................................76<br />
Setting..............................................................................................................................25<br />
Birdie Frequencies...................................................................................................... 82<br />
C<br />
Clear<br />
Favorite Scan List............................................................................................................43<br />
Hit Counters....................................................................................................................75<br />
Key......................................................................................................................................7<br />
Lockouts...........................................................................................................................49<br />
Memory......................................................................................................................80, 92<br />
Text...........................................................................................................................30, 116<br />
Cloning........................................................................................................................ 71<br />
Conventional Channel Object<br />
Creating...........................................................................................................................29<br />
Detailed Menu Reference............................................................................................101<br />
Priority Scan.....................................................................................................................74<br />
Index<br />
118<br />
119
Index<br />
Index<br />
D<br />
Dashboard.................................................................................................................. 17<br />
Dedicated Searches<br />
Defined............................................................................................................................57<br />
LMIT.................................................................................................................................57<br />
Signal Stalker II................................................................................................................60<br />
SRVC................................................................................................................................58<br />
TUNE................................................................................................................................61<br />
Tune LED.....................................................................................................................63<br />
Delay<br />
Key......................................................................................................................................7<br />
Object Delay.................................................................................103, 105, 109, 112, 114<br />
Search Delay....................................................................................................................99<br />
Setting..............................................................................................................................24<br />
Deleting Objects........................................................................................................ 44<br />
Dim.............................................................................................................................. 25<br />
Display.......................................................................................................................... 9<br />
Duplicate (DUPE)........................................................................................................ 34<br />
F<br />
Factory Defaults<br />
Initializing the <strong>Scanner</strong>...................................................................................................92<br />
Resetting Global Parameters.........................................................................................90<br />
Favorite List<br />
Adding Objects...............................................................................................................43<br />
Clearing...........................................................................................................................43<br />
Defined............................................................................................................................40<br />
Key......................................................................................................................................7<br />
FCC Notice................................................................................................................. 83<br />
Finding<br />
Locked Out Objects.......................................................................................................45<br />
Text Strings......................................................................................................................46<br />
FIPS Codes................................................................................................................. 65<br />
FUNC (Function) Key.................................................................................................... 7<br />
Text Entry.......................................................................................................................115<br />
G<br />
Global (GLOB) Menu<br />
Defined............................................................................................................................23<br />
Detailed Reference.........................................................................................................96<br />
Global Attenuator<br />
Key......................................................................................................................................6<br />
H<br />
Help Menu.................................................................................................................. 23<br />
Key......................................................................................................................................6<br />
Hit Counters............................................................................................................... 74<br />
I<br />
Input<br />
Character...........................................................................................................................7<br />
Decimal Point....................................................................................................................7<br />
Number..............................................................................................................................7<br />
Text...........................................................................................................................29, 115<br />
Installing...................................................................................................................... 16<br />
K<br />
Keylight<br />
Setting..............................................................................................................................25<br />
Key Tone..................................................................................................................... 25<br />
L<br />
LCD Contrast.............................................................................................................. 24<br />
Legal Scanning............................................................................................................ 83<br />
Limit Search<br />
Creating...........................................................................................................................51<br />
Dedicated LMIT Search..................................................................................................57<br />
Detailed Menu Reference............................................................................................108<br />
Lockout<br />
Finding.............................................................................................................................45<br />
Key......................................................................................................................................6<br />
Object Lockout...............................................................................................................47<br />
Permanent...................................................................................................................6, 48<br />
Search..............................................................................................................................49<br />
Talkgroup.........................................................................................................................50<br />
Temporary....................................................................................................................6, 48<br />
Wildcard..........................................................................................................................50<br />
LTR<br />
Display.............................................................................................................................63<br />
Home Repeater AutoMove............................................................................................79<br />
120<br />
121
Index<br />
Index<br />
M<br />
Manual Mode.............................................................................................................. 36<br />
Memory<br />
Object Numbering.........................................................................................................38<br />
Report..............................................................................................................................72<br />
Saving Main Memory......................................................................................................70<br />
Scan Lists.........................................................................................................................39<br />
V-<strong>Scanner</strong>.........................................................................................................................69<br />
Motorola<br />
Custom Channel Tables...............................................................................................108<br />
Display Information.........................................................................................................63<br />
Dwell Time.....................................................................................................................107<br />
Fleet Map......................................................................................................................108<br />
Multi-Site.................................................................................................................77, 107<br />
Priority Talkgroups..........................................................................................................74<br />
Show CC Info.................................................................................................................100<br />
<strong>Trunking</strong> System Type...................................................................................................106<br />
N<br />
Networked Systems................................................................................................... 77<br />
NS Scan List................................................................................................................ 42<br />
O<br />
Object Menus<br />
Detailed Menu Reference..............................................................................................96<br />
EXPERT BELOW..............................................................................................................28<br />
Understanding................................................................................................................26<br />
Object Numbering..................................................................................................... 38<br />
Object Searches.......................................................................................................... 51<br />
P<br />
P25 Systems<br />
Custom Channel Tables...............................................................................................108<br />
Display Information.........................................................................................................63<br />
Dwell Time.....................................................................................................................107<br />
Multi-Site.................................................................................................................77, 107<br />
Show CC Info.................................................................................................................100<br />
Subaudible Squelch Mode..........................................................................................101<br />
<strong>Trunking</strong> System Type...................................................................................................106<br />
Pause<br />
Basic Scanning................................................................................................................35<br />
Key......................................................................................................................................6<br />
Tune Mode......................................................................................................................62<br />
Power...................................................................................................................... 8, 19<br />
Power-On Configuration............................................................................................ 80<br />
Power-On Password................................................................................................... 81<br />
Priority<br />
CONV Setting...............................................................................................................101<br />
Global Setting...........................................................................................................98, 99<br />
Key......................................................................................................................................7<br />
Priority Scan.....................................................................................................................73<br />
TGRP Setting.................................................................................................................104<br />
Weather Priority Mode...................................................................................................64<br />
Programming<br />
CONV Objects................................................................................................................29<br />
PROG Key..........................................................................................................................6<br />
Storing Memory..............................................................................................................69<br />
TGRP Objects..................................................................................................................30<br />
TSYS Objects...................................................................................................................31<br />
Q<br />
QuickText.................................................................................................................. 115<br />
Customizing..................................................................................................................118<br />
S<br />
SAME<br />
Location and Event Codes.............................................................................................66<br />
Standby Mode.................................................................................................................65<br />
Scan Lists<br />
Changing.........................................................................................................................40<br />
Default.......................................................................................................................44, 98<br />
Enabling or Disabling.............................................................41, 101, 104, 108, 110, 113<br />
Grouping Objects...........................................................................................................39<br />
Naming............................................................................................................................41<br />
Viewing............................................................................................................................36<br />
Scannable Objects<br />
Creating...........................................................................................................................26<br />
Grouping.........................................................................................................................39<br />
Numbering......................................................................................................................38<br />
Scanning..........................................................................................................................35<br />
Scanning.........................................................................................................................<br />
Display Information.........................................................................................................36<br />
Favorites....................................................................................................................40, 43<br />
122<br />
123
Index<br />
Index<br />
Legally..............................................................................................................................83<br />
Priority........................................................................................................................73, 98<br />
Weather...........................................................................................................................64<br />
Wildcard..........................................................................................................................35<br />
Searching<br />
Dedicated Searches........................................................................................................57<br />
Search Mode Key..........................................................................................................7<br />
For Birdie Frequencies...................................................................................................82<br />
For Objects......................................................................................................................45<br />
Frequency Searches........................................................................................................51<br />
Limit Search.....................................................................................................................51<br />
Lockout............................................................................................................................50<br />
Search Bands...................................................................................................................94<br />
Service Search.................................................................................................................53<br />
Signal Stalker II................................................................................................................55<br />
Service and Repair...................................................................................................... 84<br />
Service Search<br />
Creating...........................................................................................................................53<br />
Dedicated Service Search..............................................................................................58<br />
Detailed Menu Reference............................................................................................110<br />
Shortcuts..................................................................................................................... 80<br />
Signal Stalker II<br />
Creating...........................................................................................................................55<br />
Dedicated Signal Stalker II.............................................................................................60<br />
Detailed Menu Reference............................................................................................113<br />
Key......................................................................................................................................6<br />
Skywarn<br />
Key......................................................................................................................................7<br />
Scan List...........................................................................................................39, 102, 105<br />
Softkeys.................................................................................................................. 6, 27<br />
Speakers................................................................................................................. 8, 20<br />
Specifications.............................................................................................................. 85<br />
Squelch....................................................................................................................... 21<br />
Encoded..................................................................................................................62, 100<br />
Settings..........................................................................................................................101<br />
Priority Scan.....................................................................................................................74<br />
Types..........................................................................................................................33, 34<br />
Text Entry.................................................................................................................. 115<br />
Text Tags..........................................................................................................................29<br />
Transferring Data........................................................................................................ 21<br />
Troubleshooting.......................................................................................................... 89<br />
<strong>Trunking</strong> System Object<br />
Creating...........................................................................................................................31<br />
Detailed Menu Reference............................................................................................106<br />
Entering TSYS Menu.....................................................................................................104<br />
Tune<br />
Dedicated Tune Search..................................................................................................61<br />
Key......................................................................................................................................7<br />
Tune LED...................................................................................................................63, 98<br />
V<br />
V-<strong>Scanner</strong>s<br />
About...............................................................................................................................69<br />
Erasing.............................................................................................................................71<br />
Loading............................................................................................................................71<br />
Using................................................................................................................................70<br />
W<br />
Weather Scanning<br />
Key......................................................................................................................................7<br />
SAME Standby Mode.....................................................................................................65<br />
Wildcard......................................................................................................................66<br />
Weather Priority Mode...................................................................................................64<br />
Weather <strong>Radio</strong> Mode.....................................................................................................64<br />
Wildcard Talkgroup<br />
Defined............................................................................................................................33<br />
Lockout............................................................................................................................50<br />
Scanning..........................................................................................................................35<br />
TGRP Ignore..................................................................................................................100<br />
T<br />
Talkgroup Object<br />
Creating...........................................................................................................................30<br />
Detailed Menu Reference............................................................................................104<br />
Global Settings...............................................................................................................99<br />
Lockout............................................................................................................................50<br />
124<br />
125
Limited Warranty<br />
This product is warranted by <strong>Radio</strong><strong>Shack</strong> against manufacturing<br />
defects in material and workmanship under normal use for one<br />
(1) year from the date of purchase from <strong>Radio</strong><strong>Shack</strong> companyowned<br />
stores and authorized <strong>Radio</strong><strong>Shack</strong> franchisees and dealers.<br />
EXCEPT AS PROVIDED HEREIN, <strong>Radio</strong><strong>Shack</strong> MAKES NO EXPRESS<br />
WARRANTIES AND ANY IMPLIED WARRANTIES, INCLUDING<br />
THOSE OF MERCHANTABILITY AND FITNESS FOR A PARTICULAR<br />
PURPOSE, ARE LIMITED IN DURATION TO THE DURATION OF<br />
THE WRITTEN LIMITED WARRANTIES CONTAINED HEREIN.<br />
EXCEPT AS PROVIDED HEREIN, <strong>Radio</strong><strong>Shack</strong> SHALL HAVE NO<br />
LIABILITY OR RESPONSIBILITY TO CUSTOMER OR ANY OTHER<br />
PERSON OR ENTITY WITH RESPECT TO ANY LIABILITY, LOSS<br />
OR DAMAGE CAUSED DIRECTLY OR INDIRECTLY BY USE OR<br />
PERFORMANCE OF THE PRODUCT OR ARISING OUT OF ANY<br />
BREACH OF THIS WARRANTY, INCLUDING, BUT NOT LIMITED TO,<br />
ANY DAMAGES RESULTING FROM INCONVENIENCE, LOSS OF<br />
TIME, DATA, PROPERTY, REVENUE, OR PROFIT OR ANY INDIRECT,<br />
SPECIAL, INCIDENTAL, OR CONSEQUENTIAL DAMAGES, EVEN IF<br />
<strong>Radio</strong><strong>Shack</strong> HAS BEEN ADVISED OF THE POSSIBILITY OF SUCH<br />
DAMAGES.<br />
Some states do not allow limitations on how long an implied<br />
warranty lasts or the exclusion or limitation of incidental or<br />
consequential damages, so the above limitations or exclusions may<br />
not apply to you.<br />
In the event of a product defect during the warranty period, take<br />
the product and the <strong>Radio</strong><strong>Shack</strong> sales receipt as proof of purchase<br />
date to any <strong>Radio</strong><strong>Shack</strong> store. <strong>Radio</strong><strong>Shack</strong> will, at its option, unless<br />
otherwise provided by law: (a) correct the defect by product repair<br />
without charge for parts and labor; (b) replace the product with<br />
one of the same or similar design; or (c) refund the purchase price.<br />
All replaced parts and products, and products on which a refund is<br />
made, become the property of <strong>Radio</strong><strong>Shack</strong>. New or reconditioned<br />
parts and products may be used in the performance of warranty<br />
service. Repaired or replaced parts and products are warranted for<br />
the remainder of the original warranty period. You will be charged for<br />
repair or replacement of the product made after the expiration of the<br />
warranty period.<br />
This warranty does not cover: (a) damage or failure caused by or<br />
attributable to acts of God, abuse, accident, misuse, improper or<br />
abnormal usage, failure to follow instructions, improper installation<br />
or maintenance, alteration, lightning or other incidence of excess<br />
voltage or current; (b) any repairs other than those provided by a<br />
<strong>Radio</strong><strong>Shack</strong> Authorized Service Facility; (c) consumables such as<br />
fuses or batteries; (d) cosmetic damage; (e) transportation, shipping<br />
or insurance costs; or (f) costs of product removal, installation, set-up<br />
service adjustment or reinstallation.<br />
This warranty gives you specific legal rights, and you may also have<br />
other rights which vary from state to state.<br />
<strong>Radio</strong><strong>Shack</strong> Customer Relations<br />
300 <strong>Radio</strong><strong>Shack</strong> Circle<br />
Fort Worth, TX 76102 12/99<br />
126 127
<strong>Radio</strong>Reference.com<br />
Your Complete Reference Source<br />
www.radioreference.com<br />
RADIOREFERENCE.COM IS THE WORLD’S LARGEST RADIO COMMUNICATIONS<br />
WEBSITE, WITH A COMPLETE FREQUENCY AND TRUNKED RADIO SYSTEM DATABASE.<br />
COME SEE WHAT FREE SERVICES WE HAVE TO OFFER TO THE COMMUNITY:<br />
The <strong>Radio</strong>Reference Database<br />
Includes a complete frequency database, trunked radio system<br />
information, FCC license assignments, 10 Code lists, agency maps, files,<br />
downloads, and detailed information for most public safety, military, and<br />
local government communications systems.<br />
The <strong>Radio</strong>Reference Discussion Forums<br />
Where over 120,000 members discuss radios, scanning, trunking, decoding,<br />
antennas, specialty radio topics, and location specific information.<br />
The <strong>Radio</strong>Reference Wiki<br />
The most comprehensive reference source of radio communications<br />
reference information – the de-facto encyclopedia for the radio<br />
communications community.<br />
FOR ONLY $7.50 A QUARTER, RADIOREFERENCE.COM ALSO PROVIDES<br />
PREMIUM SUBSCRIPTIONS, WHICH ENTITLES PAID MEMBERS ACCESS TO:<br />
<br />
<br />
<br />
<br />
<br />
COME SEE WHY WE ARE THE #1 RESOURCE FOR THE RADIO COMMUNICATIONS COMMUNITY!<br />
Hypersearch, Hyperscan, and Adaptaplug are trademarks used by <strong>Radio</strong><strong>Shack</strong> Corporation.<br />
Motorola, Smartnet, Smartzone, Omnilink, ASTRO and Privacy Plus are registered trademarks<br />
of Motorla Inc.<br />
EDACS is a registered trademark of MA-COM Inc.<br />
LTR is a registered trademark of EF Johnson.<br />
©2008. <strong>Radio</strong><strong>Shack</strong> Corporation.<br />
All rights reserved. <strong>Radio</strong><strong>Shack</strong> and <strong>Radio</strong><strong>Shack</strong>.com<br />
are trademarks used by <strong>Radio</strong><strong>Shack</strong> Corporation.<br />
U.S. Pat. Nos. 5,870,405 and 5,517,511<br />
20-197<br />
07A08<br />
Printed in China<br />
GE-08D-0560