Digital Trunking â Desktop/Mobile Radio Scanner - Radio Shack
Digital Trunking â Desktop/Mobile Radio Scanner - Radio Shack
Digital Trunking â Desktop/Mobile Radio Scanner - Radio Shack

Create successful ePaper yourself
Turn your PDF publications into a flip-book with our unique Google optimized e-Paper software.
<strong>Scanner</strong> Setup<br />
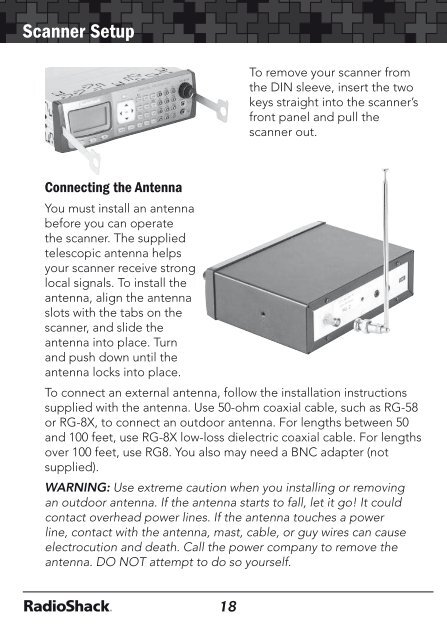
Connecting the Antenna<br />
You must install an antenna<br />
before you can operate<br />
the scanner. The supplied<br />
telescopic antenna helps<br />
your scanner receive strong<br />
local signals. To install the<br />
antenna, align the antenna<br />
slots with the tabs on the<br />
scanner, and slide the<br />
antenna into place. Turn<br />
and push down until the<br />
antenna locks into place.<br />
To remove your scanner from<br />
the DIN sleeve, insert the two<br />
keys straight into the scanner’s<br />
front panel and pull the<br />
scanner out.<br />
To connect an external antenna, follow the installation instructions<br />
supplied with the antenna. Use 50-ohm coaxial cable, such as RG-58<br />
or RG-8X, to connect an outdoor antenna. For lengths between 50<br />
and 100 feet, use RG-8X low-loss dielectric coaxial cable. For lengths<br />
over 100 feet, use RG8. You also may need a BNC adapter (not<br />
supplied).<br />
WARNING: Use extreme caution when you installing or removing<br />
an outdoor antenna. If the antenna starts to fall, let it go! It could<br />
contact overhead power lines. If the antenna touches a power<br />
line, contact with the antenna, mast, cable, or guy wires can cause<br />
electrocution and death. Call the power company to remove the<br />
antenna. DO NOT attempt to do so yourself.<br />
Powering Your <strong>Scanner</strong><br />
<strong>Scanner</strong> Setup<br />
You can power your scanner from a wall outlet, or from your vehicle’s<br />
battery.<br />
You must use a power source that supplies 12V DC and delivers at<br />
least 600 mA. Its center tip must be set to positive and its plug must<br />
fit the scanner’s DC 13.8V jack. The supplied AC adapter and DC<br />
power cord meet these specifications. Using a power source that<br />
does not meet these specifications could damage the scanner or the<br />
adapter.<br />
Wall Outlet<br />
1. Connect the tip of the supplied AC adapter to the DC 13.8V jack<br />
at the rear of your scanner.<br />
2. Plug the AC adapter into your wall outlet.<br />
To prevent electric shock, do not use the AC adapter’s polarized<br />
plug with an extension cord, receptacle, or outlet unless you can fully<br />
insert the blades to prevent blade exposure.<br />
Note: To avoid injury, do not connect the provided power adapter to<br />
a ceiling outlet.<br />
Vehicle (Power Socket)<br />
To power your scanner from a 12V power source in your vehicle, such<br />
as a cigarette-lighter socket, you need a 12V, 600 mA DC cigarettelighter<br />
adapter (not supplied), available at your local <strong>Radio</strong><strong>Shack</strong><br />
store.<br />
1. Insert the adapter’s barrel plug into the scanner’s DC 13.8V jack.<br />
2. Plug the adapter’s other end into your vehicle’s cigarette lighter<br />
or power socket.<br />
Note: When you use a cigarette-lighter adapter, you might hear<br />
electrical noise from your engine while scanning. This is normal. This<br />
is less of a problem if you connect directly to the vehicle fuse box.<br />
18<br />
19