USB / S / RE - Seattle Coffee Gear
USB / S / RE - Seattle Coffee Gear
USB / S / RE - Seattle Coffee Gear

Create successful ePaper yourself
Turn your PDF publications into a flip-book with our unique Google optimized e-Paper software.
7.6 Foamed milk<br />
Press the button to excite the steam and emulsion<br />
delivery electromagnetic valves until the programmed<br />
temperature and froth level are reached or<br />
until the function is switched off.<br />
7.7 Steamed milk<br />
Pressing the key excites the steam distribution<br />
electro-valves until the programmed temperature<br />
is reached or until the same is pressed again.<br />
Safety Devices<br />
Dispensing cannot be carried out if the machine<br />
has not reached the operating pressure or temperature<br />
at least once, and each time that the boiler<br />
pressure drops too much.<br />
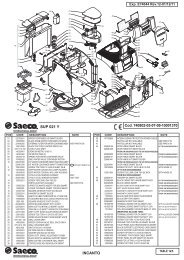
8 Steam supply handwheel “C-LEVER”:<br />
Rotating the turn-knob upwards will open the tap;<br />
the turn-knob will remain in open position to allow<br />
for a continuous steam supply. To close the tap,<br />
turn the turn-knob back into its horizontal position.<br />
Rotating the turn-knob downwards provides for<br />
instant steam supply. Once it is released, the turnknob<br />
will go back into its horizontal position and<br />
the steam supply is instantly stopped.<br />
9 Supplementary manual water filling tap positioned<br />
under the discharge basin.<br />
Press down to fill the boiler.<br />
10 Valved gas power tap (models with gas heating).<br />
Open: vertical position;<br />
Closed: turn 90° in clockwise direction.<br />
11 Piezoelectric button (models with gas heating).<br />
Firing button: press down firmly to give off the<br />
spark to light the gas for the burner.<br />
7.2. Control instruments (Fig.8)<br />
12 Gauge with mobile needle on a fixed dial with a<br />
double scale.<br />
Visual control of the pump (manometer on the lefthand<br />
side) and of the boiler pressure (manometer<br />
on the right-hand side)<br />
7.3. Starting up<br />
Turn on the water supply tap 2 Fig.6.<br />
Turn the main switch 1; the pump is activated, filling<br />
the boiler.<br />
When the water reaches the correct level, the pump<br />
stops.<br />
Turn the main switch 2 to begin heating the water<br />
in the boiler then turn each one until water begins<br />
to flow from them.<br />
Wait for the machine to reach its working pressure<br />
and to reach the correct thermal balance.<br />
Models with gas (Fig.8)<br />
Turn on the water supply tap 2 (Fig.6).<br />
Turn on the gas tap 3 (Fig.6).<br />
Turn the main switch 1; the pump is activated, filling<br />
the boiler.<br />
When the correct level is reached, the pump stops.<br />
Turn the switch 2.<br />
Turn the gas tap 10 to the vertical open position<br />
and hold down the incorporated button, at the same<br />
time repeatedly press hard on the piezelectric button<br />
11 until the spark lights the gas flame (carry out<br />
this operation looking through window 14). Hold<br />
the tap button 10 down for approx. 30 seconds to<br />
allow the safety system to keep the flame lighted.<br />
If the flame goes out, repeat the operation.<br />
Should the flame not light up, avoid insisting<br />
and close the gas tap by turning it 90° in a<br />
clockwise direction.<br />
Wait until the machine reaches its working pressure<br />
and until the correct thermal balance is achieved.<br />
13 Minimum and maximum water level indicator .<br />
Visual control of water level in boiler.<br />
14 Control window (models with gas heating).<br />
Visual control of lighting and functioning of the<br />
flame of the gas burner.<br />
76