PowerMate P Series User's Guide - Support - NEC
PowerMate P Series User's Guide - Support - NEC
PowerMate P Series User's Guide - Support - NEC

You also want an ePaper? Increase the reach of your titles
YUMPU automatically turns print PDFs into web optimized ePapers that Google loves.
PROPRIETARY NOTICE AND LIABILITY DISCLAIMER<br />
The information disclosed in this document, including all designs and related<br />
materials, is the valuable property of <strong>NEC</strong> Corporation (<strong>NEC</strong>) and/or its licensors.<br />
<strong>NEC</strong> and/or its licensors, as appropriate, reserve all patent, copyright and other<br />
proprietary rights to this document, including all design, manufacturing,<br />
reproduction, use, and sales rights thereto, except to the extent said rights are<br />
expressly granted to others.<br />
The <strong>NEC</strong> product(s) discussed in this document are warranted in accordance with<br />
the terms of the Warranty Statement accompanying each product. However, actual<br />
performance of each such product is dependent upon factors such as system<br />
configuration, customer data, and operator control. Since implementation by<br />
customers of each product may vary, the suitability of specific product<br />
configurations and applications must be determined by the customer and is not<br />
warranted by <strong>NEC</strong>.<br />
To allow for design and specification improvements, the information in this<br />
document is subject to change at any time, without notice. Reproduction of this<br />
document or portions thereof without prior written approval of <strong>NEC</strong> is prohibited.<br />
MultiSync and <strong>PowerMate</strong> are registered trademarks of <strong>NEC</strong> Technologies, Inc.<br />
FastFacts is a U.S. trademark of <strong>NEC</strong> Technologies, Inc.<br />
All other product, brand, or trade names used in this publication are the trademarks or<br />
registered trademarks of their respective trademark owners.<br />
First Printing — August 1995<br />
Copyright 1995 Copyright 1995<br />
<strong>NEC</strong> Technologies, Inc.<br />
<strong>NEC</strong> Corporation<br />
1414 Massachusetts Avenue 7-1 Shiba 5-Chome, Minato-Ku<br />
Boxborough, MA 01719<br />
Tokyo 108-01, Japan<br />
All Rights Reserved<br />
All Rights Reserved
Contents<br />
Using This <strong>Guide</strong><br />
Text Conventions .....................................................<br />
Related Documents...................................................<br />
vi<br />
vii<br />
1 Taking a Look at Your Computer<br />
On the Front............................................................. 1-2<br />
CD-ROM Reader ................................................ 1-2<br />
Diskette Drive A ................................................. 1-3<br />
IR Window ......................................................... 1-5<br />
System Controls and Lamps ................................ 1-6<br />
On the Back ............................................................. 1-8<br />
External Connectors ............................................ 1-8<br />
Power Supply Features........................................ 1-11<br />
Speakers .................................................................. 1-11<br />
Microphone.............................................................. 1-12<br />
2 Getting Started<br />
Using Your Mouse ................................................... 2-1<br />
Using Online Documentation .................................... 2-4<br />
Where to Go from Here ............................................ 2-6<br />
3 24-Hour Information Services<br />
<strong>NEC</strong>'s FastFacts Service .......................................... 3-2<br />
<strong>NEC</strong> Bulletin Board Service ..................................... 3-4<br />
America Online Service ............................................ 3-6<br />
CompuServe Online Service ..................................... 3-7<br />
AT & T Interchange................................................. 3-8<br />
E-Mail/Fax Technical <strong>Support</strong> Service ..................... 3-9<br />
Internet .................................................................... 3-10<br />
<strong>NEC</strong> Technical <strong>Support</strong> Services.............................. 3-11<br />
Contents iii
4 If You Have a Problem<br />
What to Do if You Have a Problem .......................... 4-2<br />
Solutions to Common Problems ................................ 4-3<br />
System Problems................................................. 4-3<br />
Diskette Drive Problems...................................... 4-5<br />
Monitor Problems................................................ 4-6<br />
Keyboard/Mouse Problems.................................. 4-7<br />
CD-ROM Problems............................................. 4-7<br />
Speaker Problems................................................ 4-8<br />
Microphone Problems.......................................... 4-8<br />
Replacing the CMOS Battery ................................... 4-9<br />
Online Diagnostics ................................................... 4-11<br />
Getting Help............................................................. 4-11<br />
Getting Help from Your Company ....................... 4-12<br />
Getting Help from Your <strong>NEC</strong> Dealer................... 4-12<br />
Getting Help from <strong>NEC</strong>'s Technical <strong>Support</strong><br />
Center ............................................................. 4-12<br />
<strong>NEC</strong> Warranty/Non-Warranty Repair Service ..... 4-13<br />
A Setting Up a Healthy Work Environment<br />
Making Your Computer Work for You ..................... A-1<br />
Arrange Your Equipment.......................................... A-3<br />
Adjust Your Chair.................................................... A-4<br />
Adjust Your Input Devices ....................................... A-6<br />
Adjust Your Monitor................................................ A-8<br />
Vary Your Workday................................................. A-10<br />
Pre-Existing Conditions and Psychosocial Factors..... A-11<br />
Checking Your Comfort: How Do You Measure Up? A-12<br />
Checking Your Chair........................................... A-12<br />
Checking Your Keyboard .................................... A-12<br />
Checking Your Mouse......................................... A-12<br />
Checking Your Monitor....................................... A-12<br />
Checking You ..................................................... A-13<br />
Tables<br />
Quick Reference to Information About<br />
Your Computer .................................................... 2-6<br />
iv Contents
Contents v
Using This <strong>Guide</strong><br />
The <strong>PowerMate</strong> P <strong>Series</strong> <strong>User's</strong> <strong>Guide</strong> provides a quick<br />
reference to information about your computer.<br />
The guide contains the following information:<br />
n Chapter 1, Taking a Look at Your System, provides a<br />
look at system components. See this chapter to<br />
familiarize yourself with your system.<br />
n Chapter 2, Getting Started, gives you information about<br />
using a mouse, using online documentation, and what<br />
you should do after your system is up and running.<br />
The chapter includes a quick-reference chart for finding<br />
information about a variety topics.<br />
n Chapter 3, 24-Hour Information Services, lists the<br />
services available to you for information and help and<br />
describes how to access the services.<br />
n Chapter 4, If You Have a Problem, contains<br />
troubleshooting tips for solving simple problems and<br />
provides where you can find help when you cannot solve<br />
a problem yourself.<br />
! WARNING<br />
Prolonged or improper use of a computer<br />
workstation may pose a risk of serious injury. To<br />
reduce your risk of injury, set up and use your<br />
computer in the manner described in Appendix A,<br />
Setting Up a Healthy Work Environment.<br />
Using This <strong>Guide</strong> v
n Appendix A, Setting Up a Healthy Work Environment,<br />
contains guidelines to help you use your computer<br />
productively and safely. This appendix also instructs<br />
you on how to set up and use your computer to reduce<br />
your risk of developing nerve, muscle, or tendon<br />
disorders.<br />
TEXT CONVENTIONS<br />
This guide uses the following text conventions.<br />
n Warnings, cautions, and notes have the following<br />
meanings:<br />
! WARNING<br />
Warnings alert you to situations that could result in<br />
serious personal injury or loss of life.<br />
! CAUTION<br />
Cautions indicate situations that can damage the<br />
hardware or software.<br />
NOTE<br />
Notes give important information about the<br />
material being described.<br />
vi Using This <strong>Guide</strong>
n Names of keyboard keys are printed as they appear on<br />
the keyboard, for example, Ctrl, Alt, or Enter.<br />
n Text or keystrokes that you enter appear in boldface<br />
type. For example, type return and press Enter.<br />
n File names are printed in uppercase letters.<br />
RELATED DOCUMENTS<br />
In addition to this guide, the following printed<br />
documentation ships with your <strong>PowerMate</strong> ® P <strong>Series</strong><br />
system.<br />
n <strong>NEC</strong> <strong>PowerMate</strong> P <strong>Series</strong> Quick Setup/<br />
Quick-Reference Roadmap<br />
Quick Setup contains information for quickly getting<br />
your system up and running. Read this information to set<br />
up the system for the first time.<br />
The Quick-Reference Roadmap gives you a look at the<br />
documentation, <strong>NEC</strong> tools, software applications, and<br />
services available to you.<br />
n How Does Your Workplace Measure Up?<br />
This brochure provides information for setting up and<br />
using your computer productively and safely.<br />
Information includes guidelines to reduce the risk of<br />
injury associated with using a computer.<br />
n TabWorks User’s <strong>Guide</strong><br />
This guide describes how to us TabWorks for<br />
organizing your work and launching your applications<br />
from a notebook-like location.<br />
n TranXit Quick Reference <strong>Guide</strong><br />
This guide describes wireless data transfers between<br />
your computer and a laptop using the TranXit<br />
software.<br />
Using This <strong>Guide</strong> vii
n Windows 95 User’s <strong>Guide</strong><br />
This is a quick reference guide that comes with<br />
Windows 95 systems.<br />
Your system comes with the following online documentation<br />
on the hard disk:<br />
n <strong>PowerMate</strong> P <strong>Series</strong> System Documentation<br />
This online documentation is your comprehensive source<br />
of information about your system. It contains a System<br />
Tour, User’s <strong>Guide</strong>, Hardware Reference <strong>Guide</strong>, Option<br />
Installation <strong>Guide</strong>, and <strong>Support</strong> <strong>Guide</strong>.<br />
n Ergonomics<br />
This is an online version of the “How Does Your<br />
Workplace Measure Up?” brochure.<br />
n MS-DOS Quick-Start <strong>Guide</strong><br />
Comes with MS-DOS ® /Windows ® for WorkGroups<br />
systems. Provides information for using<br />
MS-DOS.<br />
n Windows Quick-Start <strong>Guide</strong><br />
Comes with MS-DOS ® /Windows ® for WorkGroups<br />
systems. Provides information for using Windows for<br />
WorkGroups.<br />
n Using Windows 95<br />
Comes with Windows 95 systems. Contains information<br />
for using Windows 95.<br />
Most of your application programs provide extensive online<br />
help. Some programs provide separate online user’s guides<br />
for specific applications.<br />
Windows 95 provides extensive online help and “wizards”<br />
to guide you through procedures.<br />
viii Using This <strong>Guide</strong>
In addition to the documentation that ships with the system,<br />
the following documentation is available from <strong>NEC</strong>:<br />
n <strong>PowerMate</strong> P <strong>Series</strong> Service and Reference<br />
Manual provides information for maintaining,<br />
troubleshooting, and repairing the <strong>PowerMate</strong> P <strong>Series</strong><br />
system. This guide also includes hardware and interface<br />
information for programmers, engineers, and others who<br />
need to know how the system is designed.<br />
To purchase the service and reference manual, call <strong>NEC</strong><br />
at 1-800-632-4525 and select spare part sales at the<br />
prompt.<br />
n <strong>NEC</strong> FastFacts<br />
<strong>NEC</strong> FastFacts is an automated service that sends the<br />
latest information about <strong>NEC</strong> and its products directly<br />
to a fax machine. The service is available 24 hours a<br />
day, 7 days a week.<br />
With FastFacts, you can obtain product literature and<br />
technical information bulletins. By using FastFacts, you<br />
can be kept up-to-date on the latest technical information<br />
for your system.<br />
See “<strong>NEC</strong>’s FastFacts Service” in Chapter 3 for<br />
information about using FastFacts.<br />
Using This <strong>Guide</strong> ix
1<br />
Taking a Look at<br />
Your Computer<br />
! WARNING<br />
Prolonged or improper use of a computer<br />
workstation may pose a risk or serious injury. To<br />
reduce your risk of injury, set up and use your<br />
computer in the manner described in Appendix A,<br />
Setting Up a Healthy Work Environment.<br />
After unpacking your computer, familiarize yourself with<br />
your system. The following information provides a brief<br />
look at features on the front and rear of your system.<br />
For a comprehensive source of information about your<br />
computer, see the online <strong>NEC</strong> <strong>PowerMate</strong> P <strong>Series</strong> System<br />
Documentation in the Windows ® <strong>NEC</strong> Information group.<br />
Taking a Look at Your Computer 1-1
ON THE FRONT<br />
The following figure show the features on the front of the<br />
systems. A brief description of the features follows the<br />
figure.<br />
CD-ROM Reader<br />
Diskette Drive A<br />
System Controls<br />
and Lamps<br />
IR Window<br />
Front features<br />
CD-ROM Reader<br />
A quad-speed CD-ROM reader is a standard feature in<br />
multimedia models. The CD-ROM reader is assigned as<br />
drive E.<br />
Use the CD-ROM reader to load and start programs from a<br />
compact disc (CD). You can also use the CD-ROM reader<br />
to play your audio CDs. The CD-ROM reader is fully<br />
compatible with Kodak Multisession Photo CDs and<br />
standard audio CDs.<br />
1-2 Taking a Look at Your Computer
The CD-ROM reader operates at different speeds depending<br />
on whether the CD you are using contains data or music.<br />
This allows you to get your data faster and to see smoother<br />
animation and video.<br />
The CD-ROM reader has the following features (see the<br />
following figure):<br />
n Headphone jack<br />
Allows the connection of an optional set of headphones<br />
with a stereo mini-jack plug.<br />
n Volume control knob<br />
Lets you adjust the volume of an optional set of<br />
headphones.<br />
n CD busy lamp<br />
Lights when the reader is retrieving data, music, or<br />
graphics/audio from a CD. Do not eject the CD or turn<br />
off the system unit when the lamp is on.<br />
n Eject/retract button<br />
Ejects or retracts the reader’s loading tray. Press this<br />
button when the computer power is on to insert or<br />
remove a CD into or out of the reader.<br />
n CD tray<br />
Provides a surface for loading a CD into the reader.<br />
Press the eject/retract button to eject or retract the CD<br />
tray.<br />
n Emergency eject hole<br />
Allows the manual ejection of a CD if the eject function<br />
is disabled by software or if a power failure occurs.<br />
Taking a Look at Your Computer 1-3
NOTE<br />
The CD-ROM reader in your system might<br />
look different from the one shown here.<br />
CD Tray<br />
CD Busy<br />
Lamp<br />
Emergency<br />
Eject Hole<br />
Volume<br />
Control Knob<br />
Headphone<br />
Jack<br />
Eject/Retract<br />
Button<br />
CD-ROM reader features<br />
Diskette Drive A<br />
Diskette drive A loads and starts programs from a diskette.<br />
Diskette drive A is your primary “bootable” drive. Your<br />
diskette drive has the following features (see the following<br />
figure):<br />
n Diskette drive busy lamp<br />
Lights when your diskette drive is reading to or writing<br />
from a diskette.<br />
1-4 Taking a Look at Your Computer
n Diskette release button<br />
Press this button to release a diskette from the diskette<br />
drive.<br />
Diskette Release Button<br />
Diskette Drive<br />
Busy Lamp<br />
IR Window<br />
Diskette drive A features<br />
The IR (infrared) window is the system’s IR port. The IR<br />
port supports two-way wireless communications. The<br />
interface uses infrared as the transmission medium instead<br />
of a traditional cable.<br />
The IR port lets you transfer files to or from portable<br />
devices such as laptops and personal digital assistance<br />
(PDA) products using application software supporting<br />
IrDA data transfer. Your system comes with Puma<br />
TranXit software for wireless data transfer.<br />
With IrDA software, you can transfer data at speeds of up<br />
to 115 kilobytes per second and at distances up to 3 feet<br />
from the IR window.<br />
Taking a Look at Your Computer 1-5
System Controls and Lamps<br />
System controls let you select specific system operations.<br />
Lamps let you know the status of system operation. Your<br />
computer has the following controls and lamps:<br />
Power Lamp<br />
Disk Lamp<br />
Power Button<br />
Reset Button<br />
Suspend Button<br />
System controls and lamps<br />
n Power lamp<br />
The power lamp indicates whether system power is on or<br />
off. It also lets you know if the system is operating in a<br />
power-saving mode.<br />
A steady green lamp indicates that the power is on to all<br />
system components. A blinking green lamp indicates that<br />
the system is in Suspend mode with full power<br />
reduction.<br />
n Disk lamp<br />
Indicates if your hard disk is doing anything. A green<br />
lamp tells you that the hard disk is reading or writing<br />
data.<br />
1-6 Taking a Look at Your Computer
! CAUTION<br />
Do not turn off the system, unless absolutely<br />
necessary, while the disk lamp is lit. To do so can<br />
damage your hard disk or data.<br />
n Power button<br />
Press this button to turn on system power. Press it again<br />
to turn off the power.<br />
n Reset button<br />
The reset button lets you manually restart your system<br />
when it does not respond to keyboard commands.<br />
! CAUTION<br />
Resetting your system can result in the loss of data.<br />
Press the reset button only when all other methods<br />
of restarting your computer fails.<br />
n Suspend button<br />
Lets you initiate a power-saving mode of operating your<br />
computer. Press this button to suspend system operation<br />
when you plan to be away from your computer for a<br />
short time. Press any key or move your mouse to resume<br />
system operation to where you stopped it.<br />
A blinking system unit power lamp lets you know that<br />
the system is in Suspend mode.<br />
Taking a Look at Your Computer 1-7
ON THE BACK<br />
On the back of your computer, you’ll find external<br />
connectors, power supply features, and expansion board<br />
slots. The following figures show these features.<br />
Voltage Selector<br />
Switch<br />
Fan<br />
Power Supply<br />
Switch<br />
Printer Port 1<br />
Keyboard Port<br />
Mouse Port<br />
Audio<br />
Connectors<br />
VGA Monitor<br />
Connector<br />
Serial Port 1<br />
Serial Port 2<br />
Rear features<br />
External Connectors<br />
External connectors let you attach peripheral devices, such<br />
as a monitor, keyboard, mouse, and printer to your system.<br />
Your system has the following external connectors:<br />
n VGA monitor connector<br />
Attach the signal cable from your monitor to this<br />
connector. <strong>Support</strong>s an <strong>NEC</strong> MultiSync ® monitor or<br />
other video graphics array (VGA)-compatible monitor<br />
with 15-pin connector.<br />
1-8 Taking a Look at Your Computer
n Audio connectors<br />
These connectors come integrated on multimedia models.<br />
The connectors include a microphone in, line in, and line<br />
out jack along with a musical instrument digital interface<br />
(MIDI)/joystick connector.<br />
MIDI/Joystick<br />
Connector<br />
Line Out Jack<br />
Line In Jack<br />
Microphone In<br />
Jack<br />
Audio connectors<br />
⎯ The microphone in jack lets you connect a<br />
microphone for recording audio information in your<br />
data system files and allows hands-free<br />
speakerphone functions.<br />
⎯ The line in jack lets you connect a stereo audio<br />
device such as a stereo amplifier or a cassette or<br />
minidisc player for playback or recording.<br />
⎯ The line out jack allows you to connect an amplified<br />
output device such as powered speakers, stereo tape<br />
recorder, or an external amplifier for audio output.<br />
Use this jack to connect the stereo speakers that<br />
come with your system.<br />
Taking a Look at Your Computer 1-9
⎯ The MIDI/Joystick connector allows you to connect<br />
a joystick or MIDI kit to your system.<br />
The joystick connector on your system is identical to<br />
that on a standard PC game control adapter or game<br />
I/O connector. You can connect any analog joystick<br />
with a 15-pin D-sub connector. It also works well<br />
with any application that is compatible with the<br />
standard PC joystick. To use two joysticks, you<br />
need a Y-cable splitter.<br />
n Printer Port<br />
Use this port to connect a parallel printer with a 25-pin<br />
connector to the system.<br />
n Serial Ports<br />
Attach a serial device with a 9-pin connector to each<br />
serial port. Serial devices include a pointing device,<br />
serial printer, or modem.<br />
n Keyboard port<br />
Attach the keyboard that comes with your computer to<br />
this connector.<br />
The keyboard port supports a personal system (PS)/2 ® -<br />
compatible, 101-key or 104-key keyboard (in the U.S.<br />
and Canada) or a 102-key keyboard (in the United<br />
Kingdom and Germany) with a 6-pin mini DIN<br />
connector.<br />
n Mouse port<br />
Attach the mouse that comes with your computer to this<br />
port. The mouse port supports a PS/2-compatible<br />
mouse.<br />
1-10 Taking a Look at Your Computer
Power Supply Features<br />
Your system has the following power supply features:<br />
n Power supply fan<br />
Keep this area clear for proper ventilation. The power<br />
supply fan cools system components and prevents them<br />
from overheating.<br />
n Voltage selector switch<br />
Sets the voltage for your system to 115 volts or 230<br />
volts.<br />
! CAUTION<br />
Set the switch correctly for the voltage in your area.<br />
Most wall outlets in the United States and Canada<br />
are 115 volts. Outlets in Europe, Australia, and Asia<br />
(except Taiwan) are 230 volts. Taiwan uses 115-volt<br />
outlets.<br />
n Power supply switch<br />
Powers on the power supply. The power supply must be<br />
powered-on before the power button on the front of the<br />
system will operate.<br />
n Power socket<br />
Connect your power cable to this socket.<br />
SPEAKERS<br />
Multimedia models come with a pair of high-quality stereo<br />
speakers that you can arrange to suit your work<br />
environment.<br />
An AC adapter comes with the system. Set up the speakers<br />
with the AC adapter. The speakers connect to the line out<br />
jack on the back of the system unit.<br />
Taking a Look at Your Computer 1-11
The speaker set features a power button, power lamp, bass<br />
control, treble control and volume knob.<br />
Treble Control<br />
Base Control<br />
Volume Control<br />
Power Button<br />
Power Lamp<br />
Speaker features<br />
Adjust the speaker volume by using the volume control on<br />
the front of the right speaker or by using the preinstalled<br />
sound system software. Use the sound software to balance<br />
the speakers.<br />
The software to operate the computer’s sound system is<br />
AudioStation.<br />
MICROPHONE<br />
Multimedia models come with a microphone. The<br />
microphone allows you to record voice and sound into your<br />
computer data files. See the online documentation in your<br />
sound software.<br />
1-12 Taking a Look at Your Computer
2<br />
Getting Started<br />
This chapter provides the information you need to start<br />
using your system. Information includes:<br />
n Using a Mouse<br />
If you are already familiar with using a mouse, skip this<br />
section.<br />
n Using Online Documentation<br />
Read this section to use the comprehensive online system<br />
documentation about your system.<br />
n Where to Go from Here<br />
Look at this section for a quick reference to what you<br />
can do and where you can information.<br />
USING YOUR MOUSE<br />
Use your mouse to quickly move around on the screen, to<br />
select menu items, and to choose functions specific to your<br />
software.<br />
Moving your mouse across a flat surface moves a pointer<br />
on your screen.<br />
Here are the basic ways to use your mouse:<br />
n Click<br />
Clicking selects an object on your screen. To “click,”<br />
point to the object and press and quickly release the left<br />
mouse button. Be sure you don’t move the mouse when<br />
you click.<br />
Getting Started 2-1
n Double click<br />
Some actions require a double click to execute them. To<br />
“double click” an object, point to the object and quickly<br />
press and release the left mouse button twice.<br />
n Press<br />
Pressing a mouse button holds an action until you<br />
release a mouse button. For example, pointing to a menu<br />
and pressing the left mouse button holds the menu open<br />
for reading until you release the button.<br />
n Drag<br />
Dragging your mouse attaches your pointer to an object<br />
on the screen and allows you to highlight text or move<br />
an object. To drag an object, point to the object, press<br />
the left mouse button, and move the mouse to the new<br />
location.<br />
Right Mouse<br />
Button<br />
Left Mouse<br />
Button<br />
Locating mouse buttons<br />
Typical screen objects that you click or double click are<br />
icons, buttons, and menu options.<br />
2-2 Getting Started
You can use clicking and dragging to highlight a word.<br />
Click and hold down the left mouse button at the beginning<br />
of the word and move the pointer across the letters you want<br />
to highlight.<br />
NOTE<br />
If your mouse pointer disappears, move your<br />
mouse in wide circles to bring it back into the<br />
screen.<br />
The functions of the right mouse button depends on the<br />
application program you use. See the documentation for the<br />
application to see what the button does.<br />
The pointer, also called a cursor, can take the following<br />
shapes:<br />
n a small arrow — shows where you are on the screen.<br />
n a blinking block or an “I” mouse cursor — shows you<br />
where you can type.<br />
n an hourglass — the pointer changes to an hourglass<br />
when your computer is busy.<br />
n a hand with a pointing finger — tells you it’s okay to<br />
click.<br />
n a hand with all fingers extended — indicates when you<br />
can’t click.<br />
Getting Started 2-3
Your mouse works best on a mouse pad. A mouse pad is a<br />
small piece of rubber, plastic, or textured material. The pad<br />
provides traction for moving the mouse and results in more<br />
sensitivity and control of movement.<br />
! CAUTION<br />
To prevent damage to your mouse and to the<br />
system, turn off the system power before you<br />
connect or disconnect your mouse.<br />
Also, the system fails to recognize that a mouse is<br />
attached if you connect the mouse after system<br />
power is on.<br />
For more information about your mouse, see your online<br />
User’s <strong>Guide</strong>.<br />
USING ONLINE DOCUMENTATION<br />
Your system comes with documentation conveniently<br />
available at your fingertips. No more looking for printed<br />
documents. Information about your system is available right<br />
from Windows.<br />
To access the system documentation, locate the <strong>NEC</strong><br />
Information group in Windows. Click the <strong>NEC</strong> <strong>PowerMate</strong><br />
P <strong>Series</strong> Documentation icon. A welcome screen appears<br />
with information to find what you need<br />
<strong>NEC</strong> <strong>PowerMate</strong> P <strong>Series</strong> System Documentation is a<br />
comprehensive source of information about your system. To<br />
help you find the information you need, the documentation<br />
is organized by topic in the following modules:<br />
n System Tour<br />
n User’s <strong>Guide</strong><br />
2-4 Getting Started
n Hardware Reference <strong>Guide</strong><br />
n Option Installation <strong>Guide</strong><br />
n <strong>Support</strong> <strong>Guide</strong>.<br />
NOTE<br />
Run the online <strong>NEC</strong> <strong>PowerMate</strong> P <strong>Series</strong><br />
System Documentation at the shipping default video<br />
resolution — 800 by 600 with 256 colors.<br />
Other online documents include:<br />
n Ergonomics<br />
n MS-DOS Quick-Start <strong>Guide</strong> (comes with Windows for<br />
WorkGroups systems)<br />
n Windows Quick-Start <strong>Guide</strong> (comes with Windows for<br />
WorkGroups systems)<br />
n Using Windows 95 (comes with Windows 95 systems)<br />
Most of your application programs provide extensive online<br />
help at the touch of a button (usually the Help button).<br />
Some programs provide separate online user’s guides for<br />
specific applications.<br />
Windows 95 provides extensive online help and “wizards”<br />
to guide you through procedures.<br />
Getting Started 2-5
WHERE TO GO FROM HERE<br />
Once you have your system up and running, we suggest that<br />
you do the following:<br />
n Read Appendix A, “Setting Up a Healthy Work<br />
Environment.”<br />
n Take the System Tour in your online <strong>NEC</strong> <strong>PowerMate</strong> P<br />
<strong>Series</strong> System Documentation.<br />
n See the online User’s <strong>Guide</strong> in your online <strong>NEC</strong><br />
<strong>PowerMate</strong> P <strong>Series</strong> System Documentation.<br />
n See “<strong>NEC</strong> Backup Utility” in the online Hardware<br />
Reference <strong>Guide</strong> to back up all your software. You can<br />
find the Hardware Reference <strong>Guide</strong> in your online <strong>NEC</strong><br />
<strong>PowerMate</strong> P <strong>Series</strong> System Documentation.<br />
n Install any applications. See the documentation that<br />
comes with the application.<br />
See the following quick reference chart to find information<br />
about some of the things you might want to do:<br />
Quick Reference to Information About Your Computer<br />
WHAT YOU WANT TO FIND WHERE TO FIND IT<br />
Basic information about my<br />
computer<br />
Online User’s <strong>Guide</strong> in <strong>NEC</strong> <strong>PowerMate</strong> P<br />
<strong>Series</strong> System Documentation<br />
Backing up system software “<strong>NEC</strong> Backup Utility” in the online Hardware<br />
Reference <strong>Guide</strong> (<strong>NEC</strong> <strong>PowerMate</strong> P <strong>Series</strong><br />
System Documentation)<br />
Setting a password “Setting a Password” in the online User’s<br />
<strong>Guide</strong> (<strong>NEC</strong> <strong>PowerMate</strong> P <strong>Series</strong> System<br />
Documentation)<br />
2-6 Getting Started
Quick Reference to Information About Your Computer<br />
WHAT YOU WANT TO FIND WHERE TO FIND IT<br />
Using Windows Online<br />
MS-DOS Quick Start <strong>Guide</strong><br />
Windows Quick Start <strong>Guide</strong><br />
Using Windows 95<br />
Printed<br />
Windows 95 User’s <strong>Guide</strong><br />
(with Windows 95 systems)<br />
Loading a CD “Loading a CD” in the online User’s <strong>Guide</strong><br />
(<strong>NEC</strong> <strong>PowerMate</strong> P <strong>Series</strong> System<br />
Documentation)<br />
Playing a music CD Online AudioStation User’s <strong>Guide</strong> in the<br />
AudioStation group in Windows<br />
Using the suspend button “Saving Power” and Managing Power” in the<br />
online User’s <strong>Guide</strong> (<strong>NEC</strong> <strong>PowerMate</strong> P <strong>Series</strong><br />
System Documentation)<br />
Adding options “Adding Internal Options” or “Adding External<br />
Options, online Option Installation <strong>Guide</strong> (<strong>NEC</strong><br />
<strong>PowerMate</strong> P <strong>Series</strong> System Documentation)<br />
Understanding power<br />
management<br />
“Saving Power” and Managing Power” in the<br />
online User’s <strong>Guide</strong> (<strong>NEC</strong> <strong>PowerMate</strong> P <strong>Series</strong><br />
System Documentation)<br />
Using online services, like Online Services Help group<br />
America Online ® , Prodigy ® , and<br />
CompuServe ®<br />
Transferring files from my<br />
laptop to my computer via<br />
the IR window<br />
Printed TranXit Quick Reference <strong>Guide</strong>, online<br />
help in the Puma TranXit software, and<br />
“Using the IR Port” in the online User’s <strong>Guide</strong><br />
(<strong>NEC</strong> <strong>PowerMate</strong> P <strong>Series</strong> System<br />
Documentation)<br />
Getting Started 2-7
Quick Reference to Information About Your Computer<br />
WHAT YOU WANT TO FIND WHERE TO FIND IT<br />
Changing video drivers “Changing Video Drivers” in the online User’s<br />
<strong>Guide</strong> (<strong>NEC</strong> <strong>PowerMate</strong> P <strong>Series</strong> System<br />
Documentation)<br />
Using Desktop Management<br />
Interface<br />
“Desktop Management Interface” in the online<br />
Hardware Reference <strong>Guide</strong> (<strong>NEC</strong> <strong>PowerMate</strong> P<br />
<strong>Series</strong> System Documentation)<br />
Using support services “24-Hour Information Services” in the online<br />
<strong>Support</strong> <strong>Guide</strong> (<strong>NEC</strong> <strong>PowerMate</strong> P <strong>Series</strong><br />
System Documentation)<br />
Taking care of my system “Taking Care of Your System” in the online<br />
User’s <strong>Guide</strong> (<strong>NEC</strong> <strong>PowerMate</strong> P <strong>Series</strong><br />
System Documentation)<br />
2-8 Getting Started
3<br />
24-Hour Information<br />
Services<br />
<strong>NEC</strong> has made it easy for you to get information and help<br />
when you need it. We offer 24-hour information services<br />
via:<br />
n <strong>NEC</strong>'s FastFacts Service<br />
n <strong>NEC</strong>'s Bulletin Board Service<br />
n America Online ® Service<br />
n CompuServe ® Online Service<br />
n AT & T Interchange Online Service<br />
n E-mail to <strong>NEC</strong>'s Technical <strong>Support</strong> Services through a<br />
commercial online service or Internet<br />
n Fax Service to <strong>NEC</strong>'s Technical <strong>Support</strong> Services<br />
n Internet World Wide Web and <strong>NEC</strong>'s ftp Site<br />
n <strong>NEC</strong>'s Technical <strong>Support</strong> Services.<br />
If you have access to a modem and/or fax machine<br />
(telephone for Technical <strong>Support</strong>), you can use the above<br />
services to obtain information about your system at any<br />
time, day or night, seven days a week.<br />
Not only do these services provide general information<br />
about your system, they can also be used to answer your<br />
questions and help solve any problems you may have with<br />
your system, should that ever be necessary.<br />
24-Hour Information Services 3-1
<strong>NEC</strong>'S FASTFACTS SERVICE<br />
<strong>NEC</strong>'s FastFacts service is a self-help, automated electronic<br />
information service for obtaining up-to-date product<br />
application notes, installation procedures, troubleshooting<br />
tips, data sheets, technical information bulletins, illustrated<br />
parts lists, part numbers, and other information about your<br />
system.<br />
Using a fax machine, you can obtain information from<br />
FastFacts 24 hours a day, 7 days a week. You simply call<br />
the FastFacts number on your touch-tone telephone, order<br />
the information you want by following the voice prompts,<br />
and FastFacts will automatically fax the information to you.<br />
If you are new to FastFacts, you should first order one of<br />
the following catalogs. Each catalog lists the available<br />
documents and their document numbers. Current catalogs<br />
include:<br />
n Catalog 1, <strong>NEC</strong> Graphics Products<br />
n Catalog 2, <strong>NEC</strong> CD-ROM, Printers, and Disk Drive<br />
Products<br />
n Catalog 3, <strong>NEC</strong> Computer Products<br />
n Catalog 4, <strong>NEC</strong> Products for the Macintosh<br />
n Catalog 5, <strong>NEC</strong> Factory Refurbished Product List<br />
n Catalog 6, <strong>NEC</strong> Select Direct Pricing<br />
n Catalog 7, <strong>NEC</strong> Technical <strong>Support</strong> Notes, Technical<br />
Information Bulletins, Illustrated Parts Lists<br />
n Catalog 9, <strong>NEC</strong> Product and Configuration Manual<br />
Index.<br />
3-2 24-Hour Information Services
Order information from FastFacts as follows. If you would<br />
like instructions for using FastFacts, request document<br />
number 63233469 when prompted.<br />
1. Be sure that your fax machine or fax/modem is on. Have<br />
the document number ready for the document you want.<br />
2. At your touch-tone telephone, enter 800-366-0476 (U.S.<br />
and Canada only).<br />
For international use, enter the international long<br />
distance access number, the U.S. country code, and the<br />
U.S. telephone number (708-238-7800).<br />
3. Listen to the instructions provided by the voice prompts.<br />
Press 1 if you do not want an introduction to FastFacts.<br />
Follow the automated instructions for ordering your<br />
document or catalog.<br />
Press 2 if you want an introduction to FastFacts. Follow<br />
the automated instructions for ordering your catalog or<br />
document.<br />
4. When prompted, enter your fax number and name.<br />
For international use, first enter the international long<br />
distance access number (011), your country code, your<br />
area code or city code, then your fax number.<br />
The information you requested will be automatically sent to<br />
your fax machine. Please wait for the ordered document to<br />
arrive at your fax machine before calling to order more<br />
documents. If FastFacts attempts to send the second order<br />
before the first order is completed, the order may be<br />
canceled. After three tries, FastFacts assumes that your line<br />
is busy and terminates any further processing of the order.<br />
24-Hour Information Services 3-3
<strong>NEC</strong> BULLETIN BOARD SERVICE<br />
If you have access to a modem, the <strong>NEC</strong> Bulletin Board<br />
Service (BBS) can be used to provide you with the latest<br />
information on hardware and software. The BBS allows<br />
you to download files (video drivers, printer drivers, BIOS<br />
updates, etc.) for system enhancements and upgrades.<br />
The BBS can also be accessed through the CompuServe<br />
online service.<br />
Log onto the BBS as follows.<br />
1. From the Windows for Workgroups Program Manager,<br />
select Accessories and double click on Terminal.<br />
NOTE<br />
If you have Windows 95, see the online help<br />
or your Windows 95 documentation to set the <strong>NEC</strong><br />
BBS parameters and dial the BBS phone number.<br />
2. From the Settings menu, click on Communications,<br />
check that the settings match the following BBS<br />
parameters, and click OK when done.<br />
n Baud rate: select any baud rate that matches your<br />
modem, up to 14.4 kbps (select 19200 if using<br />
14.4 kbps)<br />
n Parity: none<br />
n Data bits: 8<br />
n Stop bits: 1<br />
n Flow control: Xon/Xoff (select Hardware if using<br />
14.4 kbps)<br />
3-4 24-Hour Information Services
3. From the Phone menu, click on Dial, enter the BBS<br />
phone number (508-635-4706), and click OK. Your<br />
business phone system and/or location might require a<br />
9 1 or 1 prefix.<br />
NOTE<br />
The first time that you use the BBS, you will<br />
be requested to provide information for a new user.<br />
4. Press Enter twice<br />
5. Enter your first name, last name, and password. Press<br />
Enter after each.<br />
6. Follow the screen prompts until the <strong>NEC</strong>TECH Main<br />
Menu is displayed.<br />
7. At the Main Menu, select J to join a conference. Select<br />
Conference 1 for the desktop conference.<br />
8. From the Main Menu, press F and Enter for the File<br />
menu.<br />
9. At the File menu, select F for a list of downloadable<br />
files. Follow the prompts to select a file for<br />
downloading.<br />
! CAUTION<br />
Executable files automatically format your diskette<br />
when you download files from the BBS. Formatting<br />
destroys any data on the diskette. Before you<br />
download files from the BBS, check that you do not<br />
have information on the diskette that you need.<br />
24-Hour Information Services 3-5
After you complete downloading your file, log off the BBS<br />
as follows.<br />
1. Press Enter (to continue)<br />
2. Press G (command for Goodbye/Hangup).<br />
3. Press Enter.<br />
AMERICA ONLINE SERVICE<br />
If you subscribe to America Online, you can use the service<br />
to obtain information about <strong>NEC</strong> and its products. You can<br />
use America Online to E-mail technical questions to <strong>NEC</strong>'s<br />
Technical <strong>Support</strong> staff, post technical questions and<br />
messages on the Message Board, and access the <strong>NEC</strong><br />
Software Library to download files<br />
Use the following steps to access America Online and<br />
<strong>NEC</strong>’s online information services.<br />
1. Log onto America Online.<br />
2. At the opening screen, click on Go To in the Main<br />
Menu.<br />
3. At the Go To menu, click Keyword.<br />
4. At the prompt, type either <strong>NEC</strong>TECH or <strong>NEC</strong>, then<br />
either press Enter or click on Go.<br />
5. At the <strong>NEC</strong> menu, double-click on one of the following<br />
topics, then follow the prompts:<br />
n About <strong>NEC</strong><br />
n Terms and Conditions<br />
n News<br />
n Product Information<br />
n Questions and Answers<br />
3-6 24-Hour Information Services
n <strong>NEC</strong> Promotions<br />
n Message Board<br />
n Software Library.<br />
6. Exit anytime by double-clicking on the rectangle in the<br />
upper left corner of the screen.<br />
COMPUSERVE ONLINE SERVICE<br />
If you subscribe to CompuServe, you can use the service to<br />
obtain information about <strong>NEC</strong> and its products. You can<br />
use CompuServe to E-mail technical questions to <strong>NEC</strong>'s<br />
Technical <strong>Support</strong> staff, post technical questions and<br />
messages on the Bulletin Board, and access <strong>NEC</strong>'s BBS to<br />
download files.<br />
Use the following steps to access CompuServe and <strong>NEC</strong>'s<br />
online information services.<br />
1. Log onto CompuServe.<br />
2. At the opening screen, click on Service, type in<br />
<strong>NEC</strong>TECH at the prompt, and click OK.<br />
3. At the <strong>NEC</strong> menu, double-click on one of the following<br />
topics, then follow the prompts:<br />
n <strong>NEC</strong> Bulletin Board<br />
n Information About This Service<br />
n Access <strong>NEC</strong> BBS<br />
n Access CompuServe Information Services<br />
n Exit.<br />
4. Exit anytime by double-clicking on the rectangle in the<br />
upper left corner of the screen.<br />
24-Hour Information Services 3-7
AT & T INTERCHANGE<br />
If you subscribe to the AT&T Interchange online service,<br />
you can use the service to obtain information about <strong>NEC</strong><br />
and its products. You can use the AT&T Interchange to<br />
obtain <strong>NEC</strong> corporate and product information, and<br />
participate in online discussions pertaining to <strong>NEC</strong><br />
products.<br />
Use the following steps to access the AT&T Interchange<br />
and <strong>NEC</strong>’s online information services.<br />
1. Log onto the AT&T Interchange.<br />
2. At the opening screen, click on Interchange, enter your<br />
password at the prompt, and click on Connect.<br />
3. At the Main Menu, click on Companies on Line.<br />
4. At the Companies on Line menu, scroll down to and<br />
double-click on <strong>NEC</strong> Technologies.<br />
5. At the <strong>NEC</strong> Technologies menu, double-click on one of<br />
the following topics, and follow the prompts:<br />
n Corporate Information<br />
n Latest News<br />
n Product Information<br />
n Discussions<br />
n Download Library.<br />
6. Exit anytime by double-clicking on the rectangle in the<br />
upper left corner of the screen.<br />
3-8 24-Hour Information Services
E-MAIL/FAX TECHNICAL SUPPORT SERVICE<br />
The <strong>NEC</strong> Technical <strong>Support</strong> Center offers technical<br />
support by E-mail over the Internet network if you have a<br />
modem. The Internet address is:<br />
tech-support@nectech.com<br />
You can also fax technical questions to the <strong>NEC</strong> Technical<br />
<strong>Support</strong> Center if you have access to a fax machine or<br />
fax/modem. The fax number is:<br />
(508) 635-4666<br />
When using the E-mail or fax support service, you should<br />
include the following words in the subject field for prompt<br />
response from the appropriate technical person:<br />
n Desktop (desktop or minitower systems)<br />
n Monitor<br />
n CD-ROM<br />
n Printer<br />
n Notebook.<br />
You should provide as much specific information about<br />
your questions as possible. Also, if you are sending a fax,<br />
please include your voice telephone number and your fax<br />
number with the question. You will receive a response to<br />
your questions within one business day.<br />
24-Hour Information Services 3-9
INTERNET<br />
If you have a modem, you can access <strong>NEC</strong>'s Home Page on<br />
the Internet World Wide Web. You can do this through a<br />
commercial online service or through your Internet account.<br />
<strong>NEC</strong>'s Home Page contains general information about <strong>NEC</strong><br />
products.<br />
You can also use the Internet to access <strong>NEC</strong>'s ftp (file<br />
transfer protocol) Site to download various files (video<br />
drivers, printer drivers, BIOS updates). The files are<br />
essentially the same files as on <strong>NEC</strong>'s Bulletin Board<br />
Service.<br />
To access the World-Wide-Web <strong>NEC</strong> Home Page, enter the<br />
following Internet Uniform Resource Locator (URL)<br />
through your service:<br />
http://www.nec.com<br />
To access <strong>NEC</strong>'s ftp Site, enter the following Internet ftp<br />
address through your service:<br />
ftp.nectech.com<br />
Once in the file menu, follow the prompts to choose and<br />
download the file(s) you want.<br />
<strong>NEC</strong> TECHNICAL SUPPORT SERVICES<br />
<strong>NEC</strong> also offers direct technical support through its<br />
Technical <strong>Support</strong> Center.<br />
Direct assistance is available 24 hours a day, seven days a<br />
week. Call the <strong>NEC</strong> Technical <strong>Support</strong> Center, toll free, at<br />
1-800-632-4525.<br />
Please have available your system’s name, model number,<br />
serial number, and as much information as possible about<br />
your system’s problem before calling.<br />
3-10 24-Hour Information Services
4<br />
If You Have a Problem<br />
Your system has a built-in checking program that<br />
automatically tests its components when you turn the<br />
system unit power on. If there is a problem, the system<br />
displays an error message. If this happens, follow any<br />
instructions on the screen.<br />
If screen messages do not help or an error message does not<br />
appear, use the information in this chapter to determine and<br />
solve the problem. The problem is often one that you can<br />
solve yourself.<br />
See the following sections in this chapter for help:<br />
n “What to Do If You Have a Problem”<br />
See this section first to determine the cause of your<br />
problem.<br />
n “Solutions to Common Problems”<br />
Refer to this section to solve common minor problems.<br />
n “Online Diagnostics”<br />
If your system boots, use your online diagnostics utility<br />
to determine and solve the problem.<br />
n “Getting Help”<br />
See this section for the help available to you for<br />
information about your computer and for help when you<br />
cannot solve a problem yourself. Click on a topic for<br />
help on solving problems that you may have with your<br />
system.<br />
If You Have a Problem 4-1
WHAT TO DO IF YOU HAVE A PROBLEM<br />
If you have minor problems, go through the following<br />
problem checklist for possible solutions.<br />
n Is the power switch on for the computer and any<br />
connected peripherals (monitor, printer)?<br />
Check that all power switches are on.<br />
n Is the computer and its peripherals connected to a<br />
working AC power outlet or surge protector?<br />
Check the outlet or surge protector by plugging a lamp<br />
into the outlet or surge protector.<br />
n Are all cables and power cords connected<br />
securely?<br />
Check that all cables and power cords are securely<br />
connected.<br />
n Is the monitor screen blank or is the display hard<br />
to read?<br />
Check that the monitor is on. Adjust the brightness and<br />
contrast controls on the monitor.<br />
n Was a Non-System Disk error message displayed<br />
when you started the system?<br />
You have a diskette in the diskette drive. Remove the<br />
diskette from drive A and restart the system.<br />
n Is your mouse or keyboard not responding?<br />
You may have connected the mouse and keyboard after<br />
turning on your system. Turn the system off, make sure<br />
the mouse and keyboard are connected, and turn the<br />
system back on.<br />
n Does your system fail to recognize the CD-ROM?<br />
Your drive designation may be incorrect. The reader is<br />
assigned as drive E.<br />
4-2 If You Have a Problem
SOLUTIONS TO COMMON PROBLEMS<br />
See the following sections to match your problem area and<br />
view the possible causes and solutions.<br />
When trying to solve problems, you should note what the<br />
system was doing when the problem occurred and what you<br />
attempted to do to correct the problem. This information is<br />
useful if you request assistance.<br />
System Problems<br />
Check the following list to match your problem and see the<br />
possible cause and solution.<br />
n No power and power lamp not lit<br />
Check that the power cable is plugged into the system<br />
power socket. Check that the other end of the cable is<br />
plugged into a live, properly grounded AC power outlet.<br />
n System does not boot and error message displayed<br />
on screen<br />
Run the Setup Utility. Check that the parameters are set<br />
correctly, particularly if you just installed an option.<br />
n System sounds continuous beeps<br />
Turn the system off, wait at least five seconds, and turn<br />
the system on. If the beeps continue, call your <strong>NEC</strong><br />
dealer or the <strong>NEC</strong> Technical <strong>Support</strong> Center.<br />
n System does not maintain date, time, system<br />
configuration information<br />
Replace the CMOS battery if your system board has a<br />
replaceable battery.<br />
n System does not boot from hard disk<br />
The system tries to start from the diskette drive before it<br />
starts from the hard drive. Remove the diskette from the<br />
diskette drive.<br />
If You Have a Problem 4-3
Run the Setup Utility and check the Boot parameter<br />
settings to verify that the initial boot parameter is set for<br />
hard drive C and not for a diskette drive.<br />
n System performance appears sluggish<br />
Check that your system is set for optimal operation. See<br />
your operating system documentation.<br />
Check the memory requirements of your software<br />
applications. If required, install additional SIMM<br />
memory.<br />
If you added optional memory, check that you correctly<br />
installed the SIMM memory.<br />
n System did not recognize additional SIMM memory<br />
You added only one SIMM stick. SIMMs must be added<br />
in pairs. Add a second SIMM of the same type.<br />
n System password forgotten<br />
Clear the password and reset it. See “Clearing Your<br />
Password” in the online Hardware Reference <strong>Guide</strong>.<br />
4-4 If You Have a Problem
Diskette Drive Problems<br />
Check the following problems to see the possible cause and<br />
solution.<br />
n Diskette won't load<br />
Check that the diskette is being loaded correctly.<br />
Check that the system and monitor power lamps are on<br />
and the power-on screen appears.<br />
Check that the diskette is formatted. If not, format it.<br />
See your operating system documentation.<br />
If the diskette drive busy lamp does not light when you<br />
load the diskette, try a different diskette. If this loads, the<br />
problem is in the software.<br />
n Non-System Disk or Disk Error message displayed<br />
If you are booting from the diskette drive, insert a<br />
diskette with system files into drive A.<br />
If a bootable diskette does not boot, use the Setup Utility<br />
to verify that the initial boot parameter is set to diskette<br />
drive A and not a hard disk.<br />
If You Have a Problem 4-5
Monitor Problems<br />
Check the following problems to see the possible cause and<br />
solution.<br />
n Monitor screen is dark<br />
Check that the monitor power cable is connected to the<br />
monitor and a power outlet, the monitor signal cable is<br />
connected to the system, and the brightness and contrast<br />
controls are adjusted.<br />
Press the space bar or move the mouse to take the<br />
system out of the power management mode.<br />
n Distorted image appears on your monitor screen<br />
Adjust the monitor's video controls. If this does not help,<br />
turn the monitor off for several seconds, then back on.<br />
n There is constant movement on the screen.<br />
A magnetic field is affecting your monitor. Move any<br />
devices (fan, motor, another monitor) that generate<br />
magnetic fields away from your monitor.<br />
n The screen display is fuzzy or flickering, graphics<br />
characters or garbage appears on the screen.<br />
Check that your monitor is set up correctly and that all<br />
connections have been made.<br />
Check that the video refresh rate and video driver are<br />
correct by using the Galileo video utility. Open the<br />
utility by double clicking the Galileo icon in the<br />
Windows Control Panel.<br />
4-6 If You Have a Problem
Keyboard/Mouse Problems<br />
Check the following problem to see the possible cause and<br />
solution.<br />
n Image appears on screen but nothing happens<br />
when you use the mouse or keyboard<br />
Tighten the keyboard or mouse cable connection.<br />
If this does not help, turn off the system, wait five or<br />
more seconds, and turn on the system.<br />
CD-ROM Problems<br />
Check the following problems to see the possible cause and<br />
solution.<br />
n The system does not see the CD-ROM reader<br />
The drive designation is wrong and should be changed.<br />
The CD-ROM reader is assigned as drive E.<br />
n The CD-ROM reader is not reading a disc<br />
Check that the disc is inserted in the CD tray with the<br />
label printed side up.<br />
Check that the disc is a data disc, not a music disc.<br />
Try a different disc to see if the problem is limited to one<br />
disc.<br />
n The CD-ROM disc does not eject due to a power<br />
failure or software error<br />
Turn off the system and use the CD-ROM emergency<br />
eject feature.<br />
n The CD-ROM does not play music CDs<br />
Use sound software.<br />
If You Have a Problem 4-7
Speaker Problems<br />
Check the following problems to see the possible cause and<br />
solution.<br />
n No sound from the speakers<br />
Check that the speaker power is on.<br />
n Speaker volume is too low<br />
Adjust the volume control on the speaker. If the volume<br />
is still too low, adjust the volume through the system<br />
software.<br />
n Sound is only coming from one speaker<br />
Balance the speaker output by adjusting the balance in<br />
the sound software.<br />
Microphone Problems<br />
Check the following problem to see the possible cause and<br />
solution.<br />
n You get no response from the microphone<br />
Check that the microphone is connected to the<br />
microphone in connector on the back of your system.<br />
Adjust the microphone (MIC) level through sound<br />
software.<br />
4-8 If You Have a Problem
REPLACING THE CMOS BATTERY<br />
A 3-volt lithium battery in your computer maintains system<br />
configuration information. In the event that this CMOS<br />
battery fails to maintain system configuration information,<br />
replace the battery.<br />
! CAUTION<br />
Removing the battery from the system board<br />
causes the computer to lose system configuration<br />
information. If you can, run the Setup Utility and<br />
print out or write down your system configuration<br />
settings. Then you can restore your system to its<br />
current settings.<br />
! WARNING<br />
The battery can explode if it is incorrectly replaced<br />
or improperly discarded. Use only the same battery<br />
or an equivalent type recommended by the<br />
manufacturer when replacing the battery.<br />
Lithium acts as a catalyst when exposed to water<br />
and causes spontaneous combustion on contact.<br />
Discard used batteries according to the<br />
manufacturer’s instructions.<br />
If you need to replace the battery, follow these steps:<br />
1. Turn off and unplug the system unit and any external<br />
option connected to it.<br />
2. Remove the system unit cover.<br />
If You Have a Problem 4-9
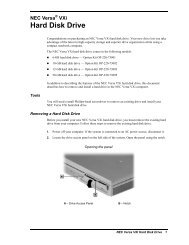
3. Locate the battery socket on the system board.<br />
Locating the battery socket on the system board<br />
4. Carefully lift the battery from the socket tabs and out of<br />
the socket.<br />
Removing the battery<br />
4-10 If You Have a Problem
5. With the positive (+) side facing up, press the new<br />
battery into the socket.<br />
6. Replace the system unit cover.<br />
7. Connect external peripherals and power cables.<br />
8. Run Setup to reconfigure your system parameters.<br />
ONLINE DIAGNOSTICS<br />
If you are unable to resolve your system's problem using the<br />
Problem/Solutions topics in this chapter, <strong>NEC</strong> suggests that<br />
you run the QA Plus online diagnostics software.<br />
QA Plus is a software diagnostic program factory installed<br />
on your system's hard disk. QA Plus permits quick testing<br />
of all major system components, individual testing of<br />
different system components, and access to various testing<br />
options.<br />
QA Plus comes on a diskette and is accessed through the<br />
MS-DOS directory.<br />
GETTING HELP<br />
If you tried correcting problems yourself and weren't<br />
successful, you may want to try one or more of the<br />
following 24-hour services for answers to your questions.<br />
(Some services require a modem or fax machine.) See<br />
Chapter 3 for information about using theses services.<br />
n <strong>NEC</strong>’s FastFacts Service<br />
n <strong>NEC</strong>’s Bulletin Board Service<br />
n America Online ® Service<br />
n CompuServe ® Online Service<br />
n AT & T Interchange Online Service<br />
If You Have a Problem 4-11
n E-mail to <strong>NEC</strong>’s Technical <strong>Support</strong> Services through a<br />
commercial online service or Internet<br />
n Fax Service to <strong>NEC</strong>’s Technical <strong>Support</strong> Services<br />
n Internet<br />
n <strong>NEC</strong>’s Technical <strong>Support</strong> Services.<br />
If you still need help, you continue with the suggestions that<br />
follow.<br />
Getting Help From Your Company<br />
If you are in a company, the best source of help may be<br />
internal. Your company may have designated central<br />
support personnel to whom you can go when you have<br />
problems.<br />
Getting Help From Your <strong>NEC</strong> Dealer<br />
The <strong>NEC</strong> dealer from whom you purchased your system is<br />
a good source of help and should be contacted. The dealer is<br />
backed by complete support resources and programs within<br />
<strong>NEC</strong>.<br />
Getting Help From <strong>NEC</strong>'s Technical <strong>Support</strong> Center<br />
Help is available to you through the <strong>NEC</strong> Technical<br />
<strong>Support</strong> Center. Direct assistance is available 24 hours a<br />
day, 7 days a week. You can call the <strong>Support</strong> Center, toll<br />
free, at 1-800-632-4525.<br />
Before calling, please have ready your system name, model<br />
number, serial number, and purchase date. Also have ready<br />
as much information as possible about the problem you are<br />
having, including any error messages that occurred.<br />
4-12 If You Have a Problem
<strong>NEC</strong> Warranty/Non-Warranty Repair Service<br />
<strong>NEC</strong>'s repair service is designed to support your warranty<br />
and non-warranty service activity.<br />
Before you call for repair service, see the previous sections<br />
in this chapter to determine if you can solve the problem<br />
yourself, within your company, through your dealer, or with<br />
the help of a technician from the <strong>NEC</strong> Technical <strong>Support</strong><br />
Center.<br />
If your system requires repair service from <strong>NEC</strong>, call the<br />
appropriate repair service:<br />
n To request repair service in the United States, call<br />
1-800-632-4525 or fax to 1-800-695-3044.<br />
n To request repair service in Canada, call<br />
1-800-268-4191 (English response) or<br />
1-800-268-4115 (French response).<br />
If You Have a Problem 4-13
A<br />
Setting Up a Healthy<br />
Work Environment<br />
! WARNING<br />
Prolonged or improper use of a computer workstation<br />
may pose a risk of serious injury. To reduce your risk of<br />
injury, set up and use your computer in the manner<br />
described in this appendix.<br />
Contact a doctor if you experience pain, tenderness,<br />
swelling, burning, cramping, stiffness, throbbing, weakness,<br />
soreness, tingling and/or numbness in the hands,<br />
wrists, arms, shoulders, neck, back, and/or legs.<br />
MAKING YOUR COMPUTER WORK FOR YOU<br />
Computers are everywhere. More and more people sit at<br />
computers for longer periods of time. This appendix explains<br />
how to set up your computer to fit your physical needs. This<br />
information is based on ergonomics — the science of making<br />
the workplace fit the needs of the worker.<br />
Some nerve, tendon, and muscle disorders (musculoskeletal<br />
disorders) may be associated with repetitive activities,<br />
improper work environments, and incorrect work habits.<br />
Examples of musculoskeletal disorders that may be<br />
associated with certain forms of repetitive activities include:<br />
carpal tunnel syndrome, tendinitis, tenosynovitis, de<br />
Quervain’s tenosynovitis, and trigger finger, as well as<br />
other nerve, tendon, and muscle disorders.<br />
Setting Up a Healthy Work Environment A-1
Although some studies have shown an association between<br />
increasing hours of keyboard use and the development of<br />
some musculoskeletal disorders, it is still unclear whether<br />
working at a computer causes such disorders. Some doctors<br />
believe that using the keyboard and mouse may aggravate<br />
existing musculoskeletal disorders.<br />
Some people are more susceptible to developing these<br />
disorders due to pre-existing conditions or psychosocial<br />
factors (see “Pre-existing Conditions and Psychosocial<br />
Factors” later in the appendix).<br />
To reduce your risk of developing these disorders, follow the<br />
instructions in this appendix. If you experience discomfort<br />
while working at your computer or afterwards, even at night,<br />
contact a doctor as soon as possible. Signs of discomfort<br />
might include pain, tenderness, swelling, burning, cramping,<br />
stiffness, throbbing, weakness, soreness, tingling and/or<br />
numbness in the hands, wrists, arms, shoulders, neck, back,<br />
and/or legs.<br />
A-2 Setting Up a Healthy Work Environment
ARRANGE YOUR EQUIPMENT<br />
Arrange your equipment so that you can work in a natural<br />
and relaxed position. Place items that you use frequently<br />
within easy reach. Adjust your workstation setup to the<br />
proper height (as described in this appendix) by lowering<br />
the table or stand that holds your computer equipment or<br />
raising the seat height of your chair. To create more desk<br />
space, you can put your computer base on the floor.<br />
Adjust<br />
your keyboard<br />
and mouse<br />
Adjust<br />
your monitor<br />
Adjust<br />
your chair<br />
Setting Up a Healthy Work Environment A-3
ADJUST YOUR CHAIR<br />
Your chair should be adjustable and stable. Vary your<br />
posture throughout the day.<br />
Check the following:<br />
n Keep your body in a relaxed yet upright position. The<br />
backrest of your chair should support the inward curve<br />
of your back.<br />
n Use the entire seat and backrest to support your body.<br />
Tilt the backrest slightly backwards. The angle formed<br />
by your thighs and back should be 90° or more.<br />
A-4 Setting Up a Healthy Work Environment
n Your seat depth should allow your lower back to comfortably<br />
contact the backrest. Make sure that the backs<br />
of your lower legs do not press against the front of<br />
the chair.<br />
n Extend your lower legs slightly so that the angle between<br />
your thighs and lower legs is 90° or more.<br />
n Place your feet flat on the floor. Only use a footrest<br />
when attempts to adjust your chair and workstation fail<br />
to keep your feet flat.<br />
n Be sure that you have adequate clearance between the<br />
top of your thighs and the underside of your workstation.<br />
n Use armrests or forearm supports to support your forearms.<br />
If adjustable, the armrests or forearm supports should<br />
initially be lowered while all the other adjustments discussed<br />
in this appendix are made. Once all these adjustments<br />
are completed, raise the armrests or adjust the<br />
forearm supports until they touch the forearms and allow<br />
the shoulder muscles to relax.<br />
Setting Up a Healthy Work Environment A-5
ADJUST YOUR INPUT DEVICES<br />
Follow these points in positioning your keyboard and<br />
mouse.<br />
n Position your keyboard directly in front of you. Avoid<br />
reaching when using your keyboard or mouse.<br />
n If you use a mouse, position it at the same height as the<br />
keyboard and next to the keyboard. Keep your wrists<br />
straight and use your entire arm when moving a mouse.<br />
Do not grasp the mouse tightly. Grasp the mouse lightly<br />
and loosely.<br />
n Adjust the keyboard height so that your elbows are near<br />
your body and your forearms are parallel to the floor,<br />
with your forearms resting on either armrests or forearm<br />
supports, in the manner described previously. If you do<br />
not have armrests or forearm supports, your upper arms<br />
should hang comfortably at your sides.<br />
n Adjust your keyboard slope so that your wrists are<br />
straight while you are typing.<br />
A-6 Setting Up a Healthy Work Environment
n Type with your hands and wrists floating above the keyboard.<br />
Use a wrist pad only to rest your wrists between<br />
typing. Avoid resting your wrists on sharp edges.<br />
n Type with your wrists straight. Instead of twisting your<br />
wrists sideways to press hard-to-reach keys, move your<br />
whole arm. Keep from bending your wrists, hands, or<br />
fingers sideways.<br />
n Press the keys gently; do not bang them. Keep your<br />
shoulders, arms, hands, and fingers relaxed.<br />
Setting Up a Healthy Work Environment A-7
ADJUST YOUR MONITOR<br />
Correct placement and adjustment of the monitor can reduce<br />
eye, shoulder, and neck fatigue. Check the following when<br />
you position the monitor.<br />
n Adjust the monitor height so that the top of the screen is<br />
at or slightly below eye level. Your eyes should look<br />
slightly downward when viewing the middle of the<br />
screen.<br />
n Position your monitor no closer than 12 inches and no<br />
further away than 28 inches from your eyes. The optimal<br />
distance is between 14 and 18 inches.<br />
A-8 Setting Up a Healthy Work Environment
n Rest your eyes periodically by focusing on an object at<br />
least 20 feet away. Blink often.<br />
n Position the monitor at a 90° angle to windows and other<br />
light sources to minimize glare and reflections. Adjust<br />
the monitor tilt so that ceiling lights do not reflect on<br />
your screen.<br />
n If reflected light makes it hard for you to see your<br />
screen, use an anti-glare filter.<br />
n Clean your monitor regularly. Use a lint-free, nonabrasive<br />
cloth and a non-alcohol, neutral, non-abrasive<br />
cleaning solution or glass cleaner to minimize dust.<br />
n Adjust the monitor’s brightness and contrast controls to<br />
enhance readability.<br />
n Use a document holder placed close to the screen.<br />
n Position whatever you are looking at most of the time<br />
(the screen or reference material) directly in front of you<br />
to minimize turning your head while you are typing.<br />
n Get regular eye check-ups.<br />
Setting Up a Healthy Work Environment A-9
VARY YOUR WORKDAY<br />
If you use your computer for prolonged periods, follow<br />
these instructions.<br />
n Vary your tasks throughout the day.<br />
n Take frequent short breaks that involve walking, standing,<br />
and stretching. During these breaks, stretch muscles<br />
and joints that were in one position for an extended period<br />
of time. Relax muscles and joints that were active.<br />
A-10 Setting Up a Healthy Work Environment
n Use a timer or reminder software to remind you to<br />
take breaks.<br />
n To enhance blood circulation, alter your sitting posture<br />
periodically and keep your hands and wrists warm.<br />
NOTE<br />
For more information on workstation setup,<br />
see the American National Standard for Human<br />
Factors Engineering of Visual Display Terminal<br />
Workstations. ANSI/HFS Standard No. 100-1988.<br />
The Human Factors Society, Inc., P.O. Box 1369,<br />
Santa Monica, California 90406<br />
PRE-EXISTING CONDITIONS<br />
AND PSYCHOSOCIAL FACTORS<br />
Pre-existing conditions that may cause or make some people<br />
more susceptible to musculoskeletal disorders include the<br />
following: hereditary factors, vascular disorders, obesity,<br />
nutritional deficiencies (e.g., Vitamin B deficiency),<br />
endocrine disorders (e.g., diabetes), hormonal imbalances,<br />
connective tissue disorders (e.g., arthritis), prior trauma<br />
(to the hands, wrists, arms, shoulders, neck, back, or legs),<br />
prior musculoskeletal disorders, aging, fluid retention due to<br />
pregnancy, poor physical conditioning and dietary habits,<br />
and other conditions.<br />
Psychosocial factors associated with these disorders include:<br />
workplace stress, poor job satisfaction, lack of support by<br />
management, and/or lack of control over one’s work.<br />
Contact a doctor if you experience pain, tenderness, swelling,<br />
burning, cramping, stiffness, throbbing, weakness,<br />
soreness, tingling and/or numbness in the hands, wrists,<br />
arms, shoulders, neck, back, and/or legs.<br />
Setting Up a Healthy Work Environment A-11
CHECKING YOUR COMFORT:<br />
HOW DO YOU MEASURE UP?<br />
Use this checklist to see if you are setting up your work<br />
environment to fit your physical needs.<br />
Checking Your Chair<br />
n Do you sit in an upright position with the backrest supporting<br />
your lower back?<br />
n When sitting, are your feet flat on the floor?<br />
n Do you periodically adjust your chair and your posture?<br />
Checking Your Keyboard<br />
n Is your keyboard angled so your wrists are straight when<br />
you type?<br />
n Is your keyboard directly in front of you?<br />
n Do you avoid resting your wrists on sharp edges?<br />
n Do you press the keys gently and not bang on them?<br />
Checking Your Mouse<br />
n Is your mouse at the same height as the keyboard and<br />
next to the keyboard?<br />
n Are your wrists straight and your touch light when<br />
moving the mouse?<br />
Checking Your Monitor<br />
n Did you adjust your monitor so that the top of the screen<br />
is at or slightly below eye level?<br />
n Do you periodically rest your eyes by blinking often or<br />
looking away from the screen?<br />
n Is your monitor no closer than 12 inches and no further<br />
away than 28 inches from your eyes?<br />
n Do you use a document holder placed close to the screen?<br />
A-12 Setting Up a Healthy Work Environment
Checking You<br />
n Is your work area set up to promote a natural and relaxing<br />
working position with frequently used work items<br />
within close reach?<br />
n Do you take frequent short breaks?<br />
n Do you stretch and walk during your breaks?<br />
n Do you vary your tasks during the day?<br />
n Do you have regular eye checkups?<br />
n Do you contact your doctor if you feel any sustained<br />
discomfort?<br />
For more information on workstation setup, see the American<br />
National Standard for Human Factors Engineering of Visual<br />
Display Terminal Workstations. ANSI/HFS Standard No.<br />
100-1988. The Human Factors Society, Inc., P.O. Box<br />
1369, Santa Monica, California 90406<br />
This appendix was prepared in consultation with Dr. David<br />
Rempel of the University of California/San Francisco<br />
Ergonomics Program and Mr. M.F. Schneider of<br />
HUMANTECH, Inc., Ann Arbor, Michigan.<br />
Setting Up a Healthy Work Environment A-13
Index<br />
A<br />
America Online, 3-6<br />
AT&T Interchange, 3-8<br />
B<br />
Battery replacement, 4-9–4-11<br />
Bulletin board service, 3-4<br />
C<br />
CD-ROM reader<br />
drive assignment, 1-2<br />
eject/retract button, 1-3<br />
emergency eject, 1-3<br />
features, 1-2, 1-3<br />
volume control, 1-3<br />
CMOS<br />
battery, 4-9<br />
CompuServe, 3-7<br />
Connectors<br />
keyboard, 1-10<br />
mouse, 1-10<br />
printer, 1-10<br />
serial port, 1-10<br />
VGA monitor connector, 1-8<br />
D<br />
Diagnostics, 4-11<br />
QA Plus, 4-11<br />
Disk lamp, 1-7<br />
Documentation, vii, ix<br />
E<br />
E-mail support, 3-9<br />
Error message, 4-1<br />
F<br />
FastFacts service, 3-2<br />
Fax support, 3-9<br />
Full power on mode, 1-6<br />
G<br />
Game connector, 1-10<br />
H<br />
Headphones, 1-3<br />
Help, 4-11<br />
from <strong>NEC</strong>'s technical support<br />
center, 4-12<br />
from your company, 4-12<br />
from your <strong>NEC</strong> dealer, 4-12<br />
I<br />
Information services, 3-1<br />
America Online, 3-6<br />
AT&T Interchange, 3-8<br />
CompuServe, 3-7<br />
E-mail support, 3-9<br />
fax support, 3-9<br />
Internet, 3-10<br />
<strong>NEC</strong> bulletin board service, 3-4<br />
<strong>NEC</strong> technical support, 3-10<br />
<strong>NEC</strong>'s FastFacts, 3-2<br />
<strong>NEC</strong>'s ftp site, 3-10<br />
<strong>NEC</strong>'s World Wide Web home<br />
page, 3-10<br />
World Wide Web, 3-10<br />
Internet, 3-10<br />
Index-1
K<br />
Keyboard<br />
connecting, 1-10<br />
port, 1-10<br />
L<br />
Lamps<br />
CD busy, 1-3<br />
disk, 1-7<br />
power, 1-6<br />
M<br />
Microphone<br />
features, 1-9, 1-12<br />
jack, 1-9<br />
MIDI connector, 1-10<br />
Mouse<br />
connecting, 1-10<br />
port, 1-10<br />
N<br />
<strong>NEC</strong> bulletin board service, 3-4<br />
<strong>NEC</strong> technical support center, 4-12,<br />
4-13<br />
<strong>NEC</strong> technical support services, 3-<br />
10<br />
<strong>NEC</strong>'s FastFacts, 3-2<br />
O<br />
Online diagnostics, 4-11<br />
P<br />
Parallel port, 1-10. See also Printer<br />
port<br />
Power lamp, 1-6<br />
Power management, 1-7<br />
full power on mode, 1-6<br />
suspend button, 1-7<br />
suspend mode, 1-6, 1-7<br />
Power saving features, 1-7<br />
Printer port<br />
connector, 1-10<br />
Problems, 4-2<br />
CD-ROM, 4-7<br />
common problem solutions, 4-3<br />
diskette drive, 4-5<br />
keyboard/mouse, 4-7<br />
microphone, 4-8<br />
monitor, 4-6<br />
speakers, 4-8<br />
system, 4-3<br />
R<br />
Reset button, 1-7<br />
S<br />
Services, 4-11<br />
Speakers<br />
features, 1-11<br />
volume, 1-11<br />
Suspend button, 1-7<br />
Suspend mode, 1-6, 1-7<br />
T<br />
Technical support, 3-10<br />
Troubleshooting, 4-1<br />
common problems, 4-3<br />
if you have a problem, 4-1<br />
minor problems, 4-2<br />
<strong>NEC</strong> technical support center, 4-<br />
12, 4-13<br />
Online diagnostics, 4-11<br />
V<br />
VGA monitor connector, 1-8<br />
Volume, 1-3<br />
Index-2
Index-3
(For United States Use Only)<br />
FEDERAL COMMUNICATIONS COMMISSION<br />
RADIO FREQUENCY INTERFERENCE STATEMENT<br />
WARNING: Changes or modifications to this unit not expressly approved by the<br />
party responsible for compliance could void the user’s authority to operate the<br />
equipment.<br />
NOTE: This equipment has been tested and found to comply with the limits for a<br />
Class B digital device, pursuant to Part 15 of the FCC Rules. These limits are designed<br />
to provide reasonable protection against harmful interference in a residential<br />
installation. This equipment generates, uses and can radiate radio frequency<br />
energy and, if not installed and used in accordance with the instructions, may<br />
cause harmful interference to radio communications.<br />
However, there is no guarantee that interference will not occur in a particular installation.<br />
If this equipment does cause harmful interference to radio or television<br />
reception, which can be determined by turning the equipment off and on, the user<br />
is encouraged to try to correct the interference by one or more of the following<br />
measures.<br />
n Reorient or relocate the receiving antenna.<br />
n Increase the separation between the equipment and receiver.<br />
n Connect the equipment to an outlet on a circuit different from the one to<br />
which the receiver is connected.<br />
Use shielded and properly grounded I/O cables and power cable to ensure<br />
compliance of this unit to the specified limits of the rules.<br />
(For Canadian Use Only)<br />
This equipment is a Class B digital apparatus which complies with the Radio<br />
Interference Regulations, C.R.C., c.1374.<br />
Cet appareil numérique de la classe B est conforme àu Règlement sur le<br />
brouillage radioélectrique, C.R.C., ch.1374.
BATTERY REPLACEMENT<br />
A lithium battery in some computers maintains system configuration information.<br />
In the event that the battery fails to maintain system configuration information,<br />
<strong>NEC</strong> recommends that you replace the battery. See “Replacing the CMOS Battery”<br />
in Chapter 4 of this guide for battery replacement information.<br />
WARNING: There is a danger of explosion if the battery is incorrectly replaced.<br />
Replace only with the same or equivalent type recommended by the manufacturer.<br />
Discard used batteries according to the manufacturer’s instructions.<br />
ATTENTION: Il y a danger d’explosion s’il y a replacement incorrect de la<br />
batterie. Remplacer uniquement avec une batterie du même type ou d’un type<br />
recommandé par le constructeur. Mettre au rébut les batteries usagées<br />
conformément aux instructions du fabricant.<br />
BATTERY DISPOSAL<br />
Do not place used batteries in your regular trash.<br />
The nickel-cadmium or nickel metal-hydride batteries must be collected, recycled,<br />
or disposed of in an environmentally-approved manner.<br />
The incineration, landfilling, or mixing of batteries with the municipal solid<br />
waste stream is prohibited by law in most areas.<br />
Return batteries to a federal or state approved battery recycler. This may be where<br />
your purchased the battery or a local seller of automotive batteries. In<br />
MINNESOTA, call 1-800-225-PRBA if further disposal information is required.<br />
Contact your local waste management officials for other information regarding<br />
the environmentally sound collection, recycling, and disposal of the batteries.