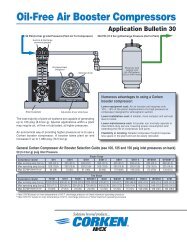
Installation, Operation & Maintenance Manual - Corken
Installation, Operation & Maintenance Manual - Corken
Installation, Operation & Maintenance Manual - Corken

You also want an ePaper? Increase the reach of your titles
YUMPU automatically turns print PDFs into web optimized ePapers that Google loves.
Assembly of Packing (T-Style)<br />
1. Replace packing as required. The segmented packing<br />
and cups are located in the packing barrel while the<br />
V-ring packing is located in the packing box cartridge.<br />
NOTE: Always use new O-rings when replacing<br />
the packing.<br />
2. Lower V-ring packing set:<br />
NOTE: The instructions below are for packing<br />
specification “G”. Depending on the packing<br />
specification used in your compressor, the<br />
order of assembly for the packing rings, V-ring<br />
packing, washers and packing spring will vary.<br />
Refer to Appendix E to view the V-ring packing<br />
arrangements and follow the order of assembly<br />
and V-ring direction. If you do not know the packing<br />
arrangement used in your compressor, refer to<br />
the model number identification codes listed in<br />
Appendix A.<br />
a. Clean and lightly oil the packing area inside the<br />
packing box cartridge.<br />
b. Insert the first retainer ring followed by a washer<br />
through the bottom of the packing box cartridge.<br />
c. Insert the packing spring followed by another<br />
washer.<br />
d. Insert a male packing ring followed by four V-rings<br />
and one female packing ring. NOTE: Insert<br />
packing rings and V-rings one at a time. Refer<br />
to Appendix E for the proper direction of the<br />
packing rings and V-rings.<br />
e. Lastly, install and tightened the adjusting screw<br />
until the PTFE locking device located on the side<br />
of the adjusting screw is engaged with the first<br />
thread of the packing box cartridge. DO NOT OVER<br />
TIGHTEN! The PTFE locking device should engage<br />
(slightly bent) the first thread but not break off.<br />
3. Middle V-ring packing set:<br />
a. Clean and lightly oil the packing area inside the<br />
packing box cartridge.<br />
b. Insert the second retainer ring followed by a washer<br />
through the top of the packing box cartridge.<br />
c. Insert a female packing ring followed by four<br />
V-rings and one male packing ring. NOTE: Insert<br />
packing rings and V-rings one at a time. Refer<br />
to Appendix E for the proper direction of the<br />
male and female packing rings and V-rings.<br />
d. Insert a washer and a packing spring followed by<br />
another washer.<br />
e. Lastly, push in on the washer and insert the third<br />
retainer ring.<br />
f. Install two O-rings on the packing box cartridge as<br />
shown in the T-Style Crosshead Guide Assembly<br />
Details in Appendix E.<br />
4. Segmented packing:<br />
NOTE: The instructions below are for packing<br />
specification “G”. Depending on the packing<br />
specification used in your compressor, the order of<br />
assembly for the segmented packing arrangement<br />
(radial or tangent) will vary. Refer to Appendix E<br />
to view the segmented packing arrangements. If<br />
you do not know the packing arrangement used<br />
in your compressor, refer to the model number<br />
identification codes listed in Appendix A.<br />
a. Clean the segmented packing cups and the area<br />
inside the packing barrel.<br />
b. Insert the segmented packing cups, segmented<br />
packing pairs and backup rings one at a time in<br />
the order shown in Appendix E.<br />
c. Reattach the packing adapter to the packing barrel<br />
using the four socket head screws.<br />
d. Install two O-rings on the packing barrel as shown<br />
in the T-Style Crosshead Guide Assembly Details<br />
in Appendix E.<br />
5. Install packing installation cone part number 3905 over<br />
the threaded end of the piston rod.<br />
6. Before installing the packing box cartridge over the<br />
packing cone and piston rod, you must insert the oil<br />
deflector ring through the side opening of the packing<br />
box cartridge. The oil deflector ring should rest on top<br />
of the lower packing set. Make sure the oil deflector<br />
ring is centered over the piston rod opening before<br />
sliding packing cartridge over the installation cone and<br />
piston rod.<br />
7. Install cages.<br />
8. Install and tighten holddown screws with special<br />
wrench.<br />
9. Install packing barrels, noting the alignment of the<br />
barrels as they sit on the crosshead guide. The valve<br />
scallops on the barrels must align properly with the<br />
valves in the cylinder.<br />
10. Remove packing installation cone.<br />
11. Replace cylinder, pistons, heads and cylinder cap. See<br />
details in Section 4.4 for proper assembly of pistons.<br />
12. Rotate unit by hand to ensure proper assembly.<br />
16