Installation, Operation & Maintenance Manual - Corken
Installation, Operation & Maintenance Manual - Corken
Installation, Operation & Maintenance Manual - Corken

You also want an ePaper? Increase the reach of your titles
YUMPU automatically turns print PDFs into web optimized ePapers that Google loves.
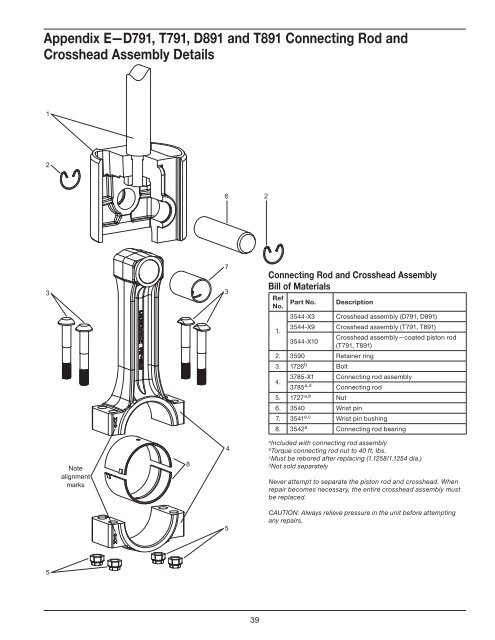
Appendix E—D791, T791, D891 and T891 Connecting Rod and<br />
Crosshead Assembly Details<br />
1<br />
2<br />
6<br />
2<br />
3<br />
7<br />
3<br />
Connecting Rod and Crosshead Assembly<br />
Bill of Materials<br />
Ref<br />
No.<br />
Part No. Description<br />
3544-X3 Crosshead assembly (D791, D891)<br />
1.<br />
3544-X9 Crosshead assembly (T791, T891)<br />
3544-X10<br />
Crosshead assembly—coated piston rod<br />
(T791, T891)<br />
2. 3590 Retainer ring<br />
3. 1726 b Bolt<br />
4.<br />
3785-X1 Connecting rod assembly<br />
3785 a,d Connecting rod<br />
5. 1727 a,b Nut<br />
6. 3540 Wrist pin<br />
7. 3541 a,c Wrist pin bushing<br />
8. 3542 a Connecting rod bearing<br />
Note<br />
alignment<br />
marks<br />
8<br />
4<br />
a<br />
Included with connecting rod assembly<br />
b<br />
Torque connecting rod nut to 40 ft. lbs.<br />
c<br />
Must be rebored after replacing (1.1258/1.1254 dia.)<br />
d<br />
Not sold separately<br />
Never attempt to separate the piston rod and crosshead. When<br />
repair becomes necessary, the entire crosshead assembly must<br />
be replaced.<br />
5<br />
CAUTION: Always relieve pressure in the unit before attempting<br />
any repairs.<br />
5<br />
39