Installation, Operation & Maintenance Manual - Corken
Installation, Operation & Maintenance Manual - Corken
Installation, Operation & Maintenance Manual - Corken

You also want an ePaper? Increase the reach of your titles
YUMPU automatically turns print PDFs into web optimized ePapers that Google loves.
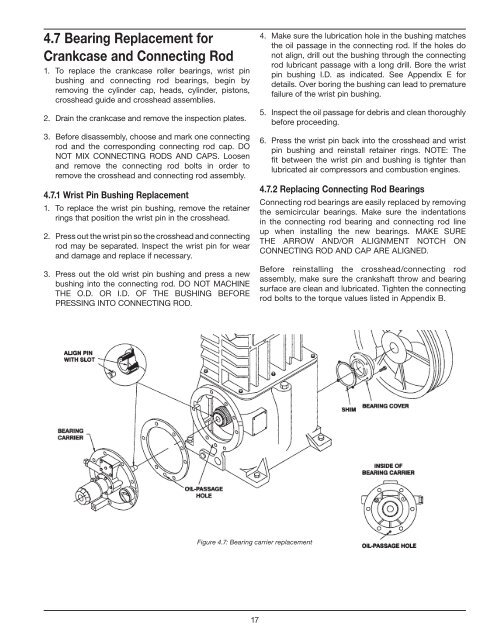
4.7 Bearing Replacement for<br />
Crankcase and Connecting Rod<br />
1. To replace the crankcase roller bearings, wrist pin<br />
bushing and connecting rod bearings, begin by<br />
removing the cylinder cap, heads, cylinder, pistons,<br />
crosshead guide and crosshead assemblies.<br />
2. Drain the crankcase and remove the inspection plates.<br />
3. Before disassembly, choose and mark one connecting<br />
rod and the corresponding connecting rod cap. DO<br />
NOT MIX CONNECTING RODS AND CAPS. Loosen<br />
and remove the connecting rod bolts in order to<br />
remove the crosshead and connecting rod assembly.<br />
4.7.1 Wrist Pin Bushing Replacement<br />
1. To replace the wrist pin bushing, remove the retainer<br />
rings that position the wrist pin in the crosshead.<br />
2. Press out the wrist pin so the crosshead and connecting<br />
rod may be separated. Inspect the wrist pin for wear<br />
and damage and replace if necessary.<br />
3. Press out the old wrist pin bushing and press a new<br />
bushing into the connecting rod. DO NOT MACHINE<br />
THE O.D. OR I.D. OF THE BUSHING BEFORE<br />
PRESSING INTO CONNECTING ROD.<br />
4. Make sure the lubrication hole in the bushing matches<br />
the oil passage in the connecting rod. If the holes do<br />
not align, drill out the bushing through the connecting<br />
rod lubricant passage with a long drill. Bore the wrist<br />
pin bushing I.D. as indicated. See Appendix E for<br />
details. Over boring the bushing can lead to premature<br />
failure of the wrist pin bushing.<br />
5. Inspect the oil passage for debris and clean thoroughly<br />
before proceeding.<br />
6. Press the wrist pin back into the crosshead and wrist<br />
pin bushing and reinstall retainer rings. NOTE: The<br />
fit between the wrist pin and bushing is tighter than<br />
lubricated air compressors and combustion engines.<br />
4.7.2 Replacing Connecting Rod Bearings<br />
Connecting rod bearings are easily replaced by removing<br />
the semicircular bearings. Make sure the indentations<br />
in the connecting rod bearing and connecting rod line<br />
up when installing the new bearings. MAKE SURE<br />
THE ARROW AND/OR ALIGNMENT NOTCH ON<br />
CONNECTING ROD AND CAP ARE ALIGNED.<br />
Before reinstalling the crosshead/connecting rod<br />
assembly, make sure the crankshaft throw and bearing<br />
surface are clean and lubricated. Tighten the connecting<br />
rod bolts to the torque values listed in Appendix B.<br />
Figure 4.7: Bearing carrier replacement<br />
17