Innovision Spintec Lightweight Rain Deflector user manual - Talamas
Innovision Spintec Lightweight Rain Deflector user manual - Talamas
Innovision Spintec Lightweight Rain Deflector user manual - Talamas
You also want an ePaper? Increase the reach of your titles
YUMPU automatically turns print PDFs into web optimized ePapers that Google loves.
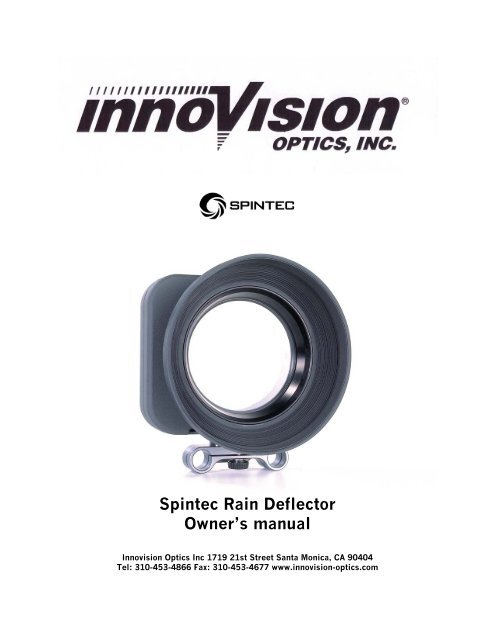
<strong>Spintec</strong> <strong>Rain</strong> <strong>Deflector</strong><br />
Owner’s <strong>manual</strong><br />
<strong>Innovision</strong> Optics Inc 1719 21st Street Santa Monica, CA 90404<br />
Tel: 310-453-4866 Fax: 310-453-4677 www.innovision-optics.com
Letter from the inventor.<br />
Dear Cameraman,<br />
For the past 19 years I have operated in the field as cameraman and producer. One of my major<br />
frustrations was a raindrop hitting the lens of my camera. This visual disturbance was<br />
unacceptable.<br />
As we all know, television creates the illusion that there is nothing between the viewer and the<br />
action. One drop of rain scatters that illusion. Time and again that disturbance forced me to stop<br />
shooting an clean the lens. A few moments later I had to do it all over again. Therefore, using my<br />
experience as a news cameraman and producer, I set myself the goal to look for a solution that<br />
would give me a real time solution to get rid of that disturbance.<br />
The technology available for at least 20 years was the use of a spinning glass in front of the lens.<br />
This did an excellent job of cleaning the lens in real time, but it resulted in a big piece of<br />
equipment that required a separate power source and had a very strong gyro effect. It made those<br />
devices unsuitable for day-to-day use.<br />
For three years I worked on the development of a device that would give me a total solution. It had<br />
to protect the camera against rain and snow, and at the same time block any interference of water<br />
drops or snow flakes with the optics.<br />
I’m very happy that I achieved this with the RD series. I hope that all my fellow cameramen will<br />
accept this, and help me make this problem a thing of the past.<br />
Sincerely,<br />
Daniel Sherwin<br />
Description<br />
The <strong>Rain</strong> <strong>Deflector</strong> was designed using the highest quality standards and materials to ensure the<br />
delivery of a product with long life and reliable performance.<br />
The most important features of this <strong>Rain</strong> <strong>Deflector</strong> are the complete absence of any gyro effect<br />
and, since it is light, a minimal inertia, and a low power consumption. All these features make it a<br />
very handy tool.<br />
We understand that speed is of essence. Therefore we made the <strong>Rain</strong> <strong>Deflector</strong> snap on the lens or<br />
mount on rods. The included rain cover protects the camera. The battery of the camera powers<br />
the unit. The housing is equipped with a sun cover to contain spun off water.
Read this first.<br />
1. The <strong>Spintec</strong> <strong>Rain</strong> <strong>Deflector</strong> is an electro-mechanical device. Please handle with care.<br />
2. Read instructions.<br />
All the safety and operating instructions should be read before the <strong>Spintec</strong> <strong>Rain</strong> <strong>Deflector</strong> is<br />
operated.<br />
3. Retain Instructions.<br />
The safety and operating instructions should be retained for future reference.<br />
4. Heed Cautions.<br />
All warnings on the <strong>Spintec</strong> <strong>Rain</strong> <strong>Deflector</strong> and in the operating <strong>manual</strong> should be adhered to.<br />
5. Follow instructions.<br />
All operating and use instructions should be followed.<br />
Set up.<br />
Requirements for set up.<br />
Before you take your <strong>Spintec</strong> <strong>Rain</strong> <strong>Deflector</strong> out of the box, locate the following parts:<br />
• <strong>Rain</strong> <strong>Deflector</strong><br />
• Snap-on rings (3)<br />
• Camera rain cover<br />
• Power cable (open ended)<br />
• Lens cap (front and back)<br />
Installing the <strong>Spintec</strong> <strong>Rain</strong> <strong>Deflector</strong><br />
Lenses with internal or external focus require a different procedure.<br />
External focus<br />
Since the front ring of a lens with external focus turns, the clip-on feature cannot be used. Instead<br />
use standard ARRI or Chrosziel 15 mm rods.<br />
1. Attaching the rod support bracket.<br />
• Take off the back lens cover.<br />
• Place the bracket onto the back of the <strong>Rain</strong> <strong>Deflector</strong>, making sure that the screw grooves are<br />
facing you.<br />
• Use a 1.5 mm Phillips screwdriver to tighten the 5 screws (provided).
Set up (cont.)<br />
2. Adjusting the brackets and the rods.<br />
Caution: Make sure that the <strong>Rain</strong> <strong>Deflector</strong> easily slides over the lens.<br />
• Use an M3 Allen wrench to adjust the height of the <strong>Rain</strong> <strong>Deflector</strong> to the center diameter of the<br />
lens.<br />
• Move the rods for side-by-side adjustment.<br />
• Tighten the clamping screw to secure the <strong>Rain</strong> <strong>Deflector</strong>.<br />
3. Inserting the <strong>Rain</strong> <strong>Deflector</strong> into the rain cover.<br />
• Put the lens cover back on. This avoids making fingerprints on the filter glass while installing<br />
the <strong>Rain</strong> <strong>Deflector</strong>. It also makes it easier to unscrew the sunshade.<br />
• Unscrew the sunshade and the clip-on locking knob. You do not need the latter for this<br />
application.<br />
• From the inside insert the <strong>Rain</strong> <strong>Deflector</strong> into the rubber frame of the camera rain cover. Make<br />
sure both draining holes of the <strong>Rain</strong> <strong>Deflector</strong> line up with those of the rain cover. The rubber<br />
of the rain cover should sit snug around the <strong>Rain</strong> <strong>Deflector</strong>.<br />
• Screw the sunshade back on (approximately 3 ½ turns). Do not force the sunshade onto the<br />
<strong>Rain</strong> <strong>Deflector</strong> as this may damage the threads. Before tightening, make sure the rubber of the<br />
rain cover is not squeezed between the <strong>Rain</strong> <strong>Deflector</strong> and the sunshade.<br />
4. Inserting the cable.<br />
• Solder the appropriate connector onto the open end of the cable. Shorten the cable if<br />
necessary. There is no difference between polarities.<br />
• Thread the cable through the loops on the inside of the rain cover. Close the Velcro loop to<br />
secure the cable.<br />
• Connect the Limo to the <strong>Rain</strong> <strong>Deflector</strong>.<br />
5. Mounting the <strong>Rain</strong> <strong>Deflector</strong>.<br />
• Turn the focus to its extended position.<br />
• Take off the back cover.<br />
• Slowly slide the <strong>Rain</strong> <strong>Deflector</strong> onto the rods. Make sure there is no contact between the<br />
spinning glass and the lens frame.<br />
Caution: Any contact, however slight, between the lens front and the rotating filter will damage<br />
the filter beyond repair.<br />
• Tighten the clamping screw to secure the <strong>Rain</strong> <strong>Deflector</strong>.<br />
6. Finishing.<br />
• Wrap the rain cover over the camera, while inserting the cable connector into the power<br />
source.<br />
• Take off the front lens cover.
Set up (cont.)<br />
Internal focus:<br />
1. Inserting the <strong>Rain</strong> <strong>Deflector</strong> into the rain cover.<br />
• Leave the lens covers on. This avoids making fingerprints on the filter glass while installing the<br />
<strong>Rain</strong> <strong>Deflector</strong>. It also makes it easier to unscrew the sunshade.<br />
• Unscrew the sunshade and the clip-on locking knob.<br />
• From the inside insert the <strong>Rain</strong> <strong>Deflector</strong> into the rubber frame of the camera rain cover. Make<br />
sure both draining holes of the <strong>Rain</strong> <strong>Deflector</strong> line up with those of the rain cover. The rubber<br />
of the rain cover should sit snug around the <strong>Rain</strong> <strong>Deflector</strong>.<br />
• Screw the sunshade back on (approximately 3 ½ turns). Do not force the sunshade onto the<br />
<strong>Rain</strong> <strong>Deflector</strong> as this may damage the threads. Before tightening, make sure the rubber of the<br />
rain cover is not squeezed between the <strong>Rain</strong> <strong>Deflector</strong> and the sunshade.<br />
• Insert the clip-on locking knob.<br />
2. Inserting the cable.<br />
• Solder the appropriate connector onto the open end of the cable. Shorten the cable if<br />
necessary. There is no difference between polarities.<br />
• Thread the cable through the loops on the inside of the rain cover. Close the Velcro loop to<br />
secure the cable.<br />
• Connect the Limo to the <strong>Rain</strong> <strong>Deflector</strong>.<br />
3. Step-down ring.<br />
• Slide the appropriate step-down ring over the front of the lens.<br />
Caution: Make sure the stop rim is facing the front of the lens.<br />
4. Mounting the <strong>Rain</strong> <strong>Deflector</strong>.<br />
• Take off the back lens cover.<br />
• Slide the <strong>Rain</strong> <strong>Deflector</strong> over the step-down ring.<br />
Caution: If mounted correctly, there will be no contact between the spinning glass and the lens<br />
frame. Any contact, however slight, between the lens front and the rotating filter will damage<br />
the filter beyond repair.<br />
• Firmly tighten the locking knob.<br />
5. Finishing.<br />
• Wrap the rain cover over the camera, while inserting the cable connector into the power<br />
source.<br />
• Take off the front lens cover.
Operation.<br />
Start the <strong>Rain</strong> <strong>Deflector</strong> by using the on/off switch on the left side of the unit.<br />
The <strong>Rain</strong> <strong>Deflector</strong> makes a slight noise and slightly vibrates while in operation. This is normal.<br />
Guidelines:<br />
• Do not touch the glass while it is spinning.<br />
• Do not use the <strong>Spintec</strong> <strong>Rain</strong> <strong>Deflector</strong> under water.<br />
Storage.<br />
• Disconnect the power plug.<br />
• Fold back the rain cover.<br />
• Unscrew the clamping screw or the locking knob.<br />
• Slide off the <strong>Rain</strong> <strong>Deflector</strong> from the camera.<br />
• Shake off the excess water.<br />
• Attach the front and back lens covers.<br />
Note: There is no need to dismantle the <strong>Rain</strong> <strong>Deflector</strong> from the rain cover for storage.<br />
Cleaning the rotating filter.<br />
Caution: Do not attempt cleaning the filter while the <strong>Rain</strong> <strong>Deflector</strong> is mounted on the camera.<br />
• Unscrew the sunshade.<br />
• Take off the back lens cover.<br />
• Simply push on the rim of the glass filter, while slightly rotating. The glass will pop free from<br />
the driving wheels. Take out the filter.<br />
• Use soap and water to rinse.<br />
Caution: Do not apply excessive pressure to the black ring of the glass, as you may damage it.<br />
• Carefully insert the filter between the four driving wheels by slightly rotating the filter.<br />
Note: Apply light pressure on the black ring of the glass. This will prevent smearing of the<br />
filter glass.<br />
Caution: Do not attempt to clean the glass while it is spinning. It may cause injury.<br />
• Put the back lens cover on.<br />
• Screw the sunshade on.<br />
Recommendation: If seawater has hit the <strong>Rain</strong> <strong>Deflector</strong>, let it spin while spraying clean water on<br />
the filter. This will clean out the salt water inside the case via the drain holes and thus avoid<br />
corrosion.
Technical specifications.<br />
Dimensions: 142 mm (W) x 120 mm (H) x 38 mm (D)<br />
Power: DC between 10.8 V and 12 V @ 700 mA<br />
Weight: 437g (excluding bracket and rain cover)<br />
Noise: 40 dB maximum<br />
Operating Temperature: -20º C to + 35º C<br />
Speed of spinning glass: over 50 rps (3000 rpm) at 12 V<br />
Mounting: Clip-on for internal focus<br />
Bracket to use with 15 mm rods for external focus<br />
<strong>Rain</strong> cover: custom made and manufactured by Kata for <strong>Spintec</strong>.<br />
Attachments.<br />
Do not use attachments not recommended by Spin Technologies, Inc., as they may cause<br />
hazards.<br />
Limited Warranty.<br />
During the warranty period, any defective parts will be replaced if the unit is brought in, or<br />
delivered to a Spin Technologies Inc. Service Center.<br />
To obtain warranty service you must ship the unit collect to <strong>Spintec</strong>, 205 Ben Zait Street,<br />
Jerusalem, Israel, email: daniel@spintec.co.il, or deliver it to your dealer in either the original<br />
package or a similar package that will offer the same degree of protection.<br />
This warranty does not cover a unit<br />
• That has been previously altered, repaired or serviced by anyone other than a dealer or<br />
<strong>Spintec</strong>.<br />
• That has been subject to mishandling in transit, accident, misuse, vandalism, neglect, abuse,<br />
lack of reasonable care (including rental to others) or operated contrary to the instructions<br />
contained in the accompanying <strong>manual</strong>.<br />
• On which the serial number has been altered or removed.<br />
This warranty is valid worldwide and applies to product purchased from a Spin Technologies Inc.<br />
dealer. You must retain the dealer’s dated bill of sales as evidence of the date of purchase.<br />
Repair and replacement as provided under this warranty are the exclusive remedy of the<br />
purchaser. Spin Technologies Inc. shall not be liable for any incidental or consequential damages<br />
resulting from the use of the unit or arising out of any breach of any express or implied warranty<br />
on this product. All expressed and implied warranties, including the warranties of merchantability<br />
and fitness for a particular purpose, are limited to the one-year warranty period.
Registration Card.<br />
Model No.:<br />
Serial No.:<br />
Date of Purchase:<br />
Purchased from:<br />
Address:<br />
Your Name:<br />
Address:<br />
Your facility is A: TV Station/Cable; B: Corporate/Industrial; C: Educational; D: Rental: E: Other<br />
Number of cameras at your facility for outdoors use?<br />
What kind of lenses do you use?<br />
What features would you like to add or change to improve <strong>Spintec</strong>’s <strong>Rain</strong> <strong>Deflector</strong>?<br />
We would like to hear from you. If you have access to the Internet, we would appreciate you filling<br />
out a registration on line. We would like to know what for and where you use the <strong>Spintec</strong> <strong>Rain</strong><br />
<strong>Deflector</strong>. If not we would appreciate that you mail us the enclosed registration card.<br />
If you like to submit an article for our web site about your production with the <strong>Spintec</strong> <strong>Rain</strong><br />
<strong>Deflector</strong> please email to peter@spintec.co.il.


