

Chairside Magazine Volume 2, Issue 1 - Glidewell Dental Labs
Chairside Magazine Volume 2, Issue 1 - Glidewell Dental Labs
Chairside Magazine Volume 2, Issue 1 - Glidewell Dental Labs

You also want an ePaper? Increase the reach of your titles
YUMPU automatically turns print PDFs into web optimized ePapers that Google loves.
No-Prep vs. Minimal-Prep Veneers on the Same Patient<br />
No-Prep vs. Minimal-Prep Veneers on the Same Patient<br />
Figure 1<br />
Figure 2 Figure 3<br />
Figure 5<br />
Figure 6 Figure 7<br />
Figure 4<br />
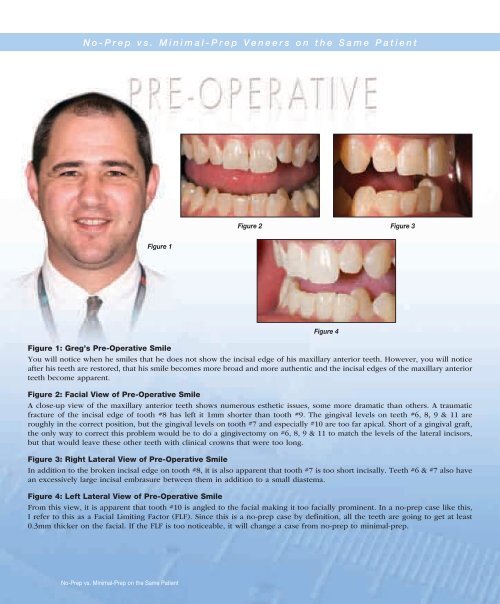
Figure 1: Greg’s Pre-Operative Smile<br />
You will notice when he smiles that he does not show the incisal edge of his maxillary anterior teeth. However, you will notice<br />
after his teeth are restored, that his smile becomes more broad and more authentic and the incisal edges of the maxillary anterior<br />
teeth become apparent.<br />
Figure 2: Facial View of Pre-Operative Smile<br />
A close-up view of the maxillary anterior teeth shows numerous esthetic issues, some more dramatic than others. A traumatic<br />
fracture of the incisal edge of tooth #8 has left it 1mm shorter than tooth #9. The gingival levels on teeth #6, 8, 9 & 11 are<br />
roughly in the correct position, but the gingival levels on tooth #7 and especially #10 are too far apical. Short of a gingival graft,<br />
the only way to correct this problem would be to do a gingivectomy on #6, 8, 9 & 11 to match the levels of the lateral incisors,<br />
but that would leave these other teeth with clinical crowns that were too long.<br />
Figure 3: Right Lateral View of Pre-Operative Smile<br />
In addition to the broken incisal edge on tooth #8, it is also apparent that tooth #7 is too short incisally. Teeth #6 & #7 also have<br />
an excessively large incisal embrasure between them in addition to a small diastema.<br />
Figure 4: Left Lateral View of Pre-Operative Smile<br />
From this view, it is apparent that tooth #10 is angled to the facial making it too facially prominent. In a no-prep case like this,<br />
I refer to this as a Facial Limiting Factor (FLF). Since this is a no-prep case by definition, all the teeth are going to get at least<br />
0.3mm thicker on the facial. If the FLF is too noticeable, it will change a case from no-prep to minimal-prep.<br />
Figure 8<br />
Figure 5: Greg’s Smile After No-Prep Veneers<br />
Notice how his smile is now a full smile with his lower lip paralleling the incisal edges of the maxillary anterior teeth. Like many<br />
patients, being happy with their anterior teeth leads to more natural smiles.<br />
Figure 6: Facial View of Post-Operative No-Prep Veneer Smile<br />
I think we can all agree there has been a dramatic improvement from figure 2 to this picture. Essentially, all of the cosmetic<br />
objections the patient originally had have been eliminated by the no-prep veneers. Interestingly, even our FLF has been somewhat<br />
nullified by the no-prep veneer. Because tooth #10 was so short, the ceramist was able to increase its length while bringing<br />
the incisal edge back toward the lingual. This has created an illusion that #10 is not as facially prominent as it actually is. The<br />
only time I see this happen is when the FLF tooth is lengthened by the ceramist.<br />
Figure 7: Right Lateral View of Post-Operative No-Prep Veneer Smile<br />
Compare this picture with figure 3 and note the multiple esthetic improvements. For example, the incisal embrasure between<br />
teeth #6 & #7 that was too far open in figure 3 has been closed in figure 7. The deficient distal-marginal ridge on tooth #6 has<br />
been corrected in figure 7 giving tooth #6 a more pleasing overall shape and appearance. The broken incisal edge on tooth #8<br />
has also been corrected.<br />
Figure 8: Left Lateral View of Post-Operative No-Prep Veneer Smile<br />
Compare this photo with figure 4 and note the multiple esthetic improvements. For example, the insufficient length of tooth<br />
#10 has been corrected. Tooth #9 was a concern to me because the tooth was nearly ideal prior to treatment. Placing a no-prep<br />
veneer on this tooth would not make it look any better, except that the shade will blend in with the adjacent teeth. In figure 8<br />
however, tooth #9 does not appear to be too large. We also dodged a bullet on tooth #10, which was facially prominent prior<br />
to treatment, as it blends in reasonably well. Í<br />
No-Prep vs. Minimal-Prep on the Same Patient<br />
No-Prep vs. Minimal-Prep on the Same Patient


