User Manual AV6**D Digital Series RV6**D ... - Toshiba-OM.net
User Manual AV6**D Digital Series RV6**D ... - Toshiba-OM.net
User Manual AV6**D Digital Series RV6**D ... - Toshiba-OM.net

Create successful ePaper yourself
Turn your PDF publications into a flip-book with our unique Google optimized e-Paper software.
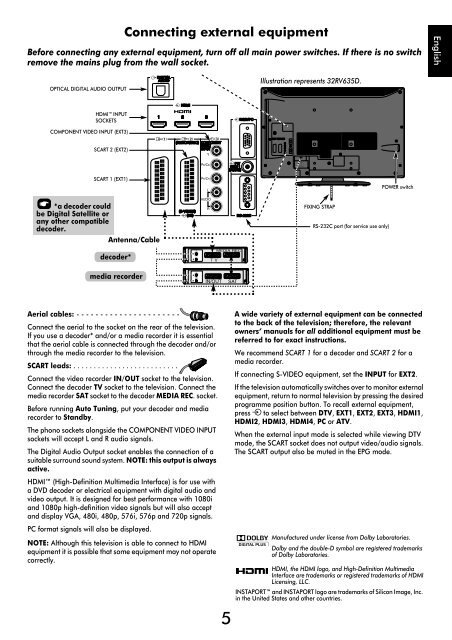
Connecting external equipment<br />
Before connecting any external equipment, turn off all main power switches. If there is no switch<br />
remove the mains plug from the wall socket.<br />
English<br />
OPTICAL DIGITAL AUDIO OUTPUT<br />
Illustration represents 32RV635D.<br />
HDMI INPUT<br />
SOCKETS<br />
C<strong>OM</strong>PONENT VIDEO INPUT (EXT3)<br />
SCART 2 (EXT2)<br />
SCART 1 (EXT1)<br />
POWER switch<br />
*a decoder could<br />
be <strong>Digital</strong> Satellite or<br />
any other compatible<br />
decoder.<br />
Antenna/Cable<br />
FIXING STRAP<br />
RS-232C port (for service use only)<br />
decoder*<br />
media recorder<br />
Aerial cables: - - - - - - - - - - - - - - - - - - - - - -<br />
Connect the aerial to the socket on the rear of the television.<br />
If you use a decoder* and/or a media recorder it is essential<br />
that the aerial cable is connected through the decoder and/or<br />
through the media recorder to the television.<br />
SCART leads: . . . . . . . . . . . . . . . . . . . . . . . . . .<br />
Connect the video recorder IN/OUT socket to the television.<br />
Connect the decoder TV socket to the television. Connect the<br />
media recorder SAT socket to the decoder MEDIA REC. socket.<br />
Before running Auto Tuning, put your decoder and media<br />
recorder to Standby.<br />
The phono sockets alongside the C<strong>OM</strong>PONENT VIDEO INPUT<br />
sockets will accept L and R audio signals.<br />
The <strong>Digital</strong> Audio Output socket enables the connection of a<br />
suitable surround sound system. NOTE: this output is always<br />
active.<br />
HDMI (High-Definition Multimedia Interface) is for use with<br />
a DVD decoder or electrical equipment with digital audio and<br />
video output. It is designed for best performance with 1080i<br />
and 1080p high-definition video signals but will also accept<br />
and display VGA, 480i, 480p, 576i, 576p and 720p signals.<br />
PC format signals will also be displayed.<br />
NOTE: Although this television is able to connect to HDMI<br />
equipment it is possible that some equipment may not operate<br />
correctly.<br />
5<br />
A wide variety of external equipment can be connected<br />
to the back of the television; therefore, the relevant<br />
owners’ manuals for all additional equipment must be<br />
referred to for exact instructions.<br />
We recommend SCART 1 for a decoder and SCART 2 for a<br />
media recorder.<br />
If connecting S-VIDEO equipment, set the INPUT for EXT2.<br />
If the television automatically switches over to monitor external<br />
equipment, return to normal television by pressing the desired<br />
programme position button. To recall external equipment,<br />
press o to select between DTV, EXT1, EXT2, EXT3, HDMI1,<br />
HDMI2, HDMI3, HDMI4, PC or ATV.<br />
When the external input mode is selected while viewing DTV<br />
mode, the SCART socket does not output video/audio signals.<br />
The SCART output also be muted in the EPG mode.<br />
If r button is pressed while viewing DTV mode, the picture<br />
on your screen and the SCART output will become a still<br />
picture.<br />
Manufactured under license from Dolby Laboratories.<br />
Dolby and the double-D symbol are registered trademarks<br />
of Dolby Laboratories.<br />
HDMI, the HDMI logo, and High-Definition Multimedia<br />
Interface are trademarks or registered trademarks of HDMI<br />
Licensing, LLC.<br />
INSTAPORT and INSTAPORT logo are trademarks of Silicon Image, Inc.<br />
in the United States and other countries.