Lesson 42 Create a Flock of Birds, One Pinch Pot at a time
Lesson 42 Create a Flock of Birds, One Pinch Pot at a time
Lesson 42 Create a Flock of Birds, One Pinch Pot at a time

Create successful ePaper yourself
Turn your PDF publications into a flip-book with our unique Google optimized e-Paper software.
tools & M<strong>at</strong>erials<br />
l AMACO® Low Fire Clay (White #25 or Red #67)<br />
Optional: AMACO® air dry clays—<br />
Mexican <strong>Pot</strong>tery Clay (Red), Marblex (Gray) or<br />
Stonex (White)<br />
l Scoring Tools or Forks<br />
l Flexible Serr<strong>at</strong>ed Ribs<br />
l Sureform or Clay Shredder<br />
l Flexible Rubber Ribs<br />
l Small Drill Bit or Needle Tool<br />
l Small Paddles or Wooden Spoons<br />
l Sponges<br />
l Newspaper for Glazing<br />
l AMACO® LM Low Fire M<strong>at</strong>t Glazes<br />
l S<strong>of</strong>t N<strong>at</strong>ural-Hair Brushes<br />
l W<strong>at</strong>er to Clean Bisque<br />
<strong>Lesson</strong> Plan Goals and Objectives<br />
l Students will cre<strong>at</strong>e a hollow bird using pinch and coil<br />
methods, refine the surface, and then personalize with<br />
texture and glazes.<br />
l Students will learn to transl<strong>at</strong>e perceived 2-D volume to a<br />
3-dimensional form.<br />
l The lesson integr<strong>at</strong>es n<strong>at</strong>ural history with art.<br />
This lesson is suitable for all ages.<br />
N<strong>at</strong>ional Visual Arts Standards<br />
l Understanding and applying media, techniques<br />
and processes.<br />
l Making connections between visual arts and other<br />
disciplines.<br />
l Using knowledge <strong>of</strong> structures and functions.<br />
l Reflecting upon and assessing the characteristics <strong>of</strong> artwork.<br />
l Choosing a range <strong>of</strong> subject m<strong>at</strong>ter, symbols and ideas.<br />
Technique<br />
Each student gets a half-pound ball <strong>of</strong> clay<br />
1 3<br />
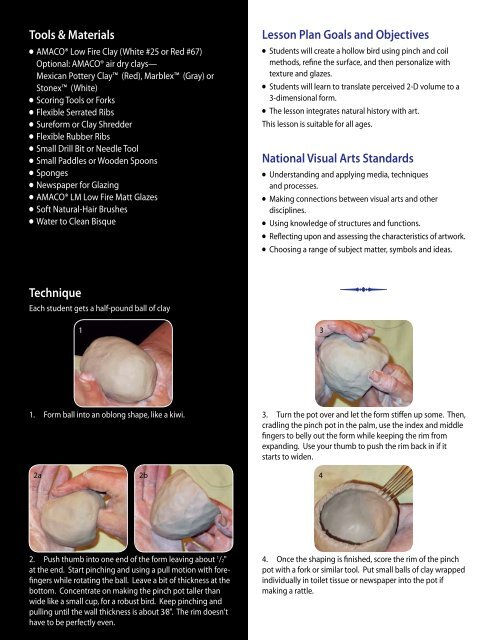
1. Form ball into an oblong shape, like a kiwi.<br />
3. Turn the pot over and let the form stiffen up some. Then,<br />
cradling the pinch pot in the palm, use the index and middle<br />
fingers to belly out the form while keeping the rim from<br />
expanding. Use your thumb to push the rim back in if it<br />
starts to widen.<br />
2a<br />
2b<br />
4<br />
2. Push thumb into one end <strong>of</strong> the form leaving about 1 /2"<br />
<strong>at</strong> the end. Start pinching and using a pull motion with forefingers<br />
while rot<strong>at</strong>ing the ball. Leave a bit <strong>of</strong> thickness <strong>at</strong> the<br />
bottom. Concentr<strong>at</strong>e on making the pinch pot taller than<br />
wide like a small cup, for a robust bird. Keep pinching and<br />
pulling until the wall thickness is about 3⁄8". The rim doesn't<br />
have to be perfectly even.<br />
4. Once the shaping is finished, score the rim <strong>of</strong> the pinch<br />
pot with a fork or similar tool. Put small balls <strong>of</strong> clay wrapped<br />
individually in toilet tissue or newspaper into the pot if<br />
making a r<strong>at</strong>tle.