Lesson 42 Create a Flock of Birds, One Pinch Pot at a time
Lesson 42 Create a Flock of Birds, One Pinch Pot at a time
Lesson 42 Create a Flock of Birds, One Pinch Pot at a time

Create successful ePaper yourself
Turn your PDF publications into a flip-book with our unique Google optimized e-Paper software.
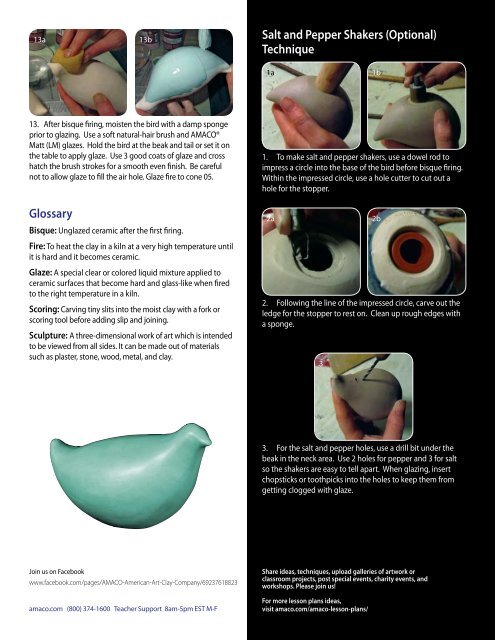
13a<br />
13b<br />
Salt and Pepper Shakers (Optional)<br />
Technique<br />
1a<br />
1b<br />
13. After bisque firing, moisten the bird with a damp sponge<br />
prior to glazing. Use a s<strong>of</strong>t n<strong>at</strong>ural-hair brush and AMACO®<br />
M<strong>at</strong>t (LM) glazes. Hold the bird <strong>at</strong> the beak and tail or set it on<br />
the table to apply glaze. Use 3 good co<strong>at</strong>s <strong>of</strong> glaze and cross<br />
h<strong>at</strong>ch the brush strokes for a smooth even finish. Be careful<br />
not to allow glaze to fill the air hole. Glaze fire to cone 05.<br />
1. To make salt and pepper shakers, use a dowel rod to<br />
impress a circle into the base <strong>of</strong> the bird before bisque firing.<br />
Within the impressed circle, use a hole cutter to cut out a<br />
hole for the stopper.<br />
Glossary<br />
Bisque: Unglazed ceramic after the first firing.<br />
Fire: To he<strong>at</strong> the clay in a kiln <strong>at</strong> a very high temper<strong>at</strong>ure until<br />
it is hard and it becomes ceramic.<br />
2a<br />
2b<br />
Glaze: A special clear or colored liquid mixture applied to<br />
ceramic surfaces th<strong>at</strong> become hard and glass-like when fired<br />
to the right temper<strong>at</strong>ure in a kiln.<br />
Scoring: Carving tiny slits into the moist clay with a fork or<br />
scoring tool before adding slip and joining.<br />
Sculpture: A three-dimensional work <strong>of</strong> art which is intended<br />
to be viewed from all sides. It can be made out <strong>of</strong> m<strong>at</strong>erials<br />
such as plaster, stone, wood, metal, and clay.<br />
2. Following the line <strong>of</strong> the impressed circle, carve out the<br />
ledge for the stopper to rest on. Clean up rough edges with<br />
a sponge.<br />
3<br />
3. For the salt and pepper holes, use a drill bit under the<br />
beak in the neck area. Use 2 holes for pepper and 3 for salt<br />
so the shakers are easy to tell apart. When glazing, insert<br />
chopsticks or toothpicks into the holes to keep them from<br />
getting clogged with glaze.<br />
Join us on Facebook<br />
www.facebook.com/pages/AMACO-American-Art-Clay-Company/69237618823<br />
amaco.com (800) 374-1600 Teacher Support 8am-5pm EST M-F<br />
Share ideas, techniques, upload galleries <strong>of</strong> artwork or<br />
classroom projects, post special events, charity events, and<br />
workshops. Please join us!<br />
For more lesson plans ideas,<br />
visit amaco.com/amaco-lesson-plans/