Lesson 42 Create a Flock of Birds, One Pinch Pot at a time
Lesson 42 Create a Flock of Birds, One Pinch Pot at a time
Lesson 42 Create a Flock of Birds, One Pinch Pot at a time

Create successful ePaper yourself
Turn your PDF publications into a flip-book with our unique Google optimized e-Paper software.
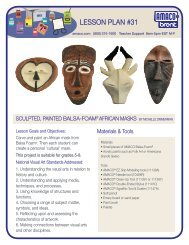
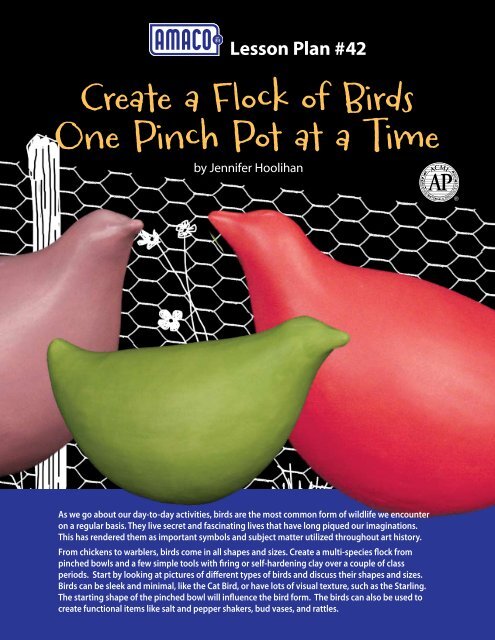
<strong>Lesson</strong> Plan #<strong>42</strong><br />
<strong>Cre<strong>at</strong>e</strong> a <strong>Flock</strong> <strong>of</strong> <strong>Birds</strong><br />
<strong>One</strong> <strong>Pinch</strong> <strong>Pot</strong> <strong>at</strong> a Time<br />
by Jennifer Hoolihan<br />
Jennifer Hoolihan, Asheville NC<br />
As we go about our day-to-day activities, birds are the most common form (Chickens: <strong>of</strong> wildlife LM-53 we encounter<br />
Orchid,<br />
on a regular basis. They live secret and fascin<strong>at</strong>ing lives th<strong>at</strong> have long LM-41 piqued Chartreuse our imagin<strong>at</strong>ions.<br />
, LM-54 Coral)<br />
This has rendered them as important symbols and subject m<strong>at</strong>ter utilized throughout art history.<br />
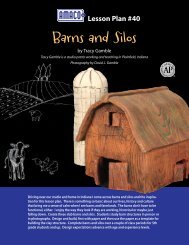
From chickens to warblers, birds come in all shapes and sizes. <strong>Cre<strong>at</strong>e</strong> a multi-species flock from<br />
pinched bowls and a few simple tools with firing or self-hardening clay over a couple <strong>of</strong> class<br />
periods. Start by looking <strong>at</strong> pictures <strong>of</strong> different types <strong>of</strong> birds and discuss their shapes and sizes.<br />
<strong>Birds</strong> can be sleek and minimal, like the C<strong>at</strong> Bird, or have lots <strong>of</strong> visual texture, such as the Starling.<br />
The starting shape <strong>of</strong> the pinched bowl will influence the bird form. The birds can also be used to<br />
cre<strong>at</strong>e functional items like salt and pepper shakers, bud vases, and r<strong>at</strong>tles.
tools & M<strong>at</strong>erials<br />
l AMACO® Low Fire Clay (White #25 or Red #67)<br />
Optional: AMACO® air dry clays—<br />
Mexican <strong>Pot</strong>tery Clay (Red), Marblex (Gray) or<br />
Stonex (White)<br />
l Scoring Tools or Forks<br />
l Flexible Serr<strong>at</strong>ed Ribs<br />
l Sureform or Clay Shredder<br />
l Flexible Rubber Ribs<br />
l Small Drill Bit or Needle Tool<br />
l Small Paddles or Wooden Spoons<br />
l Sponges<br />
l Newspaper for Glazing<br />
l AMACO® LM Low Fire M<strong>at</strong>t Glazes<br />
l S<strong>of</strong>t N<strong>at</strong>ural-Hair Brushes<br />
l W<strong>at</strong>er to Clean Bisque<br />
<strong>Lesson</strong> Plan Goals and Objectives<br />
l Students will cre<strong>at</strong>e a hollow bird using pinch and coil<br />
methods, refine the surface, and then personalize with<br />
texture and glazes.<br />
l Students will learn to transl<strong>at</strong>e perceived 2-D volume to a<br />
3-dimensional form.<br />
l The lesson integr<strong>at</strong>es n<strong>at</strong>ural history with art.<br />
This lesson is suitable for all ages.<br />
N<strong>at</strong>ional Visual Arts Standards<br />
l Understanding and applying media, techniques<br />
and processes.<br />
l Making connections between visual arts and other<br />
disciplines.<br />
l Using knowledge <strong>of</strong> structures and functions.<br />
l Reflecting upon and assessing the characteristics <strong>of</strong> artwork.<br />
l Choosing a range <strong>of</strong> subject m<strong>at</strong>ter, symbols and ideas.<br />
Technique<br />
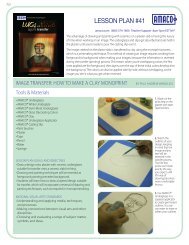
Each student gets a half-pound ball <strong>of</strong> clay<br />
1 3<br />
1. Form ball into an oblong shape, like a kiwi.<br />
3. Turn the pot over and let the form stiffen up some. Then,<br />
cradling the pinch pot in the palm, use the index and middle<br />
fingers to belly out the form while keeping the rim from<br />
expanding. Use your thumb to push the rim back in if it<br />
starts to widen.<br />
2a<br />
2b<br />
4<br />
2. Push thumb into one end <strong>of</strong> the form leaving about 1 /2"<br />
<strong>at</strong> the end. Start pinching and using a pull motion with forefingers<br />
while rot<strong>at</strong>ing the ball. Leave a bit <strong>of</strong> thickness <strong>at</strong> the<br />
bottom. Concentr<strong>at</strong>e on making the pinch pot taller than<br />
wide like a small cup, for a robust bird. Keep pinching and<br />
pulling until the wall thickness is about 3⁄8". The rim doesn't<br />
have to be perfectly even.<br />
4. Once the shaping is finished, score the rim <strong>of</strong> the pinch<br />
pot with a fork or similar tool. Put small balls <strong>of</strong> clay wrapped<br />
individually in toilet tissue or newspaper into the pot if<br />
making a r<strong>at</strong>tle.
5a 5b<br />
9<br />
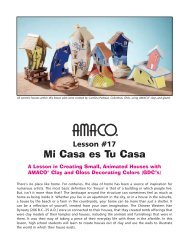
5. Using thumb and forefinger on both hands, push in the<br />
rim until it meets. Be careful not to squish in the sides <strong>of</strong> the<br />
pinch pot.<br />
9. Gently paddle the body <strong>of</strong> the bird to compress the<br />
lumps left from pinching. Tap the base <strong>of</strong> the bird on a fl<strong>at</strong><br />
surface to cre<strong>at</strong>e a resting point.<br />
6a<br />
6b<br />
10a<br />
10b<br />
6. Roll out a coil about the thickness <strong>of</strong> a pencil and long<br />
enough to cover the seam. Slip and score the coil and use it<br />
to fill in and strengthen the seam. Use a serr<strong>at</strong>ed rib or fork<br />
to work the coil into the pinch pot. Smooth out the coil with<br />
fingers or a flexible rib.<br />
10. Allow the bird to harden slightly before refining the<br />
surface. Use a Sureform or clay shredder to scrape out any<br />
lumpiness. Be sure to define the base so the bird will sit without<br />
rocking. Follow up with a finely serr<strong>at</strong>ed rib to cut down<br />
the marks left from the shredder.<br />
7 11<br />
7. Decide which end will be the tail, then smooth and pull<br />
the tail from one end <strong>of</strong> the closed pinch pot. It may be necessary<br />
to pinch a little clay <strong>of</strong>f the tail to keep it from getting too<br />
large. This clay can be added to the other end for the head.<br />
Work the tail into a point and p<strong>at</strong> the rump to round it up.<br />
11. Once the bird has been roughed out with the<br />
serr<strong>at</strong>ed rib, use a damp sponge and flexible rib smooth out<br />
the scr<strong>at</strong>ch marks. This will leave a clean surface ready for<br />
carving in detail or leave the bird smooth for a flawless glaze<br />
finish.<br />
8a 8b<br />
12<br />
8. Smooth and pull the other end into the head. Add small<br />
bits <strong>of</strong> clay to the neck and beak area to get the desired proportions.<br />
Round the beak <strong>at</strong> the end so it will be resistant to<br />
chipping.<br />
12. Use a needle tool to make an air hole near the base <strong>of</strong><br />
the bird. Cover the bird loosely with plastic to allow it to dry<br />
slowly and evenly. If using firing clay, bisque fire when dry to<br />
cone 04. If using air-dry clay, allow to dry <strong>at</strong> room temper<strong>at</strong>ure<br />
and away from he<strong>at</strong> until hard. During drying, rot<strong>at</strong>e<br />
object occasionally so all surfaces are exposed to air. Drying<br />
<strong>time</strong> depends on size and thickness <strong>of</strong> the object.
13a<br />
13b<br />
Salt and Pepper Shakers (Optional)<br />
Technique<br />
1a<br />
1b<br />
13. After bisque firing, moisten the bird with a damp sponge<br />
prior to glazing. Use a s<strong>of</strong>t n<strong>at</strong>ural-hair brush and AMACO®<br />
M<strong>at</strong>t (LM) glazes. Hold the bird <strong>at</strong> the beak and tail or set it on<br />
the table to apply glaze. Use 3 good co<strong>at</strong>s <strong>of</strong> glaze and cross<br />
h<strong>at</strong>ch the brush strokes for a smooth even finish. Be careful<br />
not to allow glaze to fill the air hole. Glaze fire to cone 05.<br />
1. To make salt and pepper shakers, use a dowel rod to<br />
impress a circle into the base <strong>of</strong> the bird before bisque firing.<br />
Within the impressed circle, use a hole cutter to cut out a<br />
hole for the stopper.<br />
Glossary<br />
Bisque: Unglazed ceramic after the first firing.<br />
Fire: To he<strong>at</strong> the clay in a kiln <strong>at</strong> a very high temper<strong>at</strong>ure until<br />
it is hard and it becomes ceramic.<br />
2a<br />
2b<br />
Glaze: A special clear or colored liquid mixture applied to<br />
ceramic surfaces th<strong>at</strong> become hard and glass-like when fired<br />
to the right temper<strong>at</strong>ure in a kiln.<br />
Scoring: Carving tiny slits into the moist clay with a fork or<br />
scoring tool before adding slip and joining.<br />
Sculpture: A three-dimensional work <strong>of</strong> art which is intended<br />
to be viewed from all sides. It can be made out <strong>of</strong> m<strong>at</strong>erials<br />
such as plaster, stone, wood, metal, and clay.<br />
2. Following the line <strong>of</strong> the impressed circle, carve out the<br />
ledge for the stopper to rest on. Clean up rough edges with<br />
a sponge.<br />
3<br />
3. For the salt and pepper holes, use a drill bit under the<br />
beak in the neck area. Use 2 holes for pepper and 3 for salt<br />
so the shakers are easy to tell apart. When glazing, insert<br />
chopsticks or toothpicks into the holes to keep them from<br />
getting clogged with glaze.<br />
Join us on Facebook<br />
www.facebook.com/pages/AMACO-American-Art-Clay-Company/69237618823<br />
amaco.com (800) 374-1600 Teacher Support 8am-5pm EST M-F<br />
Share ideas, techniques, upload galleries <strong>of</strong> artwork or<br />
classroom projects, post special events, charity events, and<br />
workshops. Please join us!<br />
For more lesson plans ideas,<br />
visit amaco.com/amaco-lesson-plans/