Advanced Modules - Directorate General of Employment & Training
Advanced Modules - Directorate General of Employment & Training
Advanced Modules - Directorate General of Employment & Training
You also want an ePaper? Increase the reach of your titles
YUMPU automatically turns print PDFs into web optimized ePapers that Google loves.
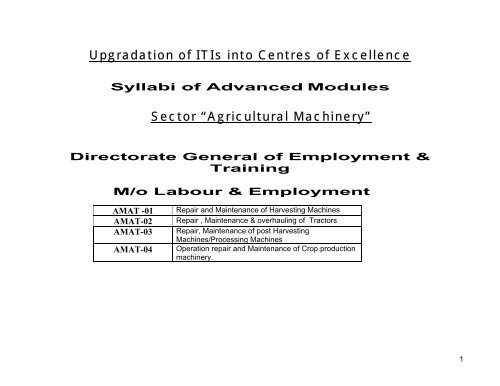
Upgradation <strong>of</strong> ITIs into Centres <strong>of</strong> Excellence<br />
Syllabi <strong>of</strong> <strong>Advanced</strong> <strong>Modules</strong><br />
Sector “Agricultural Machinery”<br />
<strong>Directorate</strong> <strong>General</strong> <strong>of</strong> <strong>Employment</strong> &<br />
<strong>Training</strong><br />
M/o Labour & <strong>Employment</strong><br />
AMAT -01<br />
AMAT-02<br />
AMAT-03<br />
AMAT-04<br />
Repair and Maintenance <strong>of</strong> Harvesting Machines<br />
Repair , Maintenance & overhauling <strong>of</strong> Tractors<br />
Repair, Maintenance <strong>of</strong> post Harvesting<br />
Machines/Processing Machines<br />
Operation repair and Maintenance <strong>of</strong> Crop production<br />
machinery.<br />
1
Upgradation <strong>of</strong> ITIs into Centres <strong>of</strong> Excellence-<br />
Broad guidelines for implementation <strong>of</strong> <strong>Advanced</strong> Module <strong>of</strong> Sector<br />
“Agricultural Machinery”.<br />
These Centres will be providing multiskill training to meet the skill requirement <strong>of</strong> particular sector <strong>of</strong> industry with their active involvement<br />
in all aspects <strong>of</strong> training. The training will be provided in three parts as given below:<br />
♦ <strong>Training</strong> in Basic skill areas for a period <strong>of</strong> one year.<br />
♦ <strong>Training</strong> in <strong>Advanced</strong> modules <strong>of</strong> six months duration after Broad based basic <strong>Training</strong>(BBBT)<br />
♦ Testing & Certification both for the Broad Based Basic <strong>Training</strong> & <strong>Advanced</strong> Module <strong>Training</strong> during subsequent six months will be<br />
conducted under the aegis <strong>of</strong> NCVT .<br />
♦ <strong>Training</strong> in specialized modules mainly by the industry (The course curricula, duration etc will be designed in consultations with the<br />
IMC/local industry). The trade testing & certification for specialized module will be done jointly by the State Government & Industry.<br />
Said certificate will have recognization from NCVT<br />
♦ As per the recommendations <strong>of</strong> the EFC, <strong>Training</strong> in the shop floor should constitute alteast 25-40% <strong>of</strong> the curriculum.<br />
The training programme will have multi-entry and multi-exit provisions as given below:<br />
• trainee can opt to go to the labour market after completing broad based basic training <strong>of</strong> one year duration or after completing<br />
advanced module/s.<br />
• multi-entry and multi-exit provisions would enable a trainee to take admission for advanced/ additional advanced /specialized<br />
module as per his/her need .<br />
Guidelines for <strong>Training</strong> in <strong>Advanced</strong> modules<br />
A minimum <strong>of</strong> three modules would be essentially needed , so as to ensure that all the 96 trainees are accommodated in the<br />
three modules may be selected in consultation with IMC for which in two shifts .<br />
If it is felt that available modules for which the course curricula has been developed at National Level are not sufficient to<br />
cater to the needs <strong>of</strong> local industry in a particular state, States are free to select module as per need in consultation with<br />
industry . They may develop suitable module(s) accordingly in consultations with the industry clearly indicating tool &<br />
equipment list , instructor qualifications , space norms etc. & forward the same to DGE&T for seeking approval <strong>of</strong> NCVT.<br />
A trainee at a time can opt only for one <strong>Advanced</strong> Module .<br />
Admission Criteria, Space requirement, Qualification <strong>of</strong> instructor <strong>of</strong> the various modules <strong>of</strong> “ Agricultural Machinery ”<br />
sector are attached herewith.<br />
2
Admission to <strong>Advanced</strong> Module for the graduates <strong>of</strong> ITI in related trades:<br />
There is a provision for lateral entry for graduates <strong>of</strong> ITIs (NTC /NAC passed outs from conventional system ) <strong>of</strong> the related trades subject to<br />
availability <strong>of</strong> seats in <strong>Advanced</strong> Module. Trades <strong>of</strong> conventional system mentioned against each advanced module in the following statement,<br />
could be <strong>of</strong>fered admission in <strong>Advanced</strong> Module .<br />
Sl.No.<br />
Name <strong>of</strong> the<br />
Module<br />
Admission criteria<br />
Space<br />
requirement<br />
Duration<br />
In Weeks<br />
Qualification/ Status<br />
Of Instructor<br />
AMAT -01 Repair and<br />
Maintenance <strong>of</strong><br />
Harvesting<br />
Machines<br />
AMAT-02 Repair ,<br />
Maintenance &<br />
overhauling <strong>of</strong><br />
Tractors<br />
AMAT-03 Repair,<br />
Maintenance <strong>of</strong><br />
post Harvesting<br />
Machines/Proce<br />
ssing Machines<br />
Operation repair<br />
AMAT-04 and<br />
Maintenance <strong>of</strong><br />
Crop production<br />
machinery<br />
Completed BBBT in Sector Agricultural Machinery or<br />
NTC/NAC in Mechanic Agricultural Machinery trade.<br />
Completed BBBT in Sector Agricultural Machinery or<br />
NTC/NAC in Tractor Mechanic trade.<br />
Completed BBBT in Sector Agricultural Machinery or<br />
NTC/NAC in Mechanic Agricultural Machinery trade.<br />
Completed BBBT in Sector Agricultural Machinery or<br />
NTC/NAC in Mechanic Agricultural Machinery trade.<br />
80 sq m with<br />
separate<br />
parking<br />
space for<br />
bigger<br />
machinery .<br />
24 weeks For modules<br />
AMAT 1 ,2&3<br />
Degree in Agriculture<br />
Engineering with<br />
minimum two years<br />
teaching/industrial<br />
experience in the<br />
relevant field OR<br />
Diploma in Agriculture<br />
Engineering with<br />
minimum four years<br />
teaching/industrial<br />
experience in the<br />
relevant field<br />
3
Module I<br />
Repair and Maintenance <strong>of</strong> Harvesting Machines<br />
Theory<br />
Reapers • Importance <strong>of</strong> Harvesting Mechanization<br />
Vertical Conveyor<br />
Reaper (VCR)<br />
• Role and Importance <strong>of</strong> Reaper<br />
• Types <strong>of</strong> reapers<br />
o Vertical conveyor reaper<br />
o Horizontal conveyor reaper<br />
o Bunch conveying reaper<br />
• Reaper binder<br />
• Components <strong>of</strong> vertical conveyor reaper :<br />
o Cutter bar assembly<br />
o Gathering header assembly<br />
o Vertical Lugged Conveying Belt Assembly<br />
o Power Train Arrangement<br />
o Traction chassis and Mainframe<br />
o Ground wheel and Prime wheel<br />
• Working principle and functions <strong>of</strong> each assembly<br />
Prime Mover • Prime movers used for operation <strong>of</strong> vertical conveyor<br />
reapers<br />
o Tractor - for tractor front mounted reaper<br />
o Engine - for walking and riding type reapers<br />
Common tools • Selection and use <strong>of</strong> various tools e.g.<br />
o Screw driver, pliers, hammers, chisels,<br />
hacksaw, spanners, sockets, cleaning brushes,<br />
pullers etc.<br />
Practicals<br />
• Draw free hand sketches <strong>of</strong> different components <strong>of</strong><br />
reapers<br />
• Field visits to observe harvesting mechanization<br />
• Practice in free hand sketching <strong>of</strong> different assemblies<br />
• Operate the tractor with various controls <strong>of</strong> lifting<br />
and lowering <strong>of</strong> implements<br />
• Fit the reaper with tractor<br />
• Fit the reaper with engine<br />
• Set and adjust the reapers<br />
• Select and use different hand tools for various operations<br />
safely.<br />
4
Selection <strong>of</strong> Vertical<br />
Conveyor reapers<br />
Setting the reapers for<br />
Operation<br />
• Safety considerations<br />
• Criteria for selection <strong>of</strong> VCR<br />
Theory Practicals<br />
• Various factors about crop and field conditions <strong>of</strong> VCR<br />
harvesting<br />
• Preparation <strong>of</strong> check list for selection<br />
• Factors affecting setting <strong>of</strong> reaper<br />
• Method <strong>of</strong> setting <strong>of</strong> reaping attachment<br />
• Method <strong>of</strong> mounting attachment for tractor front<br />
mounted reaper<br />
• Method <strong>of</strong> setting <strong>of</strong> self propelled reaper for field<br />
operation<br />
Field Operation • Importance <strong>of</strong> pre-operational procedures before<br />
operating VCR<br />
• Field patterns to be followed and field preparations made<br />
before working with VCR<br />
• Techniques <strong>of</strong> operation <strong>of</strong> VCR for harvesting any<br />
suitable crop<br />
• Adjust the setting <strong>of</strong> reaping attachment<br />
• Mount the attachment for tractor front mounted reaper<br />
• Set self propelled reaper for field operation<br />
• Check various pre-operation points in reaper and tractor<br />
prior to field operation.<br />
• Operate the VC Reaper in the field with tractor and<br />
engine<br />
• Record the time taken during operation, losses, area<br />
covered in operation<br />
Trouble Shooting <strong>of</strong><br />
Reaper<br />
Maintenance and<br />
repair <strong>of</strong> vertical<br />
• Operating troubles <strong>of</strong> VCR<br />
o The reasons <strong>of</strong> trouble during cut crop and<br />
block discharge, Cutting knife and conveyor belts<br />
stopped, Improper Cutting, Improper conveying<br />
<strong>of</strong> cut crop, Improper Windrows<br />
o The reason for Loss <strong>of</strong> power or<br />
insufficient power, Slippage <strong>of</strong> ground wheel,<br />
Tractor traction unit: Loss <strong>of</strong> power or<br />
insufficient power etc.<br />
• Rectification methods for different problems<br />
• Methods for ensuring trouble free working<br />
• Methods for trouble free working <strong>of</strong> vertical<br />
• Read the operating manual<br />
• Identify problems and rectify<br />
• Observe all safety precautions<br />
• Carry out all maintenance and servicing operations<br />
related to Guards, Conveyor belt, Knife, Star wheel and<br />
5
conveyor reapers.<br />
Crop Parameters for<br />
Harvesting by Vertical<br />
Conveyor Reaper<br />
Off- Season Storage <strong>of</strong><br />
Vertical Conveyor<br />
Reaper (VCR)<br />
Theory Practicals<br />
conveyor reapers by taking proper care <strong>of</strong>:<br />
o Cutter bar, star wheel, pressure spring,<br />
lugs and conveyor belt.<br />
• Crop factors that affect the performance <strong>of</strong> vertical<br />
conveyor<br />
• Factors affect the performance:<br />
o Crop Variety<br />
o Maturity <strong>of</strong> Crop<br />
o Crop Moisture<br />
o Crop Condition<br />
o Crop Density<br />
• Methods <strong>of</strong> <strong>of</strong>f-season storing.<br />
• Steps to be followed in <strong>of</strong>f season storing<br />
tension spring systematically and safely.<br />
• Operate the VCR and record the impact on Crop<br />
Variety<br />
o Maturity <strong>of</strong> crop.<br />
o Crop moisture<br />
o Crop condition<br />
o Crop Density<br />
• Carry out the following operations:<br />
• Clean the machine<br />
• Wipe <strong>of</strong>f remaining water completely<br />
• Lubricate all the moving parts / components.<br />
• Repaint surface where paint has worn <strong>of</strong>f.<br />
• Remove tension from all belts and clean, remove grease,<br />
oil and dirt.<br />
• Store the machine in a dry sheltered place<br />
• Make a list <strong>of</strong> needed repairs<br />
Combine<br />
Combine • Role and importance <strong>of</strong> combine<br />
• Types <strong>of</strong> combines, basic operations<br />
performance components <strong>of</strong> combine<br />
Cutter bar<br />
Reel<br />
Auger<br />
Knife and its drive<br />
Identify different component<br />
6
Theory Practicals<br />
• Mode <strong>of</strong> operation • Drive operates <strong>of</strong> combine with various controls.<br />
Adjustments <strong>of</strong><br />
Combine<br />
• Criteria for adjustment <strong>of</strong> reel –vertical<br />
• Angle adjustment <strong>of</strong> rod<br />
• Horizontal adjustment<br />
• Reel speed<br />
• Auger adjustment<br />
• Knife stroke<br />
• Blade up & down adjustment<br />
• Alignment <strong>of</strong> fingers<br />
• Perform all adjustments <strong>of</strong> the Combine and set reel<br />
speed.<br />
Repair & maintenance • Trouble shooting techniques<br />
• Safety regulation.<br />
• Read and use the operation Manual<br />
• Identify & rectify problems<br />
• Observe all safety precautions<br />
Off season storage <strong>of</strong><br />
combine<br />
• Methods <strong>of</strong> <strong>of</strong>f-season storing.<br />
• Steps to be followed in <strong>of</strong>f season storing<br />
• Carry out the following operations:<br />
• Clean the machine<br />
• Wipe <strong>of</strong>f remaining water completely<br />
• Lubricate all the moving parts / components.<br />
• Repaint surface where paint has worn <strong>of</strong>f.<br />
• Remove tension from all belts and clean, remove grease,<br />
oil and dirt.<br />
• Store the machine in a dry sheltered place<br />
• Make a list <strong>of</strong> needed repairs<br />
7
Theory Practicals<br />
Tractor drawn ground nut digger<br />
Ground nut Digger • Need and importance <strong>of</strong> ground nut digger<br />
• Types <strong>of</strong> diggers<br />
• Components <strong>of</strong> ground nut digger, working<br />
principle and its functions.<br />
• Field visit<br />
Field operation • Important pre-operational procedure before<br />
operating ground nut digger<br />
• Check various pre-operation points in digger and tractor<br />
prior to field operations<br />
• Operate the ground nut digger in the field with tractor<br />
• Record the time taken during operation, losses, area<br />
covered in operation<br />
Trouble shooting <strong>of</strong><br />
ground nut digger<br />
• Commons troubles and its causes. Read the<br />
• Rectification method.<br />
• Read instructional Manual<br />
• Identify problems and rectify<br />
• Observe all safety precautions<br />
• Carry out maintenance and servicing<br />
Potato Digger – Tractor operated<br />
Potato Digger • Types<br />
• Components<br />
• Working principle and functions <strong>of</strong> each<br />
assembly<br />
Field operation • Important pre-operational procedure before<br />
operating<br />
• Field patterns to be followed<br />
• Techniques <strong>of</strong> operation<br />
• Check various pre-operational points in potato digger<br />
prior to field operation<br />
• Operate the potato digger with tractor<br />
• Record the time taken during operation, loses, area<br />
covered in operation<br />
8
Theory Practicals<br />
Repair & maintenance • Commons troubles and its causes. Read the<br />
• Rectification methods.<br />
• Read instructional Manual<br />
• Read and use the operation manual<br />
• Identify problems and rectify<br />
• Observe all safety precautions<br />
• Carry out all maintenance and servicing<br />
9
List <strong>of</strong> equipment, tools and instruments<br />
Sl. No. Item/ Specification Quantity proposed for a<br />
batch <strong>of</strong> 16 trainees<br />
1. Animal drawn reaper 2<br />
2. Self propelled riding type Reaper 2<br />
3. Vertical Conveyor Reaper 2<br />
4. Side mounted reaper 2<br />
5. Tractor rear mounted reaper 2<br />
6. Cutter bar assembly 4<br />
7. Gathering-header Assembly 4<br />
8. Vertical lugged conveying belt Assembly 2<br />
9. Traction chassis and Mainframe 2<br />
10. Ground wheel 4<br />
11. Prime movers (Engine) 2<br />
12. Tractor - for tractor front mounted reaper 1<br />
13. Engine - for walking and riding type reapers 2<br />
14. Diesel 1000 ltr.<br />
15. Oil 50 ltr.<br />
16. Measuring tapes 2<br />
17. Field crops like wheat, Soya bean, paddy etc., As per practice<br />
18. Workshop Tool kit 4<br />
19. Stopwatchs 4<br />
20. Hand tools 4 set<br />
21. Desired spare parts As per needs<br />
10
Sl. No. Item/ Specification Quantity proposed for a<br />
batch <strong>of</strong> 16 trainees<br />
22. Grease 50 kg<br />
23. Lubricating oil 50 ltr.<br />
24. Cotton cloth 10 Kg<br />
25. Nuts and bolts <strong>of</strong> different sizes As per needs<br />
26. Paint and spare part 10 ltr.<br />
27. Power tiller operated soyabean reaper 1<br />
28. Power Tiller 2<br />
29. Combine 1<br />
30. Tractor operated potato digger 1<br />
31. Tractor operated ground nut digger 1<br />
• Raw material and consumables are not included in the list.<br />
11
Module II<br />
Repair, Maintenance and Overhauling <strong>of</strong> Tractor<br />
Theory<br />
Tractor and its systems • Different systems and their functions<br />
• Parts <strong>of</strong> system and interconnections<br />
• Operation <strong>of</strong> a tractor<br />
Steering system • Types <strong>of</strong> steering system<br />
• Toe in adjustments<br />
• Methods <strong>of</strong> repairing<br />
Brake system • Types <strong>of</strong> Brakes<br />
• Components <strong>of</strong> mechanical, disk & hydraulic brakes<br />
• Methods <strong>of</strong> adjustment<br />
• Procedure <strong>of</strong> fault finding<br />
Clutch • Types <strong>of</strong> clutches<br />
• Various parts <strong>of</strong> a clutch<br />
• Adjustment <strong>of</strong> clutch<br />
• Dismantling and assembly procedure<br />
• Fault finding techniques<br />
Gear box • Constructional features<br />
• Fault identification and method <strong>of</strong> rectifications<br />
Hydraulic system • Principles <strong>of</strong> operation <strong>of</strong> hydraulic system<br />
• Components <strong>of</strong> hydraulic system<br />
• Troubleshooting methods<br />
Practicals<br />
• Inspection <strong>of</strong> various system<br />
• Pre-start and checkup <strong>of</strong> a tractor.<br />
• Dismantle and assemble components <strong>of</strong> steering system<br />
• Carry out repairs<br />
• Dismantle and assemble different types <strong>of</strong> brakes<br />
• Adjust brakes<br />
• Remove faults in braking system<br />
• Dismantle and assemble a clutch<br />
• Finding and remove faults<br />
• Carry out adjustments <strong>of</strong> clutch<br />
• Dismantle and assemble a gear box<br />
• Identify fault and rectify<br />
• Dismantle and assembly <strong>of</strong> hydraulic system<br />
• Carry out adjustment and setting<br />
• Identify faults and remove them<br />
Differential • Importance <strong>of</strong> differential • Dismantle a differential<br />
12
• Functions <strong>of</strong> different components<br />
• Final drive, purpose and construction<br />
• Methods <strong>of</strong> trouble shooting<br />
Axle and tyres • Wheel and axle<br />
• Fitting <strong>of</strong> cage wheel and adjusting track - width for<br />
different operations<br />
• Toe-in adjustment<br />
• Repair <strong>of</strong> tyre and tubes<br />
• Care and maintenance<br />
Electrical system • Care and maintenance <strong>of</strong> tractor auto-electrical system<br />
• Methods and techniques used<br />
Entrepreneurship • Market study<br />
• Criteria for layout <strong>of</strong> small and medium level service<br />
center<br />
• Financial analysis<br />
• Equipments and tool requirement<br />
• Requirement for a project proposal<br />
Engine • Types <strong>of</strong> engine<br />
• Technical term used in engine<br />
• Technical specification <strong>of</strong> tractor engine<br />
• Four stroke spark ignition engine<br />
• Two stroke spark ignition engine<br />
Parts <strong>of</strong> I.C. Engine • Components, main parts its importance and working.<br />
• Overhauling <strong>of</strong> an Engine.<br />
Overhauling &<br />
servicing schedule<br />
• Importance <strong>of</strong> overhauling & service schedule<br />
• Checkup schedule during schedule<br />
Theory Practicals<br />
• Carry out adjustment <strong>of</strong> clearances and backlashes<br />
• Assemble a differential<br />
• Adjust track width, toe-in<br />
• Carry out ballasting <strong>of</strong> tyres<br />
• Repair <strong>of</strong> tyre and tubes<br />
• Check battery and carry out maintenance<br />
• Check and rectify alternator, self-starter, cut –out and<br />
other components<br />
• Selection <strong>of</strong> site for establish the shop<br />
• Calculate economics <strong>of</strong> setting a shop<br />
• Make a list <strong>of</strong> tools and equipment required for a<br />
workshop<br />
• Draw the layout <strong>of</strong> shop<br />
• Prepare a project proposal and safety chart<br />
• Identify, disassemble and assemble components.<br />
• Adjust & set various parts.<br />
• Overhaul an Engine.<br />
13
List <strong>of</strong> equipment, tools and instruments<br />
Sl. No. Item/ Specification Quantity proposed for a<br />
batch <strong>of</strong> 16 trainees<br />
Tractor 2<br />
1. Trainees Tool Kit 16 Nos.<br />
2. Steel rule 15cm. English and metric 16<br />
3. Screw driver 20cm x 9mm. Blade 16 Nos.<br />
4. Screw driver 30 cm X 9mm Blade 16 Nos.<br />
5. Spanner D.E. set <strong>of</strong> 12 pieces (6mml to 32mm) 16 Nos.<br />
6. Pliers combination 20cm. 16 Nos.<br />
7. Pliers side cutting 15cm 16 Nos.<br />
8. Pliers round nose 15 cm 16 Nos.<br />
9. Pliers flat nose 15 cm 16 Nos.<br />
10. Hand file 20cm Second cut flat 16 Nos.<br />
11. Hand file 20 cm. Second cut half-round 16 Nos.<br />
12. Hand file 20 cm. Smooth triangular 16 Nos.<br />
13. Hand file 30 cm. Bastard 16 Nos.<br />
14. Hand file 30 cm. Round bastard 16 Nos.<br />
15. Center punch 10 cm. 16 Nos.<br />
16. Chisel cold flat 20 mm. 16 Nos.<br />
17. Feeler gauge 20 blades (metric) 16 Nos.<br />
18. Steel tools box with lock and key (folding type) size 400x200x150 mm 16 Nos.<br />
19. b. Shop outfit & measuring instruments<br />
20. Hollow punch set <strong>of</strong> seven pieces 6mm to 15 mm 1 set<br />
14
Sl. No. Item/ Specification Quantity proposed for a<br />
batch <strong>of</strong> 16 trainees<br />
21. Drift punch copper 15 cm 2 Nos.<br />
22. Prick punch 15 cm. 2 Nos.<br />
23. Chisels cross cut 200 mmx 6mm 2 Nos.<br />
24. Allen key set <strong>of</strong> 12 pieces (2mm to 14 mm) 4 Sets<br />
25. Philips screw driver type set <strong>of</strong> 5 pieces (100 mm to 300 mm) 4 set<br />
26. Engineer’s square 15 cm. Blade 2 Nos.<br />
27. Dividers spring 15 cm. 2 Nos.<br />
28. Ball peen hammer 0.5 kg 4 Nos.<br />
29. Scriber wit scribing black universal 16 Nos.<br />
30. Marking out table 90x60x90 cm. 4 Nos.<br />
31. Hacksaw frame adjustable 4 Nos.<br />
32. Engineers stethoscope 1 set<br />
33. Hand vice 37 mm 2 Nos.<br />
34. Drill Twist (assorted) 10 Nos.<br />
35. Taps and Dies complete sets (5 types) 1 set<br />
36. Hand reamers adjustable 10.5 to 11.25 m, 11.25 to 12.75 mm, 12.75 to 14.25 mm and 14.25 to<br />
15.75 mm<br />
2 Sets<br />
37. Micrometer outside 0-25 mm, 25-50 mm 1 each<br />
38. Micrometer outside 50 mm to 75 mm and 75 mm to 100 mm. 2 Nos.<br />
39. Mallets wooden/ plastic 2 Nos.<br />
40. Micrometer in side 25-50, 50-75, 75-150 mm with extension rod. 1 each<br />
41. Spanner, ring set <strong>of</strong> 12 metric sizes 6 to 32 mm. 16 sets<br />
42. Spanner, adjustable 15 cm. 1 Nos.<br />
15
Sl. No. Item/ Specification Quantity proposed for a<br />
batch <strong>of</strong> 16 trainees<br />
43. Spanner, adjustable 15 cm 1 Nos.<br />
44. Spanners socket with speed handle, T-bar, ratchet and universal up to 32 mm 2 Sets<br />
45. Adjustable spanner (pipe wrench 350 mm) 2 Nos.<br />
46. Oil can 0.5/ 0.25 liter capacity 2 Nos.<br />
47. Cleaning Tray 45x30 cm 4 Nos.<br />
48. Piston ring expander 1 No<br />
49. Piston ring compressor 2 Nos.<br />
50. Piston Ring Groove cleaner 2 Nos.<br />
51. Cylinder ridge remover/ cutter 1 No.<br />
52. Feeler gauge piston (metric) 1 Set<br />
53. Valve spring Lifter 1 No.<br />
54. Valve grinding tool-suction type 6 Nos.<br />
55. Valve key inserter 1 No.<br />
56. Cylinder bore gauge capacity 20 to 160 mm 2 Nos.<br />
57. Portable electric drill 6mm 1 No.<br />
58. Injector cleaning Kit 1 Set<br />
59. Injector dismantling and assembling jig and fixture 1 Set<br />
60. Injector dismantling tool kit 1 No.<br />
61. Fuel injection pump dismantling tool kit 1 Set<br />
62. Torque wrench 12-68 Nm. 2 Nos.<br />
63. Work bench 250x120x60 cm with 2 vices 12cm Jaw 2 Nos.<br />
64. Pullers screw powered 2 mm gap with bearing puller attachment 1 No.<br />
16
Sl. No. Item/ Specification Quantity proposed for a<br />
batch <strong>of</strong> 16 trainees<br />
65. Vice grip pliers 2 Nos.<br />
66. Circlip pliers Expanding and contracting type 15 cm & 20 cm 8 Sets<br />
67. Inspection lamp with guard and wandering lead <strong>of</strong> 50 ft. length 1 No.<br />
68. Crow bar 1 No.<br />
69. Cleaning tray – Aluminum 45x30 cm with 6 small compartments 4 Nos.<br />
70. Portable electric drill 6 mm 1 No.<br />
71. Circlip plies 15 cm. Expanding type 1 No.<br />
72. Circlip pliers 15 cm. Contracting type 1 No.<br />
73. c. <strong>General</strong> Installation/ machineries<br />
74. Drilling machine bench to drill up to 12mm die 1 No.<br />
75. Chain and pulley block 3000 kg. Capacity electric type 1 No.<br />
76. Horses and wheel choke 1 No.<br />
77. Bearing puller screw powered/ hydraulic powered with attachments Max spread 80, 200 and 300<br />
mm<br />
1 No.<br />
78. Hydraulic jack with trolley capacity 3 Ton 1 No.<br />
79. Screw jack one tone, capacity double lift 1 No.<br />
80. Fuel feed pump (plunger type) 1 No.<br />
81. Injectors 1 No.<br />
82. Surface plate 60x60 cm 1 No.<br />
83. ‘V’ block 75x38 mm pair with clamps 1 No.<br />
84. Electric pedestal grinder with two 18cm. Wheel 1 No.<br />
85. Wheel alignment gauge 1 No.<br />
86. Camber angle gauge 1 No.<br />
17
Sl. No. Item/ Specification Quantity proposed for a<br />
batch <strong>of</strong> 16 trainees<br />
87. Fuel injection pump one with pneumatic governor, one with R.Q.V. governor and one with R.S.V.<br />
governor, VE pump/ DPC pumps<br />
88. Disk brake with caliper assembly 2 Nos.<br />
89. Injector testing set (hand operated) 1 No.<br />
1 No.<br />
90. Triple leg grip puller with bearings attachment screw/ hydraulic powered max. spread 80, 160, 250,<br />
450 mm<br />
1 No.<br />
91. Fuel injector cleaning kit (in a wooden box complete) 1 No.<br />
92. Engines 4 cylinder petrol MPFI and four cylinder diesel engine other than procured under module<br />
01 and 02<br />
1 No.<br />
93. Toe-in, toe-out gauge 1 No.<br />
94. Injector dismantling jig with mounting bench 1 No.<br />
95. Speed counter – pointed type to read up to 5000 RPM 1 No.<br />
96. Special tools for overhauling <strong>of</strong> inline and distributor type pumps with jigs 1 No.<br />
97. Fuel injection pump test bench with accessories. 1 No.<br />
• Raw material and consumables are not included in the list.<br />
18
Module III<br />
Repair, Maintenance <strong>of</strong> Post Harvesting machines/processing<br />
machines<br />
Thresher<br />
Theory<br />
Practicals<br />
Power thresher • Types <strong>of</strong> threshers<br />
• Traditional threshing practices<br />
• Classification <strong>of</strong> power thresher based on sources <strong>of</strong><br />
power mover, crop, threshing cylinder, feeding unit<br />
• Need <strong>of</strong> thresher<br />
• Draw free hand sketches <strong>of</strong> different components <strong>of</strong><br />
power thresher.<br />
Functional components • Functional components <strong>of</strong> power thresher and their<br />
use<br />
o<br />
o<br />
o<br />
o<br />
o<br />
o<br />
Feeding unit<br />
Threshing unit<br />
Cleaning and grading unit<br />
Handling unit<br />
Power Transmission unit<br />
Frame<br />
• Draw free hand sketches <strong>of</strong> feeding unit viz chute<br />
type, hopper type, chute with positive feed rollers,<br />
moving platform -canvass or chain conveyors.<br />
• Draw free hand sketches <strong>of</strong> spike tooth cylinder, hammer<br />
mill cylinder, raspbar cylinder, and syndicator type with<br />
serrated flywheel<br />
• Draw free hand sketches <strong>of</strong> cleaning and grading unit<br />
(blower or aspirator, Sieves)<br />
• Draw free hand sketches <strong>of</strong> power transmission unit<br />
installed in thresher.<br />
• Note the details <strong>of</strong> frame assembly <strong>of</strong> various threshers<br />
19
Theory Practicals<br />
Selection <strong>of</strong> power<br />
thresher<br />
• Factors related to proper selection <strong>of</strong> power thresher,<br />
o Type <strong>of</strong> thresher<br />
o Capacity <strong>of</strong> thresher<br />
o Quality <strong>of</strong> thresher<br />
o Cost <strong>of</strong> thresher and safety measures<br />
o Provision <strong>of</strong> adjustments<br />
o Availability <strong>of</strong> spare parts<br />
o Facilities for repair<br />
o Sources <strong>of</strong> prime mover<br />
o Suitability <strong>of</strong> thresher to other crops<br />
• Study <strong>of</strong> thresher manual<br />
• Fix different attachments according to requirements<br />
Common tools • Selection and use <strong>of</strong> various tools e.g. screw driver,<br />
pliers, hammers, chisels, hacksaw, spanners, sockets,<br />
cleaning brushes, pullers etc.<br />
• Safety considerations<br />
• Select and use different hand tools for various operations<br />
safely<br />
Dismantling and<br />
Assembly<br />
• Techniques to be followed • Dismantle a power thresher<br />
• Assemble a power thresher<br />
Installation • Factors relevant for installation<br />
o Direction <strong>of</strong> wind,<br />
o Foundation and leveling <strong>of</strong> thresher,<br />
o Belt alignment and tension,<br />
o Direction <strong>of</strong> threshing-cylinder rotation<br />
• Check the direction <strong>of</strong> wind<br />
• Make the holes in ground for transportation wheels<br />
• Check the level <strong>of</strong> thresher<br />
• Fix pegs around the wheels<br />
• Mount the prime mover (engine /electric motor) on the<br />
frame<br />
• Connect the prime mover and check alignment.<br />
• Check the direction <strong>of</strong> rotation <strong>of</strong> the threshing cylinder<br />
and correct<br />
20
Adjustments • Regions & procedures<br />
o Speed <strong>of</strong> threshing cylinder<br />
o Cylinder concave clearance<br />
o Speed <strong>of</strong> blower/aspirator<br />
o Air flow<br />
o Sieve slope<br />
o Speed and stroke <strong>of</strong> sieves<br />
o Location <strong>of</strong> blower/aspirator<br />
Safety • <strong>General</strong> safety requirement during operations and<br />
maintenance <strong>of</strong> thresher<br />
• Steps to be checked during operations<br />
• Importance <strong>of</strong> operator manual<br />
Operation and<br />
performance<br />
Common troubles and<br />
remedies<br />
• <strong>General</strong> operation techniques<br />
• Terms like performance <strong>of</strong> a thresher<br />
o Capacity <strong>of</strong> thresher<br />
o Threshing efficiency<br />
o Cleaning efficiency<br />
o Sieve overflow<br />
o Blow grain<br />
o Damage to the grain<br />
Theory Practicals<br />
• Method <strong>of</strong> identification <strong>of</strong> common troubles, reasons<br />
and their remedies<br />
• Check the belt tension and correct.<br />
• Read and check the instruction manual <strong>of</strong> thresher<br />
• Calculate the speed <strong>of</strong> threshing cylinder<br />
• Measure the cylinder concave clearance<br />
• Measure the speed <strong>of</strong> blower/aspirator<br />
• Check the provision for airflows<br />
• Measure the sieve slope<br />
• Measure stroke length and speed <strong>of</strong> crank mechanism<br />
• Reading <strong>of</strong> operator manual and use the tips.<br />
• Adopt general safety precautions during various<br />
operations<br />
• Measure the speed <strong>of</strong> cylinder with tachometer<br />
• Feed the crop slowly and uniformly<br />
• Calculate threshing efficiency<br />
• Calculate the cleaning efficiency<br />
• Correct the trouble when threshing cylinder stalls<br />
• Correct the trouble when too many unthreshed heads<br />
appear<br />
• Correct the trouble when excessive damage to the grain<br />
• Correct the trouble when grain blows with straw<br />
• Correct the trouble when more grain with tailings appear<br />
• Correct the trouble when vibrations in thresher during<br />
21
Care & maintenance • Importance <strong>of</strong> care and maintenance<br />
• Importance <strong>of</strong> servicing<br />
• Storage <strong>of</strong> thresher<br />
Operation and<br />
maintenance <strong>of</strong><br />
winnowers<br />
Cleaner and grader<br />
• Importance <strong>of</strong> winnowing<br />
• Winnower and its components<br />
• Types <strong>of</strong> winnower<br />
Cleaner & grader • Importance <strong>of</strong> cleaning & grading<br />
• Types <strong>of</strong> cleaner/grader<br />
• Methods <strong>of</strong> cleaning /grading<br />
• Cleaning efficiency<br />
Theory Practicals<br />
operation<br />
• Correct the trouble when bhusa is <strong>of</strong> bigger size<br />
• Carry out all operation maintenance as required<br />
• Read the operator manual <strong>of</strong> winnower<br />
• Operate the winnower<br />
• Carry out common maintenance<br />
Constructional detail<br />
and settings<br />
• Main parts and their functions.<br />
• Settings and Adjustments<br />
Settings • Important settings in cleaner like slope, screen size,<br />
angle<br />
• Sizes <strong>of</strong> screen as per crop<br />
Operations <strong>of</strong><br />
cleaner/grader<br />
repair, maintenance <strong>of</strong><br />
cleaner/grader<br />
• Method <strong>of</strong> operations, precautions to be observed during<br />
operation<br />
• Procedure for cleaning<br />
• Capacity <strong>of</strong> cleaner<br />
•<br />
• Commons troubles and its causes. Read the<br />
• Rectification methods.<br />
• Read instructional Manual<br />
Dismantle and assemble various components <strong>of</strong> a cleaner.<br />
• Set and adjust cleaner according to requirements.<br />
• Operate the cleaner<br />
• Calculate the capacity & efficiency <strong>of</strong> cleaner<br />
• Read and use the operation manual<br />
• Identify problems and rectify<br />
• Observe all safety precautions<br />
22
Theory Practicals<br />
• Carry out all maintenance and servicing<br />
Dal mill<br />
Dal mill • Need & importance <strong>of</strong> milling<br />
• Methods <strong>of</strong> milling<br />
• Field Visit<br />
Components • Main Components and their functions • Identify various components<br />
• Assemble and disassemble different component <strong>of</strong> dal<br />
mill<br />
Adjustment & setting<br />
during operation<br />
• Adjustment <strong>of</strong> roller<br />
• Milling capacity and efficiency<br />
• Adjust the roller spacing<br />
• Calculate output and efficiency <strong>of</strong> dal Mill<br />
• Calculate the milling efficiency<br />
Operate the dal mill • Electrical connection <strong>of</strong> dal mill<br />
• Methods <strong>of</strong> operation<br />
• Precautions to be observed<br />
• Capacity <strong>of</strong> dal mill<br />
• Operate the dal mill<br />
• Calculate the capacity <strong>of</strong> dal mill<br />
Trouble shooting,<br />
repair & maintenance<br />
<strong>of</strong> dal mill<br />
• Commons troubles and its causes. Read the<br />
• Rectification methods.<br />
• Read instructional Manual<br />
• Read and use the operation manual<br />
• Identify problems and rectify<br />
• Observe all safety precautions<br />
• Carry out all maintenance and servicing<br />
Low cost multipurpose grain mill<br />
Multipurpose grain<br />
mill<br />
• Need and importance<br />
• Use and types <strong>of</strong> grain mill<br />
• Milling method<br />
• Field visit<br />
23
Theory Practicals<br />
Components • Components <strong>of</strong> grain mill • Identify, disassemble and assemble main parts<br />
Adjustment & setting<br />
during operation<br />
• Steps to be followed in operation <strong>of</strong> grain mill, milling<br />
efficiency, crop condition prior to milling<br />
• Adjust the feed adjuster<br />
• Set the vertical grinding wheel<br />
• Calculate the output and efficiency <strong>of</strong> a grinder.<br />
Operate the grinder • Electrical connection <strong>of</strong> grinder<br />
• Method <strong>of</strong> operation<br />
• Precaution to be followed<br />
• Capacity <strong>of</strong> grinder<br />
• Operate the grinder<br />
• Adjust the components as per need<br />
Trouble shooting,<br />
repair, maintenance <strong>of</strong><br />
grinder<br />
• Commons troubles and its causes. Read the<br />
• Rectification methods.<br />
• Read instructional Manual<br />
• Read and use the operation manual<br />
• Identify problems and rectify<br />
• Observe all safety precautions<br />
• Carry out all maintenance and servicing<br />
24
List <strong>of</strong> equipment, tools and instruments<br />
Sl. No. Item/ Specification Quantity proposed for a<br />
batch <strong>of</strong> 16 trainees<br />
1. Spike tooth type power thresher/model 2<br />
2. Hammer mill type thresher/model 2<br />
3. Rasp bar type thresher/model 2<br />
4. Syndicator type thresher/model 2<br />
5. Multi crop thresher 2<br />
6. Semi-axial flow multi crop thresher 2<br />
7. High capacity multi crop thresher 2<br />
8. Spade 4<br />
9. Pegs 4<br />
10. Hammers 4<br />
11. Spanners 4<br />
12. Adjustable wrench 4<br />
13. Spirit level 4<br />
14. Pulleys <strong>of</strong> different sizes 4<br />
15. Stop watch 4<br />
16. Tachometer 4<br />
17. Scale 4<br />
18. Vernier calipers 4<br />
19. Pulley puller 4<br />
25
Sl. No. Item/ Specification Quantity proposed for a<br />
batch <strong>of</strong> 16 trainees<br />
20. Operator manuals for various thresher 4<br />
21. Charts, slide depicting need <strong>of</strong> safety measures 4<br />
22. Crops like wheat, paddy, groundnut, soybean, sorghum, maize etc As per needs<br />
23. Weighing balance 4<br />
24. Measuring tape 4<br />
25. Greasing gun 4<br />
26. Kerosene oil 4<br />
27. Grease 4<br />
28. Old cloth 4<br />
29. Brush 4<br />
30. Pedal cum power operated cleaner 2<br />
31. Dal mill 2<br />
32. Low cost multipurpose grain mill 2<br />
• Raw material and consumables are not included in the list.<br />
26
Module IV<br />
Operation repair and Maintenance <strong>of</strong> Crop production<br />
machinery<br />
Tools & measuring<br />
instruments<br />
Pressurised irrigation<br />
equipment<br />
Theory<br />
• Type <strong>of</strong> tools, measuring instruments and related<br />
equipment<br />
• Selection criteria and use<br />
• Safety consideration<br />
• Construction, specifications and working principle <strong>of</strong><br />
various irrigation equipment related to Sprinkler system<br />
o Main pipe line, lateral, vipers, bend and end<br />
caps, pressure gauge filters<br />
o Drip irrigation main pipeline, lateral line, Ts<br />
connections, emitters, bend and end caps,<br />
pressure gauge, filters<br />
o Selection <strong>of</strong> sprinkler / drip irrigation system<br />
o Laying procedure <strong>of</strong> irrigation system<br />
Practicals<br />
• Select and use tools & instruments for different<br />
operations<br />
• Estimate time, money, resources for given<br />
irrigation system<br />
• Prepare lay out <strong>of</strong> irrigation system<br />
• Join component <strong>of</strong> the system<br />
• Test the system<br />
Quality control • Methods <strong>of</strong> quality control • Check specifications and maintain quality control<br />
Operation and<br />
maintenance<br />
• Irrigation frequency concept<br />
• Regular maintenance <strong>of</strong> irrigation system<br />
• Filter cleaning<br />
• Storage <strong>of</strong> irrigation equipment<br />
• Operate pressurised irrigation system<br />
• Storage pressurised irrigation equipment<br />
• Cleaning the equipment<br />
27
Theory Practicals<br />
Sprinkler system<br />
• Importance <strong>of</strong> sprinkler irrigation<br />
• Knowledge <strong>of</strong> different available systems<br />
• Selection <strong>of</strong> systems<br />
Installation • Procedure <strong>of</strong> installation<br />
• Terms used amount <strong>of</strong> water required<br />
• Method <strong>of</strong> calculation<br />
• Selection and laying <strong>of</strong> pipes<br />
• Different types <strong>of</strong> sprinklers and their<br />
maintenance<br />
Calibration, maintenance & repairing <strong>of</strong> seed drill and planter<br />
Seed drill & planter • Use and importance<br />
• Types & Components<br />
• Seed cum fertilizer drill (tractor drawn)<br />
• Seed cum fertilizer drill (animal drawn)<br />
Calibration • Need <strong>of</strong> calibration<br />
• Calibration techniques<br />
Common adjustments • Necessary adjustment in seed drill cum planter<br />
• Depth <strong>of</strong> soaring<br />
• Seed and fertilizer rate<br />
• Row spacing<br />
• Power transmission system<br />
• Prepare a detailed plan on paper with position <strong>of</strong><br />
equipment & pipes<br />
• Layout pips and test<br />
• Carryout maintenance operations<br />
• Field visit<br />
• Calibrate seed drill<br />
• Measure the circumference <strong>of</strong> drive wheel<br />
• Measure the spacing between two consecutive furrow<br />
opener<br />
• Calculate size <strong>of</strong> drill<br />
. Use instructional manual.<br />
• Set the height <strong>of</strong> furrow opener<br />
• Set the depth in tractor drawn drill using tractor<br />
hydraulic system<br />
• Set the row spacing<br />
Maintenance and<br />
repair<br />
• Common problems & its causes<br />
• lubrication<br />
• Identify the loose, worn and damage parts and repair &<br />
replace<br />
• Read the operator manual<br />
28
Theory Practicals<br />
• Alignment and its checking • Lubricate the parts<br />
Off seasons storage • Importance <strong>of</strong> <strong>of</strong>f season storage<br />
Trouble shooting &<br />
remedies<br />
• Storage precautions<br />
• Technique <strong>of</strong> storage<br />
• Use <strong>of</strong> operator manual<br />
• Methods <strong>of</strong> identifying problems, symptoms and<br />
rectification<br />
• Safety measures<br />
Calibration, maintenance & repairing <strong>of</strong> spraying and dusting equipment<br />
• Alignment <strong>of</strong> seed drill<br />
• Carry out all operations for <strong>of</strong>f-season storing.<br />
• Identify and remove problems in seed drill cum planter,<br />
Sprayer & duster<br />
Functions <strong>of</strong><br />
components<br />
Type <strong>of</strong> sprayer<br />
• Need & importance <strong>of</strong> spraying and dusting<br />
equipment<br />
• Familiarization with basic components <strong>of</strong> a sprayer<br />
and duster<br />
• Types <strong>of</strong> sprayers<br />
o Simple hand sprayer<br />
o Foot sprayer<br />
o Stir up pump<br />
o Knapsack sprayer<br />
o Rocking sprayer<br />
o Power sprayer<br />
o Mini blower<br />
Type <strong>of</strong> duster • Parts <strong>of</strong> dusters<br />
• Types <strong>of</strong> duster<br />
o Bellow type<br />
o Plunger piston type<br />
o Knapsack type<br />
o Rotary type<br />
o Power type<br />
• Survey the market for identify action <strong>of</strong> spraying dusting<br />
equipment<br />
• Reading the operator manual<br />
Identify sprayers and their components.<br />
• Identify dusters and components.<br />
29
Nozzles • Types <strong>of</strong> nozzles<br />
o Parts <strong>of</strong> duster<br />
o Selection <strong>of</strong> duster<br />
• Pattern <strong>of</strong> nozzle spray<br />
• Parts <strong>of</strong> nozzle<br />
Theory Practicals<br />
• Disassemble the nozzle<br />
• Arrange nozzle part in sequence<br />
• Identify the different parts <strong>of</strong> nozzle<br />
• Assemble the nozzle<br />
Tools and equipments • Type <strong>of</strong> tools, measuring instruments and related<br />
equipment<br />
• Selection criteria and use<br />
• Safety consideration<br />
• Select and use tools & instruments for different<br />
operations<br />
Maintenance <strong>of</strong><br />
sprayer/duster<br />
• Technique <strong>of</strong> maintenance<br />
• Method <strong>of</strong> maintenance<br />
• Proper maintenance schedule and duration<br />
• Use sprayers/duster effectively.<br />
Repair, maintenance and field adjustments <strong>of</strong> primary and secondary tillage implements<br />
Primary<br />
Tillage implements<br />
• Basic terms, parts and functions. • Survey <strong>of</strong> primary tillage implements<br />
• Draw the drawings <strong>of</strong> various primary<br />
tillage implement<br />
Secondary<br />
Tillage implement<br />
• Terms, parts and functions <strong>of</strong> secondary<br />
tillage implements<br />
• Identity the secondary tillage<br />
implements<br />
• Survey <strong>of</strong> secondary tillage implements<br />
• Draw the drawings <strong>of</strong> various secondary<br />
tillage implement<br />
Common adjustments • Common adjustments during operation • Adjust the implements<br />
Maintenance and<br />
repair <strong>of</strong> primary and<br />
secondary tillage<br />
equipments<br />
• Damaged / loose / work out parts<br />
• Technique <strong>of</strong> maintenance<br />
• Carry out maintenance.<br />
30
List <strong>of</strong> equipment, tools and instruments<br />
Sl. No. Item/ Specification Quantity proposed for a<br />
batch <strong>of</strong> 16 trainees<br />
Pump 2<br />
1. Bye pass valve 4<br />
2. Ventury assembly 4<br />
3. Pressure gauge 4<br />
4. Backwash valve 2<br />
5. Sand filter 2<br />
6. HDPE/PVC main line As per needs<br />
7. Sub main HDPE/PVC As per needs<br />
8. Ball valve 2<br />
9. Flush valve 2<br />
10. Dripper 2<br />
11. Lateral 2<br />
12. End stop 2<br />
13. • Range <strong>of</strong> Emitters<br />
• Turbo Seal PC Emitter<br />
• J-SC-PC-Plus Emitter<br />
• J-Turbo Key Plus Dripper<br />
• Turbo Seal Plus Emitter<br />
• Jain Emitter<br />
• Mini Inline Emitter<br />
• J-Loc Emitter<br />
• Vari Flow Dripper<br />
• Turbo Stake Dripper<br />
As per needs<br />
31
Sl. No. Item/ Specification Quantity proposed for a<br />
batch <strong>of</strong> 16 trainees<br />
• Micro Dripper<br />
14. • Range <strong>of</strong> Spray heads and Jets<br />
• J-Mini Sprinkler<br />
• J-Jets<br />
• Fogger<br />
• J-Bubbler-Adjustable Flow Plus<br />
• J-Bubbler-PC<br />
15. • Range <strong>of</strong> Poly Fittings and Accessories<br />
• Trickle Guard - Sprayers<br />
• Trickle Guard - Poly<br />
• Trickle Guard - Poly Filter<br />
• Lateral Inline Filter<br />
• Jain Lateral Drain Valve<br />
• Mini Sprinkler Base<br />
• Mini Sprinkler Riser<br />
• Jain Poly Fittings<br />
• Jain Extension Tube Fittings<br />
• Jain Drip Tape Fittings<br />
• Jain Poly Threaded Fittings<br />
• Hydraulic Control Tube Fittings<br />
• Multi Outlet Take-<strong>of</strong>fs<br />
As per needs<br />
As per need<br />
32
Sl. No. Item/ Specification Quantity proposed for a<br />
batch <strong>of</strong> 16 trainees<br />
• Stakes and Assembly<br />
• Tools & Accessories<br />
16. • Our Sprinklers Product Range includes:<br />
• Lawn Sprinklers & Garden Pop-ups<br />
• Spray Pop-ups<br />
• Accessories and fittings for Spray Pop-ups<br />
• Nozzle for Spray Pop-ups Swing Joint<br />
• Flexi Pipe<br />
• Spray Nozzle Adaptor<br />
• Pop-up Shield<br />
• Overhead Sprinklers (High-Level Sprinklers)<br />
• Floppy Sprinkler<br />
• Quick Coupler<br />
• Jain Floppy Saddle<br />
• Quick Coupler Riser Assembly<br />
• Jain Impact Sprinkler - Full Circle<br />
• Jain Impact Sprinkler - Part Circle<br />
• Jain - Komet Medium Volume Rain Gun Model - 162 & 163<br />
• Jain - Komet Big Volume Rain Gun Model Twin 95 Plus<br />
• Jain - Komet Big Volume Rain Gun Model Twin 140 Plus<br />
• Raingun Riser Stand<br />
• Raingun Trolly<br />
• Raingun Installation Options<br />
As per needs<br />
17. Seed drill animal drawn, tractor drawn 1<br />
18. Seed cum fertilizer drill (3 row) 2<br />
33
Sl. No. Item/ Specification Quantity proposed for a<br />
batch <strong>of</strong> 16 trainees<br />
19. Animal drawn planter 1<br />
20. Power tiller drawn seed cum fertilizer drill 1<br />
21. Animal drawn cultivator 1<br />
22. Disc harrow / disc cultivator 1<br />
23. Cultivator – animal drawn 1<br />
24. Cultivator – tractor drawn 1<br />
25. Disc plough 1<br />
• Raw material and consumables are not included in the list.<br />
34


