AIR GREASE GUN - Harbor Freight Tools
AIR GREASE GUN - Harbor Freight Tools
AIR GREASE GUN - Harbor Freight Tools
Create successful ePaper yourself
Turn your PDF publications into a flip-book with our unique Google optimized e-Paper software.
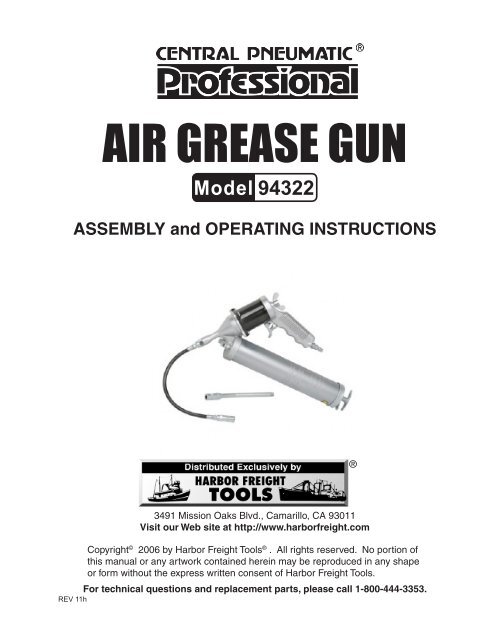
<strong>AIR</strong> <strong>GREASE</strong> <strong>GUN</strong><br />
Model 94322<br />
ASSEMBLY and OPERATING INSTRUCTIONS<br />
®<br />
REV 11h<br />
3491 Mission Oaks Blvd., Camarillo, CA 93011<br />
Visit our Web site at http://www.harborfreight.com<br />
Copyright © 2006 by <strong>Harbor</strong> <strong>Freight</strong> <strong>Tools</strong> ® . All rights reserved. No portion of<br />
this manual or any artwork contained herein may be reproduced in any shape<br />
or form without the express written consent of <strong>Harbor</strong> <strong>Freight</strong> <strong>Tools</strong>.<br />
For technical questions and replacement parts, please call 1-800-444-3353.
Specifications<br />
Output Pressure<br />
Air Inlet<br />
Working Air Pressure Range<br />
Bent Spout Length<br />
Air Consumption<br />
3600 PSI<br />
1/4” - 18 NPT Female<br />
60 - 150 PSI, 90 PSI Recommended<br />
6-3/4” L<br />
Recommended Hose Size 3/8”<br />
Flexible Hose Length 12”<br />
Canister Dimensions<br />
Air Inlet Screen<br />
Outlet Fitting<br />
Weight<br />
Handle Rotation<br />
6.25 CFM @ 90 PSI<br />
10-7/8” x 2-1/4” Dia.<br />
50 Mesh<br />
1/8”- 27 Female NPT<br />
3.85 lb.<br />
360° Rotation Capacity<br />
Save This Manual<br />
You will need the manual for the safety warnings and precautions, assembly instructions,<br />
operating and maintenance procedures, parts list and diagram. Keep your invoice with this<br />
manual. Write the invoice number on the inside of the front cover. Keep the manual and invoice<br />
in a safe and dry place for future reference.<br />
Safety Warnings and Precautions<br />
WARNING: When using tool, basic safety precautions should always be followed to<br />
reduce the risk of personal injury and damage to equipment.<br />
Read all instructions before using this tool!<br />
1. Keep work area clean. Cluttered areas invite injuries.<br />
2. Observe work area conditions. Do not use machines or power tools in damp or wet<br />
locations. Don’t expose to rain. Keep work area well lit.<br />
3. Keep children away. Children must never be allowed in the work area. Do not let them<br />
handle machines, tools, extension cords, or air hoses.<br />
4. Store idle equipment. When not in use, tools must be stored in a dry location to inhibit<br />
rust. Always lock up the Air Grease Gun and the grease, in a location that is out of reach<br />
of children.<br />
5. Use the right tool for the job. Do not attempt to force a small tool or attachment to<br />
do the work of a larger industrial tool. There are certain applications for which this<br />
tool was designed. It will do the job better and more safely at the rate for which it was<br />
intended. Do not modify this tool and do not use this tool for a purpose for which it was<br />
not intended.<br />
6. Dress properly. Do not wear loose clothing or jewelry as they can be caught in<br />
moving parts. Protective, electrically nonconductive clothes and nonskid footwear are<br />
recommended when working. Wear restrictive hair covering to contain long hair.<br />
SKU 94322<br />
REV 09/06<br />
For technical questions, please call 1-800-444-3353. Page 2
7. Use eye and ear protection. Always wear ANSI-approved impact safety goggles. Wear<br />
a NIOSH-approved dust mask or respirator when working around chemical dusts and<br />
mists.<br />
8. Do not overreach. Keep proper footing and balance at all times. Do not reach over or<br />
across running machines or air hoses.<br />
9. Maintain tools with care. Keep tools clean for better and safer performance. Follow<br />
instructions for lubricating and changing accessories. Inspect tool cords and air hoses<br />
periodically and, if damaged, have them repaired by an authorized technician. The handles<br />
must be kept clean, dry, and free from oil and grease at all times.<br />
10. Disconnect air supply. Disconnect air hose and turn off the compressor when not in<br />
use.<br />
11. Remove adjusting keys and wrenches. Check that keys and adjusting wrenches are<br />
removed from the tool or machine work surface before plugging it in.<br />
12. Avoid unintentional starting. Do not carry any tool with your finger on the trigger,<br />
whether it is connected to the air compressor or not.<br />
13. Stay alert. Watch what you are doing, use common sense. Do not operate any tool when<br />
you are tired.<br />
14. Check for damaged parts. Before using any tool, any part that appears damaged<br />
should be carefully checked to determine that it will operate properly and perform its<br />
intended function. Check for alignment and binding of moving parts; any broken parts<br />
or mounting fixtures; and any other condition that may affect proper operation. Any part<br />
that is damaged should be properly repaired or replaced by a qualified technician. Do<br />
not use the tool if any switch does not turn On and Off properly.<br />
15. Guard against electric shock. Prevent body contact with grounded surfaces such as<br />
pipes, radiators, ranges, and refrigerator enclosures.<br />
16. Replacement parts and accessories. This product is to be repaired and serviced only<br />
by a qualified technician. When this product is serviced, only identical replacement parts<br />
should be used. Use of any other parts will void the warranty. Only use accessories<br />
intended for use with this tool. Approved accessories are available from <strong>Harbor</strong> <strong>Freight</strong><br />
<strong>Tools</strong>.<br />
17. Do not operate tool if under the influence of alcohol or drugs. Read warning labels<br />
if taking prescription medicine to determine if your judgement or reflexes are impaired<br />
while taking drugs. If there is any doubt, do not operate the Grease Gun.<br />
18. Use proper size and type extension cord. If an extension cord is required, it must be<br />
of the proper size and type to supply the correct current to the air compressor without<br />
heating up. Otherwise, the extension cord could melt and catch fire, or cause electrical<br />
damage to the tool. Check your air compressor’s manual for the appropriate size cord.<br />
19. Maintenance. The maintenance outlined in the maintenance section should be performed<br />
regularly. For your safety, this product should be serviced or repaired regularly only by<br />
a qualified technician.<br />
20. Compressed air only. Never use combustible gas as a power source.<br />
SKU 94322<br />
For technical questions, please call 1-800-444-3353. Page 3
21. Check hoses carefully. Never use the Grease Gun if the hoses are cracked, frayed, or<br />
kinked. Avoid problems by not severely bending the hoses. If hoses appear damaged,<br />
have them replaced.<br />
22. This Grease Gun is designed only to hold and dispense grease. Never use it to hold<br />
and dispense any other material.<br />
Note: Performance of the compressor (if powered by line voltage) may vary depending<br />
on variations in local line voltage. Extension cord usage may also affect tool<br />
performance.<br />
Warning: The warnings, cautions, and instructions discussed in this instruction manual<br />
cannot cover all possible conditions and situations that may occur. It must be understood<br />
by the operator that common sense and caution are factors which cannot be built into<br />
this product, but must be supplied by the operator.<br />
Unpacking<br />
When unpacking, check to make sure the parts listed on page 9 are included. If any<br />
parts are missing or broken, please call <strong>Harbor</strong> <strong>Freight</strong> <strong>Tools</strong> at the number on the cover of<br />
this manual as soon as possible.<br />
Operation<br />
Grease<br />
Gun<br />
1/4”-18 NPT Female<br />
NOTE: For best service you should incorporate an oiler, regulator, and inline filter, as shown in<br />
the diagram above. Hoses, couplers, oilers, regulators, and filters are all available at <strong>Harbor</strong><br />
<strong>Freight</strong> <strong>Tools</strong>.<br />
1. If desired, for quick tool connection, you will need to prepare a 1/4” quick air connector<br />
(not included) to connect to the air source hose. First, wrap the 1/4” quick air connector<br />
(not included) with pipe thread seal tape (not included) before threading it onto the<br />
3/8” air source hose. Then, connect the 1/4” quick air connector to the Air Inlet (2) on<br />
the Grease Gun.<br />
Note: If you are not using an automatic oiler system, before operation, add a few drops<br />
of Pneumatic Tool Oil to the airline connection. Add a few drops more after each hour<br />
of continual use.<br />
2. To check your air system, set the air pressure on your compressor to 90 PSI. Do not<br />
exceed the testing air pressure of 90 PSI.<br />
3. Check the air connection for leaks. After test is complete, disconnect from the air supply<br />
until grease is loaded into the Air Grease Gun.<br />
SKU 94322<br />
For technical questions, please call 1-800-444-3353. Page 4
Grease Loading Instructions<br />
Grease can be loaded into the Grease Gun by: loading with a filler pump (FIG. 1), using<br />
suction filling (FIGURE 2), or loading with a cartridge (FIG. 3).<br />
WARNING: Disconnect the Grease Gun from the air supply before filling.<br />
Loading a grease cartridge (FIGURE 1)<br />
1. Remove the Container Tube (17) from the top of the Housing Cap (7).<br />
2. Pull back on the Plunger Handle (19) until it is fully extended. Lock it into place with<br />
the Catch Plate (20).<br />
3. Remove the caps/lids from both ends of the cartridge (not included). Insert the<br />
cartridge into the Container Tube (17) in the orientation indicated on the cartridge,<br />
making sure that it is in as far as possible.<br />
4. Reassemble the Container Tube (17) to the top on the Housing Cap (7). Press the<br />
Catch Plate (20) and release the Plunger Handle (19). Press the Plunger Handle<br />
(19) in as far as it will go.<br />
FIGURE 1 FIGURE 2 FIGURE 3<br />
Filler Hose with<br />
Plug on the Pump<br />
(not included)<br />
enters the<br />
Filler Plug (28)<br />
Cartridge<br />
(28)<br />
Container<br />
Tube (17)<br />
Filler Pump Filling Suction Filling Cartridge Filling<br />
Suction Filling (FIGURE 2)<br />
NOTE: See the Assembly Drawing on page 9, Figures A, B, and C on page 6 and FIGURE<br />
2 above.<br />
1. Remove the Container Tube (17) from the top of the Housing Cap (7).<br />
2. Submerge the open end of the Container Tube (17) approximately 2 inches into the<br />
grease container (not included).<br />
3. Slowly, pull back and fully extend the Plunger Handle (19) to draw grease upward into<br />
the Container Tube (17). When the Plunger Handle (19) is fully extended, lock it into<br />
place with the Catch Plate (20).<br />
SKU 94322<br />
For technical questions, please call 1-800-444-3353. Page 5
4. Carefully, reassemble the Container Tube (17) to the top on the Housing Cap (7).<br />
Press the Catch Plate (20) and release the Plunger Handle (19). Press the Plunger<br />
Handle (19) in as far as it will go.<br />
Butterfly Lock Knob (25)<br />
Front Housing (7)<br />
Adapter (8)<br />
Air Fitting (2)<br />
Finger Grip (1)<br />
Flexible Hose Assy.<br />
(29)<br />
Trigger (3)<br />
Bend Spout (9)<br />
Plunger Handle (19)<br />
FIGURE A<br />
Container Tube (18)<br />
Follower Rod (18)<br />
FIGURE B<br />
FIGURE C<br />
Top view of Container Tub (17)<br />
Catch Plate (20)<br />
Air Vent Valve<br />
(10)<br />
Filler Plug<br />
(28)<br />
Plunger Handle (19)<br />
REV 07/05<br />
SKU 94322<br />
For technical questions, please call 1-800-444-3353. Page 6
Loading with a Filler Pump (not included)<br />
See the Assembly Drawing on page 9, Figures A, B, and C on page 6 and FIGURE<br />
1 on page 5.<br />
1. Slowly, pull back and fully extend the Handle (21). Lock it into place with the<br />
Locking Plate (20).<br />
2. Insert the Filler Plug on the end of the hose of the Filler Pump (not included) into the<br />
Nozzle (10).<br />
3. Follow the instructions provided in the Filler Pump manual (not included) to operate<br />
the Filler Pump until the Tube (18) is full.<br />
4. Disconnect the Grease Gun from the Filler Pump (not included).<br />
5. Press the Locking Plate (20) and release the Handle (21). Press the Handle (21) in<br />
as far as it will go.<br />
How to Rotate the Finger Grip<br />
Note: If your application requires you to rotate the Finger Grip (1), loosen the Butterfly Lock<br />
Plug (25) Twist the Housing (22) to the desired angle then tighten the Butterfly Lock Plug (25)<br />
(see Figure A, page 6).<br />
Operating the Grease Gun<br />
Note: If your application requires the Flexible Hose (29), attach it to the Bent Spout (9).<br />
Before every use, prime the Grease Gun by operating the Gun (see below) until<br />
grease flows from the tip. If it does not prime properly, follow the directions<br />
above for venting trapped air.<br />
1. Attach the Grease Gun to the air source hose following the directions on page four.<br />
Set the air compressor to 30 - 100 PSI.<br />
2. Squeeze the Trigger (3) to begin the flow of grease.<br />
3. Release the Trigger (3) to stop the flow of Grease.<br />
4. Disconnect from the air source hose before refilling the Grease Gun. Turn off the air<br />
compressor.<br />
Warning! The Grease Gun may still have air pressure after disconnected from the air<br />
source. Point the Grease Gun into a suitable receptacle and fire it until all of the air is<br />
expended.<br />
Note: Before every use, prime the Grease Gun by operating the Gun (see above) until grease<br />
flows from the tip. If it does not prime properly, follow the directions above for venting trapped<br />
air.<br />
SKU 94322<br />
For technical questions, please call 1-800-444-3353. Page 7
Troubleshooting<br />
If the Grease Gun does not operate:<br />
1. Check that gun is properly connected to the air source and the air compressor is set<br />
to 30 - 150 PSI.<br />
2. If it still doesn’t operate, take it to an qualified service technician to check the Springs<br />
(6 and 17), and the Piston Assembly (5).<br />
If the Grease Gun cycles and does not pump grease:<br />
1. Repeat priming operation on page 7.<br />
2. Check to see if you are out of grease.<br />
3. Disconnect any extensions and prime until grease flows.<br />
If the Grease Gun continues to lose prime:<br />
1. Release trapped air.<br />
2. Refill the Grease Gun and repeat priming.<br />
3. Have an qualified service technician check the position on the Follower Assembly.<br />
Note: If your Grease Gun fails to work, it is usually because air pockets have formed<br />
in the Gun. To remove them, disconnect the Grease gun from the air supply. Press<br />
in the Air Vent Valve (10) at the same time pull back and fully extend the Plunger<br />
Handle (19) several times. Then push the Plunger Handle (19) all the way in and<br />
tighten the Container Tube (17) to the Gun.<br />
If the Grease Gun still doesn’t operate, contact a qualified service technician.<br />
Maintenance<br />
Always disconnect from the air source hose before attempting any maintenance.<br />
1. After each use, clean leftover grease from the Tube (18).<br />
2. Make sure the Nozzle (10) and the tip of the Grease Gun are clear of dirt, grease, or<br />
any debris.<br />
3. Wipe down the unit with a lint free cloth.<br />
PLEASE READ THE FOLLOWING CAREFULLY<br />
THE MANUFACTURER AND/OR DISTRIBUTOR HAS PROVIDED THE PARTS DIAGRAM IN THIS INSTRUCTION SHEET AS A REF-<br />
ERENCE TOOL ONLY. NEITHER THE MANUFACTURER NOR DISTRIBUTOR MAKES ANY REPRESENTATION OR WARRANTY OF<br />
ANY KIND TO THE BUYER THAT HE OR SHE IS QUALIFIED TO MAKE ANY REP<strong>AIR</strong>S TO THE PRODUCT OR THAT HE OR SHE IS<br />
QUALIFIED TO REPLACE ANY PARTS OF THE PRODUCT. IN FACT, THE MANUFACTURER AND/OR DISTRIBUTOR EXPRESSLY<br />
STATES THAT ALL REP<strong>AIR</strong>S AND PARTS REPLACEMENTS SHOULD BE UNDERTAKEN BY CERTIFIED AND LICENSED TECHNI-<br />
CIANS AND NOT BY THE BUYER. THE BUYER ASSUMES ALL RISK AND LIABILITY ARISING OUT OF HIS OR HER REP<strong>AIR</strong>S<br />
TO THE ORIGINAL PRODUCT OR REPLACEMENT PARTS THERETO, OR ARISING OUT OF HIS OR HER INSTALLATION OF<br />
REPLACEMENT PARTS THERETO.<br />
SKU 94322<br />
For technical questions, please call 1-800-444-3353. Page 8
SKU 94322<br />
For technical questions, please call 1-800-444-3353. Page 9
90 Day Warranty<br />
<strong>Harbor</strong> <strong>Freight</strong> <strong>Tools</strong> Co. makes every effort to assure that its products meet high quality<br />
and durability standards, and warrants to the original purchaser that this product is free from<br />
defects in materials and workmanship for the period of 90 days from the date of purchase. This<br />
warranty does not apply to damage due directly or indirectly, to misuse, abuse, negligence or<br />
accidents, repairs or alterations outside our facilities, criminal activity, improper installation,<br />
normal wear and tear, or to lack of maintenance. We shall in no event be liable for death,<br />
injuries to persons or property, or for incidental, contingent, special or consequential damages<br />
arising from the use of our product. Some states do not allow the exclusion or limitation of<br />
incidental or consequential damages, so the above limitation of exclusion may not apply to<br />
you. This warranty is expressly in lieu of all other warranties, express or implied, including the<br />
warranties of merchantability and fitness.<br />
To take advantage of this warranty, the product or part must be returned to us with<br />
transportation charges prepaid. Proof of purchase date and an explanation of the complaint<br />
must accompany the merchandise. If our inspection verifies the defect, we will either repair or<br />
replace the product at our election or we may elect to refund the purchase price if we cannot<br />
readily and quickly provide you with a replacement. We will return repaired products at our<br />
expense, but if we determine there is no defect, or that the defect resulted from causes not<br />
within the scope of our warranty, then you must bear the cost of returning the product.<br />
This warranty gives you specific legal rights and you may also have other rights which vary<br />
from state to state.<br />
REV 11h<br />
SKU 94322<br />
For technical questions, please call 1-800-444-3353. Page 10


