

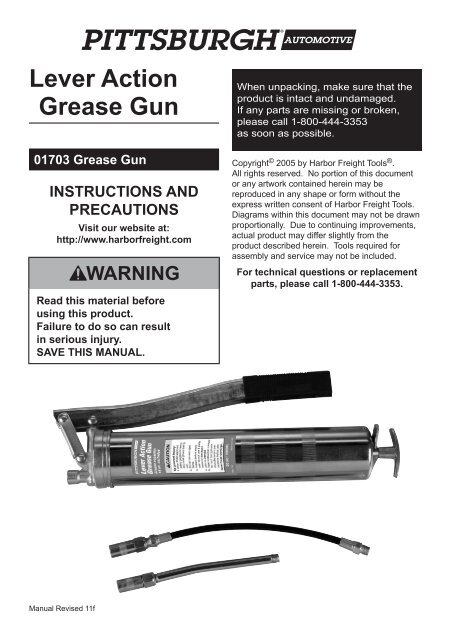
Lever Action Grease Gun - Harbor Freight Tools
Lever Action Grease Gun - Harbor Freight Tools
Lever Action Grease Gun - Harbor Freight Tools

You also want an ePaper? Increase the reach of your titles
YUMPU automatically turns print PDFs into web optimized ePapers that Google loves.
<strong>Lever</strong> <strong>Action</strong><br />
<strong>Grease</strong> <strong>Gun</strong><br />
01703 <strong>Grease</strong> <strong>Gun</strong><br />
INSTRUCTIONS AND<br />
PRECAUTIONS<br />
Visit our website at:<br />
http://www.harborfreight.com<br />
Read this material before<br />
using this product.<br />
Failure to do so can result<br />
in serious injury.<br />
SAVE THIS MANUAL.<br />
When unpacking, make sure that the<br />
product is intact and undamaged.<br />
If any parts are missing or broken,<br />
please call 1‐800‐444‐3353<br />
as soon as possible.<br />
Copyright © 2005 by <strong>Harbor</strong> <strong>Freight</strong> <strong>Tools</strong> ® .<br />
All rights reserved. No portion of this document<br />
or any artwork contained herein may be<br />
reproduced in any shape or form without the<br />
express written consent of <strong>Harbor</strong> <strong>Freight</strong> <strong>Tools</strong>.<br />
Diagrams within this document may not be drawn<br />
proportionally. Due to continuing improvements,<br />
actual product may differ slightly from the<br />
product described herein. <strong>Tools</strong> required for<br />
assembly and service may not be included.<br />
For technical questions or replacement<br />
parts, please call 1‐800‐444‐3353.<br />
Manual Revised 11f
Specifications<br />
Capacity<br />
Function Method<br />
Extension Pipe<br />
Coupler Type<br />
14 OZ. Standard<br />
<strong>Grease</strong> Cartridge<br />
Manual (Piston and <strong>Lever</strong>)<br />
6 IN. Long<br />
4 Jaw<br />
Important Safety Information<br />
The warnings, cautions, and instructions<br />
discussed in this instruction manual<br />
cannot cover all possible conditions<br />
and situations that may occur. It must<br />
be understood by the operator that<br />
common sense and caution are factors<br />
which cannot be built into this product,<br />
but must be supplied by the operator.<br />
1. Wear ANSI-approved safety<br />
goggles and heavy-duty<br />
work gloves during use.<br />
2. Do not use near open flame.<br />
3. Inspect before every use; do not<br />
use if parts are loose or damaged.<br />
4. Use as intended only.<br />
Do not use <strong>Grease</strong> <strong>Gun</strong> to hold or<br />
dispense any other materials.<br />
5. Properly load cartridge before use.<br />
6. Read grease manufacturer’s<br />
cautions before use.<br />
7. Maintain a firm grip on the<br />
tool with both hands.<br />
8. Keep body of <strong>Grease</strong> <strong>Gun</strong> dry, clean,<br />
and free from oil and grease.<br />
9. Read and understand all instructions<br />
and safety precautions as outlined<br />
in the manufacturer’s manual for the<br />
vehicle (or object) to be lubricated.<br />
Page 2 For technical questions, please call 1-800-444-3353. SKU 01703
10. Keep work area clean.<br />
Cluttered areas invite injuries.<br />
11. Keep children away. Children must<br />
never be allowed in the work area.<br />
12. Store idle equipment. When not<br />
in use, tools must be stored in a dry<br />
location to inhibit rust. Always lock up<br />
tools and keep out of reach of children.<br />
13. Dress properly. Do not wear loose<br />
clothing or jewelry as they can be<br />
caught in moving parts. Wear restrictive<br />
hair covering to contain long hair.<br />
14. Do not overreach. Keep proper<br />
footing and balance at all times.<br />
15. Maintain tools with care.<br />
Follow instructions for lubricating<br />
and changing accessories.<br />
16. Stay alert. Watch what you are<br />
doing, use common sense. Do not<br />
operate any tool when you are tired.<br />
17. Check for damaged parts. Before<br />
using any tool, any part that appears<br />
damaged should be carefully checked<br />
to determine that it will operate<br />
properly and perform its intended<br />
function. Any part that is damaged<br />
should be properly repaired or<br />
replaced by a qualified technician.<br />
18. Replacement parts and accessories.<br />
When servicing, use only identical<br />
replacement parts. Use of any<br />
other parts will void the warranty.<br />
19. Do not operate tool if under the<br />
influence of alcohol or drugs.<br />
Read warning labels on prescriptions to<br />
determine if your judgment or reflexes<br />
are impaired while taking drugs. If there<br />
is any doubt, do not operate the tool.<br />
20. Maintenance. For your safety, service<br />
and maintenance should be performed<br />
regularly by a qualified technician.<br />
SKU 01703<br />
For technical questions, please call 1-800-444-3353.<br />
Page 3
Filling the <strong>Grease</strong> <strong>Gun</strong><br />
Suction Filling<br />
Installing <strong>Grease</strong> Cartridge<br />
Cartridge<br />
Release<br />
Latch<br />
Plunger<br />
Rod<br />
Barrel<br />
1. Unscrew and remove the head of<br />
the <strong>Grease</strong> <strong>Gun</strong> from the Barrel.<br />
2. Remove the rubber plunger (it is for<br />
bulk loading use only). Use a 12mm<br />
wrench to remove the nut, then<br />
carefully pry out the rubber plunger.<br />
It is under spring pressure, so hold<br />
onto it. The plastic disc behind the<br />
plunger is used for grease tubes.<br />
3. Pull the Plunger Rod all the way back<br />
and ensure it is locked in place.<br />
4. Remove both ends from a 14 ounce<br />
grease cartridge (not included), and<br />
insert the cartridge into the Barrel in the<br />
direction indicated on the cartridge.<br />
5. Screw the Head back onto the Barrel.<br />
6. Depress the Release Latch,<br />
and push the Plunger Rod<br />
forward as far as possible.<br />
1. Unscrew and remove the<br />
Head from the Barrel.<br />
2. Insert the open end of the Barrel<br />
into the grease. Slowly pull the<br />
Plunger Rod back while pushing<br />
the Barrel deeper into the grease<br />
to prevent air pockets from<br />
being pulled into the Barrel.<br />
3. When the Plunger Rod is fully<br />
extended, remove the Barrel from<br />
the grease. Wipe the exterior of<br />
the Barrel clean of grease.<br />
4. Then, screw the Head<br />
back onto the Barrel.<br />
5. Depress the Release Latch, and push<br />
the Plunger Rod back into the Barrel.<br />
Page 4 For technical questions, please call 1-800-444-3353. SKU 01703
Using a Filler Pump<br />
Loader<br />
Port<br />
<strong>Lever</strong><br />
1. Pull back on the Plunger Rod until the<br />
Plunger Rod is extended only halfway.<br />
2. Remove the Loader Cover Screw.<br />
3. Attach the Loader Port of the<br />
<strong>Grease</strong> <strong>Gun</strong> to the Filler Valve<br />
on the grease container.<br />
4. Operate the Filler Pump on<br />
the grease container to fill the<br />
Barrel of the <strong>Grease</strong> <strong>Gun</strong>.<br />
5. WARNING! Read and understand<br />
all safety warnings and instructions<br />
as outlined in the owner’s<br />
manual of the Filler Pump.<br />
6. When the Plunger Rod automatically<br />
extends about 8 inches out from the<br />
rear of the Barrel, the Barrel is filled.<br />
7. Disconnect the <strong>Grease</strong> <strong>Gun</strong> from the<br />
Filler Valve on the grease container.<br />
Then, depress the Release Latch<br />
and push the Plunger Rod forward<br />
into the Barrel as far as possible.<br />
Operating Instructions<br />
Read the ENTIRE IMPORTANT<br />
SAFETY INFORMATION<br />
section at the beginning of<br />
this document including all<br />
text under subheadings<br />
therein before set up or use of<br />
this product.<br />
1. Clean the <strong>Grease</strong> <strong>Gun</strong> carefully<br />
and completely with a clean<br />
cloth before each use.<br />
2. Insert the Coupler of the <strong>Grease</strong> <strong>Gun</strong><br />
fully onto the clean grease fitting<br />
of the object you are lubricating.<br />
3. With one hand, hold the Barrel securely.<br />
With the other hand, pump the Handle<br />
of the <strong>Grease</strong> <strong>Gun</strong> several times or<br />
until a small amount of grease begins<br />
to flow back out of the grease fitting.<br />
4. Remove the Coupler from the<br />
grease fitting, and wipe any excess<br />
grease from the exterior of the<br />
grease fitting and Coupler.<br />
5. When finished, store the <strong>Grease</strong><br />
<strong>Gun</strong> in a clean, dry, safe location<br />
out of reach of children.<br />
Expelling Air Pockets<br />
from the Barrel<br />
NOTE: If the <strong>Grease</strong> <strong>Gun</strong> does<br />
not work properly, there may be<br />
air pockets in the Barrel.<br />
1. Unscrew the Head 1-1/2 turns.<br />
2. Depress the Clamp and slowly push<br />
the Handle forward to the Barrel.<br />
3. After all excess air is expelled from<br />
the Barrel, retighten the Head.<br />
SKU 01703<br />
For technical questions, please call 1-800-444-3353.<br />
Page 5
Maintenance and Servicing<br />
1. Before each use, inspect the general<br />
condition of the <strong>Grease</strong> <strong>Gun</strong>.<br />
Check for cracked or damaged parts,<br />
misaligned or binding of moving parts,<br />
leaking connections, and any other<br />
condition that may affect the product’s<br />
safe operation.<br />
Record Serial Number Here:<br />
<br />
Note: If product has no serial number,<br />
record month and year of purchase instead.<br />
If a problem occurs, have the problem<br />
corrected before further use.<br />
Do not use damaged equipment.<br />
2. After every use, dry with a soft cloth,<br />
remove all grease and debris from<br />
the <strong>Grease</strong> <strong>Gun</strong>. Do not use solvents<br />
to clean or immerse in any liquids.<br />
3. When storing, keep in a clean, dry and<br />
safe location away from children.<br />
4. CAUTION! All maintenance, service,<br />
and repairs not discussed in this<br />
manual should only be performed<br />
by qualified service technician<br />
Page 6 For technical questions, please call 1-800-444-3353. SKU 01703
Limited 90 Day Warranty<br />
<strong>Harbor</strong> <strong>Freight</strong> <strong>Tools</strong> Co. makes every<br />
effort to assure that its products meet<br />
high quality and durability standards, and<br />
warrants to the original purchaser that this<br />
product is free from defects in materials<br />
and workmanship for the period of 90 days<br />
from the date of purchase. This warranty<br />
does not apply to damage due directly or<br />
indirectly, to misuse, abuse, negligence or<br />
accidents, repairs or alterations outside<br />
our facilities, criminal activity, improper<br />
installation, normal wear and tear, or to<br />
lack of maintenance. We shall in no event<br />
be liable for death, injuries to persons<br />
or property, or for incidental, contingent,<br />
special or consequential damages arising<br />
from the use of our product. Some states<br />
do not allow the exclusion or limitation<br />
of incidental or consequential damages,<br />
so the above limitation of exclusion may<br />
not apply to you. THIS WARRANTY IS<br />
EXPRESSLY IN LIEU OF ALL OTHER<br />
WARRANTIES, EXPRESS OR IMPLIED,<br />
INCLUDING THE WARRANTIES OF<br />
MERCHANTABILITY AND FITNESS.<br />
To take advantage of this warranty, the<br />
product or part must be returned to us<br />
with transportation charges prepaid. Proof<br />
of purchase date and an explanation<br />
of the complaint must accompany the<br />
merchandise. If our inspection verifies<br />
the defect, we will either repair or replace<br />
the product at our election or we may<br />
elect to refund the purchase price if<br />
we cannot readily and quickly provide<br />
you with a replacement. We will return<br />
repaired products at our expense, but if<br />
we determine there is no defect, or that<br />
the defect resulted from causes not within<br />
the scope of our warranty, then you must<br />
bear the cost of returning the product.<br />
This warranty gives you specific legal<br />
rights and you may also have other<br />
rights which vary from state to state.<br />
SKU 01703<br />
For technical questions, please call 1-800-444-3353.<br />
Page 7
3491 Mission Oaks Blvd. • PO Box 6009 • Camarillo, CA 93011 • (800) 444-3353


