MDR-252 - Switchover Help Scheme
MDR-252 - Switchover Help Scheme
MDR-252 - Switchover Help Scheme

Create successful ePaper yourself
Turn your PDF publications into a flip-book with our unique Google optimized e-Paper software.
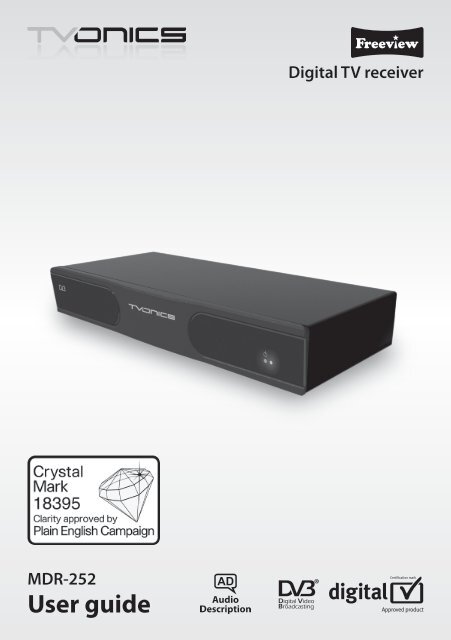
<strong>MDR</strong>-<strong>252</strong><br />
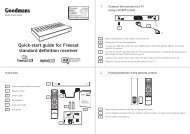
User guide<br />
Digital TV receiver
Important information<br />
Before using your new digital TV receiver, please take a minute to read the<br />
following safety information.<br />
• Only use the supplied AC mains adaptor.<br />
• Do not cut off the supplied AC mains adaptor’s plug.<br />
• Do not allow the digital TV receiver to get wet.<br />
• Do not use the digital TV receiver in hot, humid or very dusty places.<br />
• Do not place any objects on the digital TV receiver.<br />
• Allow for enough ventilation around the digital TV receiver.<br />
• To clean the digital TV receiver, use a lightly dampened, soft cloth. Do<br />
not use any kind of abrasive cloth, sponge or cleaner.<br />
• Do not try to open the digital TV receiver. If the receiver needs repairing,<br />
contact the shop where you bought the product.<br />
• To help prevent damage to plasma and LCD screens, switch off your TV<br />
when you are not using it.<br />
• As the AC mains adaptor is used to disconnect the unit from the mains,<br />
connect the unit to an easily accessible AC outlet (plug socket). If you<br />
notice a problem with the unit, disconnect the main plug from the AC<br />
outlet immediately.<br />
Environmental information<br />
Waste Electrical and Electronic Equipment<br />
This symbol on the product or in the instructions means that<br />
after you have finished using it, this product is defined as<br />
Waste Electrical and Electronic Equipment (WEEE). You must<br />
not put this product in your normal bin. You should take it<br />
to a suitable WEEE collection centre. If you are buying a new<br />
product, the shop you are buying it from will do this for you.<br />
For more information, please contact the local authority or<br />
the shop where you bought the product.<br />
2
Contents<br />
Important information.................................................................................................. 2<br />
Environmental information......................................................................................... 2<br />
Package contents............................................................................................................ 4<br />
Putting batteries into the remote control.............................................................. 5<br />
The remote control......................................................................................................... 6<br />
Connecting to a TV......................................................................................................... 8<br />
Switching your receiver on.......................................................................................... 9<br />
Automatic tuning..........................................................................................................10<br />
Everyday use...................................................................................................................12<br />
The <strong>Help</strong> pages..............................................................................................................15<br />
The Channel list.............................................................................................................16<br />
The Info display..............................................................................................................17<br />
The Programme guide.................................................................................................18<br />
The Timers screen..........................................................................................................20<br />
The Main menu..............................................................................................................22<br />
Main menu options......................................................................................................23<br />
Troubleshooting............................................................................................................27<br />
Specifications..................................................................................................................29<br />
General information.....................................................................................................30<br />
3
R6<br />
Package contents<br />
q<br />
w<br />
e<br />
t<br />
r<br />
y<br />
u i o<br />
q Digital TV receiver<br />
w Remote control<br />
e Batteries (2xAA)<br />
r AC mains adaptor<br />
t SCART lead<br />
y RF lead<br />
u User guide<br />
i Quick-start guide<br />
o How to set up your universal<br />
remote control guide<br />
4
Putting batteries into the remote control<br />
• Remove the battery cover from the remote control.<br />
• Put two AA batteries in the compartment as shown in the diagram.<br />
The correct polarity (+ and - symbols) are also shown inside the battery<br />
compartment.<br />
• Replace the cover.<br />
Don’t forget to get rid of old batteries safely. Check with your local<br />
council for how you should get rid of batteries. Never put batteries on a<br />
fire or in the bin with normal household waste.<br />
5
The remote control<br />
w<br />
e<br />
r<br />
y<br />
o<br />
1@<br />
1$<br />
1%<br />
1&<br />
1(<br />
q<br />
t<br />
u<br />
i<br />
1)<br />
1!<br />
1#<br />
1^<br />
1*<br />
2)<br />
2!<br />
2@<br />
To set up the remote control for your TV, please see the ‘How to set up<br />
your universal remote control’ guide that comes with this product.<br />
6
q [stb]<br />
w [tv]<br />
e [home]<br />
r [tv/radio]<br />
t [swap]<br />
y [mute]<br />
u [tv input]<br />
i [arrow]<br />
, , ,<br />
o [vol +/-]<br />
Switches the digital TV receiver on or into standby<br />
Switches the TV on or off (if you have programmed it<br />
to do this)<br />
Cancels any on-screen menu and returns the digital<br />
TV receiver to the first channel stored in the Channel<br />
list (usually, BBC One)<br />
Switches between digital TV and digital radio<br />
channels<br />
Switches between the channel you’re currently<br />
watching and the channel you were previously<br />
watching<br />
Turns the sound on or off<br />
Chooses the TV input source (if you have<br />
programmed the remote control to do this)<br />
Move around the on-screen menus<br />
Increases or reduces the receiver volume. Can also be<br />
used to increase or reduce your TV volume<br />
(if you have programmed it to do this)<br />
1) [P +/-] Goes up or down the channels<br />
1! [OK] Displays the Channel list and selects options on the<br />
on-screen menus (see page 16)<br />
1@ [guide] Enters and leaves the Programme guide, also called<br />
Electronic Programme Guide (EPG) (see page 18)<br />
1# [info] Displays programme information (see page 17)<br />
1$ [back] Goes back to the previous menu screen you were on<br />
1% [exit] Goes out of the menu and goes back to the last<br />
programme you were watching<br />
1^ [menu] Enters and leaves the menu screen<br />
1& [help] Enters and leaves the <strong>Help</strong> screen<br />
1* [text] Gives digital teletext (if available)<br />
1( [red, green,<br />
yellow, blue]<br />
Changes or goes to different options when on the<br />
digital teletext pages<br />
2) [0-9] Chooses channels, enters PIN, uses <strong>Help</strong> pages<br />
2! [AD] Switches Audio Description on or off<br />
2@ [sub] Switches Subtitles on or off (if available)<br />
7
Connecting to a TV<br />
w<br />
TV aerial<br />
Receiver back panel<br />
y<br />
5.1V DC IN 900mA<br />
<strong>MDR</strong>-<strong>252</strong><br />
TVTH20000001<br />
q Plug the supplied AC mains adaptor between the power socket on the<br />
back panel of the receiver and a standard wall socket. Only switch on<br />
the wall socket when all cables have been attached.<br />
(Do not cut off the supplied AC mains adaptor’s plug.)<br />
w You can also plug in an audio device such as a Hi-Fi, but we do not<br />
supply a cable for this.<br />
e Plug the supplied SCART lead between the TV socket on the back<br />
panel of the receiver and the SCART socket on your TV.<br />
r If you are using a video or DVD recorder, plug a SCART lead between<br />
the VCR socket on the back panel of the receiver and your video or DVD<br />
recorder (SCART lead not supplied). See page 14 for more details.<br />
t Plug the supplied RF lead between the RF OUT socket on the back<br />
panel of the receiver and your TV, video or DVD recorder.<br />
y Plug the aerial lead into the RF IN socket on the back panel of the<br />
receiver.<br />
8<br />
q<br />
e<br />
r<br />
t
Switching your receiver on<br />
• Switch on your TV.<br />
• Set the TV to the input channel you have connected the receiver to<br />
(for example AV1). This may happen automatically. (See your TV manual<br />
if you are having trouble with this.)<br />
• Switch on the receiver at the mains.<br />
• The green power light will switch on, which shows that the receiver is<br />
ready to use.<br />
If you are turning your receiver on for the first time, the Automatic<br />
tuning menu will appear on your TV screen. See page 10 for detailed<br />
instructions.<br />
Using standby<br />
Power<br />
light<br />
(green)<br />
Standby<br />
light<br />
(red)<br />
When you’re not watching TV, you should set the digital TV receiver to<br />
standby. Press the [stb] button on the remote control and the red standby<br />
light will switch on. This shows that the receiver is in standby. To come out<br />
of standby just press the [stb] button again.<br />
If you don’t plan to use the digital TV receiver for a long period, put the<br />
receiver in standby and wait 20 seconds before switching it off at the mains.<br />
(Don’t worry - all of your settings will be saved.)<br />
9
Automatic tuning<br />
The first time you switch on your digital TV receiver you will see a screen<br />
like the one below.<br />
Please press OK when you wish the box to start tuning<br />
OK<br />
Startup screen<br />
Press the [OK] button on the remote control to begin automatic tuning.<br />
When automatic tuning has finished, you may see a region preference<br />
screen as shown below. This list will show the regions that are available to<br />
you, with the best-quality signal shown at the top of the list (1).<br />
Please select your preferred region.<br />
1<br />
2<br />
3<br />
Wales<br />
England<br />
Scotland<br />
Press red to select region and exit. Region 1 has the best Signal.<br />
Region preferences screen<br />
More than three regions may be shown in some instances. If you only<br />
see two regions in this list or do not see this list at all, it does not mean<br />
that your signal is too weak, but that the receiver has chosen the best<br />
signals available to you.<br />
10
If Press OK appears next to the region you have chosen, as shown in<br />
the screen below, further regional options are available. Press the [OK]<br />
button to get a list of those options. If Press OK does not appear, no other<br />
options are available.<br />
Please select your preferred region.<br />
1<br />
2<br />
3<br />
Wales<br />
England<br />
Scotland<br />
Press OK<br />
Region 1 has the best Signal.<br />
Press the [red] button to store channels from the region.<br />
Automatic tuning complete. Total channels found: 92<br />
TV channels: 57 Radio channels: 27 Data channels:8<br />
OK<br />
Automatic tuning summary screen<br />
Press the [OK] button to remove the summary screen and start watching<br />
digital TV.<br />
11
Everyday use<br />
Changing channels<br />
Press [P+] or [P-] on the remote control to go up or down the channels.<br />
To choose a particular channel<br />
Press one of the [0-9] buttons, then press the [OK] button. If you do not<br />
press the [OK] button, the digital TV receiver will change to the channel<br />
number you have pressed after about two seconds.<br />
For two- or three-digit channels (10 to 999), press the appropriate [0-9]<br />
buttons one after the other, then press the [OK] button. If you do not<br />
press the [OK] button, the digital TV receiver will change to the channel<br />
you have chosen after about two seconds.<br />
Channel swapping<br />
The [swap] button lets you keep an eye on two channels by switching<br />
between the current channel and the last channel you watched – so you<br />
can swap between the channels.<br />
Home button<br />
The [home] button on the remote control will cancel any on-screen menu<br />
and return the digital TV receiver to the first channel stored in the channel<br />
list (usually, BBC One).<br />
Subtitles<br />
Press the [sub] button on the remote control to display Subtitles<br />
(if available). Press again to switch off the Subtitles.<br />
12
Audio Description<br />
Audio Description is a spoken explanation that describes all important<br />
information on a programme, such as body language, facial expressions,<br />
scenery, action, costumes or anything that helps to describe the plot of<br />
the story, event or image.<br />
Audio Description is not always available but you can check, in the<br />
following way, when it will be available.<br />
To<br />
Switch on<br />
Audio Description<br />
Switch off<br />
Audio Description<br />
Check if<br />
Audio Description<br />
is available<br />
Press<br />
[AD] button<br />
You will hear one short beep. If AD is available<br />
you will hear another two short beeps. If AD is not<br />
available, there will be no extra beeps. When you<br />
change channel, you will also hear two short beeps<br />
if AD is available.<br />
[AD] button<br />
You will hear one long beep.<br />
[info] button<br />
If Audio Description is available, an [AD] symbol is<br />
shown on the information display.<br />
See page 25 to set the Audio Description language and volume.<br />
Screen saver in radio mode<br />
When you are listening to a radio channel, the screen saver will<br />
automatically start if you do not press any button for 15 minutes. To<br />
remove the screen saver, press any button on the remote control.<br />
Automatic standby<br />
When automatic standby is on, the digital TV receiver will automatically<br />
switch to standby if not used for more than 3 hours, to help reduce the<br />
amount of electricity it uses. If you are still watching TV at this time, a<br />
screen will be shown allowing you to stop the digital TV receiver entering<br />
standby. You can switch automatic standby off by going to the Settings<br />
option in the Main menu. See page 24 for more details.<br />
13
Recording TV programmes<br />
To record TV programmes you must first connect a video or DVD recorder<br />
to the digital TV receiver (see page 8). Usually you would connect to<br />
the AV1 socket on the back of your video or DVD recorder. See your video<br />
or DVD recorder manual for more details.<br />
One-touch recording<br />
Select the channel on the digital TV receiver you want to record. Set your<br />
video or DVD recorder to the input channel you have connected the<br />
receiver to (for example, AV1). See your video or DVD recorder manual<br />
for more details. Press record on the remote control of your video or DVD<br />
recorder to start recording. When the programme has finished, press stop.<br />
Recording using a timer<br />
If you want to record using a timer, you will need to set a matching timer<br />
for your digital TV receiver and your video or DVD recorder. See page 20<br />
for how to set the timer on the digital TV receiver. See the video or DVD<br />
recorder manual for how to set that timer.<br />
Common on-screen symbols<br />
You may be able to see the following symbols in the Programme guide,<br />
Channel list and Info display.<br />
Locked channel<br />
Timer has been set<br />
Radio channel<br />
Teletext available<br />
Swap channel<br />
Hide channel<br />
[S] Subtitles [AD] Audio Description<br />
Multilanguage option available (Audio and Subtitle).<br />
14
The <strong>Help</strong> pages<br />
The <strong>Help</strong> pages give advice and information for many of the features of this<br />
digital TV receiver.<br />
The <strong>Help</strong> pages<br />
To<br />
Use the <strong>Help</strong> pages<br />
Choose a help topic<br />
Return to the index page<br />
Leave the <strong>Help</strong> pages<br />
Press<br />
[help] button<br />
[1]-[9] buttons<br />
[0] button<br />
[help] or [exit] button<br />
And, if you press the [help] button while using any of the following, it will<br />
take you directly to the relevant <strong>Help</strong> page.<br />
Channel banner, Channel information, Channel list, Edit<br />
channel list, Programme guide, Settings, Parental control, Tuning and<br />
Timers.<br />
15
The Channel list<br />
The Channel list displays all the available channels.<br />
The Channel list<br />
To<br />
Press<br />
Use the Channel list<br />
[OK] button while watching TV<br />
Choose channels [ ] and [ ] buttons<br />
Display the previous nine channels [red] button<br />
in the list<br />
Display the next nine channels in [green] button<br />
the list<br />
Switch to the channel you have [OK] button<br />
chosen<br />
Leave the Channel list<br />
[exit] or [back] button<br />
16
The Info display<br />
The Info display gives brief information on the current and future<br />
programmes.<br />
The Info display<br />
To<br />
Press<br />
Use the Info display<br />
[info] button<br />
See information for future and [ ] and [ ] buttons<br />
previous programmes<br />
See information for other channels [ ] and [ ] buttons<br />
Set a reminder for future<br />
programmes<br />
[OK] button while highlighting a<br />
future programme<br />
Change the Audio setting<br />
[red] button (if available)<br />
Change the Subtitle setting [green] button (if available)<br />
Change AD language<br />
[yellow] button (if available)<br />
Leave the Info display<br />
[info] or [exit] button<br />
Any changes to the Audio, Subtitle and AD Language settings are<br />
temporary and only apply to the current channel you are watching. You<br />
can change these options in the Settings menu (see page 23) or the<br />
Accessibility settings menu (see page 24).<br />
17
The Programme guide<br />
The Programme guide shows programme information for the next eight<br />
days (if broadcasters provide this information). You can also set timers<br />
that will display a chosen programme when it starts.<br />
The Programme guide<br />
Setting a timer<br />
18
To<br />
Use the Programme guide<br />
Move around the Programme<br />
guide<br />
Display the previous nine channels<br />
in the list<br />
Display the next nine channels in<br />
the list<br />
Move forward four or 24 hours<br />
Move back four or 24 hours<br />
See information on the programme<br />
you have chosen<br />
Preview a current programme<br />
Switch to the current programme<br />
you are previewing<br />
Set a timer for a future programme<br />
Cancel a timer<br />
Leave the Programme guide<br />
Press<br />
[guide] button<br />
[ ], [ ], [ ] and [ ] buttons<br />
[red] button<br />
[green] button<br />
[blue] button<br />
(Press [swap] to switch between<br />
four and 24 hours)<br />
[yellow] button<br />
(Press [swap] to switch between<br />
four and 24 hours)<br />
[info] button<br />
[OK] button (while highlighting a<br />
current programme)<br />
[OK] button (while highlighting a<br />
currently previewed programme)<br />
[OK] button (while highlighting<br />
a future programme). The<br />
programme appears red in the EPG<br />
[OK] button (while highlighting the<br />
programme you want)<br />
[guide] or [exit] button<br />
19
The Timers screen<br />
The Timers screen shows all the programmes that are currently set to<br />
display when they start. You can also set a manual timer and change or<br />
cancel an existing timer.<br />
The Timers screen<br />
To<br />
Press<br />
Use the Timers screen [menu] button and then [1]<br />
Move around the Timers screen [ ] and [ ] buttons<br />
Manually set a timer<br />
[OK] button (while highlighting an<br />
empty timer slot). See below for<br />
further information.<br />
Edit a timer<br />
[red] button (while highlighting<br />
the required timer slot). See below<br />
for further information.<br />
Delete a timer<br />
[green] button (while highlighting<br />
the required timer slot)<br />
Leave the Timers screen and return [menu] or [exit] button<br />
to TV<br />
20
Editing or manually setting a timer<br />
Editing or manually setting a timer<br />
To<br />
Move around the Edit timers<br />
screen<br />
Change the ‘name’, ‘mode’ (see<br />
note 1 below) and ‘PIN’ (see note 2<br />
below) settings<br />
Change the ‘start’, ‘end’ and ‘date’<br />
settings<br />
Save and leave the Edit timers<br />
screen<br />
Press<br />
[ ] and [ ] buttons<br />
[ ] and [ ] buttons<br />
[0-9] buttons (The number you<br />
have chosen is highlighted by [ ])<br />
[OK] button<br />
Note 1<br />
Use ‘mode’ to set the timer to take place ‘once’, ‘daily’ or ‘weekly’.<br />
Note 2<br />
When you have set a timer to display a programme on a locked channel,<br />
you will need to enter the PIN before the programme is shown. To enter<br />
the PIN number, press the [6] button. If you enter your PIN when setting<br />
the timer, the programme will be shown automatically.<br />
21
The Main menu<br />
The menu system lets you choose and change a wide range of your digital<br />
TV receiver’s features.<br />
Main menu<br />
1 Timers<br />
2 Edit channel list<br />
3 Settings<br />
4 Accessibility Settings<br />
5 Parental control<br />
6 Tuning<br />
7 Service<br />
8 Software upgrade<br />
Press OK<br />
The Main menu<br />
To<br />
Press<br />
Use the Main menu<br />
[menu] button<br />
Move around the Main menu [ ] and [ ] buttons (or, press the<br />
corresponding number button to<br />
highlight an option)<br />
Choose an option<br />
[OK] button<br />
Select a setting [ ] and [ ] buttons<br />
Move back to the previous level [back] button<br />
Leave the Main menu<br />
[menu] or [exit] button<br />
22
Main menu options<br />
1 Timers menu<br />
This allows you to manage the timers. See page 20 for detailed<br />
information.<br />
2 Edit channel list menu<br />
Hide channels<br />
This allows you to hide channels you don’t want, so that they do not<br />
appear on the Programme guide, Info and Channel list.<br />
Press [OK] to choose the channel you want to hide. An ‘X’ appears next to<br />
channels that have been hidden. To show the channels again, highlight<br />
them and press [OK] to remove the ‘X’.<br />
Sort channels<br />
This allows you to rearrange the channel order. Press [OK] to choose the<br />
channel you want to move. Press [ ] or [ ] to choose the new position,<br />
then press [OK] to move the channel.<br />
3 Settings menu<br />
Audio<br />
This allows you to set the Audio preference (if available).<br />
Picture mode<br />
This allows you to switch between widescreen, 4:3 letterbox and 4:3 normal<br />
picture.<br />
Widescreen<br />
This is the default setting and is best if you have a<br />
widescreen TV.<br />
23
24<br />
4:3 normal<br />
Choose this option if you do not want to have a black<br />
bar at the top and bottom of the screen. Programmes<br />
broadcast in widescreen will fill the whole screen but<br />
you will lose the left and right edges of the picture.<br />
4:3 letterbox<br />
We recommend you choose this option if you have<br />
an older 4:3-format TV. Any programmes broadcast<br />
in widescreen will fit onto the screen, but will have a<br />
black bar at the top and bottom.<br />
TV out<br />
This allows you to switch the video output between RGB, Y/C and CVBS<br />
(TV SCART only). The default setting is RGB which gives you the best<br />
picture quality.<br />
If your TV is not compatible with RGB or you are having problems with the<br />
picture, switch to CVBS.<br />
If you have a TV that is compatible with Y/C, switch to Y/C.<br />
Loopthrough<br />
This allows you to switch off the RF and SCART loopthrough to save power.<br />
You can select off in standby or always.<br />
Auto standby<br />
This allows the digital TV receiver to switch to standby if not used for<br />
more than 3 hours, to help reduce the amount of electricity it uses. We<br />
recommend that you set this option to ‘on’.<br />
Update messages<br />
From time to time a broadcaster may decide to send messages for your<br />
information. This setting allows you to switch this feature on or off.<br />
4 Accessibility settings<br />
Keypress beep<br />
This allows you to switch on the keypress beep. When switched on, you<br />
will hear a high-pitched beep every time you press a button.
Audio Description<br />
This allows you to switch AD on or off.<br />
Audio Description volume<br />
This allows you to set the volume you prefer for Audio Description. Select<br />
between low, medium or high.<br />
Audio Description language<br />
This allows you to set the AD language you prefer (if available).<br />
Subtitle<br />
This allows you to set your preferred subtitle setting (if available).<br />
5 Parental controls menu<br />
Set PIN<br />
This allows you to change the PIN. The default PIN is 0000.<br />
Lock channels<br />
This allows you to lock channels so they can only be watched once the<br />
correct PIN is entered.<br />
Press [OK] to choose a channel to lock. A ‘ ’ appears next to channels<br />
that have been hidden. To unlock channels, highlight them and press<br />
[OK] to remove the ‘ ’.<br />
6 Tuning menu<br />
Automatic search<br />
This allows you to automatically tune the receiver to search for any new<br />
channels that may have been launched.<br />
When the automatic search has finished, you may see a region-preference<br />
screen. This list will show the regions that are available to you, with the<br />
best-quality signal shown at the top of the list (1). If you do not see this list<br />
at all, it does not mean that your signal is too weak, but that the receiver<br />
has chosen the best signals available to you. Please see page 10 for more<br />
detailed information.<br />
25
Manual search<br />
This allows you to manually tune the receiver to search for any new<br />
channels that may have been launched.<br />
Use the [0-9] buttons to enter an RF channel number then press [OK] to<br />
search. All channels found are then shown. It will add any new channels it<br />
finds when you press [OK].<br />
Both the automatic and manual searches will replace all the channels<br />
you are currently tuned into and will delete any timers you have set. You<br />
may also lose your parental controls.<br />
7 Service menu<br />
Manufacturer’s details<br />
This allows you to check the software and hardware versions running on<br />
your digital TV receiver.<br />
Signal strength<br />
This allows you to see the signal strength and transmitter region for each<br />
channel. The colour of the bar shows the quality of the signal. If the bar is<br />
Green, the signal is good. If the bar is Red or Yellow, the signal may be too<br />
weak to get acceptable reception. You can use the [P+/-] buttons to move<br />
through the channels.<br />
Reset digital TV receiver<br />
This allows you to reset the digital TV receiver. You will be asked to enter<br />
your PIN to reset the box. (The default PIN is 0000.)<br />
This will replace all the channels you currently have tuned in and will<br />
delete any timers you have set. You may also lose your parental controls.<br />
8 Software upgrade menu<br />
This allows you to search for software updates through your aerial (when<br />
available). As updates are handled automatically by your digital TV<br />
receiver, we do not recommended that you use this option.<br />
26
Troubleshooting<br />
If you have a problem with your digital TV receiver which you can’t<br />
sort out using the table below, put the receiver in standby, then<br />
unplug it at the mains. Leave the receiver unplugged for at least one<br />
minute before you connect it again to the mains.<br />
Picture<br />
Problem<br />
Possible cause or solution<br />
No picture or distorted • Check the digital TV receiver is switched on.<br />
picture<br />
• Check the aerial is correctly connected to<br />
the digital TV receiver.<br />
• Check all the connections between the<br />
digital TV receiver and the TV.<br />
• Check the TV is displaying the correct AV<br />
input (see your TV manual).<br />
• Check the signal strength (see page 26).<br />
Black and white picture • Check the ‘TV out’ setting (see page 24).<br />
Sound<br />
Problem<br />
No sound<br />
Possible cause or solution<br />
• Check the TV is not muted.<br />
• Check the digital TV receiver is not muted.<br />
• Check the TV volume is turned up.<br />
• Check the digital TV receiver volume is<br />
turned up.<br />
• Check the aerial is connected correctly and<br />
the digital TV receiver is switched on.<br />
• Check all connections between the digital<br />
TV receiver and TV, Hi-Fi or surround sound<br />
system.<br />
• Make sure your remote is set up to control<br />
your STB / TV - Refer to the universal remote<br />
control setup guide.<br />
27
Power<br />
Problem<br />
No power<br />
Remote control<br />
Problem<br />
Remote control does not<br />
work<br />
Programme guide<br />
Problem<br />
The wrong date is<br />
displayed in the<br />
Programme guide<br />
Possible cause or solution<br />
• Check the supplied power supply is<br />
correctly connected and the digital TV<br />
receiver is switched on.<br />
Possible cause or solution<br />
• Replace the batteries.<br />
• Make sure you are pointing the remote<br />
control directly at your receiver and that<br />
nothing is in the way.<br />
• Make sure that you are less than five metres<br />
away from the receiver.<br />
• Make sure your remote is set up to control<br />
your STB / TV - Refer to the universal remote<br />
control setup guide.<br />
Possible cause or solution<br />
• Put the digital TV receiver in standby, and<br />
unplug it from the mains. Leave the unit<br />
unplugged for at least one minute before<br />
you connect it to the mains again.<br />
• If the date is wrong after unplugging the<br />
digital TV receiver, this may be due to<br />
transmitter maintenance. Please see the<br />
following page on the BBC website for<br />
information on transmitter maintenance.<br />
http://www.bbc.co.uk/reception/<br />
transmitters/index.shtml<br />
28
Physical Specifications<br />
Size:<br />
Weight:<br />
Power Requirements<br />
Input Voltage:<br />
Power Consumption (on):<br />
Power Consumption (standby):<br />
Operating Temperature:<br />
Storage Temperature:<br />
Tuner<br />
RF Input / Output Connectors:<br />
Channel Coverage:<br />
Video Decoder<br />
Video Decoding:<br />
Video Formats:<br />
Specifications<br />
(W) 196mm x (D) 89mm x (H) 31mm<br />
0.23 kg<br />
5.1V DC (with supplied power supply)<br />
3W<br />
≤1W (0.7W when loopthrough is off)<br />
+10°C to +40°C<br />
-20°C to +60°C<br />
1x IEC (Female) / 1x IEC (Male)<br />
UHF (B21 to B68 / 470MHz to 854MHz)<br />
MPEG-2 Main Level / Main Profile<br />
16:9 / 4:3 / 4:3 Letterbox<br />
Video Outputs:<br />
RGB, Y/C, CVBS<br />
TV SCART = RGB, Y/C, CVBS<br />
VCR SCART = CVBS<br />
Audio Decoder<br />
Audio Decoding: MPEG-2 Layer 1<br />
Audio Mode:<br />
Stereo / Mono<br />
AV Connectors<br />
Video:<br />
Audio:<br />
Supplied Accessories<br />
Remote Control<br />
AA Batteries (2)<br />
Quick-Start Guide<br />
User Guide<br />
2x 21 Pin SCART<br />
TV SCART = RGB, Y/C, CVBS<br />
VCR SCART = CVBS<br />
1x 3.5mm Jack (Analogue Stereo)<br />
Remote control setup guide<br />
AC mains adaptor (output 5.1V DC 900mA)<br />
SCART Lead<br />
RF Lead<br />
Due to continued product improvement, this specification may change<br />
without notice. All information correct at time of going to press.<br />
29
General information<br />
Where to get more help<br />
If you have any problems using your receiver and cannot sort them out<br />
using this user guide, contact the supplier.<br />
General enquiries<br />
Freeview<br />
Phone: 08708 80 99 80 (Calls are charged at the national rate.)<br />
Website: www.freeview.co.uk<br />
<strong>Help</strong> scheme<br />
For an Easy Read version of this user guide.<br />
Website: www.helpscheme.co.uk/en/equipment<br />
Digital UK<br />
Website: www.digitaluk.co.uk/<br />
Digital TV group<br />
Website: www.dtg.org.uk<br />
30
© 2011 TVonics Solutions Ltd. U-MAN-002-18 / 71-800-048-10