Manual - RAN Hire and Sales Ltd
Manual - RAN Hire and Sales Ltd
Manual - RAN Hire and Sales Ltd

Create successful ePaper yourself
Turn your PDF publications into a flip-book with our unique Google optimized e-Paper software.
001894<br />
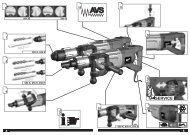
Switch action<br />
1<br />
1. Switch trigger<br />
CAUTION:<br />
• Before inserting the battery cartridge into the tool,<br />
always check to see that the switch trigger actuates<br />
properly <strong>and</strong> returns to the “OFF” position when<br />
released.<br />
To start the tool, simply pull the switch trigger. Tool speed is<br />
increased by increasing pressure on the switch trigger.<br />
Release the switch trigger to stop.<br />
Electric brake<br />
This tool is equipped with an electric brake. If the tool consistently<br />
fails to quickly stop after switch trigger release, have<br />
tool serviced at a Makita service center.<br />
2 3<br />
1. Reversing switch lever<br />
2. Clockwise<br />
3. Counterclockwise<br />
1<br />
001895<br />
Reversing switch action<br />
This tool has a reversing switch to change the direction of<br />
rotation. Depress the reversing switch lever from the A side<br />
for clockwise rotation or from the B side for counterclockwise<br />
rotation.<br />
When the reversing switch lever is in the neutral position, the<br />
switch trigger cannot be pulled.<br />
CAUTION:<br />
• Always check the direction of rotation before operation.<br />
• Use the reversing switch only after the tool comes to a<br />
complete stop. Changing the direction of rotation before<br />
the tool stops may damage the tool.<br />
• When not operating the tool, always set the reversing<br />
switch lever to the neutral position.<br />
10<br />
1<br />
1. Speed change lever<br />
001896<br />
Speed change<br />
To change the speed, first switch off the tool <strong>and</strong> then slide<br />
the speed change lever to the “2” side for high speed or “1”<br />
side for low speed. Be sure that the speed change lever is<br />
set to the correct position before operation. Use the right<br />
speed for your job.<br />
CAUTION:<br />
• Always set the speed change lever fully to the correct<br />
position. If you operate the tool with the speed change<br />
lever positioned halfway between the “1” side <strong>and</strong> “2”<br />
side, the tool may be damaged.