Manual - RAN Hire and Sales Ltd
Manual - RAN Hire and Sales Ltd
Manual - RAN Hire and Sales Ltd

You also want an ePaper? Increase the reach of your titles
YUMPU automatically turns print PDFs into web optimized ePapers that Google loves.
FUNCTIONAL<br />
DESCRIPTION<br />
CAUTION:<br />
• Always be sure that the tool is switched off <strong>and</strong> the<br />
battery cartridge is removed before adjusting or<br />
checking function on the tool.<br />
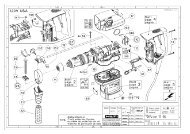
1. Battery cartridge<br />
2. Button<br />
2<br />
1<br />
1<br />
1. Battery cartridge<br />
2. Charging light<br />
3. Battery charger<br />
2<br />
001892<br />
004346<br />
3<br />
Installing or removing battery cartridge<br />
• Always switch off the tool before insertion or removal of<br />
the battery cartridge.<br />
• To remove the battery cartridge, withdraw it from the tool<br />
while pressing the buttons on both sides of the cartridge.<br />
• To insert the battery cartridge, align the tongue on the<br />
battery cartridge with the groove in the housing <strong>and</strong> slip<br />
it into place. Always insert it all the way until it locks in<br />
place with a little click. If not, it may accidentally fall out<br />
of the tool, causing injury to you or someone around you.<br />
• Do not use force when inserting the battery cartridge. If<br />
the cartridge does not slide in easily, it is not being<br />
inserted correctly.<br />
Charging<br />
1. Plug the battery charger into the proper AC voltage<br />
source. The charging light will flash in green color.<br />
2. Insert the battery cartridge so that the plus <strong>and</strong> minus<br />
terminals on the battery cartridge are on the same sides<br />
as their respective markings on the high capacity battery<br />
charger. Insert the cartridge fully into the port so that it<br />
rests on the charger port floor.<br />
3. When the battery cartridge is inserted, the charging light<br />
color will change from green to red <strong>and</strong> charging will<br />
begin. The charging light will remain lit steadily during<br />
charging.<br />
4. When the charging light color changes from red to<br />
green, the charging cycle is complete.<br />
5. If you leave the battery cartridge in the charger after the<br />
charging cycle is complete, the charger will switch into<br />
its “trickle charge (maintenance charge)” mode.<br />
6. After charging, unplug the charger from the power<br />
source.<br />
8